
Can you use a table saw as a jointer? Yes, you absolutely can use a table saw as a jointer, but it requires specific setups and safety precautions to achieve accurate, square edges. This guide will walk you through the process, focusing on safety and effectiveness.
A jointer is a crucial tool in woodworking for creating perfectly flat and square edges on lumber. While dedicated jointers offer the best results, a table saw can be an excellent substitute for those who don’t have the space or budget for a separate machine. The key lies in creating stable, repeatable setups that mimic the function of a jointer’s fence and bed.
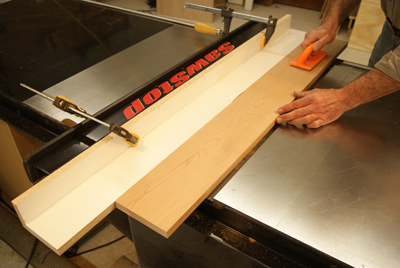
Image Source: www.woodworkersjournal.com
Why Joint Edges?
Before we dive into the “how,” let’s touch on the “why.” Jointing an edge on a piece of lumber does two main things:
- Creates a Square Edge: It makes sure the edge is at a perfect 90-degree angle to the face of the board. This is vital for glue-ups and for creating strong, stable joints.
- Ensures Flatness: It removes any warps, twists, or cup from the edge, making it perfectly straight and flat.
Without jointed edges, trying to assemble projects can lead to gaps, weak joints, and a generally unprofessional finish.
Essential Safety First!
Using a table saw for tasks beyond its primary ripping and crosscutting functions demands a heightened awareness of safety. The techniques we’ll cover involve making cuts that are not typically done freehand. Always prioritize your safety above all else.
- Eye Protection: Wear safety glasses or a face shield at all times.
- Hearing Protection: Table saws are loud. Use earplugs or earmuffs.
- Dust Mask: Sawdust can be harmful. Wear a dust mask or respirator.
- No Loose Clothing or Jewelry: These can get caught in the blade.
- Kickback Awareness: Kickback is a serious hazard where the wood is violently thrown back towards the operator. Understand the causes and how to prevent it.
- Blade Guard and Riving Knife: Always use these whenever possible. If the jig requires their removal, ensure you have a robust alternative safety measure.
- Sharp Blade: A sharp blade cuts cleaner and reduces the risk of kickback. Ensure your table saw blade alignment for jointers is perfect. This means the blade should be perfectly perpendicular to the table and parallel to the miter slots.
Tools and Materials for Table Saw Jointing
To effectively use your table saw as a jointer, you’ll need a few key items:
- Table Saw: A robust table saw with a stable fence and a good-quality blade.
- Jointer Jig: This is the cornerstone of the operation. We’ll discuss how to make one below.
- Sharp Table Saw Blade: A good crosscut or combination blade with a high tooth count will give cleaner results.
- Push Blocks and Push Sticks: Essential for safely guiding the wood.
- Measuring Tape and Square: For setup and verification.
- Featherboards: To keep the wood pressed firmly against the fence.
- Dust Collection System: Highly recommended.
The Heart of the Operation: The Table Saw Jointer Jig
The most common and safest method for using a table saw as a jointer is with a table saw jointer jig. This jig essentially creates a stable platform that registers against the table saw’s fence, allowing you to make precise, repeatable cuts on the edge of your workpiece.
How to Make a Jointer Jig
There are several ways to construct a jointer jig. Here are two popular and effective designs:
Design 1: The Simple Offset Jig
This is a straightforward jig that’s easy to build and highly effective.
Materials:
- 1/2 inch or 3/4 inch plywood (a scrap piece, approximately 30 inches long by 6 inches wide)
- 1/4 inch plywood or hardboard (a scrap piece, approximately 30 inches long by 1 inch wide, for the offset strip)
- Screws (short enough not to pierce the cutting surface)
- Wood glue
- Table saw
Construction Steps:
- Cut the Base: Cut your 1/2 or 3/4 inch plywood to the dimensions mentioned above. This will be the main body of your jig.
- Cut the Offset Strip: Cut the 1/4 inch plywood or hardboard to the same length as your base, but only about 1 inch wide. This strip will be glued to the edge of the base, creating the offset that allows the jig to register against your table saw fence.
- Glue and Screw: Apply wood glue to one long edge of the base. Attach the 1/4 inch offset strip along this edge, flush with the opposite long edge of the base. The offset strip should extend beyond the base, creating a slight gap. Secure with screws, countersinking them so they don’t interfere with the saw blade.
- Trim the Jig: Take the completed jig to your table saw. With the offset strip firmly against your table saw fence, make a pass with the blade set to its highest position. This cut will trim the jig flush with the blade, creating a perfectly square edge on the jig itself, which will be your reference surface. Important: Ensure your table saw blade is perfectly aligned before this step.
- Add a Stop (Optional but Recommended): For repeatable cuts, you can add a small block of wood as a stop to the jig. Position your workpiece against the fence, against the stop block, and then make your cut.
Design 2: The Adjustable Fence Jig
This jig offers more versatility, allowing you to adjust the offset for different blade heights or to account for blade wear.
Materials:
- Two pieces of 3/4 inch plywood (e.g., 30 inches long x 4 inches wide)
- One piece of 1/4 inch plywood or hardboard (e.g., 30 inches long x 1 inch wide)
- Two small blocks of wood (e.g., 2 inches x 2 inches x 1 inch)
- Screws
- Wood glue
- Knobs or T-nuts and bolts (for adjustability)
- Table saw
Construction Steps:
- Prepare the Base Pieces: Take one of the 3/4 inch plywood pieces. This will be your main fence-facing piece.
- Create the Adjustable Element: Take the second 3/4 inch plywood piece. This will be your base. Attach the two small wooden blocks to the underside of this base piece, near the ends, but leaving enough space between them for your table saw fence to slide. These blocks act as runners.
- Attach the Offset Strip: Glue and screw the 1/4 inch offset strip to the edge of the fence-facing piece (the first 3/4 inch plywood). Make sure the strip is flush with one side, creating the offset.
- Assemble the Jig: Position the fence-facing piece (with the offset strip) on top of the base piece. The offset strip should be against the edge where the fence will be. Use your knobs or T-nuts and bolts to attach the two pieces together. Drill pilot holes and insert the bolts from the underside of the base, securing them into the fence-facing piece. This allows you to adjust the distance between the two pieces, thus adjusting the jig’s offset.
- Trim and Square: Similar to the first design, take this jig to your table saw. With the fence-facing piece firmly against your table saw fence, make a pass with the blade. This will square up the edge of the fence-facing piece, which will be your cutting guide.
Using the Adjustable Jig:
- Place the jig on your table saw.
- Slide your table saw fence so that it butts up against the offset strip.
- Adjust the bolt/knob mechanism to create the desired offset for your blade height. The goal is to have the blade barely touch the offset strip initially.
- Make a test cut on a scrap piece of wood. The edge removed should be very thin. Adjust the jig until the blade is just kissing the offset strip.
- Now, when you feed your workpiece against the fence-facing piece of the jig, the blade will precisely remove a thin shaving from the edge of your workpiece, squaring it up.
Table Saw Edge Jointing Techniques
Once your jig is ready, you can begin jointing edges.
Setting Up for Jointing
- Blade Height: Set your table saw blade to its highest position. This ensures the maximum amount of the blade is engaged with the wood for a cleaner cut and better support. The table saw depth of cut for jointers should be set to remove just a thin shaving, about 1/16th to 1/32nd of an inch.
- Jig Placement: Place your jointer jig on the table saw. Slide the table saw fence until it registers snugly against the offset strip of your jig. Ensure the fence is locked down securely.
- Featherboard Setup: Attach featherboards to the table saw or to the jig itself. Position them to hold the workpiece firmly against the fence and the jig’s reference surface. This is crucial for preventing kickback and ensuring a square cut. You might need to experiment with featherboard placement to get it just right.
- Check Squareness: Use a reliable square to check that the blade is perpendicular to the table. This is part of table saw blade alignment for jointers.
The Jointing Process
- Feed the Workpiece: Place the edge you want to joint against the fence-facing part of your jig. Ensure the workpiece is also pressed firmly against the table.
- Use Push Blocks: Use a table saw push block for jointers to guide the workpiece through the blade. Do not use your hands to push the wood. Start the cut with the push block supporting the wood, and continue feeding it through until it’s completely past the blade.
- Make the Cut: Slowly and steadily feed the workpiece through the blade. Let the blade do the work; don’t force it.
- Repeat as Necessary: For significantly out-of-square edges, you may need to make multiple passes, each time removing a thin shaving. Check the edge with your square after each pass.
- Jointing the Opposite Edge: Once the first edge is perfectly square, you’ll need to joint the opposite edge. To do this, flip the board over and repeat the process, ensuring the newly jointed edge is now pressed firmly against the table saw fence. This ensures the board remains parallel to itself.
Advanced Techniques and Considerations
- Router Table Jointer Fence: For very wide boards, a router table jointer fence attachment can sometimes be adapted for table saw use, offering a more robust and stable reference. However, these are often designed for router tables and may require modification.
- Table Saw Auxiliary Fence: In some cases, a robust table saw auxiliary fence can be mounted to your existing fence, providing a taller and more stable reference surface. This can be combined with a jig or used directly if the auxiliary fence itself can be made perfectly parallel to the blade.
- Table Saw Outfeed Support for Jointers: For long or heavy boards, adequate table saw outfeed support for jointers is essential to prevent the workpiece from dropping or tipping as it exits the saw. This could be outfeed rollers, an outfeed table, or a helper.
- Jointing to Width: Once you have one square edge, you can use that edge against the table saw fence to rip the board to its final width. The jig isn’t strictly necessary for this, but using featherboards remains critical.
- Bevels and Angles: While this technique focuses on 90-degree edges, once you have a square reference edge, you can tilt the table saw blade to create beveled edges or use a miter gauge (with appropriate safety precautions and push blocks) to cut angles.
Troubleshooting Common Issues
- Wavy Edge: Usually caused by an inconsistent feed rate or dull blade. Ensure a steady feed and a sharp blade.
- Burn Marks: Indicates the blade is dull or you’re feeding too slowly.
- Edge Not Square: Double-check your jig’s squareness and ensure the workpiece is held firmly against the fence and jig. Verify your table saw blade alignment for jointers is correct.
- Kickback: This is a critical safety issue. Always ensure the wood is held firmly against the fence and the table. Use push blocks and featherboards. Never reach over the blade. Ensure your table saw depth of cut for jointers is appropriate; too deep a cut increases the risk.
Table Saw Jointer Jig vs. Dedicated Jointer
| Feature | Table Saw as Jointer | Dedicated Jointer |
|---|---|---|
| Edge Flatness | Good, with a well-made jig and careful setup. | Excellent, designed for this purpose. |
| Edge Squareness | Good, reliant on jig accuracy and operator skill. | Excellent, inherently designed for square edges. |
| Repeatability | Achievable with a good jig and stops. | High, consistent results. |
| Capacity | Limited by table saw size and jig design. | Can handle wider and longer boards. |
| Setup Time | Moderate to high, depending on jig complexity. | Relatively quick setup. |
| Cost | Low (if you have a table saw). | Significant investment. |
| Space Required | Uses existing table saw footprint. | Requires dedicated space. |
| Safety Risk | Higher if not set up correctly or with poor technique. | Generally safer for the intended operation. |
| Versatility | Table saw is multi-purpose; jig adds a function. | Specialized tool for jointing. |
Frequently Asked Questions (FAQ)
Q1: Is it safe to use a table saw as a jointer?
A1: Yes, it can be safe if you use a well-made table saw jointer jig, follow proper safety procedures, and maintain correct table saw blade alignment for jointers. Always use push blocks and featherboards.
Q2: What kind of blade should I use for table saw edge jointing?
A2: A combination blade or a high-tooth-count crosscut blade will provide the cleanest results. Ensure the blade is sharp.
Q3: How much should I take off with each pass?
A3: You should aim for a very thin shaving, no more than 1/16th of an inch. This minimizes strain on the saw and reduces the risk of kickback. This relates to the table saw depth of cut for jointers.
Q4: Can I joint an edge that’s significantly warped or twisted?
A4: While you can correct minor imperfections, severely warped or twisted boards are best straightened with a dedicated jointer. Trying to force severely warped wood through a table saw setup can be dangerous.
Q5: What if my table saw fence isn’t perfectly parallel to the blade?
A5: This is a problem. Ensure your table saw blade alignment for jointers is perfect first. If the fence itself is the issue, you might need to adjust or replace it. A misaligned fence will result in non-square edges, regardless of the jig.
Q6: Do I need a special fence for this?
A6: While not strictly necessary, a sturdy table saw auxiliary fence can provide a more stable reference surface. Some woodworkers adapt a router table jointer fence for this purpose, but ensure it mounts securely and is perfectly square to the blade.
By carefully constructing and using a table saw jointer jig, you can effectively achieve perfectly jointed edges on your lumber, expanding the capabilities of your table saw and improving the quality of your woodworking projects. Always remember to prioritize safety and double-check your setups.