
Can a beginner use a circular saw? Yes, absolutely! With the right guidance and a focus on safety, even someone new to woodworking can master using a circular saw. This guide will walk you through everything you need to know to get started.
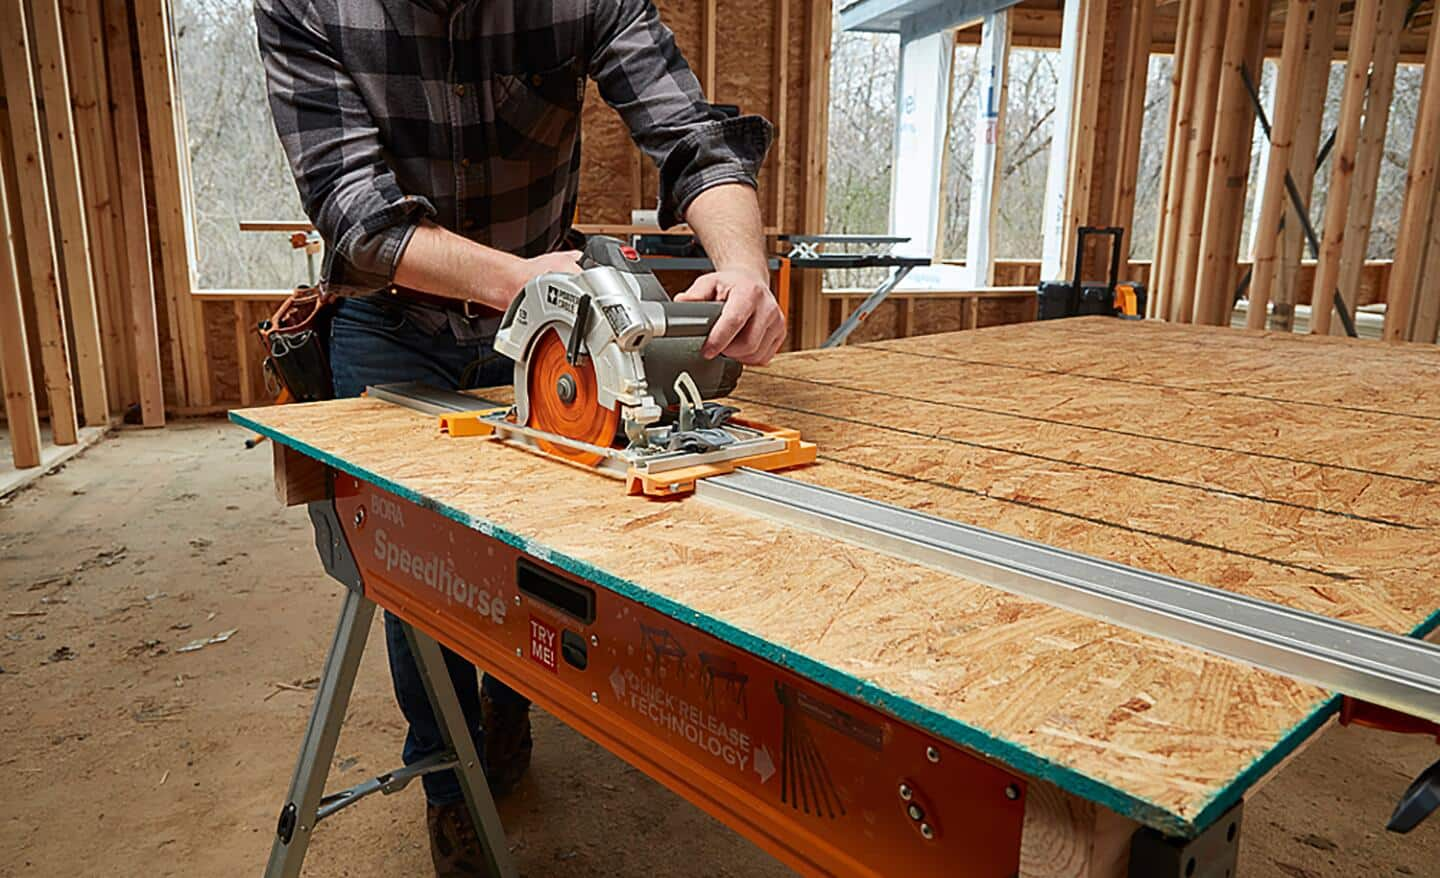
Image Source: dam.thdstatic.com
Getting Started with Your Circular Saw
So, you’ve got a new circular saw, or perhaps you’re looking to become more comfortable with the one you have. Using a circular saw can be incredibly rewarding, allowing you to make precise cuts in wood for countless DIY projects. But with great power comes great responsibility, especially when dealing with a tool that spins a sharp blade at high speeds. This is where circular saw safety becomes paramount. We’ll cover the essentials, from setting up your saw to making clean, accurate cuts.
Choosing the Right Saw for You
For DIY enthusiasts, selecting the best circular saw for DIY depends on your needs. Consider factors like:
- Corded vs. Cordless: Corded saws offer continuous power but limit your mobility. Cordless saws provide freedom of movement but require battery management.
- Motor Power: Higher wattage (for corded) or voltage (for cordless) means more power for tougher materials.
- Blade Size: Common sizes are 7-1/4 inches and 10 inches. Larger blades can cut thicker materials but make the saw heavier.
- Weight and Ergonomics: A comfortable grip and balanced weight are crucial for control and reducing fatigue.
Many entry-level corded and cordless saws are excellent for DIYers. Look for models with good reviews and features like electric brakes, which stop the blade quickly when you release the trigger.
Essential Circular Saw Safety Gear
Before you even plug in your saw, your personal safety gear is non-negotiable. Think of it as your first line of defense.
- Safety Glasses or Goggles: Protect your eyes from flying sawdust and debris. This is the most critical piece of safety equipment.
- Hearing Protection: Circular saws are loud. Earplugs or earmuffs are essential to prevent hearing damage.
- Dust Mask or Respirator: Sawdust can be harmful to your lungs. A good dust mask keeps you breathing easier and healthier.
- Gloves: While some prefer not to wear gloves for better grip, sturdy work gloves can protect your hands from splinters and minor cuts. Ensure they aren’t too loose, which could get caught in the blade.
- Sturdy Footwear: Closed-toe shoes protect your feet from dropped tools or materials.
Setting Up Your Circular Saw for Success
Proper setting up your circular saw ensures it’s ready for a safe and effective cut. This involves a few key steps:
1. Inspecting Your Saw
Before each use, give your circular saw a quick once-over.
- Check the Cord: For corded saws, ensure the power cord is free from nicks, cuts, or fraying. A damaged cord is a serious electrical hazard.
- Blade Guard: Make sure the lower blade guard moves freely and retracts smoothly. It should always cover the blade when not actively cutting. Never wedge or tie it back.
- Handles: Ensure handles are secure and free of damage.
- Base Plate (Skate): Check that the base plate is clean and smooth. Any debris or damage can affect the cut.
2. Installing the Right Circular Saw Blade
The circular saw blades you choose significantly impact the cut quality and ease of use. Different blades are designed for different tasks.
- Number of Teeth:
- Fewer Teeth (e.g., 24-tooth): Good for ripping (cutting with the grain), creating faster but rougher cuts.
- More Teeth (e.g., 40-60 tooth): Ideal for crosscutting (cutting across the grain), resulting in smoother, cleaner finishes.
- Tooth Configuration: Look at the shape of the teeth – some are designed for specific materials or to minimize tear-out.
- Blade Material: Carbide-tipped blades are durable and stay sharp longer than steel blades.
How to Change a Circular Saw Blade:
Changing a blade requires careful attention. Always unplug the saw first!
- Unplug the Saw: Ensure the saw is completely disconnected from power.
- Engage the Spindle Lock: Most saws have a button or lever to lock the spindle, preventing the shaft from turning.
- Loosen the Blade Nut: Use the wrench that came with your saw (or an appropriate socket wrench) to loosen the blade nut. Remember, it usually loosens by turning clockwise (opposite of normal screws).
- Remove the Old Blade: Carefully take off the blade, paying attention to the direction of the teeth.
- Install the New Blade: Place the new blade onto the spindle, ensuring the teeth are facing the correct direction (usually indicated by an arrow on the blade and the saw’s housing).
- Tighten the Blade Nut: Reinstall the blade nut and tighten it firmly (counter-clockwise to loosen, clockwise to tighten). Don’t overtighten, but ensure it’s snug.
- Release Spindle Lock: Disengage the spindle lock.
- Check Blade Rotation: Briefly plug in the saw (or insert the battery) and pull the trigger to ensure the blade spins freely and doesn’t wobble. Unplug/remove the battery immediately after this check.
3. Setting the Circular Saw Depth Adjustment
One of the most crucial circular saw depth adjustment settings is how deep the blade cuts. Setting this correctly improves safety and cut quality.
- The Rule of Thumb: For a clean cut with minimal tear-out on the top surface, set the blade depth so that it extends approximately 1/8 to 1/4 inch (about 3-6 mm) below the material you are cutting.
- How to Adjust: Most circular saws have a lever or knob on the front of the saw. Loosen this, adjust the base plate up or down to change the blade’s exposure, and then re-tighten the lever firmly.
Why is this important?
* Safety: If the blade is set too deep, more of the blade is exposed, increasing the risk of accidental contact.
* Cut Quality: A blade set too deep can cause more splintering on the underside of the cut. A slightly deeper cut minimizes this.
* Efficiency: Setting the depth correctly prevents unnecessary blade drag, saving power and extending blade life.
4. Adjusting for Bevel Cuts (Optional)
Many circular saws can also make angled cuts, known as circular saw bevel cuts.
- How to Adjust: Look for a bevel adjustment lever or scale, usually located at the front of the base plate. Loosen the lever, pivot the base plate to the desired angle (often marked in degrees), and then re-tighten the lever securely.
- Accuracy: Ensure the scale reads accurately and that the base plate is locked firmly in place before cutting. Always double-check your angle.
Preparing Your Workspace
A clean, organized workspace is fundamental for circular saw safety.
- Clear Clutter: Remove anything from your work area that could cause you to trip or get in the way of the saw or the material you’re cutting.
- Stable Surface: Ensure your workbench or sawhorses are stable and can support the weight of the material and the saw.
- Good Lighting: You need to see clearly where you are cutting and where the blade is.
- Ventilation: Especially important if you don’t have good circular saw dust collection. Work in a well-ventilated area or outdoors.
Mastering the Art of the Cut
Now that your saw is ready and you’re geared up, let’s talk about making those cuts.
Making Straight Cuts with a Circular Saw
Achieving a truly straight cut is a common challenge for beginners. Simply trying to follow a line by eye often results in a wavy cut. This is where using a guide comes in.
Using a Circular Saw Guide
A guide is your best friend for how to make straight cuts with a circular saw. There are several options:
- Built-in Edge Guide: Some saws come with a small adjustable metal guide that attaches to the base plate. This is useful for cuts parallel to the edge of a workpiece, but its range is usually limited.
-
Straight Edge or Guide Board: This is the most common and effective method for beginners.
- How to Use: You’ll need a long, straight piece of wood or metal. Clamp this firmly to your workpiece, aligning its edge with your cut line. The edge of the saw’s base plate will then ride along this guide, ensuring a perfectly straight path.
- Calculating Offset: You need to account for the distance between the saw blade and the edge of the saw’s base plate. This is called the offset. Measure this distance from your desired cut line to the edge of the base plate that will follow the guide. Clamp the guide board at this offset distance.
- Example: If your cut line is 2 inches from the edge of your material, and the distance from the edge of your saw’s base plate to the blade is 3 inches, you would clamp your guide board 3 inches away from your cut line. This way, when the base plate’s edge is against the guide, the blade will be exactly on your cut line.
-
Commercial Circular Saw Guides: Various companies make specialized rip guides and cutting guides that attach to your saw or your workpiece. These often offer more adjustability and stability than basic straight edges.
- Track Saws: For ultimate precision and straightness, especially on sheet goods, a track saw system is the professional choice, though more expensive.
The Cutting Process: Step-by-Step
- Mark Your Cut Line: Clearly mark your cut line on the material with a pencil.
- Position Your Guide: Clamp your chosen guide firmly to the material, ensuring it’s aligned with your cut line and accounting for the saw’s offset.
- Position the Saw: Place the circular saw’s base plate onto the material. Align the blade with your cut line (or with the edge of the guide).
- Support the Material: Ensure the workpiece is well-supported. The part being cut off should not be hanging unsupported, as it can pinch the blade and cause kickback. The offcut piece should rest on sawhorses or the workbench so it doesn’t fall and potentially pull the main piece away from the guide.
- Start the Saw: Hold the saw firmly with both hands. Make sure the blade guard is retracted by the material and then the blade. Squeeze the trigger to start the saw and let it reach full speed before it contacts the wood.
- Make the Cut: Push the saw forward smoothly and steadily. Let the blade do the work; don’t force it. Keep the base plate firmly against the guide.
- Maintain Control: Keep the saw running until the cut is complete.
- Complete the Cut: Once you’ve cut through the material, release the trigger. Allow the blade to stop spinning completely before lifting the saw from the workpiece.
Advanced Techniques and Considerations
Once you’re comfortable with straight cuts, you can explore other techniques.
Making Bevel Cuts Safely
- Set the Angle: Adjust your saw for the desired bevel angle using the base plate adjustment.
- Re-check Depth: The bevel cut will change the effective depth of the blade. You may need to readjust the depth slightly. Remember to set it so the blade extends just past the material.
- Guide Use: Using a guide is even more critical for bevel cuts, as forcing the saw on an angle can easily lead to wobbling and inaccurate cuts. Ensure your guide is clamped securely.
- Support: Proper support for the workpiece and the offcut is vital. Bevel cuts can sometimes make pieces less stable.
Circular Saw Dust Collection
Sawdust is more than just a mess; it can be a health hazard and can also obscure your cut line.
- Bag Attachment: Many circular saws come with a dust bag that attaches to the dust port. This collects a significant amount of sawdust.
- Vacuum Connection: For more effective circular saw dust collection, you can attach a shop vacuum to the dust port using an appropriate adapter. This is highly recommended for reducing airborne dust.
- Dust Blower: Some saws have a small blower that clears sawdust from the cut line as you work. While helpful, it doesn’t eliminate the need for dust collection.
- Workspace Sweeping: Even with collection systems, regularly sweep your workspace to prevent dust buildup.
Dealing with Kickback
Kickback is perhaps the most dangerous aspect of using a circular saw. It’s when the blade jams in the material and the saw is suddenly and violently thrown backward towards the operator.
What Causes Kickback?
- Blade Pinching: The most common cause. This happens when the kerf (the width of the cut) closes up and pinches the spinning blade. This can occur if:
- The material sags or shifts during the cut.
- The user twists the saw while cutting.
- The blade hits a knot or nail.
- Using a Dull or Damaged Blade: A dull blade requires more force, increasing the chance of it getting stuck.
- Blade Not Perpendicular: If the blade isn’t cutting straight through the material, it can bind.
- Cutting Warped or Twisted Wood: These materials are prone to closing up the kerf.
Preventing Kickback:
- Use the Right Blade: Ensure your circular saw blades are sharp and appropriate for the material.
- Proper Depth Setting: As discussed, setting the depth correctly helps prevent the blade from binding excessively.
- Secure Material: Always ensure your workpiece is well-supported and won’t sag or shift. Clamp it down securely.
- Maintain a Straight Cut: Avoid twisting the saw or forcing it through the material. Let the saw’s speed do the work.
- Use a Guide: A good guide helps maintain a straight path and prevents the blade from binding.
- Observe the Blade Guard: Never disable or tie back the lower blade guard. It’s designed to cover the blade instantly if it jams.
- Be Aware of the Blade’s Path: Always know where the blade is and where it will exit the material.
- Two-Handed Grip: Always use both hands to operate the saw, maintaining a firm grip.
- Stand to the Side: Position yourself so you are not directly behind the saw if kickback occurs. Stand slightly to the side of the cut line.
Frequently Asked Questions (FAQ)
Q: What is the most important circular saw safety tip?
A: The most important circular saw safety tip is to always wear safety glasses and never disable the blade guard.
Q: Can I make cuts on plywood with a circular saw?
A: Yes, plywood can be cut with a circular saw. For the cleanest results on plywood, especially on the visible surface, use a blade with a higher tooth count (40-60 teeth) and consider using a guide to prevent tear-out.
Q: What is the best way to keep cuts straight?
A: The best way to make straight cuts is by using a circular saw guide, such as a straight edge clamped to your workpiece, or a commercial guide accessory.
Q: How deep should the blade be set?
A: For circular saw depth adjustment, set the blade to extend about 1/8 to 1/4 inch below the material being cut.
Q: What are bevel cuts for?
A: Circular saw bevel cuts allow you to cut angles into the edge of your material, which is useful for creating joints, chamfers, or decorative edges.
Q: Who is a circular saw for?
A: A circular saw is a versatile tool for woodworkers, DIYers, carpenters, and contractors for cutting various types of wood and some other materials.
Q: What is the best circular saw for DIY?
A: The best circular saw for DIY is subjective and depends on your budget and project needs, but generally, a good quality corded or cordless saw with safety features like an electric brake is ideal for beginners.
Q: What kind of circular saw blades are best for beginners?
A: For general DIY use, a good all-purpose blade, often around 24-40 teeth, is suitable. If you’re doing a lot of fine finishing work, a higher tooth count blade will provide cleaner cuts.
Q: Is circular saw dust collection really necessary?
A: While not strictly mandatory for every cut, effective circular saw dust collection is highly recommended for health and safety, as well as for keeping your work area clean and your cut line visible.
By following these beginner circular saw tips, focusing on circular saw safety, and practicing with your tool, you’ll be well on your way to making accurate and confident cuts in your DIY projects. Remember, patience and attention to detail are key to mastering any power tool.