
What is the best way to measure a band saw blade? The best way to measure a band saw blade is to lay it flat on a clean surface and measure the total length from tip to tip. This is a crucial step for ensuring optimal performance and achieving clean, precise cuts with your band saw.
Choosing the right band saw blade is like picking the perfect tool for a specific job. It’s not just about having a blade, but having the right blade. And to get the right blade, you need to know how to measure your current one accurately. This guide will walk you through everything you need to know, from the basic measurements to the finer details that make all the difference.
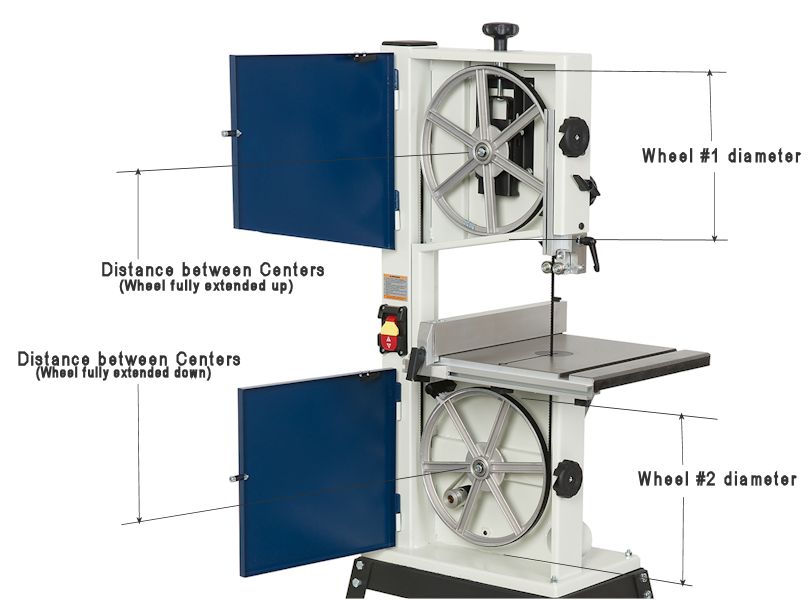
Image Source: www.bandsawbladecenter.com
Why Accurate Blade Measurement Matters
Before we dive into the “how,” let’s quickly touch on the “why.” Measuring your band saw blade accurately ensures:
- Proper Fit: A blade that’s too long or too short simply won’t work. Too long, and it might not track correctly or could even interfere with the saw’s mechanism. Too short, and it won’t engage the drive wheels properly, leading to slippage and inaccurate cuts.
- Optimal Performance: Different materials and cutting tasks require specific blade characteristics. Knowing your current blade’s specifications helps you select a replacement that’s suited for your needs.
- Safety: A correctly fitted and specified blade contributes to the overall safety of your operation. A blade that’s damaged or incorrectly sized can be a hazard.
- Longevity: Using the right blade for the job and ensuring it’s properly tensioned can extend the life of both the blade and your band saw.
Essential Band Saw Blade Measurements
There are several key measurements you’ll need to consider when dealing with band saw blades. Let’s break them down.
1. Saw Blade Length: The Foundation of Your Cut
This is arguably the most critical measurement. Your band saw is designed to accommodate a specific saw blade length. If you try to install a blade that’s too long or too short, it simply won’t function.
How to Measure Saw Blade Length:
- Lay it Flat: Uncoil your used band saw blade and lay it flat on a clean, level surface. Be careful, as the ends can be sharp.
- Measure Tip to Tip: Use a measuring tape or a good quality ruler. Start at the very tip of the first tooth and extend the tape measure all the way to the tip of the last tooth.
- Be Precise: Make sure the blade is as straight as possible when you measure. Don’t pull it taut in a way that might distort the measurement, but ensure there are no slack sections.
- Record the Measurement: Note down the length, usually in inches or millimeters, depending on your region and saw specifications.
Important Note: If you don’t have an old blade to measure, consult your band saw’s owner’s manual. It will specify the exact saw blade length required for your machine. You can also often find this information on a sticker or plate on the saw itself.
2. Band Saw Blade Width: Affecting Cut Precision and Material Capacity
The band saw blade width (also sometimes referred to as blade width or band width) significantly impacts the type of cuts you can make and the materials you can cut efficiently.
- Narrow Blades: Thinner blades are more flexible and can handle tight curves and intricate resawing. They are ideal for detailed work.
- Wide Blades: Wider blades are stiffer and better suited for straight-line cuts, resawing thick lumber, and general ripping. They offer more stability and are less likely to wander off course.
How to Measure Band Saw Blade Width:
- Lay it Flat: As with length, lay the blade flat on a clean surface.
- Measure Across the Back: Use your measuring tape or ruler to measure the width of the blade across its entire width, from the back edge to the tooth edge, avoiding the teeth themselves.
- Check Multiple Points: While most blades are uniform, it’s good practice to check the width at a couple of different points along the blade to ensure consistency.
- Record the Measurement: Note this measurement, typically in inches (e.g., 1/8″, 1/4″, 1/2″, 1″).
Your band saw will have a range of acceptable band saw blade width options. Using a blade wider than recommended can cause issues with tracking and potentially damage the saw.
3. Band Saw Blade Thickness: Contributing to Rigidity and Material Capability
Band saw blade thickness refers to the depth of the blade material itself. This measurement, often expressed in thousandths of an inch (e.g., 0.025″, 0.035″), contributes to the blade’s rigidity and its ability to withstand the forces of cutting, especially in thicker or harder materials.
How to Measure Band Saw Blade Thickness:
- Use a Caliper: The best tool for accurately measuring band saw blade thickness is a set of calipers (vernier calipers or digital calipers).
- Measure the Blade Material: Gently place the jaws of the caliper around the thickest part of the blade’s body (the spine), avoiding the teeth.
- Read the Measurement: Note the thickness in inches or millimeters.
- Alternatively, a Micrometer: For extreme precision, a micrometer can be used.
Again, your band saw manual will specify the maximum band saw blade thickness it can accommodate without causing undue stress on the machine.
Tooth Characteristics: The Cutting Edge of Performance
The teeth are what do the actual cutting, and their characteristics are vital for efficient and clean cuts.
4. Band Saw Blade TPI (Teeth Per Inch) and Pitch: The Cutting Pace
Band saw blade TPI (Teeth Per Inch) and band saw blade pitch are closely related and describe how many teeth are on the blade within a one-inch segment.
- TPI: This is a direct count of teeth within an inch.
- Pitch: This is the distance between teeth, measured from the tip of one tooth to the tip of the next. Pitch is often more useful for understanding what kind of cut a blade is designed for. A larger pitch means fewer teeth per inch.
How to Determine TPI/Pitch:
- Visual Count: Lay the blade flat.
- Use a Ruler: Place a ruler along the blade.
- Count Teeth in an Inch: Count the number of full teeth within a measured one-inch section.
- Calculate Pitch: If you counted, for example, 6 teeth in an inch, the pitch would be 1 inch divided by 6 teeth, which is approximately 0.167 inches. Many manufacturers will simply state the pitch directly, making it easier.
Choosing the Right TPI/Pitch:
- Low TPI (Coarse Pitch): Good for fast cutting of thicker, softer materials. Fewer teeth mean larger gullets (the space between teeth) to clear chips efficiently. Examples: cutting metal over 1/2 inch thick, large diameter logs.
- Medium TPI: Versatile for general-purpose cutting of medium-thickness materials.
- High TPI (Fine Pitch): Ideal for thin materials, harder metals, or when a very smooth finish is desired. More teeth contact the material, providing finer cuts but slower material removal. Examples: cutting sheet metal, plastics, small diameter tubing.
Rule of Thumb: For most materials, you want at least two to three teeth in contact with the material you are cutting at any given time.
5. Band Saw Blade Set: Affecting Cut Width and Chip Clearance
The band saw blade set refers to the way the teeth are bent or angled from side to side. This bending creates a wider kerf (the width of the cut) than the blade itself, which is essential for preventing the blade from binding in the material and for clearing sawdust or chips.
Common Types of Blade Set:
- Raker Set: Every third tooth is straight (set to the left or right), while the other two teeth alternate left and right. This is a common general-purpose set.
- Wavy Set: Teeth alternate left and right in a wavy pattern. This is ideal for cutting thin-walled tubing and profiles where consistent tooth contact is important.
- Straight Set (or Offset Set): Teeth are bent slightly to the left and right, alternating evenly. This is often used for metal cutting, providing good chip clearance.
How to Identify Band Saw Blade Set:
- Visual Inspection: Lay the blade flat and look closely at the teeth.
- Observe the Angle: You’ll see the teeth are not perfectly straight up and down.
- Identify the Pattern: Try to determine if it’s a raker, wavy, or straight set by observing how the teeth alternate. You can often see the slight bend in the teeth themselves.
The correct band saw blade set depends on the material you’re cutting and the desired outcome. A wider set is better for softer materials and chip clearance, while a narrower set is better for precise cuts in harder materials where binding is a concern.
Blade Material: Durability and Performance
The band saw blade material is the foundation of its cutting capability and longevity. Different materials offer varying degrees of hardness, flexibility, and heat resistance.
Common Band Saw Blade Materials:
- Carbon Steel: The most common and affordable. Good for general woodworking and cutting softer metals. They are flexible but can dull faster and are more prone to heat buildup.
- High-Speed Steel (HSS): Harder and more heat-resistant than carbon steel. They maintain their sharpness longer and are suitable for cutting tougher materials, including harder woods and some metals.
- Bi-Metal: Combines the toughness of a spring steel backing with hard HSS or cobalt alloy teeth. This offers excellent durability, heat resistance, and sharpness retention, making them ideal for cutting a wide range of materials, including metal, hardwoods, and plastics.
- Carbide Tipped: Features small carbide tips brazed onto the teeth. Carbide is extremely hard and holds an edge for a very long time, making these blades excellent for aggressive cutting of very hard materials or for extended production runs. They are the most expensive option.
Identifying the Blade Material:
- Markings: Often, the band saw blade material is stamped or printed on the blade itself, usually near the weld or on the back edge. Look for “CS” (Carbon Steel), “HSS,” “Bi-Metal,” or specific alloy designations.
- Color: Sometimes, different materials have distinct visual cues. HSS blades might have a golden or bluish hue due to heat treatment, while carbide-tipped blades will clearly show the metal tips.
- Feel and Flexibility: Carbon steel is generally more flexible than HSS. Bi-metal blades strike a balance.
Choosing the right band saw blade material is critical for matching the blade to your cutting tasks and the hardness of the materials you intend to cut.
Blade Construction and Assembly
Beyond the raw measurements, how the blade is put together also matters.
6. Band Saw Blade Weld: The Joining Point
Since band saw blades are manufactured in long coils, they need to be joined into a continuous loop. This is done via a band saw blade weld. The quality and type of this weld are crucial for the blade’s integrity and performance.
Types of Welds:
- Butt Weld: The two ends of the blade are butted together and then welded. This is the most common and generally reliable method.
- Scarf Weld: The ends of the blade are ground at an angle before welding. This creates a smoother, stronger weld that is less likely to break.
Identifying the Weld:
- Visual Inspection: The weld point is usually thicker than the rest of the blade and might have a slightly different texture or color.
- Smoothness: A good weld will be smooth and not create a significant bump or imperfection that could snag on your material or affect tracking.
A poorly made band saw blade weld can be a weak point, leading to blade breakage or poor cutting performance. If you notice a rough or uneven weld, it’s a sign the blade might not be of the highest quality.
Tensioning Your Band Saw Blade
While not a measurement of the blade itself, band saw blade tension is a critical factor in its performance and longevity. Proper tension ensures the blade tracks correctly on the wheels and maintains its stability during cutting.
Why Proper Tension is Key:
- Too Loose: The blade can wander, twist, or even come off the wheels, leading to inaccurate cuts and a dangerous situation.
- Too Tight: This can put excessive stress on the blade, the saw’s wheels, bearings, and guides, leading to premature wear or even blade breakage.
How to Gauge Band Saw Blade Tension:
- Manufacturer Recommendations: Always consult your band saw’s manual for recommended tension settings. Many saws have a tension indicator gauge.
- The “Feel” Method (Use with Caution): Experienced users can sometimes gauge tension by how much the blade flexes when pushed with a thumb. A gentle push should result in minimal flex. This method is subjective and requires practice.
- Sound: Some experienced users can detect improper tension by the sound the blade makes when running. A properly tensioned blade will have a higher-pitched “ring” than a loose one.
Adjusting Tension:
Most band saws have a tension adjustment wheel or knob. Turn it to increase or decrease tension as needed. Always make small adjustments and check the tension indicator or your saw’s performance.
The relationship between blade width and tension is important: Wider blades generally require higher tension than narrower blades to maintain rigidity.
Putting it All Together: Selecting the Right Replacement Blade
Once you have accurately measured your current band saw blade’s specifications, you can confidently select a replacement that will perform optimally.
Here’s a quick checklist for selecting a new blade:
- Saw Blade Length: Must match your saw’s requirement exactly.
- Band Saw Blade Width: Choose based on the types of cuts you primarily make (curves vs. straight lines).
- Band Saw Blade Thickness: Ensure it’s within your saw’s capacity.
- Band Saw Blade TPI/Pitch: Select based on the materials you cut and the desired finish.
- Band Saw Blade Set: Match the set to your cutting application (chip clearance, material type).
- Band Saw Blade Material: Choose based on durability, heat resistance, and the hardness of the materials you cut.
- Band Saw Blade Weld: Look for a reputable brand known for quality welds.
Frequently Asked Questions (FAQ)
Q: Can I measure a band saw blade while it’s still on the saw?
A: It’s highly recommended to remove the blade for accurate measurement. Measuring it while on the saw can be difficult and lead to imprecise results, especially for length.
Q: What happens if I use the wrong band saw blade length?
A: Using a blade that’s too short will prevent it from properly engaging the drive wheels, causing slippage and poor cutting. A blade that’s too long won’t fit and cannot be installed.
Q: How do I know if my band saw blade is dull?
A: Signs of a dull blade include: the saw needing to be pushed harder than usual, the blade wandering or not tracking straight, burning marks on the workpiece, or a rougher cut finish than you typically achieve.
Q: Is it okay to use a wider blade than my saw’s maximum recommended width?
A: No, it’s not advisable. A blade that is too wide can rub against the guides or even the saw frame, causing damage and potentially leading to blade breakage. Always adhere to your saw’s specifications.
Q: What does “hook” mean in relation to band saw teeth?
A: “Hook” refers to the angle of the tooth face. Teeth with a more pronounced hook angle are more aggressive and better for cutting softer materials as they slice through material more easily. Teeth with less hook are better for harder materials where they need to resist heat and breakage.
By meticulously measuring and selecting your band saw blades based on these critical parameters, you’ll unlock the full potential of your machine, achieving cleaner, more accurate cuts and extending the life of your equipment. Happy cutting!