
Can you build your own chop saw table? Yes, absolutely! This guide will show you how to make a fantastic DIY chop saw stand, a versatile miter saw workbench, or even a robust chop saw outfeed table. Building a dedicated workspace for your chop saw is a game-changer for any DIYer or woodworker. It improves safety, accuracy, and efficiency. Whether you need a portable chop saw stand for on-the-go projects, are looking for chop saw cart plans, want to create a custom chop saw jig, or are aiming for a complete woodworking chop saw setup, this guide has you covered. We’ll explore building a sturdy rolling chop saw table and even a simple chop saw base.
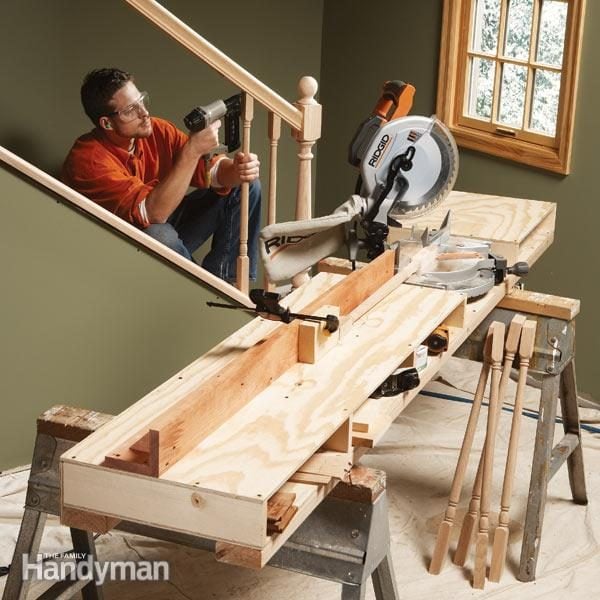
Image Source: www.familyhandyman.com
Why Build a Chop Saw Table?
Many people wonder why it’s worth the effort to build a separate table for their chop saw. The reasons are numerous and directly impact your woodworking experience.
- Improved Accuracy: A stable and level platform ensures your cuts are precise every time. Wobbly surfaces lead to crooked cuts.
- Enhanced Safety: A well-built table minimizes the risk of the saw tipping or moving unexpectedly. It also provides a stable base for dust collection and safety guards.
- Better Material Support: An extended table or outfeed system allows you to safely support long pieces of wood, preventing them from falling and causing dangerous kickback.
- Ergonomics: Raising your saw to a comfortable working height reduces strain on your back and body, especially during long projects.
- Organization: A dedicated station can incorporate storage for blades, accessories, and even dust collection, keeping your workspace tidy and efficient.
- Portability: Many designs allow for easy folding or wheels, making it simple to move your chop saw around your shop or to different job sites.
Planning Your Chop Saw Table
Before you grab your tools, take some time to plan. Think about your needs and the space you have available.
Key Considerations:
- Saw Size and Weight: Your table needs to be strong enough to support your specific chop saw. Check the dimensions and weight of your saw.
- Workspace: How much space do you have? Do you need a compact design or something more elaborate?
- Portability: Will you need to move it often? Consider wheels or a folding design.
- Material Support: Do you often work with long lumber? An outfeed table or extendable wings might be necessary.
- Storage: Do you want to incorporate storage for blades, measuring tools, or dust collection?
- Budget: Determine how much you’re willing to spend on materials.
Design Styles:
- Simple Base: A basic frame to elevate and stabilize the saw.
- Folding Stand: Designed for easy storage and transport.
- Workbench Style: A more robust station with integrated support and potentially storage.
- Rolling Cart: A mobile unit that can be moved easily around the workshop.
- Outfeed Table Integration: A table that extends the support of the saw for long cuts.
Materials and Tools You’ll Need
The specific materials will vary based on your chosen design, but here’s a general list.
Common Materials:
- Lumber:
- 2x4s: Excellent for the main frame and legs.
- 2x6s or 4x4s: For heavier-duty legs or support.
- Plywood (3/4 inch or thicker): For the saw mounting surface and shelves.
- 1x4s or 1x6s: For cross braces, dados, or trim.
- Hardware:
- Wood screws (2.5-inch and 1.5-inch): For assembling the frame.
- Pocket hole screws (if using a pocket hole jig).
- Carriage bolts and washers: For attaching the saw or for pivot points on folding designs.
- Wood glue: For reinforcing joints.
- Optional: Casters (locking casters are highly recommended).
- Optional: Hinges for folding designs.
- Optional: Drawer slides and hardware for storage.
- Finishing:
- Sandpaper (various grits).
- Wood finish (polyurethane, lacquer, or paint).
Essential Tools:
- Measuring Tape: For accurate measurements.
- Pencil: For marking cuts.
- Safety Glasses: Always wear them!
- Hearing Protection: Especially when using power tools.
- Chop Saw (or Miter Saw): The tool you’re building the table for!
- Circular Saw or Miter Saw: For cutting lumber accurately.
- Drill/Driver: For drilling pilot holes and driving screws.
- Sander: Orbital sander or sanding block for smoothing surfaces.
- Clamps: Essential for holding pieces together while gluing or screwing.
- Optional but Highly Recommended:
- Pocket Hole Jig: For strong, hidden joinery.
- Table Saw: For ripping plywood or making precise cuts.
- Jigsaw: For cutting curves or custom shapes.
- Router: For creating dados, rabbets, or rounding edges.
Building a Simple Chop Saw Base
This is a great starting point for a sturdy, elevated platform.
Step 1: Design and Measure
- Determine the height you want your saw. A good rule of thumb is to have the saw’s blade at waist height or slightly above.
- Measure the base of your chop saw to create a mounting platform. You’ll want to ensure it overhangs slightly for stability.
- Plan the dimensions of your base frame. A square or rectangular base is common.
Step 2: Cut Your Lumber
Using your miter saw or circular saw, cut the following:
- Legs: Four pieces to your desired height.
- Base Frame: Four pieces to create a square or rectangular frame that will sit on top of the legs.
- Support Braces: Two or four pieces to connect the legs diagonally or horizontally for added rigidity.
- Mounting Platform: A piece of plywood cut to size to mount your saw.
Step 3: Assemble the Base Frame and Legs
- Option A (Simple Butt Joints):
- Attach the frame pieces together at the corners using wood glue and screws. Pre-drilling pilot holes will prevent splitting.
- Attach the legs to the inside corners of the frame. Again, use glue and screws. Ensure the legs are plumb (perfectly vertical).
- Option B (Pocket Holes):
- Use a pocket hole jig to drill holes on the ends of your frame pieces and at the top of your legs.
- Join the frame pieces with glue and pocket hole screws.
- Attach the legs to the frame using glue and pocket hole screws. This creates a very strong joint.
Step 4: Add Support Braces
- Attach your support braces between the legs. This adds significant stability and prevents racking. You can use pocket holes or simple screws and glue. Consider horizontal braces connecting the legs a few inches from the bottom, and diagonal braces for maximum rigidity.
Step 5: Attach the Mounting Platform
- Place the plywood mounting platform on top of the assembled frame.
- Ensure it’s centered and level.
- Secure it with wood glue and screws. Drive screws up through the frame into the plywood.
Step 6: Mount Your Chop Saw
- Carefully place your chop saw onto the plywood platform.
- Align the mounting holes on your saw with the plywood.
- Use appropriate hardware (bolts, washers, nuts) to securely fasten the saw to the platform. Refer to your saw’s manual for the correct mounting hardware.
Step 7: Finishing Touches
- Sand all surfaces smooth.
- Apply a wood finish to protect the wood and give it a professional look.
Building a Folding Chop Saw Stand
This design prioritizes space-saving and portability, ideal for smaller workshops or job sites.
Design Concept:
The core idea is to create a frame that supports the saw, with legs that fold inwards or outwards for storage. This often involves a central hinged section.
Step 1: Planning the Folding Mechanism
- Hinge Placement: Decide where the legs will pivot. Usually, this is at the junction of the main support frame and the legs.
- Leg Design: Legs can be single pieces or hinged themselves for more compact folding.
- Locking Mechanism: You’ll need a way to lock the legs securely in the open position for safety. This could be a simple pin, a cam lock, or a support brace that flips into place.
Step 2: Cutting Components
- Main Frame: The top piece that supports the saw.
- Legs: Two sets of legs, usually hinged to the main frame.
- Support Braces: These are crucial for stability and often designed to fold with the legs or lock them in place.
- Saw Platform: Plywood to mount the saw.
Step 3: Constructing the Main Frame
- Build a sturdy rectangular frame using 2x4s or similar lumber.
- Reinforce the corners with glue and screws, or pocket holes.
Step 4: Attaching Hinges and Legs
- Attach heavy-duty hinges to the main frame where the legs will pivot.
- Attach the corresponding hinge plates to the tops of your leg pieces.
- Ensure the legs swing freely and meet the ground at the correct angle when open.
Step 5: Creating the Folding Support System
- This is the most critical part for safety.
- You might have a secondary frame that folds out with the legs, providing cross-bracing.
- Alternatively, a simple brace that hinges to the main frame and then swings down to lock onto the leg can work.
- Example: Imagine a central “X” frame. Each arm of the “X” is hinged to the main saw platform. When the legs fold out, the “X” also opens, providing support.
Step 6: Building the Saw Platform
- Cut a piece of plywood to fit your saw.
- Securely attach this to the main frame.
Step 7: Implementing the Locking Mechanism
- This could involve drilling holes through overlapping pieces and inserting clevis pins.
- Another method is to use a small piece of wood that pivots and slots into a catch.
- Ensure the mechanism is robust and won’t accidentally release.
Step 8: Mount the Saw and Test
- Mount your chop saw.
- Carefully unfold the stand, lock the legs, and test its stability before making any cuts. Shake it to ensure there’s no wobble.
Building a Rolling Chop Saw Table
This is ideal for a versatile workshop where you need to move your saw between different work areas.
Key Features:
- Sturdy Base: Capable of supporting the saw and wood.
- Casters: Heavy-duty, lockable casters are essential.
- Potential Outfeed Support: Extendable arms or wings can be added.
Step 1: Design with Mobility in Mind
- Plan a robust base that can accommodate four casters.
- Consider the overall dimensions to ensure it can easily navigate your workshop.
- Decide if you want a fixed height or an adjustable height.
Step 2: Construct the Base Frame
- Build a strong base frame, likely using 2x4s or even 2x6s for maximum stability.
- Consider doubling up pieces for the main support beams where the casters will attach.
Step 3: Attach the Casters
- Position the casters at the corners of your base frame.
- Use strong bolts, washers, and nuts to attach them securely. Make sure the casters are rated for the weight of your saw and materials.
- Crucially, use locking casters. This prevents the table from rolling unexpectedly during use.
Step 4: Build the Saw Support Structure
- This can be similar to the simple chop saw base design: legs attached to a frame.
- The key difference is that this entire structure will sit on top of your wheeled base.
- Alternatively, you can build the legs directly into the wheeled base, making the casters the primary support.
Step 5: Add Plywood Top and Mounting
- Create the plywood mounting surface and attach it securely to your support structure.
- Mount your chop saw onto this platform.
Step 6: Consider Outfeed Support (Optional)
- Extendable Wings: Build simple flip-up or slide-out wings from plywood or MDF that can be locked in place.
- Adjustable Height Supports: You can incorporate simple roller stands or adjustable legs that can be positioned to support long pieces.
Step 7: Finishing
- Sand and finish the wood.
- Test the rolling and locking of the casters thoroughly.
Custom Chop Saw Jig and Accessories
Once your table is built, you can enhance its functionality with custom jigs.
Types of Jigs:
- Repeat Cut Stop:
- Purpose: To make identical cuts repeatedly without having to measure each time.
- How to Build: A simple bracket that mounts to your fence or table extension, with an adjustable stop block. You can use a sliding dovetail or a simple T-track system for adjustability.
- Materials: Plywood, 1x material, T-track hardware, clamp.
- Crosscut Sled:
- Purpose: To ensure perfectly square crosscuts on pieces that might be difficult to handle on the chop saw alone, or for cutting very small pieces safely.
- How to Build: A sled made from a flat piece of plywood with two runners that fit snugly in your saw’s miter slots. A fence is attached to the sled perpendicular to the runners.
- Materials: Melamine-coated plywood or MDF (for a smooth sliding surface), hardwood for runners, screws, glue.
- Miter Gauge Extension:
- Purpose: To provide more surface area and better control for angled cuts.
- How to Build: Attach a wider fence to your existing miter gauge or build a new one from thicker material.
- Materials: Plywood, hardwood, screws.
- Dust Collection Setup:
- Purpose: To manage sawdust and improve air quality.
- How to Build: Incorporate a mounting point for your shop vacuum hose or a dust collection port. You might build a small enclosure around the saw’s base.
- Materials: Plywood, MDF, PVC pipe fittings, hose clamps.
Building a Repeat Cut Stop:
- Design: A simple L-shaped bracket that attaches to the back of your saw’s base or an extension wing.
- Materials: A piece of 1×4 for the main stop and a piece of plywood or 2×4 for the mounting bracket.
- Construction:
- Cut a 1×4 to your desired length for the stop.
- Cut a piece of plywood or 2×4 for the mounting bracket. Drill holes in this bracket to attach it to your table.
- Drill a hole through the stop piece and the bracket.
- Use a carriage bolt and wing nut to allow the stop to be adjusted along the bracket.
- Attach the bracket to your table with screws.
- Usage: Place your material against the stop for repetitive cuts.
Chop Saw Outfeed Table Integration
An outfeed table is essential for supporting long boards during cuts.
Methods for Integration:
- Extendable Wings: Build fold-out or slide-out sections that extend the table surface to the sides.
- How: Use hinges for flip-up wings or drawer slides for pull-out sections. Support these with legs or bracing when extended.
- Rear Extension: Create a table that extends behind the saw.
- How: Build a separate low table or shelf that aligns with the saw’s cutting plane, providing continuous support.
- Roller Stands: Position adjustable roller stands next to the saw to support long material.
- How: While not built into the table, their placement is key to the overall setup. Ensure your table has space around it for these.
Building Simple Flip-Up Wings:
- Design: Cut two pieces of plywood or MDF slightly wider than your saw’s base.
- Hinges: Attach strong hinges to one long edge of each wing and the side of your saw table’s top.
- Support: When flipped up, the wings need support. You can add folding legs to the underside of the wings, or create a simple bracket that flips down from the main table frame to hold the wing.
- Locking: Consider a small latch or cleat to keep the wings securely in the horizontal position.
Troubleshooting Common Issues
Even the best DIY projects can have hiccups. Here are a few common problems and how to fix them.
Wobble and Instability:
- Cause: Uneven legs, loose joints, inadequate bracing.
- Fix:
- Ensure all legs are cut to the exact same length.
- Check all screws and bolts for tightness.
- Add diagonal bracing to the legs.
- If using casters, ensure they are properly secured and the locking mechanism works.
Inaccurate Cuts:
- Cause: The saw isn’t square to the fence, or the table itself is not level.
- Fix:
- Calibrate your chop saw according to the manufacturer’s instructions.
- Ensure the saw is mounted perfectly flat on the platform.
- Use a reliable carpenter’s square to check the 90-degree angle of the blade to the fence.
Material Sagging:
- Cause: Not enough support for long workpieces.
- Fix:
- Add an outfeed table or extendable wings.
- Utilize roller stands or outrigger supports.
Dust Everywhere:
- Cause: Poor dust collection.
- Fix:
- Ensure your dust collection hose is properly connected to the saw’s dust port.
- Consider building a small dust collection shroud or enclosure around the blade area.
- Seal any gaps in your table structure where dust can escape.
Frequently Asked Questions (FAQ)
Q: What is the best material for a chop saw table top?
A: A 3/4-inch thick piece of plywood or MDF is generally best. Plywood offers good stability and strength, while MDF provides a very flat and smooth surface. Some prefer melamine-coated particle board for its slick surface, making material sliding easier.
Q: How high should my chop saw table be?
A: The ideal height is typically around waist level, or slightly below your elbow. This allows for comfortable operation without excessive bending or reaching. Measure your own comfortable working height.
Q: Can I use a simple chop saw base without legs?
A: You could, but it’s not recommended for safety. Elevating the saw to a comfortable working height is crucial, and a stable base is paramount to prevent tipping. A simple base needs to be substantial enough on its own.
Q: Do I need locking casters for a rolling chop saw table?
A: Absolutely. Locking casters are a non-negotiable safety feature. They prevent the table from moving or rolling while you are making a cut, which could be extremely dangerous.
Q: How do I ensure my chop saw is mounted securely?
A: Use the mounting holes provided on your chop saw and secure it to the table platform with appropriate bolts, washers, and nuts. Ensure the hardware is long enough to pass through the platform and allow for a tight connection with the nuts.
Q: What are some beginner-friendly designs for a chop saw stand?
A: A simple chop saw base with four legs and a plywood top is very beginner-friendly. Folding designs can be more complex due to the hinge and locking mechanisms, but still achievable with careful planning.
Q: How can I improve the accuracy of my cuts with a chop saw?
A: Beyond a stable table, ensure your saw’s blade is sharp and that the saw itself is calibrated correctly. Using jigs like a repeat cut stop or a crosscut sled can also significantly improve accuracy for specific tasks.
Q: What’s the difference between a chop saw table and a miter saw workbench?
A: The terms are often used interchangeably. A “chop saw table” typically refers to a stand or platform specifically designed for a chop saw. A “miter saw workbench” might be a larger, more elaborate station that includes the miter saw, but also potentially other tools, storage, and a larger work surface.
Q: Can I build a chop saw cart with storage?
A: Yes, you can easily incorporate storage by building shelves or drawers into the base of your rolling chop saw table or a dedicated cart design. This is a great way to keep accessories organized.
By following these steps and tailoring the design to your needs, you can build a robust, safe, and highly functional chop saw table that will significantly improve your woodworking projects. Happy building!