
Can you drill a square hole in wood? Yes, you absolutely can! While standard drill bits create round holes, woodworking offers several methods to achieve perfectly square openings, essential for many traditional wood joinery techniques like the mortise and tenon joint. This guide will walk you through the most effective ways to drill a square hole in wood, from simple hand tools to more advanced machinery.
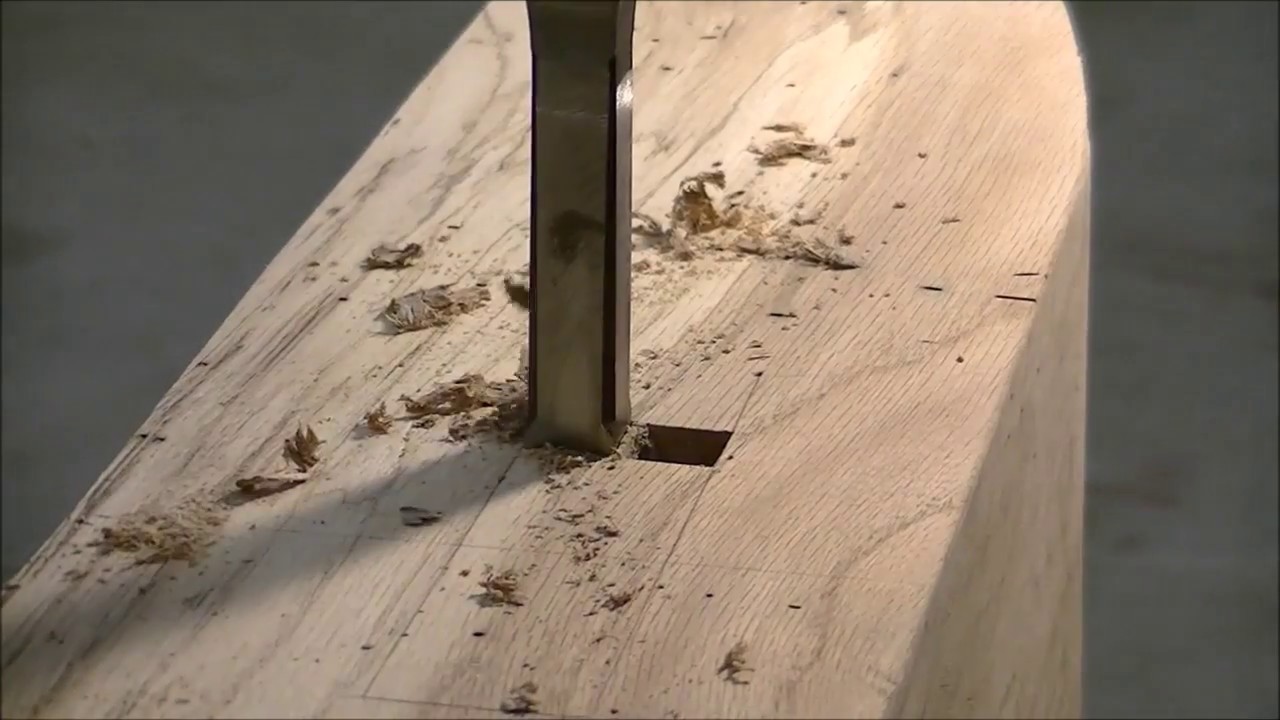
Image Source: i.ytimg.com
Why Drill a Square Hole?
Square holes are a cornerstone of many traditional wood joinery methods. The most common application is creating a mortise, which is the cavity that receives the tenon (the projecting part of another piece of wood) to form a strong, interlocking joint. These joints are celebrated for their strength and aesthetic appeal in furniture making, timber framing, and various other woodworking projects. A well-executed mortise and tenon joint offers superior durability compared to many other joining methods, especially under stress.
Common Uses for Square Holes:
- Mortise and Tenon Joints: The classic application, forming strong structural connections in furniture, doors, windows, and timber structures.
- Dovetail Joints: While not always a perfect square, the angled slots for dovetails often start with a square-cut mortise.
- Lock Mechanisms: Old-fashioned locks often featured square housings.
- Decorative Elements: Square cutouts can be used for inlay work or decorative features.
- Pegging and Doweling: While dowels are round, some methods of creating larger peg housings might benefit from a square start.
Tools for Creating Square Holes
The choice of tool depends on the size of the hole, the type of wood, your budget, and the precision required. We’ll explore several options:
1. The Mortising Chisel
A mortising chisel is a specialized tool designed specifically for creating square holes. It typically has a beveled edge on the inside and outside, allowing it to cut cleanly and efficiently.
How to Use a Mortising Chisel:
- Marking: Precisely mark the outline of your mortise on the wood. Use a sharp pencil or marking knife for accuracy.
- Rough Out: Start by chopping out the bulk of the waste wood within the marked area. Work in stages, removing small amounts of wood at a time.
- Chisel Placement: Hold the chisel perpendicular to the wood surface.
- Striking: Use a mallet or hammer to strike the end of the chisel. For larger mortises, a wooden mallet is preferred to avoid damaging the chisel handle.
- Cleaning Up: As you deepen the mortise, periodically clean out the chips. Continue chopping until you reach your desired depth.
- Squaring the Corners: Once the bulk of the waste is removed, use the sharp edge of the chisel to pare the sides and corners clean and square.
- Paring: For very fine paring, hold the chisel at a slight angle to shave off thin slivers of wood.
Advantages:
- Relatively inexpensive for a single chisel.
- Provides a good feel for the wood.
- Requires no power.
Disadvantages:
- Labor-intensive, especially for large or deep mortises.
- Requires practice to achieve consistently square sides.
- Can be challenging to maintain perfect perpendicularity.
2. The Hand Mortiser (Chisel and Mallet Method)
While a single mortising chisel is used for paring and cleaning, a more systematic approach involves a dedicated hand mortising setup. This often involves a specialized chisel with a hollow rectangular section, or a combination of chisels used in sequence. However, the most common and traditional method is using a sharp mortising chisel and a mallet as described above. For clarity, when we refer to a “hand mortiser” in this context, we mean the process of using a mortising chisel and mallet.
3. The Hollow Chisel Mortiser (Mortising Attachment for Drill Press)
This is one of the most popular and effective methods for creating square holes in a woodworking shop. A hollow chisel mortiser is essentially a chisel with a square, hollow cutting edge. It’s designed to work with a drill press.
How a Hollow Chisel Mortiser Works:
- Attachment: The hollow chisel attachment is mounted onto the quill of your drill press, surrounding the drill bit. The drill bit, often a standard twist bit or a specialized auger bit, is designed to drill out the majority of the waste wood within the mortise.
- Operation: As you lower the drill press, the spinning drill bit removes the bulk of the wood. Simultaneously, the sharp edges of the hollow chisel cut the sides of the mortise to a perfect square shape.
- Depth Control: The drill press’s depth stop is crucial for controlling the depth of the mortise accurately.
- Repeat: You typically move the workpiece or the mortiser side-to-side to create the full square opening.
Setup and Usage:
- Secure the Workpiece: Always clamp your workpiece firmly to the drill press table.
- Center the Chisel: Align the center of the hollow chisel with your marked mortise lines.
- Drill Bit Selection: Use a drill bit that is slightly smaller than the internal dimensions of the hollow chisel. This allows the chisel to cut cleanly without binding.
- Cutting Depth: Set your depth stop to the desired mortise depth.
- Mortising Process: Lower the quill to drill out the waste wood and cut the mortise. Lift the quill, reposition the workpiece, and repeat for the length of the mortise.
- Cleaning: Periodically clear out wood chips from the chisel to prevent clogging and ensure clean cuts.
Advantages:
- Produces very clean and accurate square holes.
- Much faster and less labor-intensive than hand chiseling.
- Consistent depth and squareness.
- Widely available as an attachment for most drill presses.
Disadvantages:
- Requires a drill press.
- The mortising attachment can be an additional cost.
- Can be bulky and take up space.
4. The Drill Press Mortiser (Standalone Unit)
Similar to the hollow chisel attachment, a standalone drill press mortiser is a dedicated machine that incorporates the principles of a hollow chisel mortiser. These machines are often more robust and designed for heavier use than simple attachments. They consist of a powerful motor, a quill, and a built-in hollow chisel system. The operation is essentially the same as using an attachment.
5. The Router Mortiser
A router can also be used to create square holes, though it’s a slightly different approach. Instead of a direct chisel action, a router uses a spinning bit to excavate wood.
How to Use a Router for Mortising:
- Jig Required: You will almost always need a jig to guide the router and ensure accurate, square cuts. Common jigs include:
- Mortising Jig: These are often commercially available or can be built from scratch. They typically consist of a base that registers against the workpiece and a fence system to guide the router in a straight line. Some jigs incorporate a mechanism to pivot the router for cutting the corners.
- Template Routing: You can create a template with a square opening and use a template guide bushing on your router to follow the template.
- Bit Selection: Use a straight-cutting bit, preferably one with a square shank drill bit appearance for the initial plunge, or a standard straight bit. For cleaner edges, a bit with a bearing guide can be helpful if your jig design allows.
- Depth Control: Set the router’s plunge depth accurately.
- Cutting:
- Plunge: Carefully plunge the router bit into the wood at one corner of your mortise.
- Cut Sides: Move the router along the marked lines, cutting the sides of the mortise.
- Repeat: Work in shallow passes, removing material gradually.
- Corners: For true square corners, you may need to make a separate plunge cut at each corner, or use a specialized jig that allows for corner cuts. Some woodworkers use a mortising chisel to square up the corners after routing.
Advantages:
- Versatile; a router is a common woodworking tool.
- Can create large square holes efficiently with the right jig.
- Can be very precise with a well-made jig.
Disadvantages:
- Requires a router and a specialized jig, which can be expensive or require significant DIY effort.
- Can be dusty.
- Achieving perfectly clean corners without a chisel can be challenging.
- The noise and dust generation are significant.
6. The Square Shank Drill Bit (Specialized Tool)
There are specialized drill bits designed to cut square holes directly. These are less common and often more expensive than other methods. They typically have four cutting edges that operate in a manner similar to a mortising chisel, removing wood in a square pattern.
How They Work:
These bits are often used in conjunction with a drill press or a hand drill. The bit itself has a square cutting profile. As it rotates, it plunges into the wood, excavating a square cavity. Some designs might require a slight oscillating motion or a specialized jig to create the full square.
Advantages:
- Can be a one-step process for creating square holes.
- Potentially faster than hand chiseling.
Disadvantages:
- Specialized and can be costly.
- Not as commonly available as other woodworking tools.
- May require significant downward pressure, making them less suitable for hand drills.
- May still require some paring for perfectly crisp corners, depending on the bit design.
Planning Your Mortise: Precision is Key
Regardless of the method you choose, proper planning and marking are critical for successful mortise creation.
Steps for Planning and Marking:
- Determine Dimensions: Decide on the exact length, width, and depth of your mortise. Consider the size of the tenon it needs to accommodate, allowing for a snug fit.
- Marking Out:
- Layout Lines: Use a sharp pencil and a ruler or combination square to draw precise layout lines for the mortise on the wood surface.
- Depth Line: Mark the desired depth on the side of the wood.
- Waste Area: For larger mortises, you might want to lightly score the inside of the mortise area with a marking knife. This helps prevent tear-out and guides your chisel or router bit.
- Consider Grain Direction: For hand chiseling, working with the grain whenever possible will make the process easier. However, mortises often require cutting across the grain, so sharp tools and careful technique are essential.
Choosing the Right Method for Your Project
Here’s a table to help you decide which method is best suited for your needs:
| Method | Best For | Ease of Use | Cost | Speed | Precision |
|---|---|---|---|---|---|
| Mortising Chisel | Small, occasional mortises; fine furniture | Moderate | Low (single tool) | Slow | High (with skill) |
| Hollow Chisel Mortiser | Frequent mortising; medium to large projects | High | Moderate (attachment) | Fast | Very High |
| Router Mortiser | Large mortises; when a drill press isn’t available | Moderate (with jig) | Moderate to High (router + jig) | Fast | High (with jig) |
| Square Shank Drill Bit | Specific applications; DIY projects | Moderate | High (specialty tool) | Moderate | Moderate |
Considerations for Different Wood Types:
- Softwoods (Pine, Fir): Easier to chisel and rout. Be mindful of tear-out.
- Hardwoods (Oak, Maple): Require sharper tools and more effort. Hollow chisel mortisers excel here.
- Exotic Woods: Can be unpredictable. Test your method on a scrap piece first.
Maintaining Your Woodworking Tools
Sharp tools are paramount for efficient and clean mortising.
- Chisels: Keep your mortising chisel and paring chisels honed to a razor-sharp edge using sharpening stones or diamond hones.
- Router Bits: Ensure your router bits are sharp and free of damage.
- Hollow Chisels: These also need to be kept sharp. They can often be sharpened with a honing guide and stones.
Safety First!
Always prioritize safety in the workshop.
- Eye Protection: Wear safety glasses or a face shield at all times.
- Hearing Protection: Use earplugs or earmuffs when operating power tools.
- Dust Mask/Respirator: Wear appropriate respiratory protection, especially when routing or sanding.
- Secure Workpiece: Ensure your workpiece is always firmly clamped.
- Read Manuals: Familiarize yourself with the operation of your woodworking tools, especially power tools like drill presses and routers.
- Clear Workspace: Keep your work area clean and free of obstructions.
FAQ Section
Q1: What is the easiest way to drill a square hole in wood?
The easiest way for most woodworkers with access to a drill press is using a hollow chisel mortiser attachment. It’s efficient, accurate, and requires less physical effort than hand chiseling.
Q2: Can I use a regular drill bit to make a square hole?
No, a regular round drill bit cannot create a square hole on its own. You would need to use it in conjunction with other tools or techniques to square up the corners after drilling.
Q3: How deep can I drill a square hole?
The depth of a square hole is limited by the length of your mortising chisel, the reach of your drill press quill (for hollow chisel mortisers), or the depth setting of your router. For very deep mortises, you might need to use a mortising chisel and make multiple passes.
Q4: What is the difference between a mortise and a dado?
A dado is a channel cut across the grain of the wood, while a mortise is a cavity cut into the wood, usually perpendicular to the surface, to accept a tenon.
Q5: Is a mortise and tenon joint strong?
Yes, a properly executed mortise and tenon joint is one of the strongest and most traditional wood joinery methods. It provides excellent resistance to racking and shear forces.
By mastering these techniques, you’ll be well-equipped to create strong, beautiful, and traditional joints in all your woodworking projects, from intricate furniture to robust timber framing. Happy woodworking!