
Can you drill out a barrel lock? Yes, you can drill out a barrel lock, but it requires specific tools and a careful approach to avoid damage to the surrounding materials and to ensure your safety.
Barrel locks, often found on cabinets, drawers, mailboxes, and some types of furniture, are a common form of security hardware. When a key is lost, broken, or the lock itself malfunctions, drilling becomes a necessary last resort for cylinder lock removal. While the process might seem daunting, with the right knowledge and equipment, it can be done safely and effectively. This guide will walk you through the steps involved in drilling out a barrel lock, covering everything from the necessary tools to safety precautions.
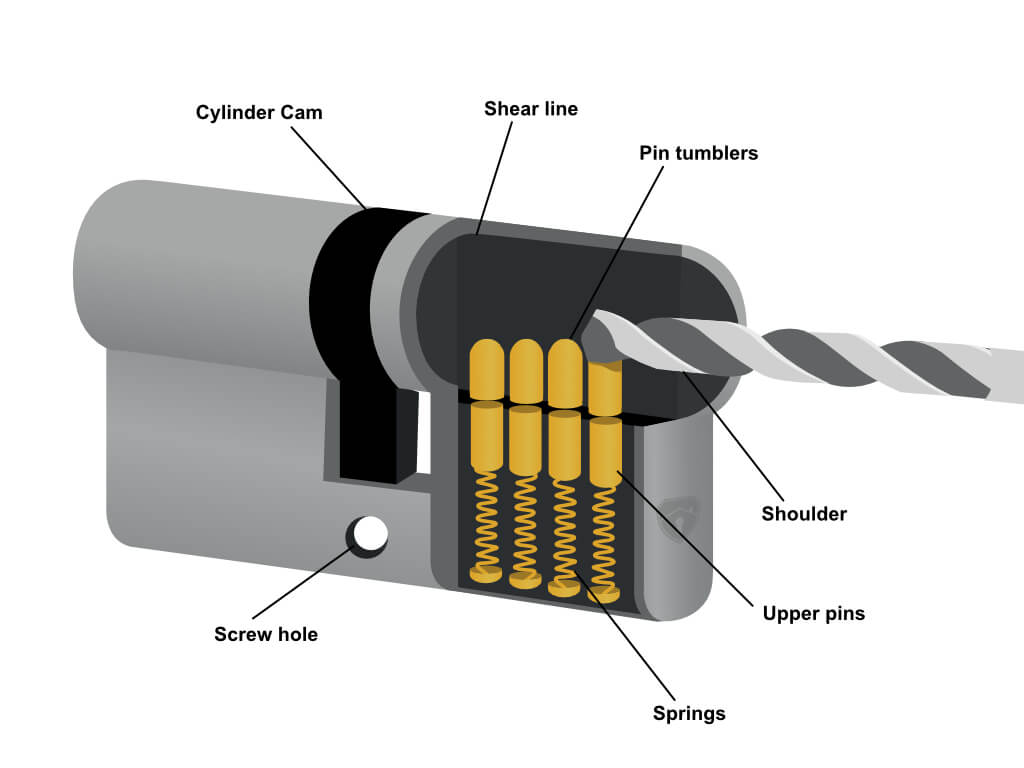
Image Source: www.lathamshardware.co.uk
Why Drill Out A Barrel Lock?
There are several reasons why you might need to drill out a barrel lock:
- Lost Key: This is the most common reason. If you can’t find your key and there’s no other way to access the locked item, drilling is often the only solution.
- Broken Key: Sometimes a key can break off inside the keyway, making it impossible to operate the lock. While broken key removal is possible in some cases, drilling is often necessary if a significant portion of the key remains lodged.
- Malfunctioning Lock: If the lock cylinder is damaged or seized, it might not open even with the correct key.
- Security Upgrade: In some instances, people might drill out an old or low-security barrel lock to replace it with a more robust security hardware option.
- Emergency Access: In urgent situations where immediate access is required and other methods fail.
Tools You’ll Need
Gathering the right tools is crucial for a successful and safe drilling operation. Here’s a list of essentials:
- Drill: A variable-speed, reversible power drill is ideal.
- Drill Bits:
- Small Titanium-Coated Drill Bits: Start with very small bits (around 1/16 inch or 1.5mm). Titanium coating helps bits last longer and cut through metal more easily.
- Larger Drill Bits: You’ll gradually move up in size, often ending with a bit slightly larger than the diameter of the pin tumblers or the shear line. A common size might be around 1/4 inch (6mm) to 5/16 inch (8mm), depending on the lock size.
- Center Punch: To create a small indentation for the drill bit to start accurately.
- Hammer: To use with the center punch.
- Safety Glasses: Absolutely essential to protect your eyes from flying metal shavings.
- Gloves: To protect your hands and provide a better grip.
- Lubricant/Cutting Fluid: To keep the drill bits cool and reduce friction, preventing them from overheating and dulling.
- Pliers or Vice Grips: To grip and turn the lock cylinder after drilling.
- Screwdriver: To help remove any surrounding components or the lock itself if needed.
- Rag or Shop Towels: For cleaning up metal shavings.
- Work Light: To ensure good visibility of the lock.
Before You Begin: Assessing the Lock and Your Goal
Before picking up a drill, take a moment to assess the situation.
- Type of Barrel Lock: Most barrel locks are pin tumbler locks. These have a series of pins that must be lifted to the correct height (the shear line) for the cylinder to turn. Knowing this helps you understand what you’re trying to disable.
- Lock Diameter: Note the diameter of the lock cylinder. This will give you an idea of the size of drill bits you might need.
- Surrounding Materials: What is the lock attached to? A wooden cabinet, a metal drawer, or something else? This will influence how you approach the drilling and clean-up.
- Your Objective: Are you trying to simply open the cabinet/drawer, or do you need to preserve the lock cylinder for later replacement? If you need to preserve it, drilling might not be the best option.
It’s important to remember that drilling is a destructive method. If you want to keep the lock, consider professional locksmith services for options like lock picking or bumping a lock, which are non-destructive. A professional locksmith is also adept at broken key removal.
Step-by-Step Guide to Drilling Out A Barrel Lock
The general principle behind drilling a barrel lock is to destroy the internal mechanism, specifically the pins and the shear line, so that the cylinder can be turned or removed.
Step 1: Preparation and Safety First
- Wear Safety Glasses: This is non-negotiable. Metal shavings can fly at high speeds.
- Wear Gloves: Protect your hands from sharp edges and heat.
- Clear the Area: Remove any flammable materials from around the lock.
- Secure the Workpiece: If possible, clamp the item with the lock so it doesn’t move while you’re drilling.
Step 2: Locating the Shear Line
The shear line is the critical point where the plug (the part that rotates with the key) meets the housing of the lock cylinder. It’s located where the pins are divided into two parts. Drilling into this area is key to disabling the lock.
- Visual Inspection: Look at the keyway. The shear line is typically around the middle of the lock cylinder, where the key would normally be inserted to its fullest extent.
- Center Punch: Using the center punch and hammer, make a small indentation directly above the keyway, at the estimated shear line. This will prevent the drill bit from wandering. Aim for the center of the cylinder’s diameter at this point.
Step 3: Drilling – The Gradual Approach
This is the core of the process. You’ll start with small drill bits and gradually increase the size.
- Start Small: Insert a small titanium-coated drill bit (e.g., 1/16 inch or 1.5mm) into your drill. Apply a small amount of cutting fluid to the tip of the drill bit.
- Drill Slowly and Steadily: Align the drill bit with the indentation you made. Apply firm but not excessive pressure. Let the drill bit do the work.
- Target the Pins: Your goal is to drill through the housing and into the pins and plug at the shear line. As you drill, you’ll likely encounter resistance as you hit the pins.
- Clear Shavings: Periodically withdraw the drill bit to clear out metal shavings. This also helps prevent overheating.
- Increase Drill Bit Size Gradually: Once you’ve drilled a small hole, switch to a slightly larger drill bit (e.g., 3/32 inch or 2.5mm). Continue drilling, again at the shear line. The purpose of this incremental approach is to weaken the cylinder and break the pins without damaging the surrounding material excessively.
- Continue Increasing Size: Keep moving up in drill bit sizes. Each time, you’re effectively destroying more of the internal pin and plug mechanism.
- Listen and Feel: Pay attention to the sound and feel of the drill. A change in resistance can indicate you’re hitting different components within the lock.
Table: Typical Drill Bit Progression for Barrel Locks
| Step | Drill Bit Size (Approximate) | Purpose |
|---|---|---|
| 1 | 1/16 inch (1.5mm) | Initial pilot hole, breaking into the housing |
| 2 | 3/32 inch (2.5mm) | Reaching and breaking individual pins |
| 3 | 1/8 inch (3mm) | Further destruction of pins and plug |
| 4 | 5/32 inch (4mm) | Significant pin and plug destruction |
| 5 | 3/16 inch (5mm) | Preparing for larger bits or final removal |
| 6 | 1/4 inch (6mm) – 5/16 inch (8mm) | Destroys the pin mechanism, allows cylinder turn |
Note: The exact sizes and progression will vary depending on the specific lock’s construction and material. Some locks might require a larger final drill bit to completely disable all pins.
Step 4: Removing the Cylinder
Once you’ve drilled to a sufficient size (typically large enough to destroy the internal pin system), the lock cylinder should be compromised.
- Attempt to Turn: With a screwdriver, pliers, or vice grips inserted into the keyway or the drilled hole, try to turn the cylinder. If it was successfully drilled, it should now rotate freely.
- Gentle Force: If it doesn’t turn immediately, you might need to apply slightly more force. Sometimes, you may need to drill a bit more or try to “wiggle” the internal components free.
- If Still Stuck: If the cylinder remains stubbornly in place, it’s possible that not all the pins were reached or destroyed. You may need to drill at a slightly different angle or use a larger drill bit. Another possibility is that you’ve drilled past the shear line and are now in the solid plug, which is less effective. Re-assess the shear line and try again.
Step 5: Final Removal and Clean-up
- Remove the Cylinder: Once the cylinder turns, you can usually pull it out or push it out from the back. You might need to remove any retaining clips or screws that hold the lock in place before the cylinder can be fully removed.
- Clean Up: Carefully sweep or vacuum away all metal shavings. Use a rag to wipe down the area.
Alternative Drilling Approaches
While the above method focuses on drilling at the shear line to destroy the pins, other techniques exist, though they might be less common or more destructive to the surrounding material:
- Drilling the Cam/Actuator: Some barrel locks have a cam or actuator at the back that turns when the cylinder rotates. Drilling directly into this cam can also disable the lock, but it requires precise placement and might be harder to access.
- Drilling the Entire Cylinder: In some cases, especially with very small or cheap locks, drilling straight through the entire cylinder diameter might work, essentially destroying it completely. This is often more damaging to the surrounding material.
When to Call a Professional Locksmith
While this guide provides detailed instructions, there are situations where calling a professional locksmith is the wisest choice:
- Valuable Items: If the lock protects valuable items or sensitive documents, you don’t want to risk damaging them.
- Complex or High-Security Locks: This guide is best suited for common, low-security barrel locks. High-security hardware might have anti-drilling features that make this method ineffective or even dangerous.
- Lack of Tools or Confidence: If you don’t have the right tools or feel uncomfortable with the process, a locksmith can quickly and efficiently resolve the issue. They are skilled in various non-destructive methods like picking a lock and destructive methods like drilling.
- Broken Key Removal: If you’re dealing with a broken key removal situation, a locksmith has specialized tools for this.
- After Drilling Attempts: If you’ve tried drilling and failed, or made the situation worse, a locksmith can often still help. They can also advise on appropriate replacement security hardware.
A professional locksmith can also offer alternatives like bumping a lock, which is a quick way to open many pin tumbler locks without causing damage if you have a bump key that matches the lock’s pin configuration.
Troubleshooting Common Issues
- Drill Bit Breaking: This can happen if you’re drilling too fast, applying too much pressure, or using dull bits. Always use cutting fluid and start with small bits.
- Drill Wandering: Not using a center punch or not creating a deep enough indentation can cause the drill bit to move.
- Lock Still Won’t Turn: You might not have drilled through all the pins, or you might have drilled past the shear line. Re-evaluate your drilling position and consider slightly larger bits.
- Damaging Surrounding Material: This is a risk with any drilling. Go slowly, use the right size bits, and be mindful of the materials you’re working with.
Conclusion
Drilling out a barrel lock is a definitive way to gain access when other methods fail. By carefully following these steps, using the correct tools, and prioritizing safety, you can successfully remove a stubborn barrel lock. However, always consider the value of the item secured and your own comfort level before undertaking this task. For complex situations or when in doubt, a qualified locksmith is your best resource for efficient and safe lock resolution. Remember that knowing how to pick a lock or how to handle broken key removal can often be less destructive alternatives.
Frequently Asked Questions (FAQ)
Q1: Will drilling damage the item the lock is attached to?
A1: It’s possible, especially if you are not careful. The drilling process can create metal shavings and potentially scratch or damage the surface around the lock. Using a center punch accurately and drilling slowly with the correct drill bits helps minimize damage.
Q2: What is the easiest way to get a barrel lock open without a key?
A2: The easiest way depends on the lock’s quality and your skills. For simple locks, picking a lock or bumping a lock (if you have a bump key) are non-destructive methods. If those aren’t options, drilling is often the most direct, albeit destructive, solution.
Q3: Can I use a regular drill bit instead of titanium-coated ones?
A3: You can, but titanium-coated drill bits are harder and more heat-resistant, making them better suited for drilling through metal like lock cylinders. They will dull faster and make the process more difficult if you use standard bits.
Q4: What happens if I drill in the wrong place?
A4: If you drill in the wrong place, you might not disable the lock mechanism. You could also damage the lock cylinder or the surrounding material unnecessarily. It’s crucial to aim for the shear line.
Q5: How do I know when I’ve drilled enough?
A5: You’ve drilled enough when the internal pins and plug are sufficiently destroyed to allow the cylinder to turn freely with a screwdriver or pliers. You’ll often feel a significant change in resistance, and the cylinder will rotate when you apply turning force.
Q6: Is it illegal to drill out a lock?
A6: It is not illegal to drill out a lock that you own or have legal permission to access. However, attempting to drill out a lock on property you do not own or have authorization for is illegal.
Q7: What if the key is broken inside the lock?
A7: Dealing with a broken key removal requires different techniques. A locksmith can often extract the broken piece. If you attempt to drill, you’ll need to be very careful not to push the broken piece further in or damage the lock to the point where even a locksmith can’t help. Sometimes, drilling might be the only way if extraction fails.