
Can I drill a hole in sea glass? Yes, you absolutely can drill a hole in sea glass. This opens up a world of creative possibilities for making your own unique jewelry. Turning weathered, tumbled sea glass into beautiful pendants, earrings, or charms is a rewarding craft. While it might seem daunting, with the right tools and techniques, drilling sea glass becomes an accessible and enjoyable process. This guide will walk you through everything you need to know to successfully make holes in glass, specifically for your sea glass jewelry making projects.
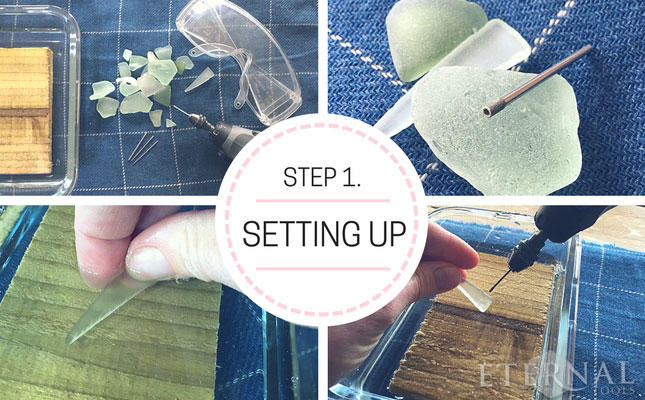
Image Source: cdn.ecommercedns.uk
What You Need to Get Started
Before you begin drilling sea glass, it’s essential to gather the right equipment. Having the proper tools will not only make the process easier but also safer.
Essential Tools and Materials
- Sea Glass: Of course, you’ll need your beautiful sea glass pieces! Select pieces that are relatively flat and have enough thickness to accommodate a drill bit without becoming too fragile.
- Drill: You have a few options here, depending on your preference and the size of your glass.
- Rotary Tool (Dremel): A rotary tool for sea glass, often referred to as a Dremel for sea glass, is a popular choice. It offers versatility and control, especially for smaller pieces.
- Electric Drill: For larger pieces or if you prefer a more traditional drilling experience, a standard electric drill can also work.
- Hand Drill for Sea Glass: A hand drill for sea glass is an option for those who prefer a more manual approach or are working with very delicate pieces. However, it requires more patience and practice to achieve clean holes.
- Drill Bits for Glass: This is perhaps the most crucial element. You need specialized drill bits for glass.
- Diamond Drill Bits: These are the best drill bits for glass jewelry. They are coated with diamond particles, which are extremely hard and efficient at cutting through glass without excessive heat or chipping. They come in various sizes, allowing you to choose the perfect diameter for your desired hole. Look for specific diamond drill bits designed for glass or tile.
- Carbide Drill Bits: While not as effective as diamond bits for glass, some carbide bits can be used, especially for softer glass. However, they tend to wear out faster and may not produce as clean a finish.
- Water Container: A small dish or bowl filled with water is essential for lubrication and cooling.
- Safety Gear: This is non-negotiable.
- Safety Glasses: Always wear safety glasses to protect your eyes from glass dust and potential shards.
- Gloves: Wearing sturdy gloves can help with grip and protect your hands.
- Dust Mask: A dust mask is recommended to avoid inhaling fine glass particles.
- Work Surface: A stable, flat surface is needed. You might want to place a towel or non-slip mat underneath to prevent the glass from moving.
- Masking Tape (Optional): For very small or smooth pieces, a small piece of masking tape can help prevent the drill bit from “walking” or slipping when you start drilling.
- Tweezers or Pliers: Useful for holding small pieces of sea glass.
Choosing the Right Drill Bit Size
The size of your drill bit for glass depends on the type of jewelry you’re creating.
| Jewelry Type | Suggested Hole Diameter | Corresponding Drill Bit Size |
|---|---|---|
| Pendant | 1/16″ – 1/8″ | Small (1-3 mm) |
| Earring | 1/32″ – 1/16″ | Very Small (0.5-1.5 mm) |
| Charm/Beading | 1/32″ – 1/8″ | Small to Medium (0.5-3 mm) |
It’s always a good idea to have a set of diamond drill bits in various small sizes to accommodate different projects.
Preparing Your Sea Glass for Drilling
Proper preparation is key to a successful drilling experience.
Cleaning Your Sea Glass
Before you start drilling sea glass, ensure your pieces are thoroughly cleaned.
- Wash: Gently wash your sea glass in warm, soapy water. Use a soft brush to remove any stubborn sand or debris.
- Rinse: Rinse the glass thoroughly to remove all soap residue.
- Dry: Pat the sea glass dry with a clean cloth. Make sure there is no moisture left, as water can interfere with the drilling process.
Securing Your Sea Glass
A stable piece of sea glass is less likely to break or slip during drilling.
- Small Pieces: For tiny or very smooth pieces, you can try placing a small piece of masking tape on the spot where you plan to drill. This can give the drill bit a bit more traction to start.
- Larger Pieces: If you’re using a rotary tool for sea glass or a Dremel for sea glass, you might be able to hold it with one hand (wearing gloves) while operating the tool with the other. However, for greater stability, consider using a small vise or clamps designed for delicate work. Be careful not to over-tighten, as this can crack the glass.
The Drilling Process: Step-by-Step
Now that you have everything ready, let’s get to the actual drilling sea glass process. Remember, drilling safely is paramount.
Step 1: Set Up Your Workspace
Find a well-lit area. Lay down a towel or a non-slip mat to keep your sea glass from moving. Have your water container, safety gear, and drilling tools within easy reach.
Step 2: Lubricate and Cool
This is a critical step to prevent the glass from overheating, which can cause it to crack, and to reduce friction for a smoother drilling experience.
- Water Bath: You can place your sea glass directly into a shallow dish of water. This is ideal when using a rotary tool for sea glass or a Dremel for sea glass. Ensure the water level is high enough to keep the drilling area submerged or at least consistently wet.
- Dripping Water: Alternatively, you can have a slow drip of water directly onto the drilling spot. This is often easier when using a standard drill.
Step 3: Position the Drill Bit
- Start Slowly: Begin with a slow speed on your drill or rotary tool for sea glass.
- Angle: Hold the drill bit at a slight angle (around 45 degrees) to the surface of the sea glass when you first start. This helps the bit to bite into the glass without skipping.
- Gentle Pressure: Apply only light, steady pressure. Let the diamond drill bits do the work. Forcing the drill can cause the glass to shatter.
Step 4: Drilling the Hole
- Start the Hole: Once the drill bit has a slight indentation, gradually straighten the drill to a 90-degree angle to the glass.
- Maintain Lubrication: Keep the area wet at all times. If the water starts to evaporate or the glass feels warm, stop drilling and let it cool down, ensuring there’s enough water.
- Steady Motion: Move the drill in a slow, steady circular motion or a very slight back-and-forth wiggling motion. This helps to clear the glass dust and keep the bit from binding.
- Patience is Key: Drilling sea glass can take time, especially with smaller drill bits or thicker glass. Don’t rush the process. If you are using a hand drill for sea glass, this process will take considerably longer and require more consistent effort.
- Monitor Progress: You’ll see glass dust accumulating in the water. This is a good sign that the bit is cutting.
- Breaks: Take short breaks every minute or two to allow the glass and the drill bit to cool further.
Step 5: Finishing the Hole
- Clear Debris: Once you feel the drill bit has gone through the glass, continue drilling for a few more seconds to ensure the hole is clear of any debris.
- Smooth Edges: You can use a slightly larger diamond drill bit at a very low speed, or a small grinding bit on your rotary tool for sea glass, to gently smooth the edges of the hole from the inside. Be very careful not to enlarge the hole too much or crack the glass.
- Rinse and Inspect: Remove the sea glass from the water and rinse it thoroughly to remove all glass dust. Inspect the hole to ensure it’s clean and smooth.
Tips for Successful Sea Glass Jewelry Making
Beyond the drilling process itself, here are some extra tips to enhance your sea glass jewelry making experience.
Working with Different Types of Sea Glass
- Thickness: Thicker sea glass is generally easier to drill than very thin pieces. If you have thin glass, use the smallest drill bits and the lightest pressure.
- Shape: Flat pieces are ideal for drilling. If your sea glass has a curved surface, finding a stable drilling spot can be more challenging. Consider drilling on the flattest part.
- Edges: Be mindful of the original edges of the sea glass. They are often the most beautiful part and should be preserved. Drill from the smoothest side if possible.
Using a Rotary Tool for Sea Glass (Dremel)
A Dremel for sea glass offers excellent control and maneuverability.
- Flex Shaft: Consider using a flex shaft attachment for your rotary tool for sea glass. This allows for greater precision and comfort, especially when working on intricate pieces.
- Speed Control: Always start at the lowest speed setting and gradually increase it as needed, but never use the highest speed for drilling glass.
- Bit Selection: Use the appropriate diamond drill bits for glass. Many Dremel kits come with various bits, but ensure you have the glass-specific ones.
Alternative Drilling Methods (Hand Drill)
If you’re using a hand drill for sea glass:
- Patience: This method requires significant patience and a steady hand.
- Constant Lubrication: Keep the drilling area consistently wet.
- Slow, Steady Turns: Rotate the drill handle smoothly and consistently.
- Regular Breaks: Take frequent breaks to rest your hand and allow the glass to cool.
Common Problems and Solutions
Even with the best intentions, you might encounter a few hiccups.
Glass Cracking
- Cause: Applying too much pressure, drilling too fast, or the glass overheating.
- Solution: Use lighter pressure, slower speeds, and ensure constant lubrication. Take breaks to cool the glass. If you notice a crack forming, stop immediately.
Drill Bit Slipping
- Cause: The surface of the glass is too smooth, or you’re starting with too much speed.
- Solution: Use a small piece of masking tape to create traction. Start with the drill bit at an angle, and then straighten it once an indentation is made.
Hole Not Smooth
- Cause: Using a dull bit, insufficient lubrication, or too much pressure.
- Solution: Ensure you are using sharp, good-quality diamond drill bits. Increase lubrication and reduce pressure. You can also try a light touch-up with a very fine grit diamond polishing bit or a small grinding bit.
Creating Your Sea Glass Jewelry
Once you’ve successfully drilled your sea glass, the real fun begins!
Jewelry Findings
- Bail: A jewelry bail is a small loop that attaches your sea glass to a chain or cord. You can find bails with adhesive backs, or you can use a small amount of strong jewelry glue.
- Jump Rings: These small metal rings are used to connect various jewelry components.
- Earring Hooks: For earrings.
- Cord/Chain: Choose a cord or chain that complements the beauty of your sea glass.
Assembly Ideas
- Pendants: Attach a bail to your drilled sea glass and hang it from a necklace chain.
- Earrings: Drill two matching pieces of sea glass and attach them to earring hooks.
- Bracelets: Incorporate drilled sea glass pieces into a beaded bracelet.
- Sun Catchers: Drill several pieces and string them together to create a beautiful sun catcher.
Frequently Asked Questions (FAQ)
Q: What is the best type of drill bit for drilling sea glass?
A: Diamond drill bits are the best drill bits for glass jewelry and sea glass because of their hardness and ability to cut through glass cleanly and efficiently.
Q: Can I use a regular drill bit on sea glass?
A: It is not recommended. Regular drill bits, like those made of high-speed steel (HSS), are not hard enough to effectively drill glass and will likely break or dull very quickly, and they can cause the glass to shatter.
Q: How do I prevent my sea glass from cracking while drilling?
A: The key is to use gentle pressure, keep the drilling area constantly lubricated and cool with water, and avoid rushing the process. Using a rotary tool for sea glass like a Dremel for sea glass with slow speeds can also help.
Q: What if I don’t have a rotary tool? Can I still drill sea glass?
A: Yes, you can use a standard electric drill or even a hand drill for sea glass. However, the process might be more challenging, requiring more patience and care. Ensure you use appropriate drill bits for glass with any drilling tool.
Q: How deep do I need to drill?
A: You only need to drill deep enough to create a hole that goes all the way through the glass, allowing a jump ring or cord to pass through. Typically, a few millimeters is sufficient for most jewelry findings.
Q: Is drilling sea glass dangerous?
A: While not inherently dangerous if proper precautions are taken, there are risks involved. Always wear safety glasses to protect your eyes from glass dust or chips, and consider wearing gloves and a dust mask. Drilling safely is crucial for a positive experience.
By following these guidelines, you can confidently transform your cherished sea glass finds into beautiful, wearable art. Happy sea glass jewelry making!