
What is drilling and tapping a hole? Drilling and tapping a hole is a fundamental metalworking process that creates a threaded cavity in a workpiece, allowing a bolt or screw to be fastened securely. Can I do it at home? Yes, with the right tools and a bit of practice, you can absolutely drill and tap a hole at home. Who is this guide for? This guide is designed for beginners, hobbyists, and anyone looking to learn the basics of creating threaded holes.
Creating a threaded hole in metal is a skill that opens up a world of possibilities for makers, mechanics, and DIY enthusiasts. Whether you’re building a custom part, repairing equipment, or simply need to attach something securely, knowing how to drill and tap a hole is invaluable. This comprehensive drilling and tapping guide will walk you through each step, from selecting the right tools to achieving a perfect thread.
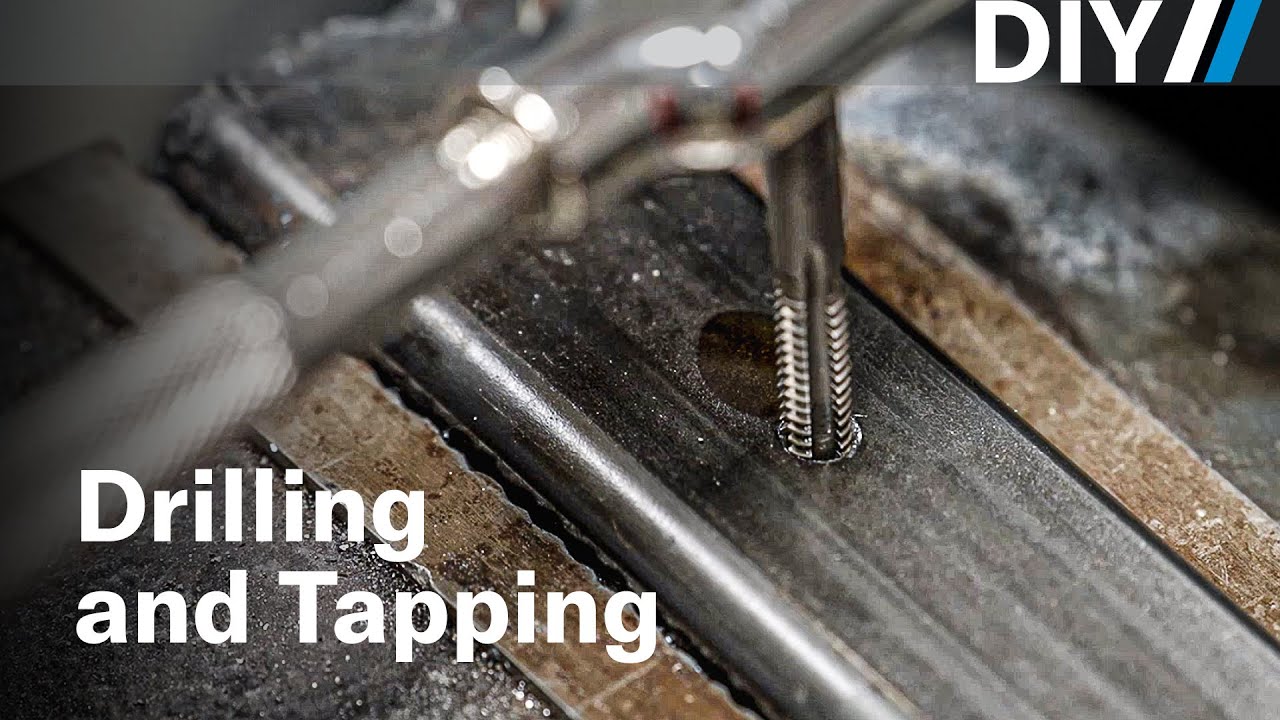
Image Source: i.ytimg.com
Essential Tools for Drilling and Tapping
Before you start, gathering the right equipment is crucial for success and safety. Having the proper tools will make the process smoother and result in a cleaner, more functional threaded hole.
The Core Components:
- Drill: This can be a hand drill, a cordless drill, or a drill press. A drill press offers more stability and accuracy, which is highly beneficial for precise hole drilling.
- Drill Bits: You’ll need a sharp drill bit that is the correct size for the tap you intend to use. This is where the tap drill size becomes critical.
- Taps: These are hardened steel cutting tools with helical grooves that create the internal threads. They come in various types for different applications.
- Tap Wrench: This tool is used to hold and turn the tap, providing the leverage needed for thread cutting.
- Cutting Fluid or Lubricant: This is essential for reducing friction, cooling the tap and workpiece, and helping to clear away metal shavings, which aids in smooth cutting threads.
- Safety Glasses: Always protect your eyes from flying metal chips.
- Gloves (Optional but Recommended): To protect your hands from sharp edges and heat.
- Vise or Clamps: To securely hold the workpiece while drilling and tapping.
Understanding Your Tap Set:
A die and tap set is a common purchase for beginners. These sets usually include a variety of taps and dies, along with a tap wrench and sometimes a die wrench.
- Taps: Typically, taps come in sets of three for each thread size:
- Taper Tap: The first tap in a set. It has a long, gradual taper at the tip, making it easy to start the threading process.
- Plug Tap: This tap has a shorter taper than the taper tap, with about 3-5 threads chamfered. It’s used after the taper tap to continue threading deeper.
- Bottoming Tap (or Plug Tap/Finishing Tap): This tap has a very short taper, with only 1-1.5 threads chamfered. It’s used to thread all the way to the bottom of a blind hole.
- Dies: Dies are used for cutting external threads on rods or bolts. While not used for drilling and tapping a hole, they are often included in sets and are useful for similar projects.
Step-by-Step: Drilling the Hole
The first major phase is creating the pilot hole. The accuracy of this step directly impacts the quality of your threads.
Choosing the Right Drill Bit: The Importance of Tap Drill Size
This is arguably the most critical step in preparation. Using the incorrect tap drill size will result in threads that are too shallow, too deep, or completely stripped.
How to Determine Tap Drill Size:
- Refer to a Tap Drill Chart: The most reliable method is to consult a tap drill chart. These charts list standard tap sizes (e.g., 1/4-20 UNC, M6x1.0) and the corresponding recommended drill bit diameter. You can find these charts online, in hardware stores, or in metalworking reference books.
-
Calculation (For Less Common Threads): For less common or custom threads, you can calculate the required tap drill size. The formula is:
- Drill Diameter = Major Diameter – (Pitch × 0.866)
- Major Diameter: The largest diameter of the thread.
- Pitch: The distance between the crests of adjacent threads (for UNC/UNF, it’s the inverse of TPI – Threads Per Inch; for Metric, it’s the distance between threads).
Example: For a 1/4-20 UNC thread:
* Major Diameter = 0.250 inches
* Pitch (distance between threads) = 1 / 20 = 0.050 inches
* Drill Diameter = 0.250 – (0.050 × 0.866) = 0.250 – 0.0433 = 0.2067 inches.
* A common drill bit size close to this is a #7 drill bit (0.201 inches) or a 13/64 inch drill bit (0.2031 inches). Your tap drill chart will confirm the best choice.
Preparing the Workpiece:
- Mark the Center: Use a center punch to create a small indentation at the exact spot where you want to drill the hole. This prevents the drill bit from wandering.
- Secure the Workpiece: Use a vise or clamps to hold the workpiece firmly. This ensures stability and prevents the material from moving during drilling.
The Drilling Process:
- Start Slowly: Begin drilling at a slow speed. For larger drill bits or harder materials, a pilot hole drilled with a smaller bit first can make the process easier and more accurate.
- Apply Lubricant: Periodically apply cutting fluid or lubricant to the drill bit and the workpiece. This reduces heat and friction, prolonging the life of your drill bit and ensuring a cleaner hole.
- Pecking Action: For deeper holes, use a “pecking” motion. Drill in for a few seconds, then retract the drill bit to clear out metal chips. This prevents the chips from clogging the flutes of the drill bit and overheating the material.
- Straightness is Key: Ensure the drill bit remains perpendicular to the surface. A slight angle can make threading a hole very difficult or impossible. If using a hand drill, a drill guide can be helpful.
Optional Step: Reaming a Hole
For extremely precise applications where the hole’s diameter is critical for the threaded fastener’s fit, you might consider reaming a hole after drilling. Reaming removes a very small amount of material to achieve a highly accurate and smooth internal diameter. However, for most general tapping purposes, a clean drilled hole is sufficient. If you do ream, ensure you use a reamer that is the correct size for the final desired hole diameter before tapping.
Step-by-Step: Tapping the Hole (Thread Cutting)
Now that you have a clean, accurately sized hole, it’s time for thread cutting. This is where the tap enters the picture.
Starting the Tap:
- Insert the Taper Tap: Place the taper tap into the tap wrench. Ensure it is centered and perpendicular to the hole.
- Initial Engagement: Gently turn the tap wrench clockwise. Apply slight downward pressure to engage the tap with the workpiece. The taper on the tap will help it start straight.
- First Turn: Turn the tap about one full turn to start the cutting threads.
The Tapping Motion:
This is where patience and a good feel for the process are important.
- The 1/4 to 1/2 Turn Rule: For every quarter to half turn you rotate the tap clockwise, you need to turn it back a quarter turn counter-clockwise. This is crucial for thread cutting. The counter-clockwise turn breaks off the small chip of metal that the tap just created, preventing it from accumulating and potentially breaking the tap or damaging the threads.
- Lubricate Regularly: Apply cutting fluid frequently, especially as you’re making progress. This keeps the tap cool and lubricated, making cutting threads easier and cleaner.
- Feel the Resistance: Pay attention to the feel of the tap. If you feel excessive resistance, stop. This usually indicates a clogged chip or a misaligned tap. Back the tap out completely, clean the tap flutes and the hole, reapply lubricant, and start again.
- Progress Through the Taps (if using a set): Once you’ve used the taper tap to establish the initial thread, you’ll typically move to the plug tap, and finally the bottoming tap if you need to thread to the very bottom of a blind hole. Each tap is used with the same careful 1/4 to 1/2 turn back motion.
Checking Your Progress:
- Visual Inspection: Periodically back the tap out of the hole and examine the threads you’ve cut. They should look clean and well-formed.
- Thread Gauge (Optional): For critical applications, a thread gauge can be used to check the pitch diameter of the threads.
Finishing the Tapping Process:
- Reaching the Desired Depth: Continue tapping until the tap is either flush with the workpiece surface (for through holes) or you’ve reached the desired depth in a blind hole.
- Final Back-Out: Once you’ve finished threading a hole, slowly back the tap out of the hole by turning the tap wrench counter-clockwise. Do this carefully to avoid damaging the freshly cut threads.
- Clean Up: Thoroughly clean the hole and the tap with a brush and solvent or compressed air to remove any remaining metal chips and lubricant.
Common Problems and Solutions
Even with careful preparation, things can sometimes go wrong. Here are a few common issues and how to address them.
Broken Tap
This is the most feared problem for beginners. A broken tap is extremely difficult to remove.
- Causes: Forcing the tap, not backing it out to clear chips, using the wrong tap drill size, dull drill bits, or drilling an off-center hole.
- Prevention: Follow the steps precisely, especially the back-out procedure. Use plenty of lubricant. Ensure your drill bit is sharp and the correct size.
- If it Happens: If a tap breaks, try to extract it using a tap extractor kit. If that fails, you may need to drill it out with a small, hard drill bit or use EDM (Electrical Discharge Machining) if available. This is a last resort and often requires professional help.
Poor Thread Quality
Threads might be rough, shallow, or have burrs.
- Causes: Dull tap, insufficient lubrication, not clearing chips properly, or using the wrong tap drill size.
- Solutions: Ensure your tap is sharp. Use plenty of cutting fluid. Follow the back-out procedure diligently. Double-check your tap drill chart for the correct size. If the threads are just slightly rough, you might be able to clean them up with a die (if it’s a through hole) or by carefully running the tap through again, ensuring good lubrication and chip clearance.
Hole is Off-Center
The drilled hole is not where you intended it to be.
- Causes: The center punch mark was inaccurate, or the drill bit wandered during the initial drilling.
- Solutions: For minor deviations, you might be able to slightly enlarge the hole using a larger drill bit or a die grinder, but this can compromise the thread integrity. For significant deviations, it’s best to scrap the part and start over. Using a drill press and a sharp drill bit with a good center punch mark are key to preventing this.
Advanced Techniques and Considerations
Once you’ve mastered the basics, you might explore some additional techniques.
Using a Drill Press
A drill press offers superior accuracy for hole drilling. It keeps the drill bit and tap perfectly perpendicular to the workpiece, which significantly reduces the risk of errors and makes the tapping process much easier.
Thread Milling
For very hard materials or when you need to create internal threads in awkward locations, thread milling using a specialized milling cutter can be an alternative to tapping. This process is more advanced and requires a milling machine or CNC.
Different Tap Materials
While HSS (High-Speed Steel) taps are common and effective for many metals, for extremely hard materials like stainless steel or titanium, you might need taps made from Cobalt or Carbide.
Through Holes vs. Blind Holes
- Through Holes: The tap will pass all the way through the material. You can use a taper tap until it exits the other side, and you don’t need a bottoming tap.
- Blind Holes: The hole stops at a certain depth. You will need to use the taper tap, then the plug tap, and finally the bottoming tap to ensure you can thread all the way to the bottom without the tap becoming wedged.
Frequently Asked Questions (FAQ)
Q1: How do I clean up damaged threads?
A1: For minor burrs or damage, you can sometimes clean up threads by running the correct size tap through the hole again, ensuring good lubrication and chip clearance. For external threads, a die of the correct size can be used.
Q2: What is the difference between UNC and UNF threads?
A2: UNC stands for Unified National Coarse thread, and UNF stands for Unified National Fine thread. Coarse threads have fewer threads per inch (TPI) and are generally stronger and easier to tap, while fine threads have more TPI, offer finer adjustments, and are often used in applications where vibration is a concern.
Q3: Can I use a regular drill bit for tapping?
A3: No, you must use a specific tap drill size recommended for the tap you are using. A standard drill bit might be too large or too small, leading to improper threads or a broken tap.
Q4: How much lubricant should I use?
A4: Use plenty of lubricant! It’s better to use too much than too little. It cools the cutting surfaces, lubricates the tap, and helps wash away metal chips, making the cutting threads process much smoother and safer.
Q5: My tap is stuck. What should I do?
A5: If your tap gets stuck, do not force it. Try to back it out gently by turning the tap wrench counter-clockwise. If it won’t budge, the likely cause is packed chips. Back it out slightly, clear the chips, re-lubricate, and proceed with caution. If it’s severely jammed, you risk breaking the tap.
Conclusion
Learning to drill and tap a hole is a rewarding skill that empowers you to create and repair with confidence. By gathering the right tools, selecting the correct tap drill size from a tap drill chart, and following a methodical approach with plenty of lubricant and patience, you can successfully create clean, strong threads in your projects. Remember to always prioritize safety, wear your safety glasses, and enjoy the process of making. With practice, threading a hole will become second nature, opening up a new level of capability in your workshop.