
Can you drill a hole in a very small or confined area? Yes, you absolutely can drill a hole in a tight space by using the right tools and techniques. This guide will show you how to tackle those challenging drilling jobs where standard drills just won’t fit. We’ll cover everything from specialized equipment to clever workarounds that make tight access drilling a breeze.
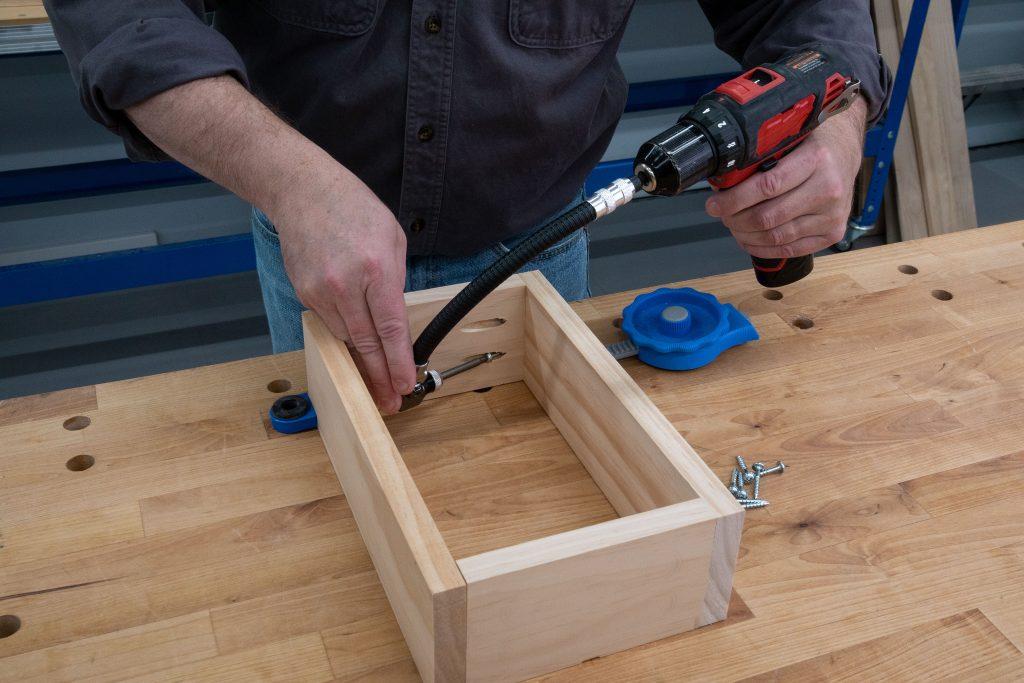
Image Source: learn.kregtool.com
Navigating the Challenges of Confined Drilling
Drilling in tight spaces presents unique obstacles. Limited maneuverability, poor visibility, and the risk of damaging surrounding materials are common concerns. Whether you’re working on plumbing, electrical installations, automotive repairs, or woodworking projects in awkward spots, finding the right approach is key. This article aims to equip you with the knowledge and tools needed to achieve precise and safe results in even the most restricted environments.
Why is Drilling in Tight Spaces So Difficult?
- Limited Reach: Standard drills are often too long or bulky to position correctly.
- Obstructed View: You can’t always see where the drill bit is going.
- Awkward Angles: Reaching the target often requires working at odd angles, straining your body.
- Tool Interference: The drill body or chuck can hit walls, pipes, or other components.
- Safety Risks: Without proper technique, you could injure yourself or damage the workpiece.
Essential Tools for Drilling in Confined Spaces
When the space is small, your regular drill might be a no-go. Thankfully, there are specialized tools designed precisely for these situations.
The Mighty Compact Drill
A compact drill, also known as a mini drill or stubby drill, is a smaller, lighter version of a standard drill. Its main advantage is its reduced length and often slimmer body, allowing it to fit into spaces where a full-sized drill would be impossible to maneuver. These are fantastic for niche drilling tasks.
- Key Features of Compact Drills:
- Shorter overall length.
- Lighter weight for easier handling.
- Often have a pistol-grip design for better control in tight spots.
- Variable speed control for precision.
- Can be corded or cordless.
The Right Angle Drill – Your Angle Master
A right angle drill, also called an offset drill, is specifically designed to drill at a 90-degree angle to the motor housing. This is invaluable when you need to drill into a surface that’s parallel to the obstruction. The compact head of a right-angle drill allows you to get into very tight corners.
- When to Use a Right Angle Drill:
- Drilling into the side of a stud when there’s minimal clearance from a wall.
- Working behind pipes or ductwork.
- Accessing bolts or fasteners in very tight engine compartments.
- Drilling through joists from the side.
Small Drill Attachments and Accessories
Beyond specialized drills, various attachments can extend the reach and functionality of your existing tools.
The Angled Drill Bit and Extension
An angled drill bit holder or a flexible shaft extension can be attached to your drill. This allows the drill bit to turn at an angle to the drill’s chuck, giving you the flexibility to reach screws or drill holes from unconventional positions.
- Types of Angled Attachments:
- Flexible Shaft Extensions: A flexible cable connects the drill chuck to the bit holder. You hold the drill further away, giving you a more comfortable grip while the flexible shaft snakes into the tight spot.
- Right Angle Drill Adapters: These are small, geared attachments that connect between your drill chuck and the drill bit, providing a 90-degree turning head. They are often more rigid than flexible shafts.
- Corner Drills: These are specialized heads that attach to the front of a drill, offering a very compact, 90-degree drilling solution.
Offset Screwdriver Bits and Holders
While not strictly for drilling, an offset screwdriver or a bit holder can be crucial for the preceding or subsequent fastening steps, often as important as the drilling itself in confined spaces. These tools have a low profile and allow you to turn screws or bolts at an angle.
The Versatile Portable Drill
Even a standard cordless drill can be adapted for tight spaces with the right approach. Choosing a smaller, lighter model and using appropriate accessories can make a significant difference.
Techniques for Difficult Angle Drilling
Mastering the techniques is just as important as having the right tools.
Positioning is Everything
- Assess the Access Point: Before you start, visualize how you will position the drill and your body. Can you get a stable stance? Will your body obstruct the drill’s path?
- Use Your Non-Dominant Hand: Sometimes, using your non-dominant hand to guide the drill can allow your dominant hand to hold the drill more stably or control the trigger better from an awkward angle.
- Lean into It (Carefully): If you need to drill at a slight angle, lean the drill gently. Avoid forcing it, as this can snap bits or damage the drill.
Working with a Right Angle Drill
- Select the Right Bit: Choose a bit that’s appropriate for the material and the hole size you need.
- Position the Drill: Place the compact head of the right-angle drill precisely where you want to start the hole.
- Apply Gentle Pressure: Start the drill at a low speed and apply steady, even pressure. The gearing in the right-angle head does the work of turning the bit.
- Maintain Control: Keep a firm grip on the drill body. The torque can be significant, so be prepared.
Utilizing Flexible Shafts and Angled Adapters
- Attach Securely: Ensure the flexible shaft or adapter is firmly attached to both the drill chuck and the drill bit.
- Guide the Bit: Hold the drill body away from the tight space, using the flexible shaft or adapter to guide the bit into position.
- Control the Speed: Start at a low speed to prevent the flexible shaft from kinking or the bit from wandering.
- Feed Slowly: As you drill, feed the bit slowly and steadily.
- Clear Debris: Periodically withdraw the bit to clear wood shavings or metal filings, especially if the hole is deep.
Step-by-Step Guide to Drilling in Tight Spaces
Let’s break down the process with a common scenario.
Scenario: Drilling a pilot hole behind a pipe for a mounting bracket.
Step 1: Preparation and Safety First
- Clear the Area: Remove any temporary obstructions.
- Gather Tools: You’ll likely need a compact drill or a standard drill with a right-angle adapter or flexible shaft. You’ll also need the appropriate drill bit, safety glasses, and gloves. A flashlight or headlamp is essential for visibility.
- Wear Safety Gear: Always wear safety glasses. Gloves can protect your hands from sharp edges or hot drill bits.
- Secure the Workpiece: If possible, ensure the item you’re drilling into is stable.
Step 2: Marking Your Spot
- Visibility: Use your flashlight to clearly see the exact spot you need to drill.
- Marking: If possible, use a pencil, marker, or a center punch to mark the precise location of the hole. A center punch helps prevent the drill bit from wandering on hard surfaces.
Step 3: Selecting the Right Tool and Bit
- Assess Space: Measure the clearance. Is it just the drill head that won’t fit, or the entire drill body?
- Choose Your Drill:
- If the drill body can fit but the chuck can’t align straight, a right angle drill or adapter is your best bet.
- If even the drill head is too bulky for a straight approach, a flexible shaft or a compact drill might be necessary.
- Select the Bit: Choose a drill bit that is slightly longer than your reach requirement, but not so long that it becomes unwieldy. For pilot holes, choose a bit slightly smaller than the screw shank.
Step 4: Positioning and Starting the Hole
- Angle Correctly: Position the drill so the bit is perpendicular to the surface you intend to drill, even if it means holding the drill body at an odd angle.
- Slow Start: Begin drilling at a very low speed. This is crucial for control, especially with flexible shafts or when drilling at an angle. It prevents the bit from skipping.
- Apply Steady Pressure: Once the bit bites into the material, apply steady, even pressure. Avoid jerking the drill.
- Visual Feedback: Keep an eye on the drill bit’s progress and listen to the sound of the drill. A change in sound can indicate you’re breaking through.
Step 5: Drilling Through
- Maintain Depth: If you only need a pilot hole, be mindful of the depth. Use a depth stop if your drill has one, or wrap tape around the bit to mark your desired depth.
- Clear Debris: For deeper holes, periodically pull the drill bit out slightly while it’s still spinning slowly to clear debris from the hole. This prevents binding and overheating.
- Complete the Hole: Continue drilling until you reach your desired depth or break through the material.
Step 6: Finishing Up
- Retract Carefully: Once done, slowly withdraw the drill bit while it’s still spinning at a low speed. This helps to create a cleaner exit hole.
- Inspect: Check the hole for cleanliness and accuracy.
- Clean Up: Remove any sawdust or metal filings from the work area.
Specific Scenarios and Solutions
Let’s look at common tight-space drilling problems and how to solve them.
Drilling into Studs Behind Drywall
Problem: You need to drill a small hole through a stud to run a wire or install a fixture, but there’s very little space between the drywall and the stud face, or the stud is positioned close to plumbing or electrical conduit.
Solution:
* A right angle drill is ideal here. Its low profile head allows you to drill directly into the side of the stud.
* If you don’t have a right-angle drill, a compact drill with a shorter bit might work.
* For extremely tight spots, a flexible shaft extension attached to your drill can snake around obstructions to reach the stud face.
Working in Automotive Engine Bays
Problem: Accessing certain bolts or drilling holes for sensors or mounting brackets in an engine bay can be incredibly challenging due to the density of components, hoses, and wires.
Solution:
* Offset screwdrivers and bit holders are essential for fasteners.
* For drilling, a compact drill is a must-have. Its small size allows it to fit into narrow gaps.
* A right angle drill is also invaluable for drilling into engine blocks or mounting brackets that are awkwardly positioned.
* Consider stubby drill bits that are shorter than standard bits to reduce the overall tool length.
Cabinetry and Furniture Assembly
Problem: Drilling pilot holes or clearance holes for screws when assembling cabinets or furniture where the internal space is limited.
Solution:
* A compact drill or a cordless screwdriver with a drilling function is perfect for this.
* When screwing into the side of a cabinet panel or attaching hinges, a right angle drill attachment or a specific right-angle drill is often the only way to get the screw flush.
* A small drill attachment like a right-angle adapter can save you from buying a whole new tool.
Plumbing and HVAC Work
Problem: Drilling holes through joists, studs, or mounting plates for pipes or ductwork in cramped crawl spaces or wall cavities.
Solution:
* Long drill bits, sometimes called auger bits, can help you reach further.
* A right angle drill is a lifesaver for drilling through the sides of wood joists or metal framing members when there isn’t much clearance.
* When working above or below pipes, a flexible shaft drill can allow you to position the drill body safely out of the way.
Choosing the Right Drill Bit for the Job
The drill bit is the business end of your operation. For tight spaces, bit selection is critical.
Bit Types for Confined Spaces
- Short Bits: Standard bits can sometimes be too long. Look for stubby drill bits that are significantly shorter than regular bits.
- Brad-Point Bits: Excellent for wood. The sharp point centers the bit precisely, preventing it from walking on the surface, which is crucial when you have limited control.
- Twist Bits: For general-purpose drilling in wood, plastic, and metal. Ensure you select the correct size and type for your material.
- Self-Centering Bits: These have a unique tip that helps the bit start precisely on your mark, reducing the need for a center punch.
- Thin Shank Bits: Some bits have a thinner shank near the tip, allowing them to fit through narrower openings even if the main body of the bit is wider.
Bit Length Considerations
- Reach vs. Control: A longer bit gives you more reach, but can also be harder to control and more prone to flexing or breaking, especially at angles.
- Depth Stops: Using a depth stop on your drill or marking your bit with tape is essential to avoid drilling too deep, which can be a problem when you can’t easily see the exit point.
Maintaining Control and Stability
Drilling in tight spaces often means you have limited leverage and support.
Hand Position and Support
- Two-Handed Grip: Whenever possible, use both hands to control the drill. One hand on the trigger handle, the other on the auxiliary handle (if available) or the drill body itself.
- Body as a Brace: Use your knees, elbows, or even your chest (with protection) to brace yourself and the drill against a stable surface if possible.
- Grip Strength: Maintain a firm but not overly tense grip. Too much tension can lead to fatigue and reduced control.
Speed Control is Key
- Low Speed for Starting: Always start drilling at the lowest speed setting. This allows the bit to bite into the material cleanly and prevents it from skittering.
- Increase Speed Gradually: As the bit gains purchase, you can slowly increase the speed. However, for difficult angle drilling, maintaining a moderate speed is often better than going full throttle.
- Listen to the Drill: The sound of the drill can tell you a lot. If it sounds strained, slow down. If it sounds like it’s cutting cleanly, you’re likely at a good speed.
Frequently Asked Questions (FAQ)
Q1: What is the best type of drill for tight spaces?
The best type of drill for tight spaces is typically a compact drill (also known as a stubby drill) or a right angle drill. These tools are specifically designed with smaller profiles to fit into confined areas.
Q2: Can I use a regular drill with an attachment to drill in tight spaces?
Yes, you can often adapt a regular drill. Using a right angle drill attachment or a flexible shaft extension can enable you to drill in tight spaces where the main body of the drill won’t fit.
Q3: How do I prevent a drill bit from wandering when starting a hole in a tight spot?
To prevent wandering, use a center punch to create a small indentation on the material before drilling. Additionally, starting at a very low speed and applying steady pressure will help the bit bite cleanly. Brad-point bits are also excellent for precise starting in wood.
Q4: What if I can’t get the drill bit to the exact angle I need?
If you’re facing difficult angle drilling and standard tools aren’t working, consider a flexible shaft attachment or a specialized corner drill bit holder. These accessories are designed to allow drilling at very acute angles.
Q5: How do I see where I’m drilling in a very dark, tight space?
Adequate lighting is crucial. Use a powerful flashlight, a headlamp, or a drill with an integrated LED light. Some flexible shaft extensions also have integrated lights.
Q6: Is there a specific type of drill bit for drilling at an angle?
While there isn’t a specific “angled” drill bit that drills at an angle, you use angled drill bit holders or adapters that allow your drill bit to turn at a 90-degree angle to the drill motor. The drill bit itself is usually a standard bit.
Q7: When should I use a right angle drill versus a flexible shaft extension?
Use a right angle drill when you need to drill directly into a surface at a 90-degree angle and the obstruction is immediately next to the drilling point. Use a flexible shaft extension when the obstruction is further away, or you need to maneuver the drill body into a more comfortable position while the shaft snakes into the tight spot.
Conclusion
Drilling in confined spaces doesn’t have to be a frustrating ordeal. By selecting the appropriate tools – whether it’s a compact drill, a right angle drill, or utilizing small drill attachments like angled holders and flexible shafts – and employing careful techniques, you can successfully tackle even the most challenging tight access drilling jobs. Remember to prioritize safety, maintain control through proper grip and speed, and select the right drill bit for the material. With a bit of preparation and the right approach, you’ll be able to achieve precise and efficient results, making difficult angle drilling a manageable task.