
Can you cut crown molding without a miter saw? Yes, you absolutely can! While a miter saw is the go-to tool for crown molding installation, it’s not the only way. If you don’t have a miter saw or are tackling a small project, you can achieve clean, accurate cuts with a few common hand tools and a bit of patience. This guide will walk you through the process, offering practical tips and alternative methods for cutting crown molding with common household tools.
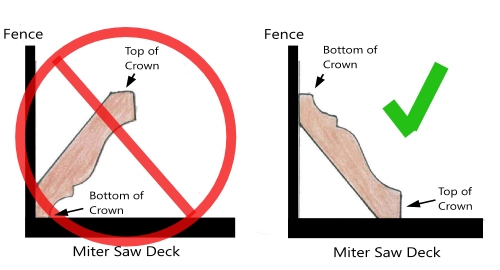
Image Source: www.mycarpentry.com
Why Go Without a Miter Saw?
There are several reasons why you might find yourself needing to cut crown molding without a miter saw. Perhaps you’re a beginner DIYer just starting out, and a miter saw feels like too big an investment for a single project. Or maybe you’re working on a small room or a few accent pieces, and the cost and space required for a miter saw seem unnecessary. Whatever your reason, rest assured that a beautiful, professionally finished look is still well within reach.
Common Scenarios for Hand-Cutting Crown Molding:
- Budget Constraints: Miter saws can be expensive.
- Limited Space: Especially in apartments or smaller homes, storing a miter saw can be a challenge.
- Small Projects: For just a few pieces of molding, a miter saw might feel like overkill.
- Learning Curve: Some DIYers prefer to start with simpler tools before graduating to power tools.
- Emergency Situations: Your miter saw might be broken, or you might need to make a quick repair.
Tools You’ll Need
The good news is that you likely have many of these tools already. If not, they are readily available at any hardware store and are generally more affordable than a miter saw.
Essential Tools:
- Crown Molding: Of course!
- Tape Measure: For accurate measurements.
- Pencil: For marking your cuts.
- Combination Square or Speed Square: To draw straight lines and check for squareness.
- Safety Glasses: Always protect your eyes.
- Hearing Protection: Even hand saws can be noisy.
- Dust Mask: Wood dust can be an irritant.
Cutting Tools:
- Miter Box: This is your best friend for hand-cutting molding. It’s a guide that holds the molding and directs your saw at precise angles (typically 45 and 90 degrees). Look for one specifically designed for crown molding or one with adjustable angles if you want more versatility.
- Hand Saw Crown Molding: A fine-tooth hand saw is crucial. A fine tooth saw crown molding will give you cleaner cuts and reduce the risk of splintering, which is especially important with detailed molding profiles. A Japanese pull saw can also work well.
- Coping Saw: This is essential for internal corners (coped joints), which are often preferred for crown molding. It allows for a precise, snug fit against the wall and ceiling.
- Flush Cut Saw: While not strictly necessary for the initial cuts, a flush cut saw is incredibly useful for trimming any small overhangs or imperfections after a cut, ensuring a perfect fit against existing surfaces.
- Utility Knife: For scoring or making very fine adjustments.
- Razor Saw: A small, fine-toothed saw that can be good for delicate cuts or touch-ups.
Other Helpful Tools:
- Chisel: For cleaning up corners or making minor adjustments. A sharp chiseling crown molding technique can be very effective.
- Clamps: To secure the molding in the miter box or to your workbench.
- Sanding Block and Sandpaper: For smoothing rough edges.
Deciphering Crown Molding Angles and Placement
Before you even pick up a saw, it’s vital to understand how crown molding sits against the wall and ceiling. Most crown molding is installed at an angle, creating a “spring angle.” This angle is what allows the molding to sit snugly between the wall and ceiling without needing complex joinery.
Standard Spring Angles:
The most common spring angles for crown molding are:
- 38 degrees: This is a very common angle.
- 45 degrees: Another frequently used angle.
- 52 degrees: Less common but still used.
Your molding package or manufacturer’s specifications should tell you the intended spring angle. Knowing this helps you set up your miter box correctly or mark your angles accurately if you’re not using a miter box.
Cutting Positions:
The key to cutting crown molding with a hand saw is to simulate the miter saw’s action. When using a miter saw, you typically lay the molding flat on the saw bed and tilt the blade. When hand-cutting, you’ll often place the molding upside down and backward in the miter box. This is because the top edge that sits against the ceiling is usually narrower than the bottom edge that meets the wall.
- Upside Down and Backward: This is the most common method for fitting molding into a miter box. The face of the molding will be against the base of the miter box, and the back of the molding will be against the fence. This means the top edge will be towards you, and the bottom edge will be away from you.
Cutting Straight (90-Degree) Joints
Straight cuts are used for the inside and outside corners of long walls or for joining two pieces of molding to span a longer distance.
Method 1: Using a Miter Box for Straight Cuts
- Set Up the Miter Box: Ensure your miter box is stable. Some miter boxes have adjustable fences or slots for specific angles. For a 90-degree cut, you’ll be using the straight slots.
- Position the Molding: Place the crown molding upside down and backward in the miter box. The wider edge (which will go against the wall) should rest against the fence, and the narrower edge (which will go against the ceiling) should rest on the bottom of the box.
- Mark the Cut: Measure the length of molding you need. Use your pencil to mark the precise cutting line on the molding. If you’re cutting a piece to fit a specific space, measure from the longest point of the molded edge.
- Secure the Molding: Use clamps to hold the molding firmly in place within the miter box. This is crucial for a clean cut and to prevent the molding from shifting.
- Saw the Cut: Place your hand saw crown molding or fine tooth saw crown molding into the appropriate 90-degree slot in the miter box. Begin sawing with smooth, even strokes. Apply light downward pressure. Let the saw do the work. Continue sawing until you have cut completely through the molding.
- Check the Cut: Remove the molding and check the cut. It should be clean and square (90 degrees) to the edge of the molding. A flush cut saw can be used to trim any minor rough spots.
Method 2: Using a Straight Edge and Hand Saw (Less Precise)
If you don’t have a miter box, you can attempt a straight cut using a straight edge and a good quality hand saw crown molding. This method requires more skill and is less accurate.
- Mark the Cut: Measure and mark your cut line carefully with a pencil and a combination square.
- Secure the Molding: Clamp the molding firmly to a workbench or sturdy surface.
- Guide the Saw: Place a metal speed square or a sturdy piece of wood along your pencil line. This will act as a guide for your saw.
- Saw the Cut: Hold the saw against the guide and begin sawing. This method is prone to angled cuts, so steady hands and careful guiding are essential.
Cutting Corner Joints (45-Degree Miters)
This is where the miter box truly shines. For inside and outside corners, you’ll need to make 45-degree cuts.
Inside Corners:
An inside corner is where two walls meet, forming an internal angle.
- Position the Molding: Place the crown molding upside down and backward in the miter box.
- Identify the Angle: For an inside corner, you need to cut the molding so that the front edge (that will be visible) is longer than the back edge. This will allow the two pieces to butt up against each other snugly in the corner.
- Use the 45-Degree Slot: Locate the 45-degree slot on your miter box that slants in the correct direction to create this angle. The cut will angle away from you.
- Mark and Secure: Mark your cut line and securely clamp the molding in place.
- Saw the Cut: Insert your hand saw crown molding or fine tooth saw crown molding into the 45-degree slot and saw through the molding.
- Repeat for the Other Piece: Cut the mating piece of molding, also at a 45-degree angle, but in the opposite direction (so the front edge is shorter than the back edge). When these two pieces meet, they should form a perfect 90-degree corner.
Outside Corners:
An outside corner is where two walls meet, forming an external angle.
- Position the Molding: Place the crown molding upside down and backward in the miter box.
- Identify the Angle: For an outside corner, you need to cut the molding so that the front edge is shorter than the back edge. This will allow the two pieces to join cleanly on the outside.
- Use the Opposite 45-Degree Slot: Locate the 45-degree slot on your miter box that slants in the opposite direction to create this angle. The cut will angle towards you.
- Mark and Secure: Mark your cut line and securely clamp the molding.
- Saw the Cut: Insert your saw into the correct 45-degree slot and make the cut.
- Repeat for the Other Piece: Cut the mating piece of molding at the opposite 45-degree angle (front edge longer than back edge). When joined, these pieces will create a neat outside corner.
A Quick Tip for 45-Degree Cuts:
When cutting 45-degree angles for corners, think about which side of the cut needs to be longer. For an inside corner, the wall-side edge of the molding needs to be longer. For an outside corner, the ceiling-side edge needs to be longer. This will help you select the correct slot in your miter box.
Mastering the Coped Joint for Internal Corners
While mitered joints can work for outside corners, internal corners often look much cleaner when “coped.” A coped joint involves cutting one piece of molding with a 45-degree miter and then using a coping saw to cut out the profile of that molding, creating a curved edge that perfectly matches the profile of the second, square-cut piece. This allows for a tighter fit, especially if your walls aren’t perfectly square.
Steps for Creating a Coped Joint:
- Cut the First Piece (Mitered): Install the first piece of molding normally. For an inside corner, cut this piece with a 45-degree miter using your miter box, ensuring the longer edge will sit against the wall.
- Cut the Second Piece (Roughly to Length): Cut the second piece of molding to length, but make a straight 90-degree cut on the end that will meet the first piece. Don’t worry if it’s not a perfect fit yet.
- Apply the Miter: Place this second piece into your miter box and cut a 45-degree miter on the end that will meet the first piece. This time, you want the cut to go away from the wall-side edge. This is an “inside” miter on the molding itself, which, when installed, will look like an outside miter on the wall. Think of it as slicing off a wedge from the end.
- Use the Coping Saw: Now, take your coping saw. Place the molding so the mitered edge is facing you. You’ll be cutting along the curve of the molding’s profile, essentially removing the “point” of the miter. The goal is to cut just inside the pencil line you’ve marked on the profile.
- Start Cutting: Begin sawing with your coping saw crown molding. Hold the saw at a slight angle (around 30-45 degrees) to the face of the molding, following the curve of the profile. Make long, smooth strokes. This step requires practice.
- Refine the Fit: Once you have a clean, curved edge that mirrors the molding’s profile, test fit it against the mitered piece. You may need to make minor adjustments with your coping saw or even a small chisel to get a perfect seam. A razor saw can be useful for very fine touch-ups.
- Install the Coped Piece: The coped piece should now fit snugly against the mitered piece. Secure it in place.
Advanced Techniques and Troubleshooting
Even with the best tools, cutting crown molding can present challenges. Here are some tips for when things get tricky.
Making Adjustments with a Utility Knife or Razor Saw
Sometimes, your cut might be slightly off, or you might have a small burr.
- Utility Knife: A sharp utility knife can be used for scoring crown molding to create a cleaner break or for carefully trimming away small imperfections. Be very careful not to cut yourself.
- Razor Saw: A razor saw is excellent for precise trimming of small areas or making fine adjustments to a mitered edge. Its very fine teeth produce smooth cuts.
Using a Jigsaw for Curves (with Caution)
While not ideal for precise miters, a jigsaw can be used for cutting molding if you have no other options, but it requires extreme care and a steady hand.
- Blade Choice: Use a fine-tooth blade designed for wood.
- Blade Placement: You’ll likely need to lay the molding flat on your workbench and use the jigsaw freehand, trying to follow your marked line. This is challenging for accurate angles.
- Backup: It’s often best to use a miter box crown molding setup as a guide even with a jigsaw if possible, or at least a very good straight edge.
Dealing with Imperfect Walls
Walls are rarely perfectly square. Coped joints are superior in these situations. If you’ve mitered and the joint isn’t tight, you can try:
- Slight Re-Miter: Carefully re-cut the miter on one of the pieces, taking off just a tiny sliver to try and close the gap.
- Slightly Wider Coping: If using coped joints, you can sometimes cut the coped edge slightly wider to help it seat better.
Filling Gaps
No matter how precise your cuts, there might be small gaps. These can be filled with:
- Wood Filler: For minor gaps.
- Caulk: For very fine seams, especially where the molding meets the wall and ceiling. Paintable caulk is ideal.
Alternative Tool Breakdown and Usage
Let’s dive a bit deeper into how some of these alternative tools function specifically for crown molding.
The Miter Box Crown Molding Essential
A miter box crown molding is designed to hold wood at specific angles. The key feature for crown molding is its ability to hold the molding at the correct “spring angle” when placed upside down and backward. The slots are precisely angled to guide your hand saw crown molding for common cuts like 45-degree miters and 90-degree cuts.
The Versatility of the Coping Saw
A coping saw is lightweight and features a thin blade held under tension by a frame. This allows for intricate curves and shapes. When coping crown molding, you use the saw to remove material from the back of a mitered piece, creating a profile that nests into the adjacent piece. This is a skill that takes practice but results in superior joints.
The Precision of the Razor Saw
A razor saw is a very fine-toothed saw, often with a stiffened back (like a backsaw). This makes it ideal for delicate work. If a cut is slightly off, a razor saw can be used to carefully shave off small amounts of wood to perfect a joint. It’s also useful for trimming small pieces where a flush cut saw might be too large.
The Utility Knife for Scoring and Trimming
A good quality utility knife with a sharp blade can be used to lightly scoring crown molding along your cut line before sawing. This can help prevent tear-out, especially on softer woods or painted surfaces. After a cut, it can be used for carefully trimming away any thin slivers of wood that may have been left behind.
The Flush Cut Saw for Perfect Finishes
A flush cut saw has a very thin, flexible blade designed to cut flush with a surface. If you’ve made a cut slightly long, or if you have a piece that needs to sit perfectly flat against another surface, a flush cut saw is the tool for the job. It allows you to trim without damaging the adjacent material.
Chiseling Crown Molding: Fine-Tuning Joints
While not for primary cutting, a sharp chisel can be invaluable for chiseling crown molding. If a coped joint isn’t quite snug, you can carefully chisel away a tiny bit of wood from the back of the coped edge to improve the fit. It’s also useful for cleaning up the corners of mitered joints.
Pre-Installation Preparation
Before you start cutting and installing, take some time to prepare.
Measure Twice, Cut Once
This adage is especially true for crown molding. Double-check all your measurements before marking and cutting.
Dry Fitting
Always “dry fit” your pieces before final installation. This means holding the cut pieces in place without adhesive or nails to check the fit. Make any necessary adjustments now.
Practicing Cuts
If you’re new to hand-cutting molding, it’s a good idea to practice your cuts on scrap pieces first. Get a feel for how the saw moves through the material and how to achieve clean angles.
Installation Tips
Once you have your pieces cut, installation is the next step.
Adhesive and Fasteners
Use a good quality construction adhesive for the back of the molding, and supplement with finishing nails. Use a nail set to drive the nails slightly below the surface.
Filling Nail Holes
Fill all nail holes with wood filler and sand them smooth once dry.
Caulking
Caulking all seams where the molding meets the wall and ceiling is crucial for a professional finish. This hides any tiny gaps and creates a seamless look.
Frequently Asked Questions (FAQ)
Q1: Is it difficult to cut crown molding without a miter saw?
A1: It can be more challenging and time-consuming than using a miter saw, but it is definitely achievable with practice and the right tools like a miter box and a good hand saw.
Q2: What is the best hand saw for cutting crown molding?
A2: A fine-tooth hand saw or a Japanese pull saw is generally best for hand saw crown molding as they provide cleaner cuts and reduce the risk of splintering. A razor saw is excellent for fine adjustments.
Q3: Can I use a regular handsaw for crown molding?
A3: While technically possible, a regular handsaw with coarse teeth is not ideal. It will likely result in rough cuts and tear-out, making it difficult to achieve a clean finish. A fine tooth saw crown molding is highly recommended.
Q4: How do I ensure my miter cuts are accurate without a power miter saw?
A4: Using a miter box crown molding is essential. It provides the guides for precise 45-degree and 90-degree cuts. Ensure the molding is held securely within the box.
Q5: What is a coping saw used for in crown molding installation?
A5: A coping saw is used to create coped joints for internal corners. One piece of molding is mitered, and the other is cut with a coping saw to match its profile, allowing for a tighter fit than a miter joint.
Q6: How can I trim a piece of molding that’s slightly too long?
A6: A flush cut saw is perfect for trimming excess length flush with a surface. A utility knife or a razor saw can also be used for very fine trimming.
Q7: Should I use a utility knife to cut crown molding?
A7: A utility knife is not suitable for cutting through thick molding. It’s best for scoring the surface to guide a saw or for trimming very thin pieces or imperfections.
Q8: What if my walls aren’t square? Will mitered corners look bad?
A8: If your walls aren’t perfectly square, mitered corners can leave gaps. Coped joints are much more forgiving and generally provide a tighter fit in imperfect corners.
Q9: How do I practice cutting crown molding?
A9: Get some scrap pieces of molding and practice making 45-degree cuts with your miter box and hand saw. Also, try making a few coped joints to get the feel for the coping saw.
Q10: What’s the best way to get a clean finish after cutting?
A10: Use a fine tooth saw crown molding. After cutting, you can lightly sand the edges with sandpaper and fill any small gaps with caulk or wood filler.
Conclusion
Cutting crown molding without a miter saw is a completely achievable DIY project. By utilizing a miter box, a good quality hand saw, and perhaps a coping saw for intricate joints, you can achieve professional-looking results. Patience and precision are key, but the satisfaction of completing your project with these fundamental tools is immense. So, don’t let the absence of a miter saw deter you from enhancing your home’s aesthetic with beautiful crown molding.