
Can you build a miter saw table yourself? Yes, absolutely! Building your own miter saw table is a fantastic project for any DIY enthusiast. It’s more than just a place to put your saw; it’s a way to make your cuts more accurate, efficient, and safe. This guide will walk you through creating a robust and versatile miter saw station that will elevate your woodworking game. We’ll cover everything from basic design principles to the nitty-gritty of construction, helping you achieve a professional-level result in your own workshop.
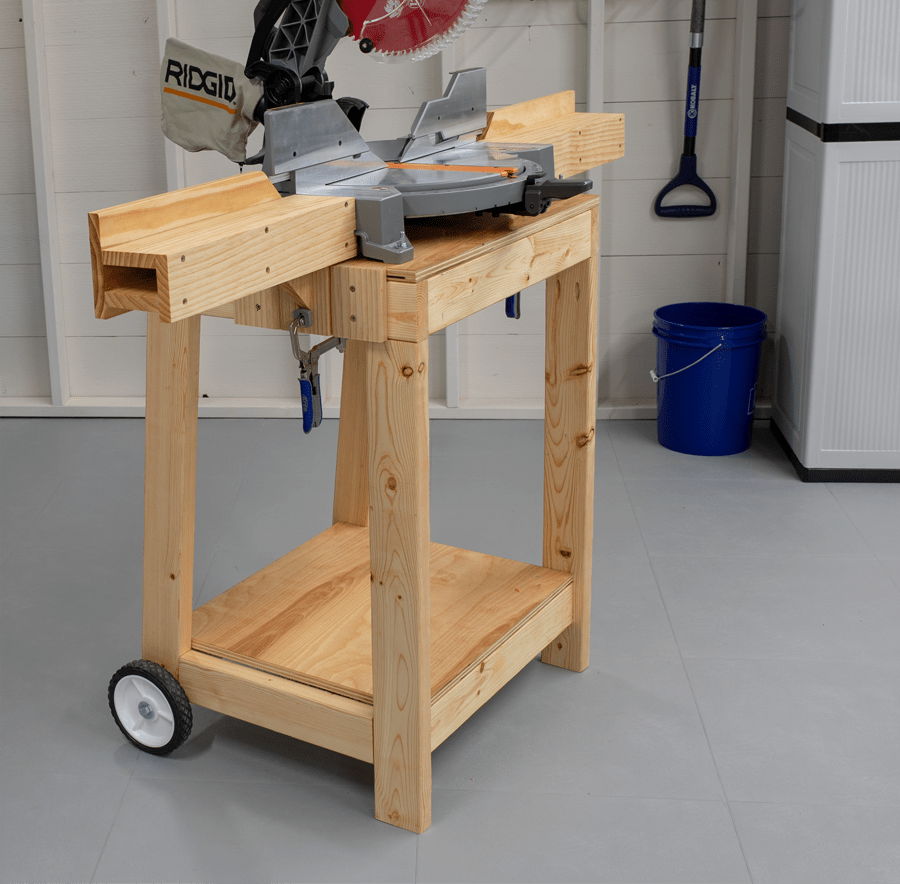
Image Source: learn.kregtool.com
Why Build a Miter Saw Table?
A dedicated miter saw table, often referred to as a miter saw stand or miter saw workbench, offers numerous advantages over simply placing your saw on a temporary surface. It provides a stable, level platform that is crucial for precise cuts. Unlike portable stands, a well-built table can incorporate features like extended support wings, dust collection integration, and built-in storage, transforming your miter saw setup into a true DIY miter saw station. This elevated workspace can also be designed to improve ergonomics, reducing strain during long work sessions. For those with limited space or a need for mobility, a mobile miter saw table can be constructed with casters, allowing you to move it around your workshop or even to job sites. Furthermore, adding a proper miter saw outfeed table significantly improves your ability to handle long boards, preventing them from tipping or falling during cuts.
Planning Your Miter Saw Table
Before you grab your tools, planning is key. A good miter saw setup begins with a solid plan. Consider these factors:
- Size and Space: Measure your workshop and determine the ideal dimensions for your table. Will it fit through doorways? Will it be a permanent fixture or a mobile miter saw table?
- Miter Saw Dimensions: Know the exact footprint of your miter saw. You’ll need to ensure it mounts securely and that there’s adequate clearance around it.
- Features: What additional features do you want? Consider:
- Outfeed Support: Essential for long material.
- Storage: Drawers, shelves, or cabinets for accessories, blades, and safety gear. This can lead to a full miter saw cabinet.
- Dust Collection: A port for your shop vacuum or dust collector is a must for a cleaner workspace.
- Fence System: A well-aligned miter saw fence is crucial for repetitive accurate cuts.
- Power Strip: Convenient access to power for your saw and other tools.
- Material: What will you build it from? Plywood, dimensional lumber (like 2x4s and 2x6s), and MDF are common choices.
- Portability: Do you need wheels? If so, consider heavy-duty locking casters.
Essential Materials and Tools
Here’s a general list of what you’ll need. Your specific miter saw table plans will dictate exact quantities.
Materials:
- Plywood (¾-inch for the top, ½-inch for sides and shelves, or as per your plans)
- Dimensional Lumber (2x4s, 2x6s for the frame)
- MDF or Melamine Board (optional, for a smoother top surface)
- Wood Screws (various lengths, e.g., 1.5-inch, 2.5-inch)
- Wood Glue
- Casters (if making a mobile unit)
- Drawer slides (if adding drawers)
- Hardware (handles, hinges, etc.)
- Finishing supplies (sandpaper, stain, sealant)
Tools:
- Measuring Tape
- Pencil
- Safety Glasses
- Hearing Protection
- Dust Mask
- Circular Saw or Table Saw (for breaking down sheet goods)
- Miter Saw (ironically!)
- Jigsaw (for cutouts)
- Drill/Driver
- Drill Bits
- Screwdriver Bits
- Clamps
- Orbital Sander
- Optional: Router, Pocket Hole Jig
Choosing Your Miter Saw Table Plans
There are countless miter saw table plans available online, ranging from simple, open-frame designs to elaborate miter saw cabinet systems. When selecting plans, consider your skill level, budget, and the features you desire. Some plans are free, while others are paid. Look for plans that include detailed cut lists and assembly diagrams. A good plan will guide you through creating a sturdy miter saw base and a precise miter saw fence.
Building the Base and Frame
The foundation of your miter saw table is its base. This needs to be robust enough to support the weight of your saw and absorb vibrations during operation.
Step 1: Cut Your Lumber
Following your chosen miter saw table plans, cut all the dimensional lumber for the base frame. Accuracy here is important for a stable final product.
- Legs: Cut four equal-length pieces for the legs. The height should be comfortable for your working height, typically around 34-36 inches, but adjust based on your preference and the height of your miter saw in its lowest position.
- Aprons: Cut pieces for the top and bottom aprons. These will connect the legs and provide a surface for attaching the tabletop and potentially lower shelves or bracing.
Step 2: Assemble the Base Frame
- Attach Aprons to Legs: Use wood glue and screws to attach the apron pieces to the legs. A pocket hole jig can create stronger, cleaner joints if you have one. Ensure the corners are square.
- Add Lower Bracing (Optional but Recommended): For added rigidity, especially if you plan to add weight with storage, add lower cross braces between the legs. This also forms the miter saw base structure.
- Check for Squareness: Measure the diagonals of the frame. If they are equal, your frame is square.
Constructing the Tabletop
The tabletop is where your miter saw will be mounted. It needs to be flat, sturdy, and provide a secure platform.
Step 1: Cut the Tabletop Material
Cut your chosen material (plywood, MDF, or melamine) to the desired size. Often, a large sheet of plywood is used, with a section cut out for the miter saw.
Step 2: Mount Your Miter Saw
- Position the Saw: Place your miter saw on the tabletop material in the desired location. Mark the mounting holes of your saw onto the wood.
- Drill Mounting Holes: Remove the saw and drill pilot holes through the tabletop at your marks. Ensure the drill bit size is appropriate for the screws you’ll use to mount the saw.
- Attach the Saw: Place the saw back onto the tabletop and secure it using appropriate screws. If your saw came with mounting hardware or specific instructions, follow those. This is a critical step for a safe miter saw setup.
Step 3: Create Cutouts (If Necessary)
If your miter saw table plans involve a cutout for the saw blade to drop through for bevel cuts, use a jigsaw to carefully cut this opening. Ensure there’s enough clearance for the blade to rotate freely without hitting the table.
Adding Support and Stability
To create a true miter saw workbench, you’ll want to add features that enhance its functionality and stability.
Step 1: Attach the Tabletop to the Base
- Position the Top: Place the tabletop assembly onto the assembled base frame.
- Secure the Top: Use wood glue and screws to attach the tabletop to the aprons of the base. Drive screws from the underside of the aprons up into the tabletop for a cleaner look.
Step 2: Incorporate an Outfeed Table
An miter saw outfeed table is a game-changer for handling long lumber.
- Build Supporting Structure: Create a frame similar to the main base, or attach extension wings directly to the sides of your existing base.
- Attach Top Surface: Cut and attach a tabletop material to the outfeed support structure. Ensure the outfeed surface is perfectly level with the main tabletop.
- Consider Rollers or Supports: For very long pieces, consider adding adjustable rollers or support legs to the outfeed table.
Step 3: Build and Attach a Fence System
A miter saw fence is crucial for accurate repetitive cuts. You can build one from plywood or MDF.
- Create Fence Material: Cut two pieces of ¾-inch plywood or MDF to the desired height and length of your table.
- Attach to Table: Securely attach these fence pieces to the back edge of your tabletop, ensuring they are perfectly perpendicular to the miter saw’s cutting plane. Use screws from underneath and consider adding a metal or wooden runner for smoother sliding of lumber. A well-aligned fence is vital for the precision of your miter saw setup.
Adding Storage and Mobility
Transforming your miter saw stand into a full DIY miter saw station often involves storage solutions.
Step 1: Install Shelves and Cabinets (Optional)
- Shelves: Cut pieces of plywood to fit between the legs or within a frame. Attach them using screws or pocket holes.
- Cabinets: If you’re building a miter saw cabinet, construct simple boxes from plywood and install them in the base. Add doors with hinges and handles for a clean look and dust protection.
Step 2: Attach Casters (For a Mobile Miter Saw Table)
- Choose Casters: Select heavy-duty casters with a weight rating significantly higher than your table’s expected load. Locking casters are essential for stability during operation.
- Mount Casters: Attach the casters to the bottom of the table legs. Reinforce the leg corners with additional wood or metal plates for better support. Ensure the table sits level once casters are attached.
Finishing Touches
A well-finished piece not only looks good but also lasts longer.
Step 1: Sanding
Thoroughly sand all surfaces, starting with a coarser grit (e.g., 80 or 120) and finishing with a finer grit (e.g., 180 or 220). Pay attention to edges and corners.
Step 2: Applying a Finish
- Paint: A few coats of durable paint can protect the wood and give your miter saw workbench a professional look.
- Stain and Sealant: If you prefer the natural wood look, apply wood stain followed by several coats of polyurethane or a durable topcoat.
- Wax or Oil: For a natural finish, consider applying beeswax or a furniture oil.
Advanced Features for Your Miter Saw Station
Once you have a solid basic miter saw base, you can enhance your DIY miter saw station further.
- Dust Collection Port: Integrate a port for your shop vacuum or dust collector. You can create a simple dust hood behind the blade or a more enclosed system.
- Repeat Stop: A simple adjustable stop attached to the fence allows for quick and accurate repetitive cuts of the same length.
- Dog Holes: Drilling dog holes in the tabletop and fence allows you to use bench dogs or stop blocks for holding workpieces.
- Integrated Power Strip: Mount a power strip on the side or back of the table for easy access to power.
- Flip-Up Support Wings: Design your outfeed table with wings that can flip up or fold down to save space.
Safety Considerations
Safety should always be your top priority when working with power tools.
- Wear Safety Glasses: Always protect your eyes.
- Use Hearing Protection: Miter saws can be loud.
- Wear a Dust Mask: Protect your lungs from sawdust.
- Ensure Stability: Make sure your table is stable and won’t tip. Lock casters if you have them.
- Proper Blade Guard: Ensure your miter saw’s blade guard is in place and functioning correctly.
- Keep Work Area Clean: Clutter can be a safety hazard.
- Secure Workpiece: Always hold your workpiece firmly against the fence and table when making cuts.
Frequently Asked Questions (FAQ)
Q1: What is the ideal height for a miter saw table?
A1: The ideal height is typically around 34-36 inches from the floor to the tabletop. This allows most users to work comfortably without excessive bending. However, it’s best to measure your own comfortable working height and adjust accordingly. Consider the lowest point your miter saw’s blade drops to during bevel cuts to ensure adequate clearance.
Q2: Can I use MDF for the tabletop?
A2: Yes, MDF (Medium-Density Fiberboard) can be used for the tabletop. It’s very stable and provides a flat surface. However, it’s not as durable or moisture-resistant as plywood and can be damaged by impact. For a more durable and smoother surface, consider a melamine-coated MDF or ¾-inch plywood topped with a laminate.
Q3: How do I ensure my fence is perfectly square to the saw blade?
A3: After attaching your fence, use a combination square or a machinist’s square to check the angle between the fence and the saw blade’s path. You can also use a digital angle gauge. Minor adjustments can be made by shimming the fence with thin pieces of material (like cardstock or veneer) at the mounting points until it reads perfectly 90 degrees. Fine-tuning your miter saw fence is crucial for accurate cuts.
Q4: What kind of casters should I use for a mobile miter saw table?
A4: For a mobile miter saw table, use heavy-duty, high-quality casters with a weight rating at least double the estimated weight of your table and miter saw. Look for casters with polyurethane wheels, as they roll smoothly and are durable. Ensure they have a reliable locking mechanism (swivel and tread locks) to prevent the table from moving during operation.
Q5: How can I improve dust collection on my miter saw table?
A5: You can improve dust collection by adding a dust shroud around the blade, connecting it to your shop vacuum or dust collector. Many DIY miter saw table plans include designs for dust collection ports. You can also build a cabinet or enclosed base to help contain dust. Ensure your vacuum or dust collector has sufficient airflow (CFM) to handle the sawdust effectively.
Q6: What are the benefits of a miter saw outfeed table?
A6: A miter saw outfeed table significantly improves your ability to handle long pieces of wood. It provides a stable surface that prevents the workpiece from tipping or falling as it exits the saw, ensuring safer and more accurate cuts. It also makes it easier to measure and mark long boards.
Q7: Is it worth building a dedicated miter saw cabinet?
A7: Yes, a miter saw cabinet can be very beneficial. It keeps your miter saw protected from dust and debris when not in use. It also provides an opportunity to integrate storage for blades, accessories, and dust collection systems, making your workspace tidier and more organized. This elevates your DIY miter saw station to a higher level of functionality.
Q8: What’s the difference between a miter saw stand and a miter saw workbench?
A8: While often used interchangeably, a miter saw stand typically refers to a more basic, often portable, frame designed to hold the miter saw. A miter saw workbench or DIY miter saw station implies a more robust, often stationary, table that might include features like outfeed support, storage, and integrated dust collection, turning the miter saw into a more functional woodworking station.
Building your own miter saw table is a rewarding project that will pay dividends in accuracy, efficiency, and safety for years to come. By carefully planning, selecting good miter saw table plans, and following these steps, you can create a workspace tailored to your needs, greatly enhancing your woodworking capabilities. Enjoy the process, and happy cutting!