
Want to build a better way to use your chop saw? This guide will show you how to build a chop saw station. A chop saw station organizes your tools, improves accuracy, and makes your workspace safer. You can build a miter saw stand, a chop saw workbench, or even a DIY chop saw table to suit your needs. This project also offers opportunities for storage for chop saw accessories and can incorporate a chop saw dust collection system.
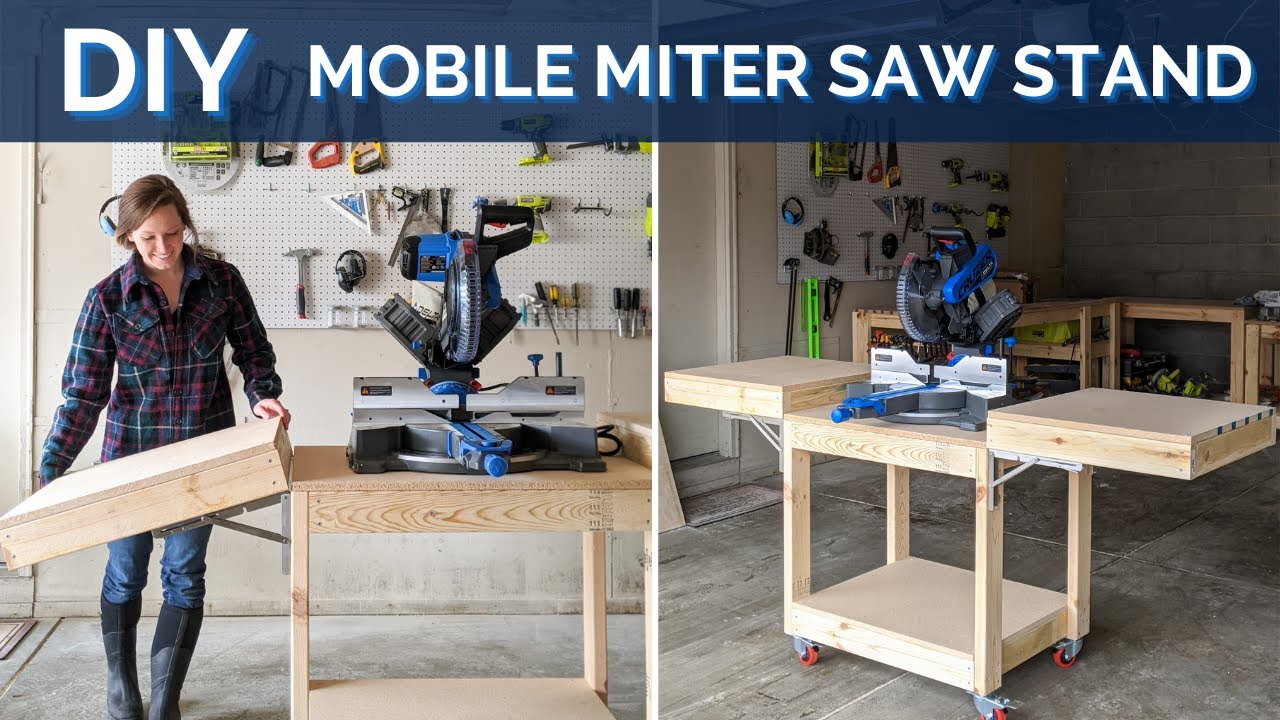
Image Source: i.ytimg.com
Planning Your Chop Saw Station
Before you pick up a saw or hammer, it’s crucial to plan your chop saw station. This step ensures you build something that fits your workshop, your workflow, and your specific cutting needs.
Assessing Your Space and Needs
Think about where your chop saw station will live. Is it in a dedicated workshop, a garage, or a basement? Measure the available space. Consider how much room you need to maneuver lumber and yourself around the station.
- Workshop Size: A small garage might need a more compact, possibly mobile design, while a larger shop can accommodate a more robust, stationary unit.
- Material Size: What size lumber will you be cutting most often? Long 2x4s or 8-foot sheets of plywood? This impacts the required length of your outfeed supports.
- Cutting Frequency: If you cut wood daily, a more elaborate station with integrated dust collection and storage will be highly beneficial. For occasional use, a simpler setup might suffice.
- Portability: Do you need to move your saw around? If so, building a mobile chop saw base is essential.
Design Considerations for Your Chop Saw Table
A well-designed station is more than just a platform. It’s a workspace that enhances efficiency and safety.
- Height: The ideal height for your chop saw station is usually around your waist or slightly lower. This allows for comfortable operation without excessive bending. You can test this by placing your saw on different height blocks or boxes and seeing what feels best.
- Stability: Your station must be rock-solid. Any wobble will affect your cuts and can be dangerous. Thick, sturdy materials and robust joinery are key.
- Work Surface: The top of your station needs to be flat and level. Consider using MDF, plywood, or even a laminate-covered surface.
- Outfeed Support: For long pieces, you’ll need chop saw outfeed support. This can be built-in rollers, flip-up supports, or extensions that cantilever out from the main station.
- Dust Collection: Sawdust is a nuisance and a health hazard. Planning for chop saw dust collection from the start will save you a lot of cleaning and breathing trouble later.
- Storage: Where will you keep blades, measuring tapes, clamps, and other accessories? Integrated shelves, drawers, or cabinets can be a lifesaver for organization.
- Repeatability Aids: Features like a precise chop saw fence and specialized chop saw jig designs can dramatically improve the accuracy of repeated cuts.
Materials and Tools
The materials you choose will affect the cost, durability, and complexity of your build.
Common Materials:
- Plywood: 3/4-inch plywood is excellent for the main structure, legs, and shelves.
- Dimensional Lumber: 2x4s and 2x6s are great for framing and legs, providing strength and rigidity.
- MDF (Medium-Density Fiberboard): A good choice for the work surface due to its flatness and ease of finishing.
- Hardwood: For areas that experience a lot of wear, like the fence or workbench top, hardwood can be a more durable option.
- Hardware: Screws (wood screws, deck screws), bolts, nuts, washers, and possibly specialized hardware for mobile bases or dust collection.
- Castors (Optional): If building a mobile unit, heavy-duty lockable castors are a must.
- Other: Wood glue, sandpaper, finish (paint, varnish).
Essential Tools:
- Measuring Tape and Pencil: For accurate layout.
- Circular Saw or Table Saw: For cutting sheet goods and lumber.
- Miter Saw (of course!): For making precise cuts on your lumber.
- Drill/Driver: For pilot holes and driving screws.
- Orbital Sander: For smoothing surfaces.
- Clamps: Essential for holding pieces together during assembly.
- Level: To ensure everything is square and plumb.
- Safety Gear: Safety glasses, ear protection, and a dust mask are non-negotiable.
Building a Basic Chop Saw Workbench
This section outlines how to build a sturdy chop saw workbench that provides a solid foundation for your saw.
Constructing the Base and Legs
The base provides stability and supports the weight of the saw and the materials you’re cutting.
Step 1: Cut Your Lumber
Measure and cut your lumber according to your design. For a basic, sturdy base, 2x4s are a good choice for legs and aprons.
- Legs: Cut four pieces of 2×4 to your desired height (e.g., 32-34 inches).
- Aprons: Cut four pieces of 2×4 to create the rectangular frame that will connect the legs. The length of these will depend on the size of your saw and the desired workbench footprint.
Step 2: Assemble the Leg Assemblies
Create two end assemblies. Each assembly will consist of two legs and a short apron piece connecting them at the top.
- Lay two legs parallel on a flat surface.
- Position an apron piece between the tops of the legs, flush with the ends.
- Drill pilot holes and secure the apron to the legs with wood screws. Use wood glue for extra strength.
- Repeat for the other two legs and apron.
Step 3: Connect the Leg Assemblies
Now, you’ll connect the two leg assemblies with the remaining apron pieces to form the main frame of your workbench.
- Stand the two leg assemblies upright.
- Position the longer apron pieces between the leg assemblies, flush with the tops of the legs.
- Drill pilot holes and secure the aprons to the legs using wood glue and screws. Ensure the frame is square by measuring diagonally; the measurements should be equal.
Creating the Top Surface
The workbench top is where your saw will sit and where you’ll make your cuts.
Step 1: Cut the Plywood or MDF
Cut a piece of 3/4-inch plywood or MDF to the desired size for your workbench top. Make it slightly larger than the footprint of your saw and base frame to allow for easy access and potential modifications.
Step 2: Attach the Top to the Base
- Center the workbench top onto the assembled base frame.
- From underneath the frame, drill pilot holes up into the workbench top.
- Secure the top using wood screws, ensuring they are not so long that they penetrate the top surface.
Integrating Your Chop Saw
Now it’s time to place your saw.
Step 1: Position the Saw
Place your chop saw on the workbench top. Position it so that it’s centered and has adequate clearance on either side for handling lumber. You might want to leave a bit of space at the back for dust collection hookups.
Step 2: Secure the Saw (Optional but Recommended)
Many chop saws have mounting holes. If yours does, it’s highly recommended to secure it to the workbench top using bolts, washers, and nuts. This prevents the saw from shifting during use, which is crucial for safety and accuracy.
Adding a Chop Saw Fence
A good chop saw fence is critical for making repeatable, accurate cuts.
Step 1: Design and Material
You can build a fence using a straight piece of 3/4-inch plywood or MDF, or even hardwood for maximum durability. The fence should be tall enough to provide a stable backing for your material.
Step 2: Attaching the Fence
- Position the fence along the back edge of your workbench top, parallel to the saw’s blade path.
- You can attach it permanently with screws from the underside of the workbench, or use a system that allows for adjustment or removal. Some builders create adjustable fences using T-track or slotted brackets.
- Crucially, ensure the fence is perfectly square to the saw’s blade. Use a combination square or engineer’s square to check this.
Chop Saw Outfeed Support Ideas
For cutting longer pieces, chop saw outfeed support is essential.
Roller Stands
- Description: Adjustable height stands with rollers that support the end of long boards.
- Pros: Versatile, adjustable, can be used with other tools.
- Cons: Can be expensive to buy, may require space to store when not in use.
Flip-Up Supports
- Description: Supports integrated into the workbench design that flip up when needed.
- Pros: Always available, don’t take up extra space.
- Cons: Less adjustable than roller stands, may not be as sturdy for very long or heavy pieces.
Table Extensions
- Description: Add-on pieces that extend the workbench surface.
- Pros: Provides a continuous flat surface.
- Cons: Can make the station larger, may require additional support.
Enhancing Your Chop Saw Station
Once you have a basic structure, you can add features to make your station even more functional.
Implementing Chop Saw Dust Collection
Effective chop saw dust collection is vital for a cleaner, healthier workspace.
Basic Dust Port Hookup
Most chop saws have a dust port. You can simply attach a shop vacuum hose directly to this port.
- Pros: Simple, immediate improvement.
- Cons: Shop vacuums have small bags, fill up quickly, and don’t capture fine dust efficiently.
Centralized Dust Collection System
For serious dust control, connect your chop saw to a dedicated dust collector or a shop vacuum with a separator.
- Step 1: Dust Separator: A dust separator (like a Dust Deputy) is placed between your shop vacuum and the saw. Sawdust and larger debris go into the separator’s bin, leaving the vacuum’s filter cleaner and extending its life.
- Step 2: Hose and Fittings: Use appropriately sized hoses (typically 2.5″ or 4″) and adapters to connect the dust separator or dust collector to your chop saw’s dust port.
- Step 3: Airflow: Ensure your dust collector or shop vacuum has enough CFM (cubic feet per minute) to effectively pull the dust away from the cutting area.
Enclosure Design for Dust Control
Building a chop saw enclosure can significantly improve dust collection.
- Design: Create a simple box around the back and sides of the saw, leaving the front clear for operation. Include a dedicated port for your dust collection hose to attach to the enclosure.
- Material: Use plywood or MDF for the enclosure walls.
- Access: Ensure you have easy access for cleaning out accumulated dust and for maintenance.
Incorporating Storage for Chop Saw Accessories
Good storage for chop saw accessories keeps everything tidy and accessible.
Shelving
- Description: Simple shelves below the workbench can store larger items like spare blades, safety gear, or lumber scraps.
- Construction: Build shelves using plywood and 2×4 supports.
Drawers
- Description: Drawers are excellent for smaller items like measuring tapes, pencils, clamps, and safety glasses.
- Construction: You can build simple plywood drawers with drawer slides or opt for more basic slide-less drawers that run on wooden runners.
Pegboards
- Description: Mount pegboard to the sides or back of your station to hang tools and accessories, keeping them visible and within reach.
Building a Mobile Chop Saw Base
If portability is key, building a mobile chop saw base is the way to go.
Types of Mobile Bases
- Commercial Mobile Bases: These are pre-made adjustable bases that can fit a variety of machines. They are easy to use but can be expensive.
- DIY Mobile Bases: These can be built from wood and heavy-duty castors.
DIY Mobile Base Construction
- Frame: Build a sturdy rectangular frame from 2x4s or 2x6s that is slightly larger than your chop saw’s footprint.
- Castors: Attach heavy-duty, lockable swivel castors to each corner of the frame. Ensure the castors are rated to support the weight of your saw plus the materials you’ll be cutting.
- Mounting Plate: Attach a piece of plywood or MDF to the top of the frame to create a stable surface for your saw.
- Saw Mounting: Mount your chop saw to this plate.
- Lever Mechanism (Optional): For easier lifting of the castors to move the base, you can incorporate a simple lever system that lifts one end of the base, retracting the castors slightly.
Creating a Chop Saw Jig
A chop saw jig can improve accuracy and safety for specific types of cuts.
Simple Stop Block Jig
- Purpose: To make identical length cuts.
- Construction: Attach a block of wood to your workbench or a separate fence that can be clamped in place. Position it against your workpiece to ensure consistent cut lengths. For more precise adjustments, use a sliding stop that can be locked in position.
Repeatable Cut Stop
- Description: A more advanced version of the stop block, often incorporating a ruler or tape measure for precise settings.
- Construction: Mount a length of hardwood or aluminum angle to a sliding base. This base can then be positioned along a fence or track and locked in place. A measuring tape can be adhered alongside it for quick adjustments.
Angle Jigs
- Purpose: To make accurate angled cuts consistently.
- Construction: These can range from simple wedges to more complex sliding jigs that hold the workpiece at a specific angle.
Advanced Chop Saw Station Features
Once your basic station is built and enhanced, consider these advanced features.
Integrated Lighting
Good lighting is essential for precise work.
- LED Strips: Mount LED light strips under any upper shelves or along the back of the workbench to illuminate the cutting area.
- Work Light: A flexible gooseneck work light can be clamped to the side of the station.
Power Strip Integration
Running power cords can be messy and a tripping hazard.
- Mounting: Mount a multi-outlet power strip to the side or back of your station.
- Cable Management: Use cable clips or raceways to keep cords organized and tidy.
Dedicated Saw Mounting Platform
If you have a large or heavy-duty chop saw, you might consider building a separate, reinforced platform for it.
- Construction: This platform can be made from thicker plywood and reinforced with framing lumber. It attaches to the main workbench.
- Benefits: Provides extra stability for larger saws.
Table Saw Integration (for Larger Stations)
For those with more space and a desire for a comprehensive cutting station, integrating a table saw can be a game-changer.
- Concept: Build a large workbench with a recess for your table saw insert plate. This creates a larger, continuous work surface where both saws can be used efficiently.
- Considerations: Requires careful planning for alignment and fence integration.
Maintenance and Safety
Regular maintenance and adherence to safety practices will ensure your chop saw station remains a valuable and safe asset.
Regular Maintenance
- Check for Squareness: Periodically re-check that your fence and any jigs are square to the blade.
- Tighten Fasteners: Ensure all screws and bolts are tight. Vibration can loosen them over time.
- Clean Surfaces: Keep the workbench and saw clean of sawdust and debris.
- Lubricate Moving Parts: If your station has moving parts (like on a mobile base), lubricate them as needed.
- Inspect Dust Collection: Ensure your dust collection system is working efficiently and that hoses are not clogged.
Safety First
- Always Wear Safety Gear: Safety glasses, ear protection, and dust masks are mandatory.
- Keep Workspace Clear: Remove any clutter from around the station.
- Secure Workpiece: Always clamp your workpiece securely when making cuts, especially when using jigs or making repetitive cuts.
- Read Your Saw Manual: Familiarize yourself with the specific safety features and operation of your chop saw.
- Never Reach Over the Blade: Keep your hands and fingers away from the blade path.
- Disconnect Power: Always unplug your saw before making any adjustments or maintenance.
- Test Mobile Bases: If your station is mobile, ensure the brakes are locked before operating the saw.
Frequently Asked Questions (FAQ)
Q1: What is the ideal height for a chop saw station?
A1: The ideal height is typically around waist level, roughly 32-36 inches from the floor to the workbench surface. This allows for comfortable operation without excessive bending. You can test different heights by placing your saw on various objects to find what feels best for your posture.
Q2: Can I build a chop saw station with limited space?
A2: Absolutely! For limited spaces, consider building a more compact workbench, a foldable design, or a station with a mobile chop saw base that can be rolled away when not in use. Incorporating vertical storage can also maximize space efficiency.
Q3: How important is a chop saw fence?
A3: A chop saw fence is extremely important for accuracy and repeatability. It provides a stable surface for your material to register against, ensuring consistent cut lengths and angles. Without a solid fence, making precise, identical cuts becomes much more challenging.
Q4: What is the best material for a chop saw workbench top?
A4: 3/4-inch MDF or plywood are excellent choices for a chop saw workbench top. MDF offers a very flat surface, which is ideal for saw placement. Plywood is also durable and can be a good option. Some builders prefer to add a sacrificial layer of hardboard or laminate over the top for added durability and ease of cleaning.
Q5: How do I improve dust collection for my chop saw?
A5: To improve chop saw dust collection, connect your saw to a shop vacuum with a dust separator, or directly to a dedicated dust collector. Building a simple enclosure around the back and sides of the saw with a dedicated dust port can also significantly enhance collection efficiency by containing the dust.
Q6: What kind of storage is useful for a chop saw station?
A6: Useful storage includes shelves for larger items like spare blades or lumber, drawers for smaller tools like measuring tapes and pencils, and pegboards on the sides or back for hanging frequently used accessories like clamps or safety glasses.
Q7: What makes a chop saw station stable?
A7: Stability comes from using sturdy materials like 2x4s or 2x6s for the frame, ensuring all joints are well-secured with screws and glue, and using a wide base footprint. For mobile bases, locking castors are crucial to prevent movement during operation.
Q8: What is a chop saw jig and why would I use one?
A8: A chop saw jig is a custom-made accessory designed to aid in specific types of cuts. For example, a stop block jig helps make repetitive cuts of the same length, while an angle jig ensures consistent angled cuts. They improve accuracy and safety, especially for production work.
By following these steps and incorporating the various design elements, you can build a chop saw station that perfectly suits your woodworking needs, making your projects more efficient, accurate, and enjoyable.