
Can you use a drill press for drilling metal? Yes, you can use a drill press for drilling metal, but you need to select the right drill bits, adjust the drilling speeds, and ensure proper clamping.
A drill press is a workshop marvel. It’s a stationary tool that offers more power, precision, and control than a handheld drill. Whether you’re a hobbyist or a professional woodworker or metalworker, a drill press can elevate your projects. But like any powerful tool, knowing how to use it safely and effectively is paramount. This guide will walk you through everything from setting up your drill press to advanced techniques and troubleshooting.
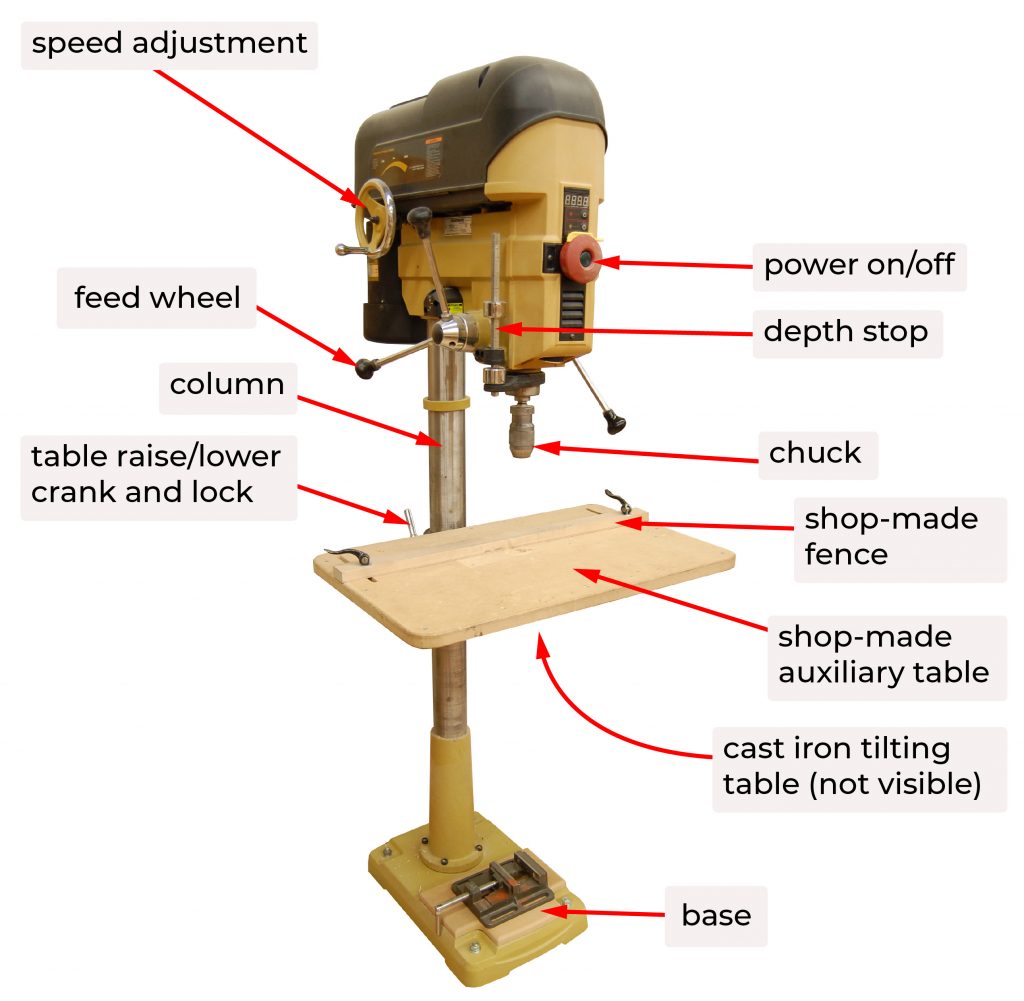
Image Source: pressbooks.bccampus.ca
Setting Up Your Drill Press for Success
Before you even think about drilling, proper setup is crucial. This ensures your safety and the quality of your work.
Anchoring the Drill Press
For stability and safety, your drill press must be securely anchored. A wobbly drill press is a recipe for disaster.
- Benchtop Models: These are typically smaller and lighter. They can be bolted to a sturdy workbench or a dedicated stand. Use lag bolts or machine bolts with washers and nuts to secure the base.
- Floor-Standing Models: These are heavier and more stable but still benefit from anchoring, especially if you’re working on a slightly uneven floor or plan to exert significant force. Bolt the base to the floor or a heavy-duty stand.
Table Height Adjustment
Getting the table at the right height is key for comfortable and accurate drilling.
- Workpiece Clearance: The table should be positioned so that your workpiece, plus any necessary jigs or clamps, fits comfortably between the drill bit and the table. You need enough space for the drill bit to pass through the material without hitting the table.
- Ergonomics: Adjust the table height so you can operate the drill press without stooping or straining your back. Your arms should be at a comfortable angle when you engage the quill.
- Locking Mechanism: Most drill presses have a mechanism to lock the table in place. Ensure this is tightened securely after you’ve made your adjustment.
Column and Head Alignment
While most drill presses come pre-aligned, it’s worth a quick check, especially with used equipment.
- Spindle to Table: Visually inspect that the spindle (where the chuck attaches) is perpendicular to the table. Most modern drill presses have fine adjustments for this.
- Runout: Some minor wobble in the chuck is normal, but excessive runout (wobble) can indicate worn bearings or a bent spindle. This is harder to fix yourself and might require professional attention or replacement of parts.
Mastering Drill Press Operation: The Core Techniques
Once your drill press is set up, it’s time to learn the fundamental operations.
Selecting the Right Drill Bit
The type of drill bit you use depends entirely on the material you’re drilling and the size of the hole you need.
Drill Bit Types
- High-Speed Steel (HSS): The most common type, suitable for wood, plastics, and many metals (especially softer ones like aluminum and brass).
- Cobalt: HSS bits with cobalt added. They are harder and more heat-resistant, making them excellent for drilling harder metals like steel and stainless steel.
- Carbide Tipped: These have carbide tips brazed onto a steel shank. They are extremely hard and designed for drilling very hard materials, including tile, brick, and concrete (though a hammer drill is often better for concrete).
- Brad-Point Bits: Primarily for wood. The sharp point in the center helps to prevent the bit from wandering when you start the hole, leading to very precise entry.
- Forstner Bits: Also for wood, these create clean, flat-bottomed holes, perfect for mortises or decorative recesses.
- Spade Bits (Paddle Bits): For wood, these are good for larger diameter holes but can leave a rougher finish than Forstner bits.
- Hole Saws: Used for cutting large-diameter holes in wood, metal, and plastic. They have a pilot bit in the center to guide them.
Choosing the Right Bit for Your Material
| Material | Recommended Drill Bit Type(s) |
|---|---|
| Softwood | HSS, Brad-Point, Spade Bits |
| Hardwood | HSS, Brad-Point, Forstner Bits |
| Plywood | HSS, Brad-Point |
| Plastics | HSS (slow speed recommended) |
| Aluminum | HSS, Cobalt (use cutting fluid) |
| Brass | HSS |
| Mild Steel | HSS, Cobalt (use cutting fluid) |
| Stainless Steel | Cobalt (essential, use cutting fluid and slower speeds) |
| Cast Iron | Cobalt, Carbide Tipped (use cutting fluid) |
| Tile/Brick | Carbide Tipped Masonry Bits |
Adjusting Drilling Speeds (RPM)
This is a critical aspect of safe and effective drilling. Too fast, and you’ll overheat and dull your bit. Too slow, and you’ll struggle to cut effectively, especially in harder materials.
Deciphering Drilling Speeds
Drill presses have a variable speed pulley system or electronic speed control. You adjust the speed by moving the belt between different sized pulleys or by turning a dial.
- General Rule: The harder the material and the larger the drill bit diameter, the slower the speed should be. Softer materials and smaller bits can tolerate higher speeds.
Speed Chart for Drill Bits (Approximate RPM)
| Drill Bit Diameter | Softwood | Hardwood | Plastics | Aluminum | Mild Steel | Stainless Steel |
|---|---|---|---|---|---|---|
| 1/8″ – 1/4″ | 2000+ | 1500 | 1200 | 1000 | 700 | 400 |
| 1/4″ – 1/2″ | 1500 | 1000 | 800 | 700 | 400 | 250 |
| 1/2″ – 1″ | 1000 | 700 | 500 | 400 | 250 | 150 |
| 1″ + | 700 | 500 | 300 | 300 | 150 | 100 |
Important Notes on Speed:
- These are guidelines. Always listen to your drill and feel the cut.
- For very hard materials or large bits, using cutting fluid or lubricant is essential, not just for cooling but also for prolonging bit life.
Clamping Work Securely
Never, ever hold your workpiece by hand while using a drill press. The drill bit can catch, causing the workpiece to spin violently, leading to serious injury.
Clamping Work Strategies
- Vise: A drill press vise is ideal for holding irregular shapes or smaller pieces securely. Ensure the vise is made of a material that won’t damage your workpiece if it has smooth jaws.
- Clamps: C-clamps, quick-release clamps, or strap clamps can be used to hold flat stock to the drill press table.
- Placement: Position clamps so they don’t interfere with the drill bit’s path or the quill’s descent.
- Support: Ensure the clamps are providing firm, even pressure.
- Hold-Downs: Some drill presses have built-in hold-downs that attach to the table slots.
- Wooden Blocks: For very delicate pieces or to avoid marring, use sacrificial wooden blocks between your clamps and the workpiece.
- Drilling a Pilot Hole for Clamps: For thin materials where you can’t clamp directly, drill a small pilot hole in a scrap piece of the same material and use that to guide your main drill bit. Clamp the scrap piece, which will ultimately be discarded.
Drilling Depth Control
Most drill presses have a depth stop mechanism, which allows you to control how far the drill bit penetrates the material.
Setting the Drilling Depth
- Position Workpiece: Place your workpiece under the drill bit and lower the quill until the bit tip just touches the surface.
- Adjust Depth Stop: Adjust the depth stop mechanism so that the collar hits the stop at the desired depth. There might be a scale on the quill or a separate adjustable collar.
- Test: Perform a test drill on a scrap piece of the same material to verify the depth is correct.
The Drilling Process: Step-by-Step
- Select and Install Drill Bit: Choose the appropriate drill bit and securely tighten it in the drill chuck. Ensure there’s no wobble.
- Set Speed and Depth: Adjust the drill press speed to the correct RPM for your material and bit. Set the depth stop if required.
- Position and Clamp Workpiece: Place your workpiece on the table and clamp it securely. Ensure it won’t move.
- Start the Drill: Turn on the drill press and let it reach full speed.
- Engage the Quill: Gently and smoothly push the quill down using the feed handle. Apply steady pressure.
- Peck Drilling (for deeper holes or harder materials): For holes deeper than their diameter, or when drilling metals, periodically retract the drill bit slightly (about halfway through the depth of the cut) to clear chips and allow cooling. This is called “pecking.”
- Clear Chips: Regularly clear away chips from the workpiece and the drill bit. A brush is ideal; avoid using your hands.
- Finishing the Hole: As the drill bit breaks through the material, reduce the pressure to prevent tear-out (especially in wood) or snagging.
- Retract the Bit: Once the hole is complete, retract the drill bit by releasing the quill handle.
- Turn Off: Turn off the drill press and wait for the spindle to stop completely before removing the workpiece or making any adjustments.
Advanced Techniques and Drill Press Accessories
Once you’ve mastered the basics, you can explore more advanced uses and accessories that enhance your drill press’s capabilities.
Using Jigs and Fixtures
Jigs and fixtures are custom-made or commercially available guides that ensure repetitive accuracy.
- Cross-Slide Vises: These allow you to move the workpiece precisely along two axes (X and Y), useful for creating patterns of holes or precise spacing.
- Drill Guides: Simple blocks with accurately sized holes that you clamp to your workpiece to ensure the drill bit enters at a precise angle.
- Indexing Heads: For very precise angular drilling or milling, though these are more advanced accessories.
Drilling at an Angle
While a drill press is designed for perpendicular drilling, you can achieve angled holes with some modifications.
- Tilting Table: Some drill presses have tables that can tilt to specific angles.
- Angle Jigs: You can create or purchase specialized jigs that hold your workpiece at a specific angle and guide the drill bit. Alternatively, you can use blocks to create a stable angled support. Remember to clamp securely!
Tapping Threads
Tapping is the process of cutting internal threads into a hole, allowing you to screw a bolt into it.
- Tap Holders: Specialized tap chucks that hold a tap securely and allow for controlled rotation.
- Slow Speed: Tapping requires very slow speeds.
- Cutting Fluid: Essential for lubrication and cooling.
- Forward and Reverse: You’ll typically need to set your drill press for forward and reverse rotation to advance and retract the tap.
Using Hole Saws and Large Diameter Bits
- Slower Speeds: Always use much slower speeds for hole saws and large diameter bits.
- Pilot Bit: Use the pilot bit to accurately center the hole saw.
- Clear Chips: Periodically retract the hole saw to clear chips, especially in thicker materials.
- Support: Ensure your workpiece is very securely clamped, as large bits exert significant torque.
Drill Press Safety: Prioritizing Your Well-being
Safety should always be your number one concern when operating any power tool.
Personal Protective Equipment (PPE)
- Safety Glasses/Face Shield: Absolutely essential. Flying chips can cause severe eye injury. A full face shield offers even more protection.
- Hearing Protection: While not always necessary for short drilling tasks, prolonged use or drilling very hard materials can be loud.
- Dust Mask/Respirator: When drilling wood or certain plastics, fine dust can be produced.
- No Loose Clothing or Jewelry: These can get caught in the rotating parts. Tie back long hair.
Workshop Safety Practices
- Keep Work Area Clean: A cluttered workspace is a hazard.
- Good Lighting: Ensure you can see what you’re doing clearly.
- No Distractions: Focus on the task at hand.
- Never Leave Running: Never leave a drill press running unattended.
- Wait for Stop: Always wait for the spindle to stop completely before removing work or changing bits.
- Disconnect Power: Unplug the drill press before changing bits, making adjustments, or performing maintenance.
Specific Drill Press Hazards
- Workpiece Kickback: As mentioned, this is the most common and dangerous hazard. Always clamp your work.
- Entanglement: Keep hands away from the rotating chuck and spindle.
- Flying Debris: Wear eye protection.
- Tool Wobble: A wobbly bit or chuck can break and fly off.
Troubleshooting Common Drill Press Issues
Even with the best care, you might encounter problems. Here’s how to tackle some common issues.
Bit Wobble
- Cause: Loose chuck, worn chuck jaws, bent drill bit, bent spindle.
- Solution: Ensure chuck is tight. Try a different drill bit. If the wobble persists with multiple bits, the spindle may be the issue.
Motor Overheating
- Cause: Dull drill bit, wrong speed, excessive pressure, lack of lubrication.
- Solution: Check bit sharpness. Adjust speed lower. Reduce pressure. Use cutting fluid for metals. Ensure vents are clear.
Hole Is Not Perpendicular
- Cause: Table not square to spindle, workpiece shifted during drilling.
- Solution: Re-align the table. Ensure workpiece is firmly clamped.
Workpiece Burning
- Cause: Too high a speed, dull bit, too much friction.
- Solution: Slow down the RPM. Use a sharper bit. Use cutting fluid on metals. Drill in stages (peck drilling) for deep holes.
Drill Press Won’t Start
- Cause: No power, tripped circuit breaker, faulty switch, safety interlock engaged.
- Solution: Check power cord and outlet. Check breaker. Inspect the switch. Ensure the chuck guard or belt cover is properly closed.
Frequently Asked Questions (FAQ)
What is the difference between a drill press and a handheld drill?
A drill press is a stationary tool that holds the drill bit vertically and uses a motor to rotate it while a quill mechanism moves the bit up and down. This offers much greater precision, stability, and power compared to a handheld drill, which requires you to manually guide the bit.
Can I use a drill press as a spindle sander?
Yes, with the right attachment, many drill presses can be used as spindle sanders. You’ll need a special spindle sander drum that fits into the drill chuck.
How do I clean and maintain my drill press?
Regular cleaning is important. Wipe down surfaces to remove dust and debris. Lubricate moving parts like the quill and table elevation mechanism according to the manufacturer’s recommendations. Ensure belts are in good condition and properly tensioned.
Is it safe to drill freehand on a drill press?
No. You must always clamp your workpiece securely to the drill press table or use a vise. Holding the workpiece by hand can lead to it spinning violently, causing severe injury.
What are drill press accessories that can improve my work?
Popular drill press accessories include vises, cross-slide tables, mortising attachments, drum sanders, featherboards for added workpiece control, and specialized jigs for repetitive tasks.
By following these guidelines, you can safely and effectively harness the power and precision of your drill press to create high-quality results in all your projects. Remember, practice and attention to detail are key.