
Image Source: www.sawstop.com
How To Make A Cross Cut Sled For Table Saw Easily
Can you make a crosscut sled for a table saw? Yes, absolutely! Building your own DIY crosscut sled is a fantastic way to improve your table saw’s accuracy and safety. It’s a foundational table saw jig that every woodworker should have. This guide will walk you through building a robust and reliable woodworking sled that will make your cuts precise and repeatable. You can also call this a sled for table saw or a shop made sled, and it’s a game-changer for any woodworking shop.
Why You Need a Crosscut Sled
A crosscut sled is essential for making perfectly square cuts on your table saw. Unlike a miter gauge, which has a small contact point with the miter slot and can wiggle, a sled has a long runner that rides in the slot, ensuring your workpiece stays perfectly aligned. This accuracy is crucial for cabinet making, furniture building, and any project where precise joinery is important. It’s also a significantly safer option than freehand cutting or relying solely on a miter gauge.
Materials You’ll Need
Gathering your materials before you start is key. Here’s a list of what you’ll typically need for a standard crosscut sled build:
- Plywood:
- One piece of 3/4-inch baltic birch plywood (or high-quality cabinet-grade plywood) for the base. The size will depend on your table saw’s capacity and your desired sled size. A common size is 24 inches by 36 inches.
- One piece of 1/4-inch or 1/2-inch plywood for the fence.
- Hardwood:
- One piece of 3/4-inch hardwood (like oak, maple, or poplar) for the runner that fits into your table saw’s miter slot. This should be a stable hardwood that won’t warp.
- Fasteners:
- Wood screws (1 1/4 inch and 2 inch are good sizes).
- Wood glue.
- Tools:
- Table saw (obviously!)
- Circular saw or track saw (optional, for breaking down large plywood sheets)
- Miter saw (optional, for cutting fence pieces)
- Jigsaw (optional, for cutting out blade slot)
- Drill/driver
- Countersink bit
- Measuring tape
- Pencil
- Square (combination square and framing square are useful)
- Clamps (pipe clamps or bar clamps are ideal)
- Sandpaper (various grits)
- Safety glasses
- Hearing protection
Step-by-Step Guide to Build Your Crosscut Sled
Let’s get down to the actual process of how to build a crosscut sled.
Step 1: Prepare Your Base
- Choose Your Size: Decide on the dimensions for your sled’s base. A good starting point is a size that’s slightly larger than the widest material you anticipate cutting, plus enough room for safety. For instance, if you often cut 18-inch wide panels, a 24-inch wide sled is a good choice. The length can be 30-36 inches for good support.
- Cut the Base: Using your table saw, circular saw, or track saw, cut a piece of 3/4-inch plywood to your desired base dimensions. Ensure the edges are perfectly square. Precision here is key for the sled’s effectiveness.
Step 2: Create the Runner
The runner is what slides in your table saw’s miter slot and keeps the sled aligned.
- Measure Your Miter Slot: Measure the width of your table saw’s miter slot. Most are 3/8 inch deep and 3/4 inch wide. However, it’s crucial to measure your specific saw.
- Cut the Runner Material: Take your 3/4-inch hardwood. You’ll want to rip it to a width that will slide snugly into your miter slot. You’ll likely need to rip it to approximately 3/4 inch wide.
- Fit the Runner: The runner should slide smoothly but without excessive play. You might need to do a few test passes on your table saw to get the width just right. You want it snug enough that it doesn’t wiggle, but not so tight that it’s difficult to move.
- Attach the Runner to the Base:
- Lay your plywood base flat.
- Position the hardwood runner along one edge of the base, ensuring it’s perfectly parallel to that edge.
- Apply wood glue to the bottom of the runner.
- Place the runner onto the base, aligning it with the edge.
- Clamp it securely in place.
- Pre-drill and countersink: Drill pilot holes through the plywood base into the runner. Use a countersink bit so the screw heads will sit flush or slightly below the surface.
- Screw the runner: Drive 1 1/4-inch wood screws every 6-8 inches to secure the runner to the base.
- Important Check: After the glue dries, ensure the runner is still perfectly parallel to the base’s edge. Any misalignment will result in inaccurate cuts.
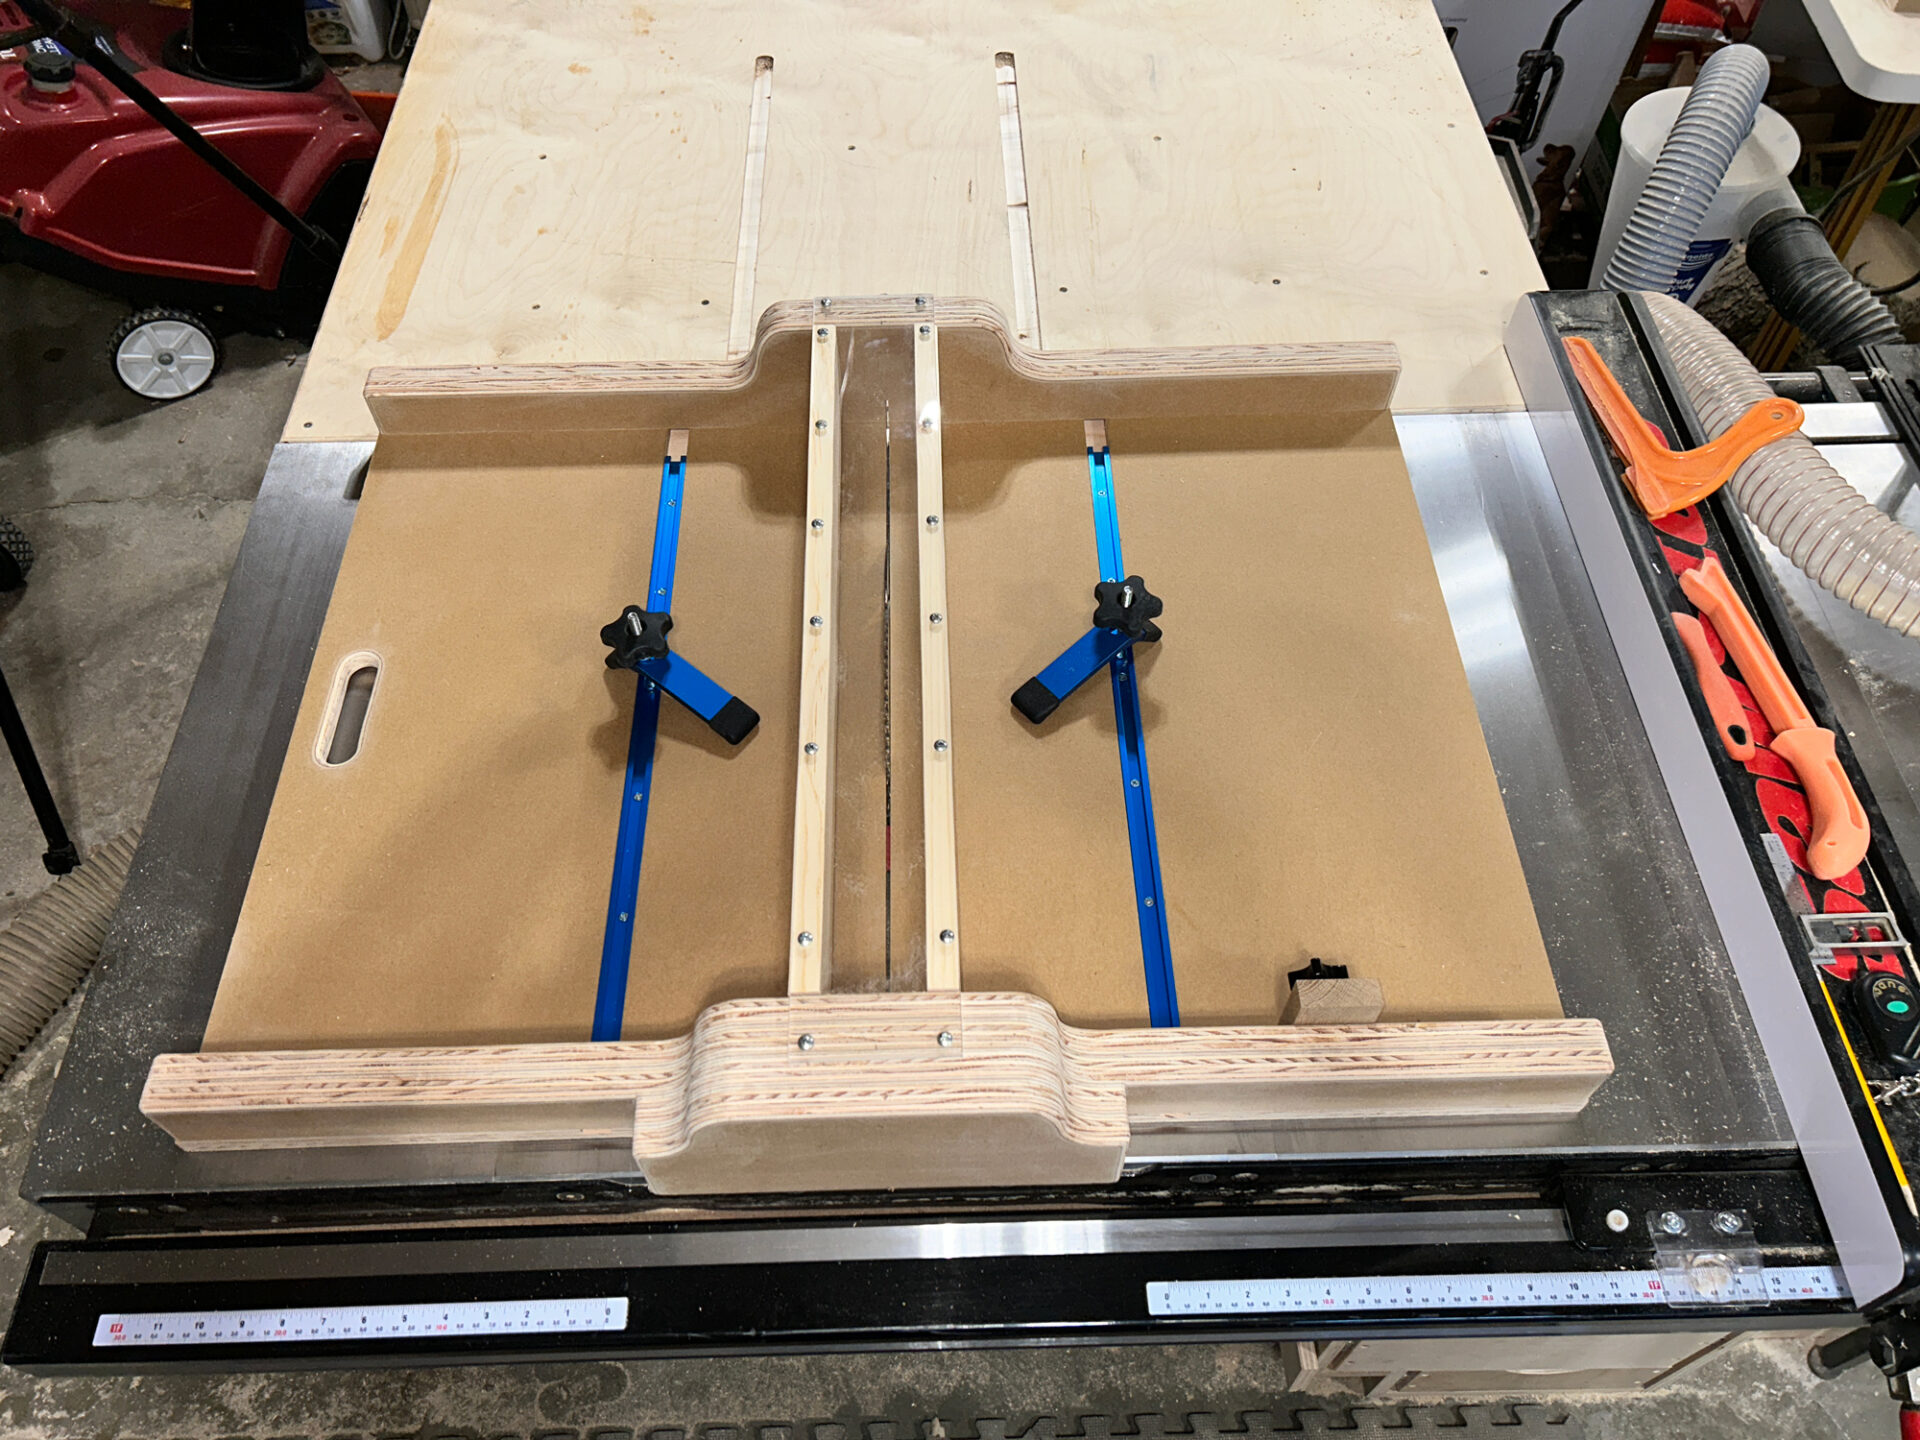
Step 3: Attach the Fence
The fence is crucial for holding your workpiece securely against the runner.
- Cut the Fence: Cut a piece of 1/4-inch or 1/2-inch plywood to be your fence. The height of the fence should be enough to provide good support for your workpieces, typically 3 to 4 inches high. The length of the fence should be the same as the length of your sled’s base.
- Position the Fence:
- Stand the fence piece up on its edge along the back of the sled base, so it’s perpendicular to the runner.
- The fence needs to be absolutely square to the runner. This is the most critical step for accuracy. Use a framing square to check for a perfect 90-degree angle.
- Ensure the fence is flush with the end of the sled base where the runner is attached.
- Glue and Screw the Fence:
- Apply a generous amount of wood glue along the bottom edge of the fence where it meets the sled base.
- Clamp the fence firmly to the base, ensuring it remains perfectly square.
- Pre-drill and countersink: Drill pilot holes through the fence into the sled base. Again, countersink so the screws are flush.
- Screw the fence: Drive 2-inch wood screws through the fence into the base every 6-8 inches.
Step 4: Cut the Blade Slot
This is where your sled becomes functional. The blade slot allows the saw blade to pass through the sled.
- Positioning is Key:
- Place your sled on the table saw.
- Slide the sled so that the runner is snug against the table saw’s rip fence (or a precisely aligned auxiliary fence). This ensures the sled base is parallel to the blade.
- Crucial: Adjust the sled’s position so the blade will cut a slot approximately 1/8 inch away from the fence. This distance is important. If the slot is too close to the fence, you won’t be able to cut full-width boards. If it’s too far, your sled won’t be as versatile for smaller pieces.
- Mark the Cut Line:
- Raise the table saw blade to its full cutting height.
- Turn on the saw.
- Carefully slide the sled forward, allowing the blade to cut a slot through the sled’s base.
- Turn off the saw and wait for the blade to stop completely before removing the sled.
- Refine the Slot (Optional but Recommended):
- You can use a jigsaw or a router with a straight bit to widen the slot slightly if needed, but be careful not to make it too wide. The goal is for the blade to pass through cleanly without binding.
- Some woodworkers prefer to cut a slightly wider slot using a dado blade on the table saw for a cleaner and more precise opening.
- If you’re using a zero clearance insert on your table saw, you can align the sled so the blade cuts into that insert, creating a perfectly matched slot. This is an advanced but highly effective technique.
Step 5: The Zero-Clearance Modification (Advanced)
For ultimate precision, you can create a zero clearance insert for your sled. This means the blade cuts directly into the sled’s surface, preventing small offcuts from falling into the blade slot and causing tear-out.
- Cut a Zero Clearance Plate: Cut a thin piece of plywood or MDF (1/8 inch or 1/4 inch) to the same dimensions as your sled’s base.
- Align and Cut:
- Place this thin plate on top of your sled base.
- Carefully align the sled on your table saw so the blade cuts a slot in this thin plate, just as you did in Step 4.
- You can then glue and screw this thin plate to your sled base.
- Alternative Zero Clearance: Another method is to use a pre-made zero clearance insert specifically designed for table saws and adapt it to your sled. This often involves a sliding mechanism or a removable insert that matches your blade’s kerf.
Step 6: Adding Support and Stability
To make your sled more versatile and stable, consider adding more runners.
- Second Runner: For added stability and to prevent the sled from tipping, especially when cutting wider boards, you can add a second runner.
- Measure the distance between your miter slot and the edge of your sled’s base.
- Cut another piece of hardwood runner to this length.
- Carefully attach it to the underside of the sled base, ensuring it’s parallel to the first runner. Glue and screws are essential here.
- Reinforcing the Fence: For very heavy-duty use or if you’re using thinner plywood for the fence, you can add a second fence piece or a cleat to the back of the existing fence.
Step 7: Finishing Touches
- Sanding: Sand all the edges and surfaces of your sled smooth. This will make it more pleasant to use and prevent splinters.
- Testing:
- Make a test cut on a scrap piece of wood.
- Measure the cut end. It should be perfectly square (90 degrees) to the edge of your workpiece.
- You can use a framing square to check the 90-degree angle.
- Calibrating for Squareness:
- If your cuts aren’t perfectly square, you might need to adjust the fence.
- Loosen the screws holding the fence to the base.
- Use a framing square to ensure the fence is perfectly 90 degrees to the runner.
- Re-tighten the screws.
- You can also use shims of paper or thin veneer behind the fence to make minor adjustments for perfect squareness.
Enhancing Your Crosscut Sled
- Stop Blocks: Adding a stop block to your fence is incredibly useful for making multiple identical cuts. You can use a simple clamp-on stop block or drill and screw a small block of wood onto the fence at a specific measurement.
- Hold-downs: For added safety, consider incorporating some form of hold-down mechanism. This could be as simple as a clamp that attaches to the fence or more specialized hold-down clamps.
- Dust Collection: You can add a port to your sled to connect to your shop’s dust collection system, helping to manage sawdust.
- Customization: This homemade table saw jig is highly customizable. Think about the types of cuts you make most often and adapt your sled accordingly. For example, you could create different fences or add features for specific tasks.
Comparing Sleds to Other Table Saw Accessories
- Miter Gauge vs. Sled: As mentioned, a sled offers superior stability and accuracy due to its larger contact surface with the miter slot. A miter gauge can still be useful for very thin materials or when space is limited, but for most crosscutting, a sled is the preferred tool.
- Dado Blade vs. Sled: A dado blade is used for cutting grooves and dados. While essential for certain joinery, it doesn’t replace the function of a crosscut sled for making straight, square cuts across a board.
- Rip Fence vs. Sled: The rip fence on your table saw is used for making cuts parallel to the blade (rips). A crosscut sled is used for cuts perpendicular to the blade (crosscuts). They serve different purposes.
Table: Material Comparison for Runners
| Material | Pros | Cons | Best Use Case |
|---|---|---|---|
| Baltic Birch | Stable, dense, smooth grain | Can be more expensive | Runners, sled base |
| Oak | Hard, durable, stable | Can be heavy, slightly more prone to minor expansion | Runners |
| Maple | Hard, dense, smooth, wears well | Can be slightly more expensive than oak | Runners |
| Poplar | Lighter, easier to work with, cost-effective | Softer, can dent more easily | Runners (if well-selected and flat) |
| MDF | Flat, stable, inexpensive | Less durable, can swell if exposed to moisture | Sled base (if weight is a concern) |
| Plywood | Strong, stable, readily available | Can delaminate if low quality, requires careful selection | Sled base, fence |
Frequently Asked Questions (FAQ)
Q1: What is the most important step in building a crosscut sled?
A1: The most critical step is ensuring the fence is perfectly square (90 degrees) to the runner. Any misalignment here will result in inaccurate cuts.
Q2: Can I use a different type of wood for the runner?
A2: Yes, you can use other dense hardwoods like maple or oak. The key is to use a stable wood that won’t warp and can be machined to a precise dimension. Avoid softwoods like pine for the runner.
Q3: How wide should my sled be?
A3: The width of your sled should be at least a few inches wider than the widest material you anticipate cutting. A common starting point is 24 inches.
Q4: What’s the best way to attach the runner to the sled base?
A4: Use wood glue for a strong bond, then secure it with wood screws. Pre-drilling and countersinking the screw holes is essential so the screw heads sit flush with or below the runner’s surface.
Q5: My cuts are not square. What should I do?
A5: Double-check that your fence is precisely 90 degrees to the runner. Loosen the fence screws, use a framing square to align it perfectly, and re-tighten. Minor adjustments can sometimes be made by shimming the fence. Also, ensure your table saw’s blade is aligned with the miter slot.
Q6: Is a crosscut sled safer than a miter gauge?
A6: Yes, in most situations, a crosscut sled is significantly safer. Its design provides greater stability and support for the workpiece, reducing the risk of kickback or the workpiece tipping.
Q7: How do I make my sled zero clearance?
A7: To achieve zero clearance, you can cut a thin piece of plywood or MDF to fit on top of your sled base and then cut the blade slot through it. This creates a perfect match for your blade, preventing small offcuts from falling into the slot.
Building your own crosscut sled is a rewarding project that will significantly enhance your woodworking capabilities. With a little care and precision, you’ll have a shop-made jig that delivers accurate, repeatable cuts every time. This is a fundamental table saw jig that is well worth the effort. Enjoy your newly improved precision and safety!