
Can you drill a hole in a mirror? Yes, you can drill a hole in a mirror, but it requires care, the right tools, and specific techniques to prevent it from cracking. This guide will walk you through the process of drilling glass, with a special focus on mirror drilling tips and vital safety precautions.
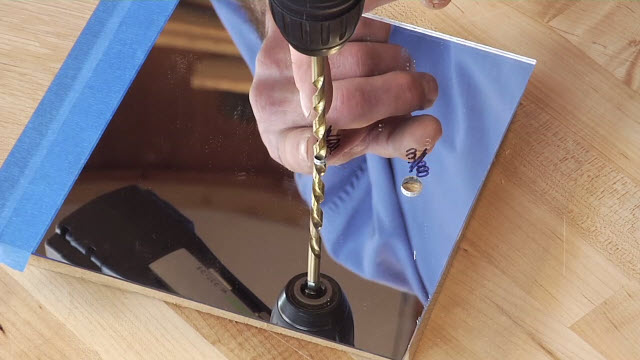
Image Source: d2culxnxbccemt.cloudfront.net
Preparing for Glass Drilling
Drilling into glass, especially a mirror, is different from drilling into wood or metal. Mirrors are fragile and can easily shatter if not handled properly. The backing of a mirror, typically silver or aluminum, can also affect how you drill. This preparation stage is crucial for a successful outcome.
Gathering Your Tools and Materials
Before you start, ensure you have all the necessary items. Having everything ready will minimize interruptions and reduce the risk of mistakes.
- Diamond Drill Bit: This is non-negotiable. Standard drill bits will not cut glass. Diamond drill bits have a coating of diamond particles that are hard enough to grind through the glass. For mirrors, you’ll want a bit specifically designed for glass or tile. The size of the bit should match the desired hole diameter.
- Drill: A variable-speed drill is highly recommended. This allows for slow speed drilling, which is critical for controlling the heat and pressure. A corded drill often provides more consistent power than a cordless one for tasks like this.
- Water Source (Lubricant): Water is essential for cooling the drill bit and the glass. This prevents overheating, which is a primary cause of cracking. You can use a spray bottle filled with water or have a small stream of water directed at the drilling site. Some people use oil-based lubricants, but water is generally preferred for glass as it’s cleaner and less messy.
- Masking Tape: To help prevent the drill bit from slipping when you start drilling and to offer some protection to the mirror’s surface.
- Safety Glasses: Always wear safety glasses to protect your eyes from glass shards.
- Gloves: Protect your hands from sharp edges and potential cuts.
- Marker: A permanent marker for marking the drilling spot.
- Support Material: A piece of wood or a thick cardboard to place under the mirror. This provides a stable surface and prevents the drill bit from digging into your workbench when it breaks through the glass.
- Drill Guide (Optional but Recommended): A glass drilling guide or a DIY jig can help you maintain the correct angle and position for the hole.
Understanding Your Mirror
Not all mirrors are created equal. The thickness of the glass and the type of backing can influence the drilling process.
- Glass Thickness: Thicker glass is generally more forgiving. Thinner glass mirrors are much more prone to cracking.
- Mirror Backing: Most modern mirrors have a silver or aluminum backing. This backing is relatively thin and will be drilled through along with the glass. Older mirrors might have different backing materials that could react to heat or lubricants. Be cautious with antique or very old mirrors.
Step-by-Step Guide to Drilling a Hole in a Mirror
Follow these steps carefully to drill a hole in your mirror safely and effectively.
Step 1: Safety First!
Before you do anything else, put on your safety glasses and gloves. Ensure your workspace is well-lit and free of clutter. Have a damp cloth or sponge ready to clean up any glass dust.
Step 2: Mark the Drilling Spot
Using a permanent marker, clearly mark the exact spot where you want the hole. For precision, especially if using a guide, make a small “X” or a dot.
Step 3: Apply Masking Tape
Cover the marked area with a few layers of masking tape. This helps to:
- Prevent Slipping: The tape provides a grippy surface for the drill bit to start on, reducing the chance of it wandering.
- Protect the Surface: It offers a minimal layer of protection to the mirror’s surface from minor scratches.
- Contain Shards: It can help to catch some of the glass dust and small shards that are generated during drilling.
Step 4: Secure the Mirror
It’s crucial to ensure the mirror doesn’t move during drilling.
- Flat Surface: Place the mirror on a flat, stable surface like a workbench or a sturdy table.
- Support Material: Put a piece of wood or thick cardboard underneath where you will be drilling. This supports the glass and prevents the drill bit from snagging the workbench when it breaks through.
- Clamping (Optional): If possible and safe for the mirror, gently clamp it in place. Be very careful not to apply too much pressure, as this can cause the mirror to crack. Use soft pads between the clamps and the mirror.
Step 5: Set Up Your Drill
- Diamond Drill Bit: Insert the appropriate size diamond drill bit into your drill. Ensure it’s securely tightened.
- Speed Setting: Set your drill to its lowest speed setting. Slow speed drilling is paramount for glass drilling. High speeds generate excessive heat, leading to cracks.
- No Hammer Function: Make sure the hammer function on your drill is turned OFF. This is for drilling into masonry and will shatter the glass.
Step 6: Lubricate the Drilling Area
This is a critical step in mirror drilling tips. Heat buildup is the enemy of glass.
- Water Lubricant: Apply water to the area you’ll be drilling. You can do this using a spray bottle, a sponge, or by having a slow, steady drip of water directed at the point of contact. A small dam of putty or clay around the drilling site can help contain the water.
- Constant Lubrication: Keep the area wet throughout the drilling process. As the bit spins, the water will cool both the bit and the glass, preventing thermal shock and cracking.
Step 7: Begin Drilling
Now for the actual drilling. Remember: slow and steady.
- Initial Angle: Start drilling at a slight angle (about 45 degrees) with very light pressure. This allows the diamond bit to create a groove or a shallow indentation.
- Progress to Perpendicular: Once the bit has started a groove, gradually bring the drill perpendicular (straight up and down) to the mirror’s surface.
- Gentle Pressure: Apply only light, consistent pressure. Let the diamond drill bit do the work. Forcing the drill will almost certainly lead to a cracked mirror.
- Periodically Lift: Lift the drill bit out of the hole every few seconds. This helps to clear away glass dust and debris and allows fresh water to reach the drilling site.
Step 8: Continue Drilling Through
Keep drilling slowly, maintaining the water lubricant, and applying gentle pressure. You’ll feel the resistance change as you get closer to breaking through the glass.
- Be Patient: This process can take time. Rushing it is the most common mistake.
- Watch for Breakthrough: As you feel the drill bit is about to break through the other side, ease up on the pressure even more.
Step 9: Finishing the Hole
Once the drill bit has passed through the glass:
- Ease Up: Immediately reduce pressure and continue drilling for just a moment to ensure a clean exit.
- Withdraw Carefully: Slowly withdraw the drill bit from the hole while it’s still spinning. This helps to clear any remaining debris.
- Clean Up: Carefully remove the tape. Rinse the mirror to wash away any glass dust and lubricant.
Alternative Methods for Drilling Mirrors
While a diamond drill bit is the most common and recommended method, there are a few other approaches to consider, though they come with their own risks.
Using a Glass Hole Saw
A glass hole saw is essentially a cup-shaped drill bit with diamond grit on its edge. It’s designed to cut a circular hole.
- How it Works: Instead of drilling a narrow hole, the hole saw grinds out a larger circle.
- When to Use: This is often used for larger diameter holes.
- Process: The process is similar to using a diamond drill bit: slow speed, lubrication, gentle pressure, and starting at an angle. You might need a drill press for larger hole saws to maintain stability.
- Considerations: Ensure the hole saw is specifically designed for glass.
Using a Rotary Tool with a Diamond Bit
For very small holes or touch-up work, a rotary tool (like a Dremel) with a small diamond grinding bit or cutting wheel can be used.
- Process: This requires even more finesse and control. Use the lowest speed setting, constant lubrication, and very light pressure.
- Limitations: It’s not ideal for precise, clean holes and is best for very small tasks. The heat buildup can be significant due to the tool’s size and speed.
Troubleshooting Common Issues
Even with the best preparation, things can go wrong. Here are some common problems and how to address them.
Mirror Cracking During Drilling
This is the most dreaded outcome.
- Causes:
- Too much pressure.
- Drill speed too high.
- Lack of lubrication.
- Starting the drill at the wrong angle.
- Mirror not properly supported.
- Existing imperfections in the glass.
- Prevention is Key: Reiterate the importance of slow speed, lubrication, gentle pressure, and proper support.
- What if it Cracks Anyway? Unfortunately, if a significant crack occurs, the mirror is likely ruined.
Drill Bit Slipping
This can happen if the surface is not prepared correctly.
- Solutions:
- Ensure you apply masking tape.
- Use a drill guide or jig.
- Start at a slight angle to create an initial indentation.
Overheating
Even with lubrication, some heat is inevitable.
- Solutions:
- Use more water.
- Lift the drill bit more frequently to clear debris and cool the bit.
- Ensure your drill is on its lowest speed.
Post-Drilling Care and Finishing
Once the hole is drilled and the mirror is cleaned, there are a few final touches.
Smoothing the Edges
The edges of the hole might be slightly rough or sharp.
- Sanding: You can carefully use fine-grit sandpaper (around 400 grit or higher) or a small diamond sanding pad to smooth the edges. Keep the area wet while sanding.
- Be Gentle: Avoid applying pressure that could cause new cracks.
Cleaning the Mirror
Thoroughly clean the mirror to remove any remaining glass dust, lubricant, or marker residue.
Safety Precautions Summarized
Let’s recap the most important safety precautions to keep you safe throughout the process:
- Eye Protection: Always wear safety glasses.
- Hand Protection: Wear gloves.
- No Hammer Function: Ensure your drill is not in hammer mode.
- Slow Speed: Use the lowest speed setting on your drill.
- Lubrication: Keep the drilling area constantly wet.
- Gentle Pressure: Let the tool do the work; don’t force it.
- Support: Ensure the mirror is well-supported.
- Workspace: Maintain a clean and organized workspace.
- Glass Disposal: Dispose of any broken glass safely.
Frequently Asked Questions (FAQ)
Q1: Can I use a regular drill bit to drill a mirror?
No, you absolutely cannot. Regular drill bits are designed for wood, metal, or masonry and will not cut glass. They will either break the glass immediately or overheat and shatter it. You must use a diamond drill bit or a glass hole saw.
Q2: What is the best lubricant for drilling glass?
Water is the most recommended lubricant for glass drilling and mirror drilling. It’s effective at cooling the bit and the glass, preventing overheating and cracking. It’s also easy to clean up. Some oils can be used, but they can make the mirror slippery and are messier.
Q3: How do I prevent a mirror from cracking when drilling?
Preventing cracks involves a combination of factors: using a diamond drill bit, slow speed drilling, constant water lubricant, gentle pressure, proper support, and starting the drill at an angle. Taking your time and being patient is also crucial.
Q4: How deep do I need to drill?
You only need to drill through the thickness of the mirror’s glass. The mirror backing is typically very thin and will be drilled through as well. Be prepared for the drill bit to exit the other side.
Q5: What if I don’t have a variable-speed drill?
If you don’t have a variable-speed drill, you’ll need to be extra cautious. You might be able to control the speed slightly by how hard you pull the trigger. However, this is much less ideal. If your drill only has one speed, ensure it’s as slow as possible. In this case, taking frequent breaks to let the bit cool and using even more lubrication is vital.
Q6: How do I choose the right size diamond drill bit?
Choose a diamond drill bit that matches the diameter of the hole you need. If you need a specific size and can’t find it, you might need to drill a smaller hole and then use a larger bit or a hole saw to enlarge it carefully.
Q7: Can I drill through the silver backing of a mirror?
Yes, the silver or aluminum backing of a mirror is thin and will be drilled through along with the glass. The main challenge is drilling the glass itself without it cracking.
Q8: Is it safe to drill a hole in a mirror that’s hanging on the wall?
It is highly recommended to remove the mirror from the wall and drill it on a stable surface. Drilling while the mirror is hanging is extremely dangerous, as the mirror could fall and break, and it’s very difficult to provide adequate support and lubrication in that position.
By following these detailed steps and safety precautions, you can successfully drill a hole in a mirror. Remember that patience and the right tools are your greatest allies in this delicate task.