
Yes, you can make incredibly straight cuts with a track saw. It’s a woodworking tool designed specifically for this purpose, offering precision and control far beyond what a standard circular saw can achieve alone. This guide will walk you through everything you need to know about using a track saw effectively, from its basic operation to advanced techniques and essential accessories.
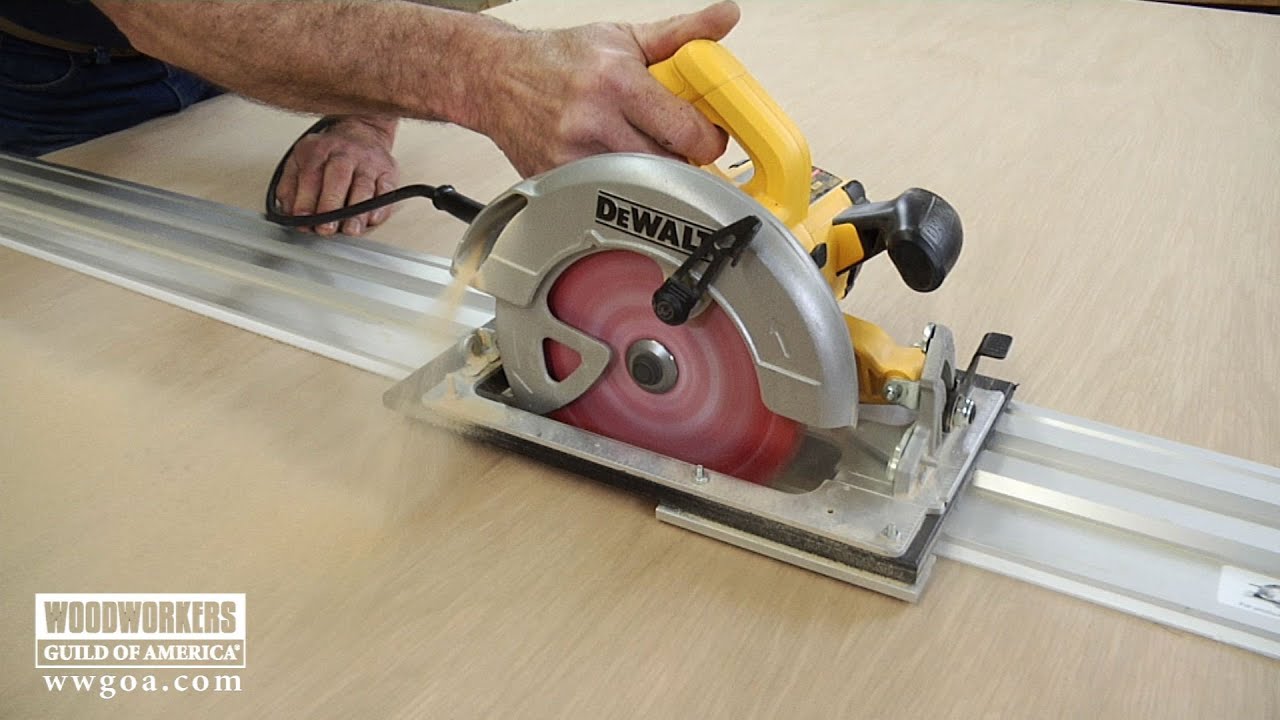
Image Source: i.ytimg.com
What is a Track Saw and Why Use One?
A track saw, also known as a plunge saw or guided circular saw, is a specialized power tool that combines the portability of a circular saw with the precision of a table saw or panel saw. Its defining feature is the track saw guide rail. This rail, when placed on your workpiece, provides a stable and perfectly straight surface for the saw to glide along. This is crucial for achieving clean, accurate cuts, especially on large sheets of material like plywood or MDF.
The primary benefit of using a track saw is its ability to deliver exceptionally straight cuts track saw users can rely on. Unlike a standard circular saw where freehand operation can lead to wavering or angled cuts, the track saw guide system ensures a consistent path. This eliminates the need for elaborate jigs or the risk of human error in guiding the saw.
Key Advantages of Track Saws:
- Precision: Achieve perfectly straight and square cuts every time.
- Control: The guide rail offers superior stability and control over the cutting process.
- Versatility: Suitable for a wide range of materials, including wood, laminates, and even some plastics.
- Reduced Tear-Out: Most track saw systems feature an anti-splinter strip on the guide rail, minimizing chipping on the material’s edge.
- Plunge Cutting: Many models offer a plunge track saw function, allowing you to start cuts anywhere on the material without needing to begin at an edge.
- Portability: While larger than a standard circular saw, they are still relatively portable compared to panel saws.
Getting Started: Essential Components and Setup
Before you start cutting, familiarizing yourself with the components of a track saw system is important.
The Track Saw and its Guide Rail
The core of the system is the track saw guide rail, often referred to as a circular saw track or saw guide system. These rails are typically made of extruded aluminum and come in various lengths. They usually have a rubber strip on the bottom that grips the material and an anti-splinter strip on the top that the saw blade cuts into, creating a perfect guide for subsequent cuts and preventing material damage.
The Track Saw Itself
The track saw unit is designed to sit snugly on the track saw guide rail. It features:
- A Motor: Powers the blade.
- A Blade: For cutting the material.
- A Base Plate: Which mates with the guide rail.
- Depth Adjustment: To control how deep the blade cuts.
- Bevel Adjustment: For making angled cuts.
- Plunge Mechanism: On plunge track saw models, this allows the blade to be lowered into the material.
- Dust Collection Port: Essential for managing sawdust.
Setting Up for Your First Cut
- Prepare Your Workpiece: Ensure your material is stable and supported. Use sawhorses or a workbench. For larger sheets, you’ll want to support them adequately to prevent sagging.
- Position the Track Saw Guide Rail:
- Place the track saw guide rail along the line you want to cut.
- Crucially, you need to account for the “offset” of the saw blade from the edge of the track. Most track saw manufacturers provide a precise measurement for this offset for both 90-degree and bevel cuts. This measurement is vital for making straight cuts track saw accurately.
- Measure Twice, Cut Once: Measure from the edge of your material to your desired cut line. Then, measure the offset from the blade to the edge of the saw’s base plate. Position the track saw guide rail so that the edge of the rail is that offset distance away from your cut line.
- Ensure the rail is firmly in place. Many rails have clamps or can be secured with the saw itself once it’s in position.
- Place the Track Saw on the Rail:
- Align the saw’s base plate with the guide rail. It should slide smoothly.
- If your saw has a plunge function, ensure it is in the raised position before placing it on the track.
- Set the Blade Depth:
- Adjust the saw’s depth setting so that the blade extends just slightly beyond the thickness of your material. This ensures a clean cut through the entire thickness without unnecessarily plunging too deep.
- A good rule of thumb is to set the blade depth to about one material thickness plus 1/8 inch (3mm).
- Connect Dust Collection: Attach your shop vacuum or dust extractor to the dust port. This is critical for visibility and a cleaner workspace.
Mastering the Cut: Techniques for Precision
Cutting with track saw requires a slightly different approach than using a freehand circular saw. The key is to work with the system, not against it.
Basic Cutting Procedure
- Engage the Plunge (if applicable): For plunge track saw models, gently press down on the saw to plunge the blade into the material at the start of your cut. Ensure the plunge lock is disengaged or the lever is set to allow plunging.
- Initiate the Cut: Once the blade is at the correct depth, begin to push the saw smoothly forward along the track saw guide rail. Maintain even pressure.
- Maintain Consistent Pressure: Avoid forcing the saw. Let the motor and blade do the work. Pushing too hard can cause the blade to bind, overheat, or result in a poor cut.
- Follow Through: Continue pushing the saw until you have completely passed through the material and clear of the end of the cut.
- Retract the Blade: Once the cut is complete, you can retract the blade. If using a plunge saw, lift the saw off the material while holding the plunge trigger/button, then release it.
Making Straight Cuts Track Saw Precision
- Accuracy in Rail Placement: The most critical step for making straight cuts track saw is accurate placement of the track saw guide rail. Use a good quality tape measure and a reliable marking knife or pencil to mark your cut line precisely.
- The Anti-Splinter Strip: The anti-splinter strip on the circular saw track is your friend. When you make the first cut with the track saw, the blade will lightly score this strip. This creates a perfectly aligned groove for subsequent cuts, preventing splintering on the top edge of your material.
- Clamping the Rail: For critical cuts, or when working on angled surfaces, always clamp the track saw guide rail securely to the workpiece. Most systems come with specialized track clamps.
Bevel Cuts
Most track saws allow for bevel cuts.
- Adjust the Bevel Angle: Locate the bevel adjustment mechanism on your saw. Loosen the locking knobs or levers and set the saw to your desired angle (e.g., 45 degrees).
- Re-Check Offset: This is crucial. When you set a bevel, the effective position of the blade relative to the edge of the track changes. Consult your track saw’s manual for the correct offset measurement for your chosen bevel angle. Reposition the track saw guide rail accordingly.
- Perform the Cut: Proceed with the cut as you would a straight cut, ensuring smooth, consistent pressure.
Plunge Cuts and Starting Cuts Mid-Sheet
The plunge track saw feature opens up a world of possibilities, especially when you need to make cuts that don’t start from an edge.
- Mark Your Start and End Points: Clearly mark where your cut needs to begin and end on the material.
- Position the Track: Place the track saw guide rail so that the saw’s blade, when fully plunged, will start exactly on your marked starting point.
- Set Blade Depth and Plunge: Set the blade depth slightly more than the material thickness. Ensure the plunge mechanism is ready to engage.
- Plunge and Cut: With the saw positioned at the start of the cut line and the blade raised, plunge the blade into the material. Once at full depth, push the saw smoothly along the track to the end of your cut.
- Retract and Finish: Lift the saw off the material to retract the blade.
Parallel Cuts with a Track Saw
Achieving parallel cuts, meaning making a second cut a specific distance from an existing edge, is another area where the track saw excels. Many manufacturers offer specific parallel guide track saw attachments.
-
Using a Parallel Guide Attachment: These attachments clamp onto the track saw guide rail or the saw itself and have an adjustable fence that rides along an edge of your workpiece. You set the distance between the fence and the track saw guide rail, and the attachment keeps the rail perfectly parallel to the edge.
- Setup: Attach the parallel guide to your track saw guide rail. Set the desired distance from your reference edge using the guide’s adjustment. Ensure the guide is snug against the edge.
- Position and Cut: Place the assembled system on your workpiece. Clamp the guide securely. Make your cut as usual. This method is excellent for ripping down large panels to width.
-
Freehand Parallel Guide: For less critical parallel cuts, or if you don’t have an attachment, you can use clamps and a straight edge as a makeshift guide.
- Measure and Mark: Measure your desired distance from the reference edge and mark your cut line.
- Clamp a Straight Edge: Clamp a straight, true piece of material (like a level or another piece of wood with a known straight edge) to your workpiece. Ensure this clamped edge is perfectly parallel to your desired cut line and positioned to guide the edge of your track saw guide rail.
- Position and Cut: Place the track saw guide rail against the clamped straight edge. Ensure the saw blade will follow your intended cut line. Proceed with cutting.
Track Saw Accessories: Enhancing Your Capabilities
The versatility of a track saw can be significantly expanded with various track saw accessories.
Essential Accessories
- Track Saw Clamps: Absolutely crucial for securing the track saw guide rail to your workpiece. They prevent the rail from shifting during a cut, which is paramount for accuracy.
- Parallel Guide Attachment: As discussed, this is invaluable for making consistent parallel cuts without relying on freehand measurements or separate guides.
- Track Connector Pieces: If you need to make cuts longer than a single rail, connector pieces allow you to join two or more rails end-to-end for a continuous cutting path. Ensure these connectors create a perfectly flush joint.
- Track Extension Pieces: Some systems offer extensions to increase the length of your cutting reach.
- Dust Extraction System (Shop Vacuum): Non-negotiable for efficient dust management, visibility, and a cleaner workspace.
- Carrying Case or Bag: For safe and convenient transport and storage of your track saw and rails.
Advanced Accessories
- Track Saw Blades: Different blades are available for specific materials (e.g., fine-tooth for laminates, rip blades for rougher cuts). Using the right blade for the job significantly impacts cut quality and ease of cutting.
- Track Saw Splinter Guards: While most tracks have an integrated anti-splinter strip, some systems allow for replacement or additional guards for extra protection.
- Track Saw Dust Extraction Adapter: Specific adapters may be needed to connect your vacuum hose to the saw’s dust port.
- Track Saw Angle Guides: These can help in setting up precise angled cuts or repeating specific angles.
- Track Saw Vacuum Holder: Some clever solutions exist to hold your vacuum hose neatly out of the way while cutting.
Track Saw Safety: A Top Priority
While track saws offer enhanced control, they are still powerful power tools. Adhering to track saw safety guidelines is paramount.
General Safety Practices
- Read the Manual: Always read and thoroughly understand your track saw’s operating manual before use.
- Wear Appropriate Safety Gear:
- Safety Glasses: Essential to protect your eyes from flying debris.
- Hearing Protection: Saws can be loud; earplugs or earmuffs are recommended.
- Dust Mask or Respirator: Crucial for protecting your lungs from fine dust particles, especially when cutting MDF or particleboard.
- Gloves: Can provide a better grip and protect your hands.
- Maintain a Clean Workspace: Keep the area around your work clear of clutter, sawdust, and tripping hazards.
- Ensure Proper Support: Make sure your workpiece is well-supported and won’t shift during cutting.
- Never Bypass Safety Features: Do not disable any safety guards or mechanisms.
- Disconnect Power When Changing Blades or Making Adjustments: Always unplug the saw before performing any maintenance or adjustments.
Specific Track Saw Safety Tips
- Secure the Track: Always clamp your track saw guide rail to the workpiece, especially for critical cuts or when using bevels. A shifting rail is a major safety hazard.
- Blade Guard Functionality: Ensure the retractable blade guard on the saw is functioning correctly and always covers the blade when the saw is not engaged.
- Plunge Safety: On a plunge track saw, ensure the plunge mechanism is smooth and the lock is engaged when needed. Be mindful of where the blade will exit the material when plunging.
- Dust Collection: Proper dust collection not only improves visibility but also reduces the amount of airborne dust, contributing to a safer working environment.
- Blade Sharpness: A dull blade requires more force, increasing the risk of kickback. Ensure your blade is sharp and appropriate for the material you are cutting.
- Kickback Awareness: While less prone to kickback than a freehand circular saw, track saws can still experience it. Kickback occurs when the blade binds in the cut, causing the saw to be violently thrown back towards the operator. Maintain a firm grip, avoid twisting the saw, and ensure the blade depth is set correctly to minimize this risk.
- Footwear: Wear sturdy, closed-toe shoes to protect your feet.
Common Track Saw Mistakes and How to Avoid Them
Even with a great tool, mistakes can happen. Being aware of common pitfalls will help you achieve the best results.
Common Mistakes
- Imprecise Rail Placement: This is the number one cause of inaccurate cuts.
- Solution: Double-check all measurements. Understand and correctly apply the blade offset for both 90-degree and bevel cuts. Use a sharp pencil or marking knife for clear lines.
- Not Clamping the Track: Believing the saw’s weight or friction is enough to hold the rail in place.
- Solution: Always clamp your track saw guide rail securely, especially for long cuts, critical joints, or any angled cuts.
- Forcing the Saw: Pushing the saw too hard, leading to binding, burning, or uneven cuts.
- Solution: Let the saw do the work. Maintain a steady, consistent pressure. If the saw bogs down, you might have a dull blade, the wrong blade, or you’re pushing too hard.
- Incorrect Blade Depth Setting: Setting the blade too deep or not deep enough.
- Solution: For plunge saws, set the depth to just slightly more than the material thickness (about 1/8 inch or 3mm extra). For non-plunge saws, you’ll need to initiate the cut from the edge and ensure the blade clears the material at the end.
- Ignoring the Offset for Bevel Cuts: Using the same offset for a bevel cut as for a straight cut.
- Solution: Always consult your saw’s manual for the correct offset when changing the bevel angle.
- Poor Material Support: Allowing the workpiece to sag, leading to binding or inaccurate cuts.
- Solution: Use sawhorses, workbenches, or support tables to ensure the material remains flat and stable throughout the cut.
- Not Using Dust Collection: Leading to poor visibility and a messy workspace.
- Solution: Always connect your shop vacuum or dust extractor. It makes a huge difference.
Maintaining Your Track Saw System
Proper maintenance ensures your track saw and its accessories perform reliably and safely.
Cleaning and Storage
- Track Saw: After use, wipe down the saw’s base plate and motor housing to remove dust and debris. Check the plunge mechanism and depth adjustment for any obstructions.
- Track Saw Guide Rail: Brush off any sawdust or debris from the guide rail. Pay attention to the anti-splinter strip; if it’s significantly damaged, it can be replaced. Store rails flat or on edge to prevent warping.
- Blades: Clean blades after use to remove resin buildup, which can affect cutting performance. Store blades properly to prevent damage.
- Storage: Store your track saw and accessories in a dry, protected area. Many systems come with a case or bag designed for this purpose.
Blade Care
- Sharpness: A sharp blade is crucial for clean cuts and safe operation. Have your blades professionally sharpened or replace them when they become dull.
- Type of Blade: Using the correct blade for the material is essential.
- Fine-tooth blades (48+ teeth): Best for smooth, splinter-free cuts on plywood, veneers, laminates, and plastics.
- Medium-tooth blades (24-40 teeth): Good all-rounders for hardwoods and softwoods.
- Coarse-tooth blades (less than 24 teeth): For faster, rougher cuts in solid wood.
General Maintenance
- Check for Damage: Periodically inspect your track saw, rails, and accessories for any signs of damage, such as cracked casings, bent rails, or loose components.
- Lubrication: Some moving parts, like the plunge mechanism, might benefit from occasional light lubrication as recommended by the manufacturer.
Frequently Asked Questions (FAQ)
Q: Can I use a standard circular saw with a track saw guide rail?
A: While some specialized adapters exist, most track saws are designed with a specific base plate that mates perfectly with their designated track saw guide rail or circular saw track. Using a standard circular saw on a dedicated track system may not provide the same level of accuracy or stability, and the anti-splinter feature might not engage correctly. Always check compatibility with the manufacturer.
Q: How do I prevent splintering when cutting plywood with a track saw?
A: Track saws are excellent at minimizing splintering due to their design and the integrated anti-splinter strip on the track saw guide rail. For best results:
1. Ensure the anti-splinter strip is intact. If it’s heavily damaged, replace it.
2. Use a fine-tooth blade appropriate for plywood.
3. Position the track so the anti-splinter strip is directly on the intended cut line before the first cut. The blade will then create a clean cut line in the strip itself, guiding future cuts perfectly and preventing tear-out on the material.
4. Consider taping the cut line with painter’s tape for extra protection, especially on delicate veneers.
Q: What’s the difference between a track saw and a circular saw?
A: The main difference lies in the guiding system. A standard circular saw is used freehand or with a separate guide jig. A track saw utilizes an integrated saw guide system in the form of a track saw guide rail or circular saw track that the saw glides on. This provides significantly more stability and accuracy for making straight cuts track saw users rely on. Many track saws also offer a plunge track saw feature, allowing cuts to start mid-material.
Q: How long do track saw guide rails typically last?
A: With proper care and usage, track saw guide rails can last for many years. The most common wear item is the anti-splinter strip, which can be replaced when it becomes too damaged or worn. Keep the rails clean and stored properly to maximize their lifespan.
Q: Can I make dado cuts with a track saw?
A: Standard track saws are designed for through-cuts and plunge cuts. They typically use a single blade of a standard kerf (the width of the cut made by the blade). Making dado cuts (grooves cut into the material) usually requires a dado blade set, which is not compatible with most track saw designs. For dado cuts, a table saw or router with a suitable jig would be more appropriate.
Q: What is the advantage of a plunge track saw?
A: A plunge track saw allows you to plunge the blade directly into the material at any point on the sheet, rather than being restricted to starting cuts from an edge. This is incredibly useful for cutting out internal shapes, making access holes, or when you can’t easily get to the edge of your workpiece.
Q: Is a parallel guide attachment necessary for track saws?
A: While you can make parallel cuts without one by using clamps and other straight edges, a parallel guide track saw attachment makes the process much simpler, faster, and more accurate. It’s a highly recommended accessory if you frequently need to rip down sheet goods or make multiple parallel cuts.
By following this comprehensive guide, you’ll be well-equipped to harness the power and precision of your track saw, achieving professional-level results on all your woodworking projects. Happy cutting!