
Can you use a skill saw if you’re a beginner? Yes, you absolutely can! This guide will walk you through everything you need to know about operating a skill saw safely and effectively. From power saw basics to skill saw maintenance, we’ll cover it all so you can tackle your DIY projects with confidence.
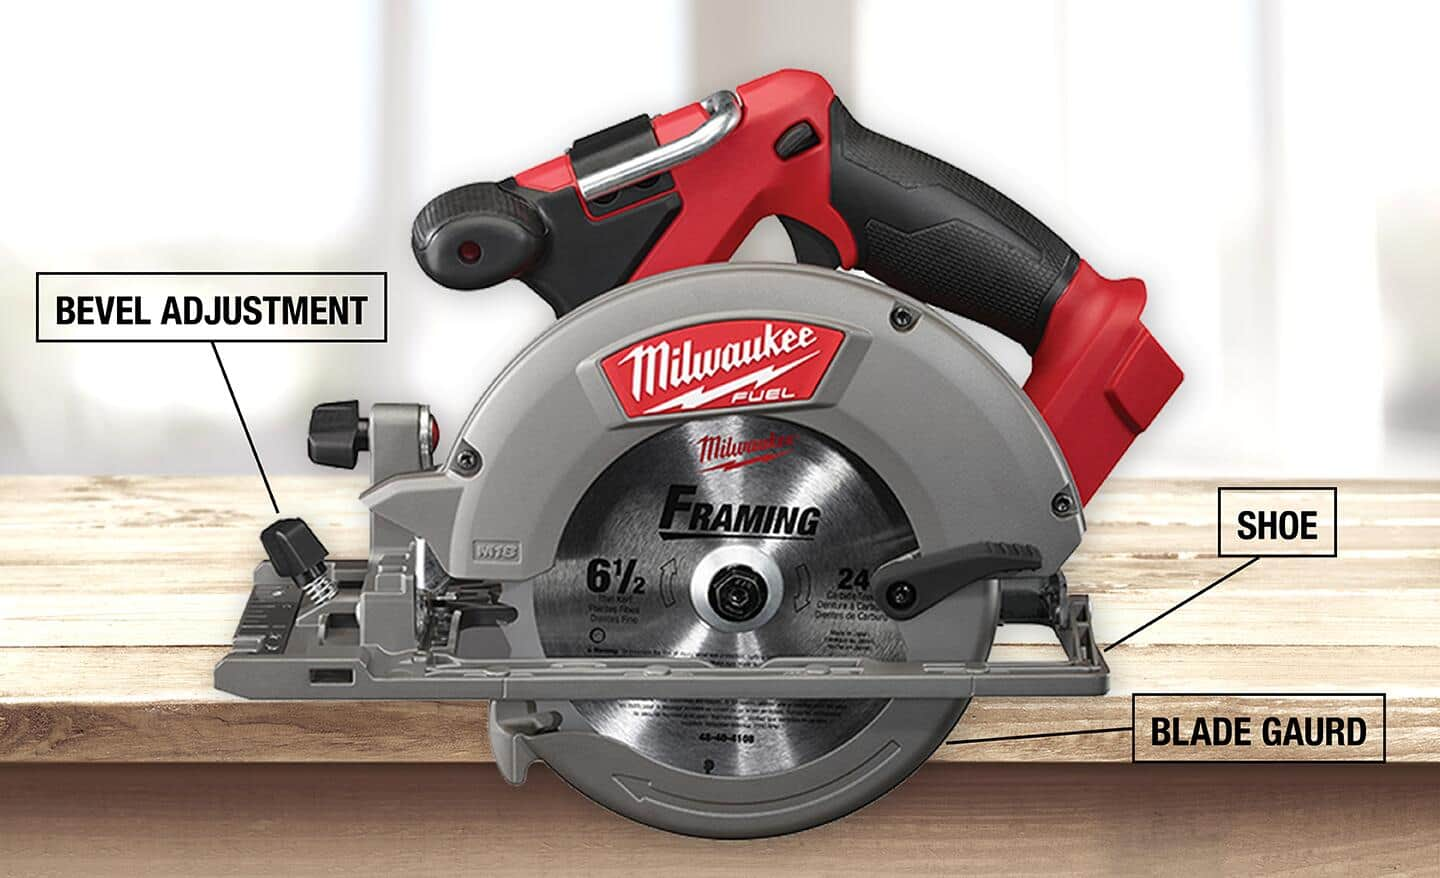
Image Source: dam.thdstatic.com
What is a Skill Saw?
A skill saw, more commonly known as a circular saw, is a portable power tool used for cutting various materials, most notably wood. It features a rotating toothed blade that spins at high speeds, allowing for quick and precise cuts. Think of it as your go-to tool for breaking down lumber, making straight cuts, or even creating shapes in wood.
Getting Started: Essential Safety First
Before you even think about plugging in your skill saw, safety must be your top priority. Mishandling this powerful tool can lead to serious injury. Here’s how to ensure you’re using a skill saw safely:
1. Personal Protective Equipment (PPE) is Non-Negotiable
- Safety Glasses or Goggles: This is paramount. Sawdust, wood chips, and even small pieces of the blade can fly off at high speeds. Always wear ANSI-approved safety glasses or goggles that fit snugly.
- Hearing Protection: Circular saws are loud! Prolonged exposure to the noise can cause permanent hearing damage. Invest in earplugs or earmuffs.
- Dust Mask or Respirator: Cutting wood creates fine dust particles that can be harmful if inhaled. A dust mask or a respirator will protect your lungs.
- Gloves: While some prefer not to wear gloves for better grip, others find they offer protection. If you wear them, ensure they are snug-fitting and won’t get caught in the blade.
- Sturdy Footwear: Closed-toe shoes are a must to protect your feet from falling objects or accidental contact with the blade.
- Avoid Loose Clothing and Jewelry: Anything loose can get caught in the spinning blade, pulling you into the saw. Tie back long hair and remove rings, necklaces, and bracelets.
2. Inspecting Your Skill Saw
Before each use, perform a thorough inspection of your saw:
- Blade: Is it sharp, clean, and free of damage? A dull or damaged blade is more likely to bind, kickback, or produce poor cuts. Ensure it’s the correct skill saw blade type for your material.
- Guard: The lower blade guard should move freely and retract smoothly. It’s designed to cover the blade when not cutting and spring back to cover it when you lift the saw. Never try to disable or tie back the guard.
- Cord and Plug: Check for any fraying, cuts, or damage. Ensure the plug is intact and securely connected.
- Housing: Make sure the saw’s housing is free of cracks or damage.
3. Setting Up Your Work Area
A safe work area is crucial for operating a skill saw:
- Good Lighting: Ensure your workspace is well-lit. You need to see your cut line clearly.
- Stable Work Surface: Always cut on a stable surface. Use sawhorses or a workbench to support your material. Never cut on your lap or directly on the floor.
- Clear Area: Remove any clutter, debris, or trip hazards from your workspace.
- Secure the Material: Clamp your workpiece firmly to your support. The material should not shift or move while you are cutting. This is vital for cutting wood with a skill saw accurately and safely.
Mastering the Basics: How to Use Your Skill Saw
Now that you’ve got safety covered, let’s get to the actual operation.
Understanding Your Skill Saw Components
Familiarize yourself with the key parts of your saw:
- Base Plate (or Shoe): This flat metal plate rests on the material you’re cutting, guiding the blade. It has markings for cut depth and common bevel angles.
- Blade Guard: The retractable guard that covers the blade.
- Trigger Lock-Off Button: Prevents accidental starting of the saw. You must press this button before pulling the trigger.
- Depth Adjustment Lever: Allows you to set how deep the blade cuts.
- Bevel Adjustment Knob: Lets you tilt the base plate to make angled (bevel) cuts.
- Spindle Lock Button: Used to lock the blade for changing.
Setting the Blade Depth
This is a critical step for safety and cut quality. The blade should extend just slightly below the material you are cutting – about one tooth’s depth.
- How to do it:
- Unplug the saw. Always start with the power disconnected.
- Locate the depth adjustment lever on the side of the saw.
- Lift the lever and slide the base plate up or down.
- Place the saw’s base plate flat on the material you intend to cut.
- Adjust the base plate so the blade extends about 1/4 inch (or the width of one saw tooth) below the material.
- Lock the lever securely.
Why this matters: A blade set too deep increases the risk of kickback and can make the saw harder to control. A blade set too shallow will not cut through the material effectively.
Making a Straight Cut: Using a Circular Saw Guide
Achieving a perfectly straight cut is a common goal for any DIY skill saw user. This is where a circular saw guide or a straight edge comes in handy.
-
Using a Factory Rip Fence: Many circular saws come with a rip fence that attaches to the base plate. This fence rides along the edge of your workpiece to guide the saw for parallel cuts (rip cuts).
- How to do it:
- Attach the rip fence to your saw.
- Measure the distance from the edge of the saw blade to the rip fence.
- Transfer this measurement to your material, marking your desired cut line.
- Adjust the rip fence so it’s the correct distance from the blade, aligning the blade with your marked line.
- Hold the fence firmly against the edge of your workpiece as you cut.
- How to do it:
-
Using a Straight Edge (e.g., a clamped-on board): This is an excellent method for making cuts anywhere on a sheet of material.
- How to do it:
- Mark your cut line on the workpiece.
- Measure the distance from the edge of the saw blade to the edge of the base plate. Choose the side of the base plate you’ll use as your guide.
- On your workpiece, measure this same distance from your cut line and draw a parallel line. This is where your base plate’s edge will ride.
- Place a straight piece of wood or metal (your guide) along this second line and clamp it securely to the workpiece. Ensure the clamps are out of the saw’s path.
- Align the edge of your saw’s base plate with the clamped-on straight edge.
- Proceed with the cut, keeping the base plate firmly against the guide.
- How to do it:
The Cutting Process: Step-by-Step
- Mark Your Cut Line: Use a pencil and a measuring tape or ruler to mark a clear cut line on your material. For precise cuts, consider using a combination square or speed square.
- Position the Saw: Place the saw’s base plate on the material with the blade aligned with your cut line. The blade should be on the waste side of your line so your cut is on the correct measurement.
- Engage the Safety Lock and Trigger: Press the trigger lock-off button, then squeeze the trigger to start the blade spinning.
- Begin the Cut: Let the blade reach full speed before it touches the material. Gently bring the spinning blade into the edge of the material.
- Move Smoothly: Push the saw forward at a steady, consistent speed. Don’t force it. Let the saw do the work. If the saw bogs down, you might be pushing too hard or the blade might be dull.
- Follow Your Line: Keep the saw moving along your marked line or guide. Maintain control and stability.
- Complete the Cut: Continue cutting until the blade has passed completely through the material.
- Release the Trigger: Once the cut is finished, release the trigger. Allow the blade to stop spinning completely before lifting the saw from the material. The guard should automatically cover the blade.
- Unplug the Saw: After you’re done cutting, unplug the saw immediately.
Different Cuts and Techniques
Beyond basic straight cuts, your skill saw can do more.
Bevel Cuts
Bevel cuts are angled cuts, often used for decorative purposes or to create joints.
- How to do it:
- Unplug the saw.
- Locate the bevel adjustment knob on the base plate.
- Loosen the knob.
- Tilt the base plate to your desired angle. Most saws have markings for common bevel angles (e.g., 45 degrees).
- Tighten the knob securely.
- Set your blade depth according to the material thickness, remembering that the blade is now at an angle.
- Follow the cutting procedure as outlined above, ensuring your base plate is firmly on the material.
Dado Cuts (Advanced)
Dado cuts are channels cut into the surface of wood. Standard circular saws cannot make dado cuts because they only have a single blade. Specialized dado blade sets exist, but they are not designed for standard circular saws and can be dangerous if used improperly. For dado cuts, a table saw or router is the appropriate tool.
Cutting Different Materials
While wood is the primary material, with the right blade, you can cut other things.
- Plywood: Plywood can splinter easily. For cleaner cuts, consider using a fine-tooth blade and applying painter’s tape along your cut line. You can also score the line with a utility knife before cutting.
- Particle Board: Similar to plywood, particle board can chip. A sharp blade and steady pressure are key.
- Laminate Flooring: Specific blades are available for cutting laminate flooring. Always check the saw’s manual and blade manufacturer’s recommendations.
Skill Saw Blade Types: Choosing the Right One
The blade is what actually does the cutting. Using the wrong blade can lead to poor results, increased risk, and even damage to the saw. Here’s a look at common skill saw blade types:
| Blade Type | Teeth Count | Common Uses | Best For… |
|---|---|---|---|
| General Purpose | 24-30 | Framing, rough cuts, crosscuts and rip cuts | Quick, rough cuts where precision isn’t critical. Good for dimensional lumber. |
| Fine Finish | 40-60 | Plywood, hardwoods, trim, fine furniture work | Smooth, clean cuts with minimal tear-out. Ideal when appearance is important. |
| Plywood/Panel | 60-80 | Plywood, laminates, melamine, particle board | Minimizing chipping and tear-out on sheet goods. |
| Carbide-Tipped | Varies | Designed for specific materials, usually harder woods | Durability and longevity. Carbide teeth stay sharp longer than standard steel blades. |
| Metal Cutting | High (e.g., 60+) | Sheet metal, conduit, aluminum, steel | Note: Requires specialized saws or blades designed for metal, and extreme caution. Always confirm saw compatibility. |
Key Considerations When Choosing a Blade:
- Material: Always match the blade to the material you’re cutting.
- Type of Cut: Are you making a rough cut or a fine finish cut?
- Arbor Size: This is the size of the hole in the center of the blade that fits onto the saw’s arbor shaft. It must match your saw.
- Blade Diameter: Most skill saws use 7-1/4 inch blades, but other sizes exist. Ensure it’s compatible with your saw.
Avoiding Kickback: The Most Common Danger
Kickback is when the saw suddenly jumps back towards the operator. It’s the most common cause of serious injury when using a circular saw. It happens when the blade binds in the material.
How Kickback Happens:
- The blade gets pinched in the cut (e.g., a cut in plywood shifts and closes in on the blade).
- The blade hits a knot or a hard spot in the wood.
- The operator twists the saw during the cut.
- The blade is dull or damaged.
- The blade guard malfunctions or is disabled.
- The material is not properly supported and sags.
How to Prevent Kickback:
- Always use the blade guard.
- Set the blade depth correctly.
- Ensure the material is well-supported. Don’t let the cut-off piece fall before the blade exits the main piece.
- Use a sharp, appropriate blade.
- Keep the base plate flat on the material. Don’t twist the saw.
- Never cut warped, wet, or knotted wood without extra precautions.
- If using a guide, ensure it’s securely clamped.
- Stand to the side of the blade’s path, not directly behind it.
Skill Saw Maintenance: Keeping Your Tool in Top Shape
Proper skill saw maintenance will ensure your tool operates safely and effectively for years to come.
Cleaning
- After each use:
- Unplug the saw.
- Use a brush or compressed air to remove sawdust and debris from the motor vents, blade guard, and base plate.
- Wipe down the exterior with a damp cloth. Avoid getting water into the motor housing.
Blade Care
- Keep blades clean: Sawdust and sap buildup can affect cutting performance. Clean blades with a blade cleaner or degreaser.
- Replace dull or damaged blades: This is the most important maintenance. A sharp blade is safer and cuts better.
- Store blades properly: Keep them in their protective cases to prevent damage and dulling.
Motor and Brushes
- Check brushes: Brushes are consumable parts that wear down over time. If your saw starts to lose power or the motor sounds different, the brushes might need replacing. Consult your saw’s manual or a qualified technician.
- Avoid overheating: Don’t push the saw too hard. If it feels like it’s overheating, let it cool down.
Storage
- Store in a dry place: Protect your saw from moisture and extreme temperatures.
- Use the original case if possible: This keeps the saw protected and organized.
Frequently Asked Questions (FAQ)
Q1: What is the difference between a skill saw and a circular saw?
A1: “Skill Saw” is actually a brand name that became so popular it’s often used as a generic term for a circular saw. So, they are essentially the same tool.
Q2: Can I make a straight cut without a guide?
A2: While it’s possible to freehand a cut, achieving a truly straight line is difficult for beginners. Using a circular saw guide or a clamped-on straight edge is highly recommended for accuracy and safety.
Q3: How often should I change my skill saw blade?
A3: This depends on usage and the type of material you cut. A general rule is to replace a blade when you notice it’s dulling (requiring more force to cut, creating rough cuts, or causing the saw to bog down). For heavy use, you might need to replace them more frequently.
Q4: What is the purpose of the trigger lock-off button?
A4: The trigger lock-off button is a safety feature designed to prevent the saw from accidentally starting when plugged in or when you’re just handling it. You must press this button before you can squeeze the trigger to activate the saw.
Q5: Can I use my skill saw to cut metal?
A5: While some specialized metal-cutting circular saws and blades exist, standard woodcutting circular saws and blades are NOT designed for cutting metal. Attempting to cut metal with a wood blade can cause extreme kickback, damage the saw, and is very dangerous. Always use the correct tool and blade for the material.
Q6: My saw’s guard is sticking. What should I do?
A6: A sticking guard is a serious safety hazard. First, unplug the saw. Then, carefully inspect the guard mechanism for debris, damage, or bent components. Clean any obstructions. If the guard is bent or damaged, it needs to be replaced. Never operate a saw with a faulty guard.
By following these skill saw beginner tips and focusing on safety, you can confidently use your circular saw for a wide range of projects. Happy building!