
Can you get accurate cuts with a circular saw? Yes, you absolutely can! Using a circular saw guide is the key to achieving precise and straight cuts every time you work with wood. This guide will walk you through everything you need to know to master this essential woodworking technique.
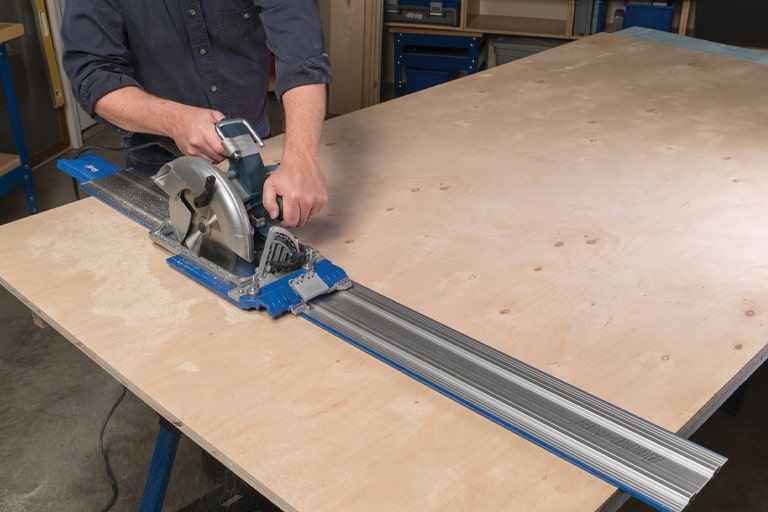
Image Source: learn.kregtool.com
Why Use a Circular Saw Guide?
A circular saw is a powerful tool, but without proper guidance, it can be challenging to make clean, straight cuts. This is where a circular saw guide comes in. It acts as an extension of your saw, providing a stable platform that follows your marked line. This dramatically improves accuracy and safety.
- Precision: Achieve perfectly straight lines, essential for everything from building furniture to making repairs.
- Safety: A guide helps keep your hand away from the blade and prevents the saw from veering off course.
- Efficiency: Spend less time correcting mistakes and more time enjoying your woodworking projects.
- Versatility: Guides can be used for various types of cuts, including rip cuts and cross cuts.
Types of Circular Saw Guides
There are several types of circular saw guides available, each with its own advantages. Knowing these options will help you choose the best one for your needs.
1. Built-in Rip Fences
Many circular saws come with a built-in rip fence. This is a metal or plastic attachment that screws onto the base plate of your saw.
How Rip Fences Work
A rip fence attaches to the saw’s base plate and extends out parallel to the blade. You set the distance between the fence and the blade according to the width of the piece you want to cut. The fence then rides along the edge of your workpiece, keeping the saw moving in a straight line.
- Best for: Making rip cuts (cuts along the grain of the wood) of consistent width.
- Limitations: Not ideal for very wide rips or for making cross cuts.
2. Aftermarket Saw Guides and Rip Fences
These are accessories designed to provide more robust and versatile guiding options than the built-in fences.
Commercial Circular Saw Guides
These are specialized tools designed for superior accuracy.
- Track Saws (or Guide Rails): These are high-end systems that consist of a metal track and a special saw base that slides along it. They offer exceptional control and are excellent for making long, precise rip cuts and cross cuts. They are often considered the ultimate table saw alternative for many tasks.
- Clamps-On Guides: These guides attach to your circular saw base and clamp onto your workpiece. They are very versatile and can be used for both rip cuts and cross cuts.
- Adjustable Guides: Many aftermarket guides offer adjustable settings, allowing you to set them for different cut widths and angles.
DIY Cutting Jigs
You can also create your own cutting jigs. These are custom-made guides tailored to specific tasks.
- Simple Straight Edge Guide: A common DIY guide is a piece of plywood or MDF with a straight edge. You attach this to your saw’s base plate, aligning the edge with the blade kerf.
- Crosscut Jig: For making accurate cross cuts, you can build a jig with a fence that rides against the edge of your workpiece, ensuring the saw stays perpendicular to the cut line.
3. Benchtop and Table Saw Alternatives
While not strictly “guides” for a handheld circular saw, it’s worth noting that table saws and track saws offer integrated guiding systems that achieve similar results. For those seeking precise rip cuts and cross cuts without a large table saw, a good circular saw guide or track saw system is an excellent investment.
Preparing Your Saw and Workpiece
Before you start cutting, proper preparation is crucial for accurate cuts.
1. Setting the Blade Depth
- Purpose: Setting the correct blade depth is essential for both safety and cut quality.
- How-to:
- Unplug the circular saw.
- Place the saw’s base plate on the edge of your workpiece.
- Lower the blade until it just touches the surface.
- Adjust the depth so the blade extends about one-quarter to one-half inch below the bottom of the wood.
- Plug in the saw and test on a scrap piece of wood.
2. Mark Your Cut Line
- Precision is Key: Use a sharp pencil or marking knife and a good quality measuring tape.
- Straight Lines: For long cuts, use a chalk line or a long straight edge to ensure your line is perfectly straight.
- Blade Kerf: Remember that the saw blade removes a small amount of material (the kerf). When marking your line, decide whether you want the cut to be on the waste side or the good side of your line. Most guides help you account for this.
3. Securing Your Workpiece
- Safety First: Always clamp your workpiece securely to a stable surface. This prevents the wood from moving during the cut, which is vital for both accuracy and safety.
- Use Clamps: Use C-clamps or F-clamps to hold the wood firmly. If you’re cutting a large sheet, ensure it’s well-supported to prevent it from sagging.
Using Your Circular Saw Guide for Straight Cuts
The core purpose of a guide is to help you make straight cuts. Here’s how to do it effectively.
1. Attaching and Adjusting Common Guides
a) Using a Built-in Rip Fence
- Loosen: Locate the knob or screw that secures the rip fence.
- Measure: Measure from the edge of the saw blade (not the guard) to the fence.
- Set Distance: Adjust the fence until it’s the desired distance from the blade to create your rip cut. Ensure the fence is parallel to the blade.
- Tighten: Securely tighten the fence.
- Test: Make a test cut on scrap material.
b) Using a Clamp-On Straight Edge Guide
- Align: Place your circular saw on the workpiece, with the blade aligned with your marked cut line.
- Position Guide: Place the straight edge guide on the workpiece, allowing the saw’s base plate to rest against it.
- Account for Kerf: You’ll need to set the guide so that when the saw’s base plate is against it, the blade cuts on your marked line. Most guides have markings or a way to measure this offset. A common method is to measure the distance from the saw blade’s cutting edge to the edge of the base plate and then position your guide that same distance away from your cut line, on the waste side.
- Clamp Guide: Firmly clamp the guide to your workpiece at both ends, ensuring it doesn’t move.
- Check Alignment: Place the saw against the guide and ensure the blade is perfectly on your marked line.
c) Using a Track Saw System
Track saws are designed for extreme precision.
- Position Track: Lay the track on your workpiece, aligning the track’s cutting line indicator with your marked cut line.
- Secure Track: Clamp the track firmly to the workpiece at both ends. Many track systems have anti-slip surfaces to help hold them in place.
- Place Saw: Place the circular saw (specifically designed for the track) onto the track. The saw’s base will engage with the track, allowing it to slide smoothly.
- Make Cut: Start the saw and push it smoothly along the track.
2. Making the Cut
- Position Saw: Place the circular saw on the workpiece with the guide firmly against the base plate. Ensure the blade is just above the surface of the wood, ready to start the cut.
- Start Saw: Turn on the circular saw and let it reach full speed before it touches the wood.
- Feed Slowly: Gently push the saw forward along the guide. Let the saw do the work; don’t force it. A smooth, steady feed rate is crucial for clean cuts.
- Maintain Contact: Keep the base plate firmly against the guide throughout the entire cut.
- Complete Cut: Continue pushing the saw until it has fully cut through the workpiece.
- Release and Turn Off: Allow the blade to stop spinning completely before lifting the saw off the workpiece and turning it off.
Specific Cutting Techniques with Guides
Guides are not just for simple straight lines; they enable various types of precise cuts.
1. Rip Cuts
Rip cuts are made along the length of the wood, parallel to the grain.
- Using a Rip Fence: Ideal for making multiple rip cuts of the same width. Set the fence and feed the wood along it.
- Using a Straight Edge Guide: Set up a straight edge guide parallel to your marked rip line, ensuring it’s offset correctly for the blade kerf. Clamp it securely.
- Considerations: For very long rip cuts, you might need to support the offcut piece to prevent it from binding the blade.
2. Cross Cuts
Cross cuts are made across the width of the wood, perpendicular to the grain.
- Using a Square or Bevel Square: For short to medium lengths, a combination square or speed square can be clamped to the workpiece to act as a guide for the saw’s base.
- Using a Dedicated Crosscut Jig: A DIY or purchased crosscut jig has a fence that you can butt the edge of your workpiece against, ensuring a perfect 90-degree cut.
- Track Saws: Track saws are excellent for cross cuts, especially on large panels, as the track can be positioned precisely.
3. Bevel Cuts (Angle Cuts)
Most circular saws allow you to adjust the base plate angle for bevel cuts.
- Setting the Angle: Loosen the bevel adjustment mechanism and set the base plate to your desired angle (e.g., 45 degrees).
- Using Guides:
- Rip Fence: For bevel rip cuts, the rip fence can still be used, but ensure it’s set at the correct distance from the angled blade.
- Straight Edge Guide: Similar to rip cuts, position your straight edge guide at the correct offset for the angled blade.
- Track Saws: Most track saws allow for bevel cuts by tilting the saw within its base. The track then guides the angled cut.
- Support: Bevel cuts can sometimes leave a less stable base. Ensure your workpiece is well-supported.
Advanced Tips for Maximum Accuracy
Achieving perfect cuts often comes down to attention to detail.
1. Calibration is Key
- Check Your Guide: Before every critical cut, double-check that your guide is perfectly aligned with your marked line and that the blade is set correctly.
- Blade Squareness: Ensure your saw blade is perfectly perpendicular to the base plate when making square cuts. Most saws have a locking mechanism for this.
2. Blade Selection Matters
- Tooth Count: A higher tooth count blade generally results in a smoother finish, which is great for making accurate cuts.
- Blade Type: Use a blade designed for the type of wood you are cutting (e.g., rip blades, crosscut blades, or combination blades).
3. Control Your Feed Rate
- Don’t Rush: Forcing the saw will cause the blade to wander, leading to inaccurate cuts and potentially dangerous kickback.
- Listen to the Saw: A saw that’s struggling or bogging down means you’re pushing too hard or your blade is dull.
4. Support Your Workpiece Properly
- Prevent Sagging: For large panels, the offcut or the main piece can sag as the cut progresses, pinching the blade. Use saw horses, outfeed tables, or supports to keep the workpiece level.
- Clearance: Ensure the offcut has room to fall away freely after the cut is completed.
5. Zero Clearance Inserts (for Track Saws)
- What They Are: Some track saw systems offer “zero clearance” inserts that fit into the saw’s base. These reduce the gap between the blade and the base, providing even more support for the wood fibers right at the cut line, preventing tear-out.
6. Practice Makes Perfect
- Scrap Wood: Always practice on scrap pieces of wood before committing to your project. This helps you get a feel for your guide and saw.
Common Problems and Solutions
Here are some common issues you might encounter and how to fix them:
| Problem | Cause | Solution |
|---|---|---|
| Wandering Cut | Guide not securely clamped, blade not straight, pushing too hard. | Re-clamp guide firmly, check blade alignment, feed saw smoothly and don’t force it. |
| Jagged Edge / Tear-out | Dull blade, wrong blade type, feeding too fast, wood splintering. | Use a sharp, appropriate blade, reduce feed rate, consider a zero-clearance insert or tape on the cut line. |
| Blade Binding | Workpiece sagging, offcut not supported, forcing the cut. | Support workpiece on both sides of the cut, ensure offcut has clearance, maintain steady feed rate. |
| Inconsistent Width Cuts | Guide slipping, not set correctly. | Ensure guide is securely clamped, double-check guide offset from the blade, re-measure distance. |
| Kerf Offset Incorrect | Guide positioned improperly relative to blade. | Re-measure the distance from the blade’s cutting edge to the saw’s base plate edge and adjust guide. |
Frequently Asked Questions (FAQ)
Q: What is the best circular saw guide for beginners?
A: For beginners, a good quality clamp-on straight edge guide is often the most versatile and cost-effective option. They are easy to set up and can be used for both rip and cross cuts. Track saws are excellent but come with a higher price tag.
Q: Can I use a circular saw guide with any circular saw?
A: Most clamp-on and DIY straight edge guides can be adapted to fit most circular saws. However, track saw systems require specific saws designed to work with their tracks. Always check compatibility before purchasing.
Q: How do I account for the blade kerf when using a guide?
A: Measure the distance from the actual cutting edge of your blade to the edge of your saw’s base plate. When setting up your guide, position it that same distance away from your marked cut line, on the waste side. This ensures the blade cuts precisely on your line.
Q: How do I make a perfectly square cross cut with a circular saw?
A: Use a reliable speed square or a combination square, clamped firmly to your workpiece. Align the saw’s base plate against the square’s fence and make your cut. For longer pieces, a dedicated crosscut jig is even better.
Q: Are track saws worth the investment compared to a circular saw with a guide?
A: Track saws offer superior precision, dust collection, and ease of use for long, straight cuts, especially on sheet goods. If you frequently need very accurate cuts, particularly for larger projects or fine woodworking, a track saw can be a worthwhile investment and a great table saw alternative. However, for occasional use or simpler projects, a good circular saw guide will suffice.
By following these guidelines and practicing with your circular saw guide, you’ll be able to achieve the precise, straight cuts you need for all your woodworking projects, making your work more efficient, safer, and professional.