
How To Tighten A Circular Saw Blade For Best Results
Can you tighten a circular saw blade yourself? Yes, you absolutely can and should learn how to tighten a circular saw blade to ensure safe and effective operation. This guide will walk you through the entire process of securing your circular saw blade for optimal performance and cutting precision. Proper circular saw maintenance, including correct blade tightening, is crucial for your safety and the longevity of your power tool. This includes knowing the right wrench size for saw blade changes and ensuring saw blade security after every blade replacement.
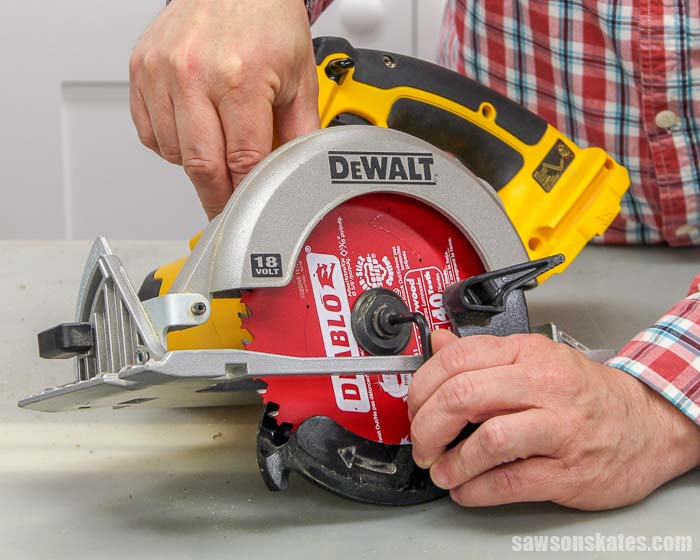
Image Source: sawsonskates.com
The Core of a Good Cut: Securing Your Circular Saw Blade
A circular saw is a powerful tool, and its effectiveness hinges on a securely fastened blade. A loose blade isn’t just inefficient; it’s a significant safety hazard. It can wobble, bind, produce rough cuts, and even cause the saw to kick back unexpectedly. Fathoming the importance of this step is the first stride in mastering your circular saw. This article is dedicated to helping you gain confidence in your ability to correctly tighten a circular saw blade, ensuring every cut is as clean and safe as possible.
Why Proper Blade Tightening Matters
- Safety First: A loose blade is unpredictable. It can vibrate violently, break apart, or cause the saw to jump out of the material. This is known as kickback, a dangerous phenomenon that can lead to severe injury.
- Cutting Quality: A well-tightened blade spins true, resulting in clean, straight cuts. A wobbly blade will produce jagged edges and inaccurate lines.
- Tool Longevity: Excessive vibration from a loose blade can stress the saw’s motor and bearings, leading to premature wear and potential damage. This is a key aspect of good power tool upkeep.
- Efficiency: A secure blade cuts through material smoothly and quickly, saving you time and effort.
Preparing for the Task: What You’ll Need
Before you begin removing or installing a saw blade, gather the necessary items. Having everything ready streamlines the process and ensures you have the right tools for the job.
Essential Tools and Supplies:
- Circular Saw: The tool you’ll be working on.
- New or Clean Blade: Make sure the blade is appropriate for the material you intend to cut and is in good condition.
- Spanner Wrench (Blade Wrench): Most circular saws come with a specific wrench designed to fit the arbor nut. If yours is lost, you’ll need to find the correct wrench size for saw blade changes. Check your saw’s manual for specifications.
- Gloves: To protect your hands from sharp blade edges and prevent oil or dirt from transferring to the blade.
- Safety Glasses: Absolutely essential to protect your eyes from flying debris.
- Clean Cloth or Rag: For wiping down the arbor and blade.
- Blade Removal Tool (Optional): Some manufacturers include a specific tool to help with blade removal.
- Work Surface: A stable, flat surface to place the saw on.
Step-by-Step Guide: Tightening Your Circular Saw Blade
Let’s break down the process of installing and tightening a circular saw blade. This procedure is a fundamental part of cutting tool maintenance.
Step 1: Disconnect Power
This is the most crucial safety step. Always ensure the circular saw is unplugged from the power source or that the battery is removed before attempting any blade changes or adjustments. Double-check that it’s disconnected.
Step 2: Position the Saw
Place the circular saw on a stable, flat surface. For easier access to the blade and arbor nut, it’s best to position the saw so the blade guard is facing upwards and the base plate (shoe) is on the work surface.
Step 3: Access the Blade
Most circular saws have a retractable blade guard. You’ll need to hold this guard out of the way to access the blade and the arbor nut.
- Manual Guard: Some saws have a lever or a way to manually hold the guard back.
- Spring-Loaded Guard: The most common type. You will need to push this guard upwards and out of the way.
Step 4: Stabilize the Blade
To loosen or tighten the arbor nut, you need to prevent the blade itself from spinning. Many circular saws have a spindle lock button or mechanism.
- Spindle Lock Button: Locate this button, usually on the side of the saw’s gear housing. Press and hold it firmly. This engages a lock that stops the spindle from rotating.
- Alternative Stabilization (if no spindle lock): If your saw doesn’t have a spindle lock, you can sometimes use a block of wood placed against the blade teeth to keep it from turning while you apply force to the arbor nut with the wrench. Be very careful when using this method to avoid injury.
Step 5: Loosening the Existing Blade (If Necessary)
- Locate the Arbor Nut: This is the large nut directly in the center of the blade.
- Identify the Wrench Size: Use the correct spanner wrench for your saw. The wrench typically fits onto the arbor nut.
- Turn Counter-Clockwise: Remember the mnemonic “Lefty loosey, righty tighty.” To loosen the arbor nut, turn it counter-clockwise while holding the spindle lock. You might need to apply firm pressure.
Step 6: Removing the Circular Saw Blade
Once the arbor nut is loosened, you can unscrew it completely.
- Unscrew the Arbor Nut: Continue turning the arbor nut counter-clockwise until it comes off. Place it in a safe place so you don’t lose it.
- Remove the Outer Flange: There’s usually a small metal disc, called an outer flange, that sits outside the blade. This will also come off.
- Carefully Slide Off the Blade: With the nut and flange removed, you can now slide the old blade off the arbor. Be mindful of the sharp teeth.
Step 7: Installing the New Saw Blade
This is where the process of tightening begins.
- Inspect the Arbor: Clean the arbor shaft and the flanges (inner and outer) with a clean cloth. Ensure there’s no debris or old blade material stuck on them.
- Position the Inner Flange: Place the inner flange back onto the arbor. Most inner flanges have a raised section that fits into a corresponding recess on the arbor, ensuring correct alignment.
- Mount the Blade: Align the new blade onto the arbor. Crucially, pay attention to the direction of the teeth. The teeth should point in the direction of rotation, which is typically forward and downward on the front of the saw as you look at it from the operating position. The arrow on the blade itself will indicate the correct rotation direction.
- Place the Outer Flange: Put the outer flange onto the arbor, over the blade. Ensure it’s seated correctly.
- Thread the Arbor Nut: Place the arbor nut back onto the arbor and begin threading it clockwise by hand. Make sure it’s going on straight and not cross-threading.
Step 8: Tightening the Arbor Nut
This is the critical step for ensuring saw blade security.
- Engage the Spindle Lock: Press and hold the spindle lock button again to prevent the arbor from turning.
- Use the Spanner Wrench: Place the spanner wrench onto the arbor nut.
- Turn Clockwise (Righty Tight-y): Tighten the arbor nut firmly by turning it clockwise. Apply significant pressure to ensure the blade is snug. You want it to be tight, but avoid over-tightening to the point where you might strip the threads or damage the components. A good, firm feel is usually sufficient.
- Check Blade Security: Once tightened, remove the wrench and release the spindle lock. Gently try to wiggle the blade. There should be absolutely no play or looseness. It should feel solid and immobile.
Step 9: Final Checks and Cleanup
- Inspect the Guard: Ensure the blade guard operates smoothly and retracts and returns freely.
- Clear Debris: Wipe down the saw and your work area.
- Reconnect Power: Once you are sure the blade is securely tightened and all tools are put away, you can reconnect the power.
Common Pitfalls and How to Avoid Them
Even with a straightforward process, mistakes can happen. Knowing common issues helps you avoid them.
Issues to Watch For:
- Wrong Blade Direction: Installing a blade backward will result in poor cuts and can put undue stress on the saw. Always check the rotation arrow on the blade and the saw.
- Cross-Threading the Nut: Forcing the arbor nut on crookedly can damage the threads on both the arbor and the nut, making future changes difficult or impossible. Always thread by hand first to ensure it’s going on straight.
- Not Tightening Enough: This is a major safety concern, leading to blade wobble, poor cuts, and kickback.
- Over-Tightening: While less common than under-tightening, excessive force can strip threads, damage the blade or flanges, or even damage the saw’s spindle.
- Forgetting the Spindle Lock: Trying to loosen or tighten the nut without engaging the spindle lock will simply cause the arbor to spin, making it impossible to work on the nut.
- Dirty Components: Debris on the arbor, flanges, or blade can prevent proper seating and secure tightening. Always clean these parts.
When to Replace Your Circular Saw Blade
Understanding how to tighten a blade is only part of proper cutting tool maintenance. Knowing when to replace it is equally important.
Signs of a Worn-Out Blade:
- Dulling: If your saw is struggling to cut, producing sawdust instead of chips, or requiring excessive force, the blade is likely dull.
- Chipped or Damaged Teeth: Missing or broken teeth compromise the blade’s cutting ability and create safety risks.
- Excessive Vibration: Even if tightened correctly, a damaged blade can cause unusual vibrations.
- Burn Marks on Wood: This is a strong indicator of a dull blade.
- Rough or Jagged Cuts: A good blade should produce smooth, clean edges.
A worn blade not only performs poorly but can also increase the risk of kickback. Regularly inspecting your blade is a vital part of your circular saw maintenance routine.
Blade Replacement vs. Blade Tightening: Differentiating the Processes
While this article focuses on tightening, it’s important to distinguish this from the entire process of blade replacement.
- Blade Tightening: This refers to the action of securing the arbor nut to ensure the blade is held firmly in place on the spindle.
- Blade Replacement: This encompasses the entire sequence: disconnecting power, removing the old blade, cleaning components, installing a new blade, and then properly tightening the arbor nut.
You might need to tighten a blade that’s already installed if you suspect it has come loose during operation. However, the most common scenario for needing to tighten a blade is after performing a blade replacement.
Specific Considerations for Different Circular Saw Types
While the core principles remain the same, there might be slight variations depending on the type of circular saw you own.
Corded vs. Cordless Circular Saws:
- Power Disconnection: For corded saws, it’s simply unplugging. For cordless saws, it means removing the battery pack. Both are equally vital for safety.
Cordless Saw Blade Access:
- Battery Removal: Ensure the battery is fully removed before proceeding.
- Guard Mechanisms: Cordless saws generally operate similarly to corded ones regarding guard mechanisms.
Troubleshooting Common Issues with Blade Tightening
Sometimes, you might encounter difficulties. Here are a few common problems and their solutions.
Problem: Spindle Lock Won’t Engage
- Possible Cause: The spindle lock might be jammed or obstructed.
- Solution: Try rotating the blade slightly while pressing the button. Clean any visible debris around the spindle lock mechanism. If it persists, consult your saw’s manual or contact the manufacturer.
Problem: Arbor Nut is Stuck
- Possible Cause: Rust, debris, or over-tightening from previous use.
- Solution:
- Apply a penetrating oil (like WD-40, but wipe off excess thoroughly before operating). Let it sit for a few minutes.
- Ensure you’re using the correct wrench and applying force smoothly.
- Try tapping lightly on the wrench with a rubber mallet to help break it free.
- If it’s severely stuck, you might need a professional to help.
Problem: Blade Wobbles After Tightening
- Possible Cause: The blade is not seated correctly on the arbor, a flange is warped, or the arbor itself is damaged.
- Solution:
- Loosen the nut, remove the blade and flanges, clean everything meticulously, and reinstall, ensuring proper alignment and the correct rotation direction.
- Inspect flanges for any signs of damage or warping.
- If the arbor appears damaged, the saw may need professional servicing.
Frequently Asked Questions (FAQ)
- Q1: How often should I check my circular saw blade tightness?
A1: It’s good practice to check the tightness of your circular saw blade before each use, especially if you’ve recently changed it. - Q2: What is the correct wrench size for a saw blade?
A2: The correct wrench size is specific to your circular saw model. It usually comes with the saw, or you can find the specification in your owner’s manual. It’s typically a spanner wrench that fits the arbor nut. - Q3: Can I use a regular wrench to tighten a circular saw blade?
A3: It’s best to use the spanner wrench specifically designed for your saw. Regular wrenches might not fit the arbor nut correctly, leading to stripping the nut or improper tightening. - Q4: My circular saw blade keeps loosening. What should I do?
A4: Ensure you are tightening the arbor nut sufficiently. If it continues to loosen, there might be an issue with the nut, the arbor, or the spindle lock mechanism. Inspect these components for wear or damage and consider professional servicing if the problem persists. This is a critical safety concern. - Q5: Is it normal for the blade to have a little wobble before tightening?
A5: No, once installed, the blade should be snug. Any noticeable wobble indicates it’s not properly secured or is installed incorrectly. - Q6: Do I need to lubricate the arbor or nut?
A6: Generally, no. Lubricants can attract dust and debris, which can interfere with proper seating and tightening. Keep components clean and dry. - Q7: What if I lose the original blade wrench?
A7: Contact the manufacturer of your circular saw or check specialized tool supply stores. You can often find generic spanner wrenches, but ensure the size and engagement pattern match your saw’s arbor nut.
By following these steps and paying close attention to the details, you can confidently tighten your circular saw blade for safe, efficient, and high-quality cutting. Remember, consistent power tool upkeep, including proper blade security, is key to achieving the best results and ensuring your safety in the workshop.