
Can you sharpen a Stihl chainsaw chain yourself? Absolutely! Sharpening your Stihl chainsaw chain correctly is crucial for efficient cutting and preventing premature wear on your saw. A dull chain makes your work harder, increases the risk of kickback, and can damage your Stihl chainsaw. This comprehensive guide will walk you through every step, ensuring your saw cuts like new.
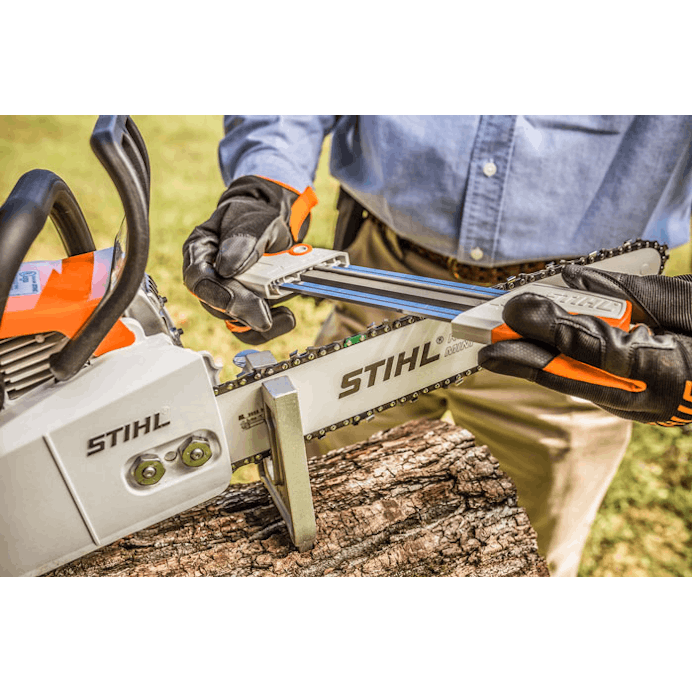
Image Source: stihlusa-images.imgix.net
Why Chain Sharpening Matters
A sharp chainsaw chain is the heart of a well-performing chainsaw. When your chain is sharp, it bites into the wood easily, producing fine sawdust. When it’s dull, you’ll notice it requires more force to cut, it might “push” rather than cut cleanly, and you’ll get coarse wood chips instead of fine dust. This not only slows down your work but also puts unnecessary strain on your Stihl chainsaw’s engine, clutch, and bar. Regular maintenance, including chain sharpening, is key to prolonging the life of your equipment.
Key Benefits of a Sharp Chain:
- Faster Cutting: A sharp chain slices through wood effortlessly.
- Reduced Effort: You won’t have to push the saw as hard.
- Cleaner Cuts: Produces fine sawdust, not coarse chips.
- Improved Safety: Reduces the risk of dangerous kickback.
- Extended Equipment Life: Less strain on the engine, clutch, and bar.
- Less Fuel Consumption: An efficient chain uses less fuel.
Essential Tools for Sharpening
To sharpen your Stihl chainsaw chain like a pro, you’ll need a few specific tools. Having the right best chainsaw file and accessories makes a world of difference.
What You’ll Need:
- Round File: This is the most critical tool. The Stihl chainsaw file size will depend on your chainsaw chain pitch.
- File Guide/Holder: Essential for maintaining the correct Stihl chainsaw sharpening angle. It often has markings to help you align the file.
- Flat File: Used for adjusting the chainsaw depth gauge.
- Depth Gauge Tool: A specialized tool to ensure the depth gauges are set correctly.
- Bench Vise or Chain Clamp: To hold the chain steady while you file.
- Gloves: For grip and protection.
- Safety Glasses: To protect your eyes from filings.
- Rag: For cleaning.
Selecting the Right File
The Stihl chainsaw file size is paramount. It must match your chainsaw chain pitch, which is the distance between any three rivets divided by two. Stihl chains typically come in pitches like .325″, 3/8″ (standard and low profile), and .404″.
- To determine your chain pitch: Look for markings on the chain itself (often on the drive links) or check your Stihl chainsaw’s manual.
- File Diameter: The round file’s diameter should be roughly 2.5 times the thickness of the drive link. Common sizes for round files are 5/32″, 3/16″, and 7/32″. A file that’s too small or too large will not effectively sharpen the cutters.
- File Quality: Invest in high-quality files. Good files hold their sharpness longer and provide a better cut. Oregon and Stihl both make excellent chainsaw files.
File Guide vs. Freehand Filing
While experienced professionals can sometimes file freehand, using a chainsaw file guide is highly recommended, especially for beginners. A file guide ensures consistency in your filing, which is crucial for a balanced and efficient chain. It helps maintain the correct Stihl chainsaw sharpening angle and depth, leading to a much better result.
Preparing Your Stihl Chainsaw for Sharpening
Before you start filing, proper preparation is key.
Steps for Preparation:
- Safety First: Ensure the chainsaw is off and the chain brake is engaged. Wear gloves and safety glasses.
- Secure the Chain: Ideally, mount the chainsaw bar in a vise or use a dedicated chainsaw vise to hold the chain steady. If you don’t have a vise, you can try to wedge the chainsaw securely on a stable surface.
- Clean the Chain: Wipe down the chain with a rag to remove dirt, sawdust, and oil. This allows you to see the cutters clearly.
- Identify the Starting Cutter: Chains have alternating left and right-facing cutters. Locate the first cutter you will sharpen. It’s often easiest to start with a cutter that is facing away from you.
- Engage the Chain Brake: Always ensure the chain brake is engaged when the saw is not in use or being actively filed.
The Sharpening Process: Step-by-Step
Sharpening involves two main actions: filing the cutters and adjusting the depth gauges.
H3: Filing the Cutters
This is the core of how to file a chainsaw chain. The goal is to restore the sharp cutting edge of each tooth.
H4: Setting the Sharpening Angle
The Stihl chainsaw sharpening angle is critical for optimal cutting performance. Most Stihl chains are designed for a 25-30 degree angle. Your file guide will have markings or guides to help you achieve this.
- How to Position the File: Place the round file into the gullet (the curved part) of the cutter. The file should be horizontal relative to the ground and parallel to the cutters on the other side of the chain.
H4: The Filing Stroke
- File Guide Placement: Position the chainsaw file guide over the cutter, ensuring the file is snug within the guide and at the correct angle. The guide will typically rest on the top plate of the cutter and the depth gauge.
- Start Filing: Begin with firm, forward strokes. Apply pressure as you push the file forward, then lift it on the backstroke to avoid dulling the file and the cutter.
- Stroke Count: Aim for a consistent number of strokes per cutter. Generally, 5-10 strokes are sufficient for most Stihl chains, but this can vary based on how dull the chain is. The goal is to remove just enough metal to create a sharp edge.
- Check the Cutter: Periodically check the cutter. You’ll see a small, bright sliver of metal appear on the cutting edge when it’s sharp. Avoid over-filing, which removes too much metal and shortens the life of the cutter.
- Maintain Consistency: Ensure that each cutter is filed to the same length and angle. You’ll notice that the cutters gradually get shorter as you sharpen them. The goal is to bring them all back to a uniform length and sharpness.
H4: Sharpening Left and Right Cutters
- Alternating Angles: Remember that the cutters alternate direction. You’ll file one set of cutters at a specific angle, then turn the file guide (or the saw) to file the opposite set of cutters at the same angle.
- Following the Guide: If using a file guide, it will help you maintain the correct angle for both left and right cutters. If filing freehand, ensure you are filing into the tooth’s cutting edge.
H4: Sharpening All Cutters
- Systematic Approach: Work your way around the entire chain, filing every cutter.
- Consistency is Key: The most important aspect of chainsaw tooth filing is consistency. Every tooth should be sharpened identically. This ensures the chain cuts smoothly and evenly.
H3: Adjusting the Chainsaw Depth Gauge
The chainsaw depth gauge (also called a raker) controls how much wood the cutter can take off with each pass. If the depth gauges are too high, the chain won’t cut efficiently, even if the cutters are sharp. If they are too low, the chain can cut too aggressively, leading to chain damage and increased risk of kickback.
H4: The Role of Depth Gauges
- Controlling Bite: The depth gauge sits in front of the cutter. It protrudes slightly to limit the depth of the cut the cutter makes.
- Optimal Protrusion: For most Stihl chains, the depth gauge should protrude about 0.025 inches (0.6 mm) above the file guide’s baseline.
H4: Using the Depth Gauge Tool
- The Process: Use a chainsaw depth gauge tool or a Stihl-specific guide. This tool has a slot that fits over the cutter and a gauge that sits on the file guide. It helps you visually determine if the depth gauge is correctly set.
- Filing the Depth Gauge: If the depth gauge is too high, use a flat file to file it down. Position the flat file parallel to the chain and file it down until it is flush with the gauge on the tool.
- Be Conservative: It’s better to leave the depth gauge slightly high than too low. You can always file it down more later if needed. Remember, you can only file metal away, not add it back.
- One Stroke is Often Enough: Filing a depth gauge usually only requires one or two smooth, backward strokes with the flat file.
H4: Checking Depth Gauges
- After Filing: After filing a batch of cutters, it’s a good practice to check the depth gauges.
- Consistency: Ensure all depth gauges are at the correct height relative to their respective cutters.
Re-tensioning and Cleaning After Sharpening
Once you’ve finished filing, there are a few final steps to ensure your chain is ready for action.
H3: Re-tensioning the Chain
- Chain Tension: A properly tensioned chain is vital for safety and performance. It should be snug against the bar but still be able to move freely by hand.
- How to Tension: Follow your Stihl chainsaw’s manual for specific instructions. Generally, you loosen the bar nuts, adjust the tension using the adjustment screw on the bar or saw body, and then re-tighten the bar nuts.
H3: Cleaning Up
- Remove Filings: Brush away any metal filings from the chain and bar.
- Lubrication: Apply a light coat of bar and chain oil to the chain to prevent rust and ensure smooth operation.
When to Consider Chain Replacement
While sharpening can breathe new life into a dull chain, there are times when chainsaw chain replacement is the better option.
Signs Your Chain Needs Replacing:
- Excessive Wear: If the cutters are significantly shortened and no longer have enough material to sharpen properly, it’s time for a new chain.
- Cracked or Broken Cutters: Damaged cutters cannot be effectively repaired.
- Stretched Chain: If the chain is constantly loosening despite proper tensioning, it might be stretched and worn out.
- Repeated Stalling: If sharpening doesn’t resolve poor cutting performance, the chain might be beyond its usable life.
- Damage from Contact: If the chain has hit dirt, rocks, or metal, it can cause nicks and damage that are difficult or impossible to file out.
Frequently Asked Questions (FAQ)
H3: How often should I sharpen my Stihl chainsaw chain?
The frequency depends on your usage. If you cut for more than 15-20 minutes, it’s a good idea to check the sharpness. If you notice a decrease in cutting performance, or if the saw starts making buzzing sounds or requiring more force, it’s time to sharpen. A good rule of thumb is to sharpen whenever you refuel.
H3: What happens if I use a dull chain?
Using a dull chain leads to slower cutting, increased wear on the bar and engine, higher fuel consumption, and a greater risk of kickback, which is extremely dangerous.
H3: Can I use a different brand of file for my Stihl chain?
Yes, you can use quality files from other reputable brands as long as the Stihl chainsaw file size (diameter) and pitch match your chain. However, Stihl files are specifically designed for their chains and are an excellent choice.
H3: My chain isn’t cutting well even after sharpening. What could be wrong?
Several factors could be at play:
* Incorrect Angle: The Stihl chainsaw sharpening angle might be wrong.
* Depth Gauges Too High: The chainsaw depth gauge might not have been lowered sufficiently.
* Dull File: The file might be worn out.
* Chain Damage: The chain might have internal damage from hitting hard objects.
* Bar Wear: The guide bar itself could be worn or damaged.
* Chain Tension: Improper tension can also affect cutting.
H3: How do I know the correct Stihl chainsaw file size?
You need to know your chainsaw chain pitch. This is typically found on the chain itself or in your chainsaw’s manual. Once you know the pitch (e.g., .325″, 3/8″), you can select the corresponding Stihl chainsaw file size. For example, a 3/8″ pitch chain often uses a 7/32″ file, and a .325″ pitch chain usually uses a 3/16″ file. Always check your manual or chain specifications for the precise recommendation.
H3: What is the correct Stihl chainsaw sharpening angle?
The most common Stihl chainsaw sharpening angle is 25-30 degrees. Your file guide will usually have markings to help you set this precisely.
Conclusion
Mastering the art of sharpening your Stihl chainsaw chain is a rewarding skill that will save you time, money, and effort. By using the correct tools, maintaining consistent angles and strokes, and paying attention to the depth gauges, you can keep your Stihl chainsaw performing at its peak. Regular chainsaw maintenance, including proper sharpening, is the key to safe, efficient, and long-lasting operation. Don’t underestimate the power of a sharp chain – it’s the difference between a frustrating chore and a satisfying job. Happy cutting!