
Can you make straight cuts with a circular saw? Yes, you absolutely can! Making straight cuts with a circular saw is achievable with the right techniques, accessories, and practice. This guide will delve into everything you need to know to safely and effectively wield this essential woodworking tool. From understanding its components to advanced cutting techniques, we’ll cover it all.
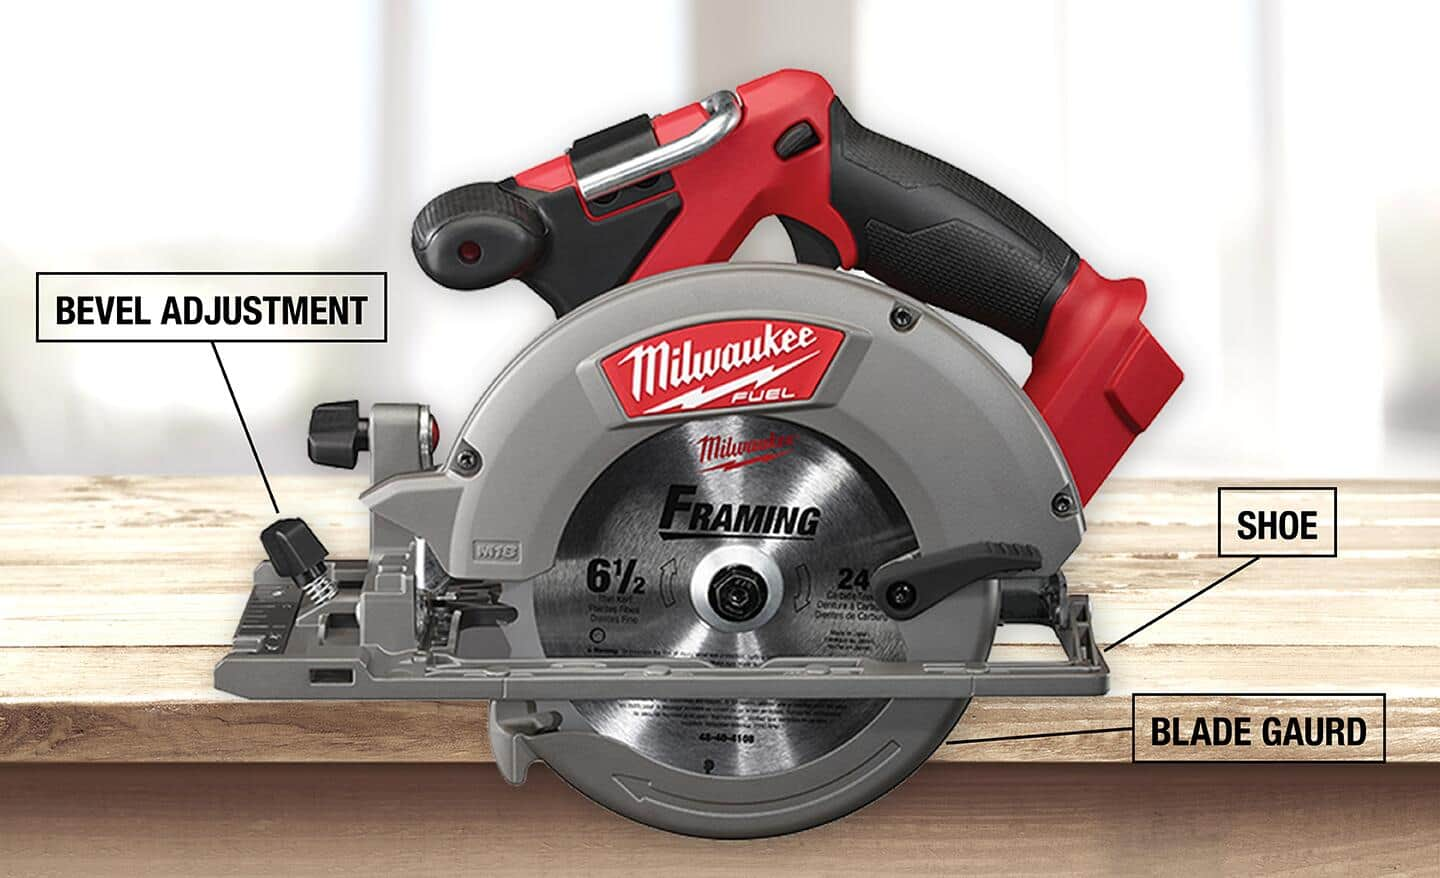
Image Source: dam.thdstatic.com
Choosing the Right Circular Saw
Before you even think about making a cut, it’s crucial to select the right circular saw for your needs. Several factors come into play:
- Power Source:
- Corded Circular Saws: Offer consistent power and don’t require battery charging. They are ideal for extended use in a workshop setting.
- Cordless Circular Saws: Provide portability and freedom of movement. Battery technology has advanced significantly, offering impressive runtime and power.
- Motor Size (Amps for corded, Voltage for cordless): A more powerful motor will handle tougher materials and thicker cuts with greater ease.
- Blade Size: The most common sizes are 7-1/4 inch and 6-1/2 inch. Larger blades can cut deeper but are heavier.
- Features: Look for features like electric brakes (stops the blade quickly), depth adjustment levers, bevel adjustment for angled cuts, and dust blowers to keep your cut line visible.
Essential Circular Saw Safety
Circular saw safety is paramount. A moment of carelessness can lead to serious injury. Always prioritize safety in your woodworking endeavors.
Personal Protective Equipment (PPE)
- Safety Glasses or Goggles: Essential to protect your eyes from sawdust and flying debris.
- Hearing Protection: Circular saws are loud. Earplugs or earmuffs will prevent long-term hearing damage.
- Dust Mask or Respirator: Protect your lungs from fine wood dust.
- Work Gloves: While some prefer not to wear gloves for better grip, others find they offer added protection against splinters and minor abrasions. Use them if they improve your comfort and control.
- Sturdy Footwear: Protect your feet from dropped tools or materials.
Safe Operating Practices
- Read Your Manual: Every saw is slightly different. Familiarize yourself with your specific model’s features and safety warnings.
- Inspect the Saw: Before each use, check the power cord (if applicable) for damage, ensure the blade is securely fastened and sharp, and verify that all guards are functioning correctly.
- Secure Your Workpiece: Always clamp your material firmly to a stable work surface. Never attempt to hold the material with your free hand or foot while cutting.
- Keep the Area Clear: Remove any obstructions, flammable materials, or tripping hazards from your work area. Good lighting is also important.
- Maintain Control: Keep a firm grip on the saw with both hands. Stand in a balanced position to support the saw’s weight and control its movement.
- Let the Saw Do the Work: Don’t force the saw. Apply steady, even pressure and let the blade cut through the material. Forcing the saw can lead to binding, kickback, or an uneven cut.
- Blade Guard: Never disable or tie back the retractable blade guard. It’s designed to cover the blade when not in use and retract as you cut.
- Be Aware of the Cord: If using a corded saw, keep the cord away from the blade path.
- Proper Stance: Stand slightly to the side of the blade’s path, not directly behind it. This is a crucial circular saw kickback prevention measure.
Deciphering the Circular Saw Blade Types
The type of blade you use significantly impacts the quality and speed of your cut, as well as the material you can cut. Choosing the right circular saw blade types is as important as choosing the right saw.
| Blade Diameter | Tooth Count | Typical Use | Cut Quality | Cut Speed |
|---|---|---|---|---|
| 7-1/4″ | 24-30 | Rough cuts, framing, dimensional lumber | Coarse | Fast |
| 7-1/4″ | 40-50 | General purpose, plywood, crosscuts | Medium | Medium |
| 7-1/4″ | 60+ | Fine cuts, trim, rip cuts, laminate, melamine | Fine | Slow |
| Specialty | Varies | Masonry, metal, plastic, specific cutting tasks | Varies | Varies |
- Tooth Count: Lower tooth count blades are faster and better for rough cuts in thicker materials. Higher tooth count blades offer smoother, cleaner cuts but are slower and can overheat in thick stock.
- Tooth Configuration: Blades can have TCG (Triple Chip Grind), ATB (Alternate Top Bevel), or FTG (Flat Top Grind) teeth. ATB is common for general-purpose and crosscutting, while FTG is often used for ripping. TCG is excellent for harder materials like laminates and plastics.
Making Straight Cuts with a Circular Saw
Making straight cuts with a circular saw is a fundamental skill. Here’s how to achieve precision:
The Importance of a Sharp Blade
A dull blade will wander, bind, and produce ragged cuts. Ensure your blade is sharp and appropriate for the material you’re cutting.
Setting the Depth of Cut
This is a critical step for safety and cut quality.
1. Unplug the saw or remove the battery.
2. Place the saw on the edge of your material.
3. Adjust the circular saw depth adjustment lever. The blade should extend just slightly below the material – about one tooth’s depth.
4. Why is this important? Setting the depth too deep increases the risk of kickback and makes the saw harder to control. Setting it too shallow won’t cut all the way through.
Using the Rip Fence or Guide Fence
A circular saw guide fence is an accessory that attaches to the saw and runs along the edge of your workpiece, guiding the saw for a straight cut.
- Attach the Fence: Most circular saws come with a basic rip fence. If yours didn’t, they are readily available for purchase. Slide the fence into the designated slots on the saw base.
- Measure and Set: Measure from the edge of the saw’s base plate (the part that rests on the wood) to the blade. Set the guide fence at this measurement, plus any additional offset you need for your desired cut. Some fences have built-in adjustment scales.
- Clamp the Fence (if necessary): On some saws, the fence can loosen. Ensure it’s firmly in place before cutting.
- Cutting with the Fence: Run the guide fence along the edge of your material as you cut. This ensures a parallel, straight cut.
Using a Straight Edge Guide
For cuts longer than your saw’s built-in rip fence, or for making cuts parallel to an edge that isn’t perfectly straight, a temporary straight edge guide is invaluable.
- Choose Your Guide: This can be a length of straight plywood, a metal ruler, or a dedicated cutting guide. Ensure it’s perfectly straight.
- Measure and Mark: Mark your cut line on the material.
- Position the Guide: Measure the distance from the saw’s base plate to the blade. Measure this same distance from your cut line on the material and mark this spot. Align the edge of your straight edge guide with this mark.
- Clamp Securely: Clamp the straight edge guide firmly to your workpiece at both ends, ensuring it won’t shift during the cut.
- Cutting with the Guide: Run the edge of the saw’s base plate along the straight edge guide.
The “Plunge Cut” Technique (for starting a cut mid-material)
While generally not recommended for beginners on long, straight cuts, plunge cuts are sometimes necessary.
- Set Depth: Ensure the depth is set correctly to only slightly exceed the material thickness.
- Position and Stabilize: Place the saw with the blade just above the material where you want to start the cut. Ensure the base plate is fully supported.
- Engage the Blade: Start the saw.
- Plunge Carefully: Slowly and smoothly lower the front of the saw until the blade enters the wood. Once the blade is fully engaged and cutting, slowly bring the front of the saw down until the base plate is flat on the material.
- Complete the Cut: Continue the cut as usual.
Cutting Different Materials with a Circular Saw
A circular saw isn’t just for wood. With the right blade and techniques, you can cut various materials.
Cutting Plywood and Sheet Goods
Plywood can splinter easily.
* Use a Fine-Tooth Blade: A blade with 50-60 teeth is ideal.
* Support the Cut: Ensure the waste side of the cut is fully supported. As the blade exits the material, the remaining piece can drop, causing tear-out.
* Score the Line: Lightly score the cut line with a utility knife to help prevent splintering.
* Backer Board: Consider taping a piece of painter’s tape along the cut line to further reduce splintering.
Cutting Melamine and Laminates
These materials are prone to chipping.
* Fine-Tooth Blade: A high-tooth-count blade (60+ teeth) is essential.
* Scoring: Score the cut line with a utility knife.
* Blade Depth: Set the depth to cut only slightly deeper than the laminate or melamine layer.
* Support: Ensure full support for both sides of the cut.
Cutting Plastics
- Plastic-Specific Blades: Use blades designed for cutting plastic. They typically have fewer teeth than wood blades and are designed to avoid melting.
- Slow Speed: If your saw has variable speed, use a slower setting.
- Avoid Melting: Steady, consistent speed is key. If the plastic starts to melt and gum up the blade, you may need a different blade or technique.
Cutting Metal
- Abrasive Blades or Carbide-Tipped Metal Blades: Standard wood blades will not work and can be dangerous. Use specialized metal cutting blades.
- Coolant: For thicker metal, a cutting fluid or coolant can help prevent overheating.
- Secure Clamping: Metal must be clamped exceptionally well.
- Slow Speed: Use the slowest speed setting on your saw.
- Eye Protection is Crucial: Metal shards are sharp and dangerous.
Cutting Masonry (Brick, Stone, Tile)
- Diamond-Tipped Blades: These are specifically designed for cutting masonry.
- Water/Dust Suppression: Many masonry cutting tasks require water to suppress dust and cool the blade. Some saws are designed for wet cutting, or you can use a spray bottle.
- Slow and Steady: This is not a fast operation. Let the blade do the work and keep the saw moving smoothly.
Circular Saw Kickback Prevention
Circular saw kickback prevention is vital for safety. Kickback occurs when the blade suddenly binds in the material and the saw is violently thrown back towards the operator.
Causes of Kickback
- Dull Blade: A dull blade requires more force and is more likely to bind.
- Blade Binding: The kerf (the cut slot) closing up behind the blade due to the material flexing or pinching. This can happen when cutting with the grain or when the workpiece isn’t adequately supported.
- Twisting the Saw: Angling the saw off the intended cut line.
- Hitting Knots or Hard Spots: Sudden resistance can cause the blade to bind.
- Starting the Cut Incorrectly: Not allowing the blade to reach full speed before entering the material.
How to Prevent Kickback
- Use a Sharp Blade: The most important step.
- Proper Depth Setting: As mentioned, setting the depth to slightly more than the material thickness reduces the amount of blade exposed.
- Support Your Work: Ensure the material is fully supported, especially the waste side of the cut. Use sawhorses, workbenches, or scrap wood to prevent the cut from closing.
- Maintain a Straight Cut: Keep the saw aligned with your cut line. Avoid twisting the saw.
- Stand to the Side: Never stand directly behind the saw’s path.
- Let the Blade Reach Full Speed: Before entering the material, let the saw spin up to its maximum RPMs.
- Avoid Binding: If the saw feels like it’s binding, stop immediately, unplug or remove the battery, and assess the situation. Don’t try to force it.
- Use a Riving Knife (if available): Some higher-end circular saws have a riving knife, which is a metal plate behind the blade that helps keep the kerf open and significantly reduces the risk of kickback.
- Consider a Zero-Clearance Insert: These aftermarket inserts create a tighter fit around the blade, reducing the chance of small pieces falling into the gap and causing a jam.
Best Practices for Circular Saw Use
Following best practices for circular saw use will elevate your efficiency, precision, and safety.
- Mark Your Cut Lines Clearly: Use a sharp pencil or marking knife.
- Establish a Cut Line Indicator: Many saws have a visible indicator on the base plate that aligns with the blade. Use this in conjunction with your marked line for accuracy.
- Pre-Drill Screw Holes: When joining pieces, pre-drilling helps prevent wood splitting.
- Practice on Scrap: Before cutting valuable material, practice your cuts on scrap pieces of the same thickness and type.
- Clear Sawdust: Periodically clear sawdust from the base plate and the workpiece to maintain visibility and prevent the saw from binding.
- Use the Correct Saw for the Job: A powerful corded saw for heavy-duty tasks, a cordless saw for portability, and a track saw for ultra-precise long cuts if needed.
- Make Multiple Passes on Thick Material: For very thick stock, you might need to make two shallower passes rather than one deep cut.
- Listen to Your Saw: Changes in sound can indicate a problem, such as a dull blade or the saw binding.
Maintaining Your Circular Saw
Regular maintenance ensures your saw operates safely and effectively. Maintaining your circular saw is a crucial part of responsible tool ownership.
- Clean the Saw: After each use, brush or blow away sawdust and debris from the motor housing, vents, and base plate.
- Check and Tighten Components: Periodically check that the blade is securely fastened, the base plate screws are tight, and any adjustable guides are firm.
- Inspect the Blade: Clean off resin and pitch buildup with a blade cleaner. Replace blades that are dull, damaged, or have missing teeth.
- Lubrication (if applicable): Consult your owner’s manual to see if any lubrication is recommended for moving parts.
- Brush Replacement (for corded models): Over time, the carbon brushes in corded saws wear down. Your manual will indicate if and how these can be replaced.
Frequently Asked Questions (FAQ)
Q: Can I use a circular saw to cut metal?
A: Yes, but you must use a specialized metal-cutting blade (abrasive or carbide-tipped for metal) and follow safety precautions, including appropriate PPE and securing the workpiece very well.
Q: How do I avoid splintering when cutting plywood?
A: Use a fine-tooth blade, support the waste side of the cut, and consider scoring the cut line with a utility knife or applying painter’s tape along the line.
Q: My circular saw is hard to push through the wood. What could be wrong?
A: Several things could cause this: the blade might be dull, the depth of cut might be set too deep, you might be forcing the saw, or the kerf might be closing up behind the blade (binding). Check these issues first.
Q: What is the best way to make a perfectly straight cut without a table saw?
A: The best methods involve using a rip fence for cuts parallel to an existing edge or a clamped straight edge guide for cuts parallel to a line or another edge. Precision measurement and secure clamping are key.
Q: How often should I replace my circular saw blade?
A: This depends on usage, the material you cut, and the quality of the blade. A good indicator is when cuts become rough, the saw struggles, or you start experiencing more tear-out. For general woodworking, a blade might last for dozens of projects, but for heavy use or cutting harder materials, replacement will be more frequent.
By familiarizing yourself with these techniques, safety measures, and maintenance tips, you’ll be well on your way to mastering the circular saw and tackling a wide range of woodworking projects with confidence and precision.