
Operating a table saw requires a solid foundation in safety principles and a methodical approach to each cut. Can I operate a table saw without extensive training? While basic operation can be learned, mastering safe and effective table saw use demands careful study and practice. Who is responsible for table saw safety? Ultimately, the operator is responsible for ensuring their own safety and the safety of those around them. This guide will walk you through the essential steps to safely and effectively operate a table saw.
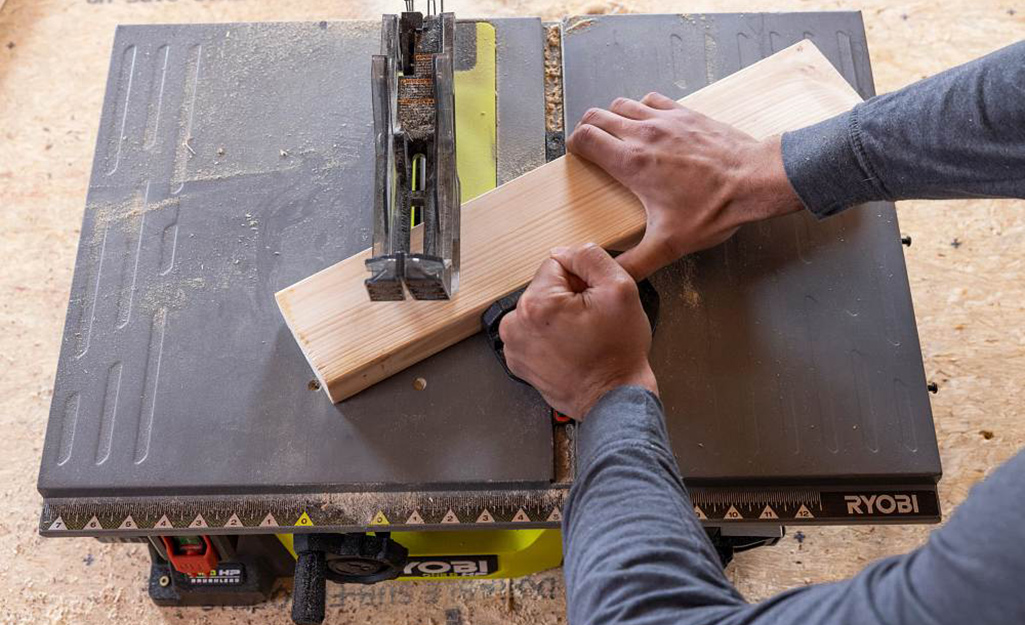
Image Source: contentgrid.homedepot-static.com
Preparing Your Workspace for Table Saw Operation
Before you even think about turning on the saw, a clean and organized workspace is paramount. A cluttered area is a recipe for accidents.
Clearing the Path
- Remove Obstructions: Ensure there’s ample space around the table saw. You need room to maneuver lumber, stand comfortably, and keep clear of any swinging parts or ejected material.
- No Tripping Hazards: Keep the floor clear of sawdust, wood scraps, cords, and anything else that could cause you to stumble.
Lighting and Ventilation
- Adequate Lighting: Good visibility is crucial for accurate cuts and avoiding mistakes. Ensure the area directly around and above the saw is well-lit.
- Dust Management: Table saws generate a significant amount of dust. Proper table saw dust collection is not just about cleanliness; it’s about your health and visibility. Connect your saw to a shop vac or dust collector system. Many modern table saws have dust ports designed for this.
Personal Protective Equipment (PPE)
This is non-negotiable. Always wear the right gear.
- Safety Glasses or Face Shield: Protect your eyes from flying debris. This is the most important piece of PPE.
- Hearing Protection: Table saws are loud. Earplugs or earmuffs are essential to prevent hearing damage.
- Dust Mask or Respirator: Protect your lungs from fine wood dust.
- Appropriate Clothing: Avoid loose clothing, jewelry, or anything that could get caught in the spinning blade. Long sleeves can be rolled up. Wear sturdy, closed-toe shoes.
- Gloves (Optional, with Caution): Some operators prefer gloves for better grip, but be extremely cautious. If you wear gloves, ensure they are not loose and that you are confident they won’t snag. Many experienced woodworkers avoid gloves when operating a table saw because of the snagging risk.
Essential Table Saw Components and Their Functions
Familiarizing yourself with the different parts of your table saw will greatly enhance your ability to operate it safely and effectively.
The Table and Its Features
The table saw itself is the central workbench. It’s a flat surface with a slot or miter gauge slot that guides the blade.
- Table Surface: Should be smooth and flat to allow lumber to glide easily.
- Miter Slots: These slots, usually T-shaped, run parallel to the blade. They are designed to hold and guide a miter gauge or a table saw crosscut sled.
- Extension Wings: Many table saws have extension wings that expand the usable surface area, helpful for supporting larger pieces of wood.
The Blade and Guarding Mechanisms
The blade is the business end of the saw, and proper handling is critical.
- Table Saw Blade: Comes in various tooth counts and configurations for different types of cuts (ripping, crosscutting, etc.). A sharp, clean blade is essential for both safety and cut quality.
- Blade Guard: A crucial safety feature that covers the blade when it’s not in use or during certain operations. It helps prevent accidental contact with the blade and can direct sawdust away.
- Riving Knife or Splitter: This is a thin piece of metal positioned directly behind the blade, aligned with its kerf (the width of the cut). It separates the wood after the blade passes through, preventing the wood from pinching the blade and causing a dangerous kickback. It’s arguably the most important safety device on a table saw.
- Anti-Kickback Pawls: These are small, toothed devices that bite into the wood if it starts to move backward towards the operator, helping to prevent kickback.
The Fence and Miter Gauge
These are your primary guides for making accurate cuts.
- Table Saw Fence: A long metal bar that runs parallel to the blade. It’s used for making straight table saw ripping cuts. A good fence locks firmly in place and is easily adjustable.
- Table Saw Miter Gauge: A tool that fits into the miter slots and holds wood at a specific angle for crosscutting. It provides a stable guide for cutting shorter pieces accurately.
Step-by-Step: Basic Table Saw Operation
Once your workspace is prepared and you’re wearing your PPE, you can begin setting up for your cut.
1. Blade Installation and Height Adjustment
Can I change the table saw blade myself? Yes, but it requires caution.
Changing the Table Saw Blade
- Disconnect Power: Crucially, unplug the table saw from the power outlet before attempting any blade changes.
- Access the Blade: Locate the blade access panel on the saw, usually under the table.
- Loosen the Arbor Nut: Use the correct size wrench to loosen and remove the arbor nut. The arbor is the shaft the blade mounts on. You may need to hold the arbor steady with another wrench or a specific arbor lock tool.
- Remove the Old Blade: Carefully slide the old blade off the arbor. Note its orientation.
- Install the New Blade: Place the new table saw blade installation on the arbor, ensuring it’s oriented correctly (teeth should face the direction of blade rotation, typically forward and downward).
- Tighten the Arbor Nut: Securely tighten the arbor nut. Don’t overtighten, but ensure it’s snug.
- Reassemble: Replace the blade guard and any other covers.
Setting Blade Height
- Power On Briefly: Plug the saw back in and turn it on for a moment to check the blade spins freely. Then unplug again.
- Raise the Blade: Turn the blade height adjustment crank until the blade teeth are just slightly above the table surface. A good starting point is about 1/8 to 1/4 inch higher than the wood you are cutting.
- Why This Height? Raising the blade too high increases the risk of kickback. A lower blade profile also means less of the blade is exposed above the workpiece.
2. Fence Adjustment for Ripping
This is how you make straight cuts along the length of a board.
Aligning the Table Saw Fence
- Measure and Mark: Determine the desired width of your ripped piece.
- Set the Fence: Move the table saw fence adjustment so the distance from the blade to the fence is exactly the width you need. Use a measuring tape or a measuring scale on the saw.
- Lock the Fence: Ensure the fence is locked down securely. It should not budge when you apply pressure.
- Check Alignment: For precise cuts, especially with longer boards, ensure the fence is perfectly parallel to the blade. Many fences have a mechanism to adjust their parallel alignment. A quick check is to slide a known square piece of wood against the blade and fence.
3. Using the Miter Gauge or Crosscut Sled for Crosscutting
This is for cutting wood to length.
Employing the Miter Gauge
- Insert into Slot: Place the table saw miter gauge into one of the table slots.
- Set the Angle: If you need a square cut (90 degrees), ensure the miter gauge head is firmly set to 90 degrees. If you need an angled cut, adjust the miter gauge to the desired angle.
- Position the Wood: Place the wood firmly against the miter gauge.
- Support the Wood: Always ensure the wood is fully supported. For long pieces, you might need outfeed support or a helper.
Using a Table Saw Crosscut Sled
A crosscut sled offers superior stability and accuracy for crosscuts, especially for narrow pieces or when cutting multiple identical pieces.
- Build or Acquire: A crosscut sled is typically a piece of plywood with a fence attached at 90 degrees to a base, which slides in the miter slots.
- Position and Cut: Place the wood against the sled’s fence. Push the sled and wood through the blade. The sled’s fence keeps the wood square to the blade.
4. Making the Cut: Ripping and Crosscutting Techniques
Now that everything is set, it’s time to cut.
Performing a Table Saw Ripping Cut
- Position the Wood: Place the workpiece flat on the table, with one edge against the fence.
- Start the Saw: Turn on the table saw and let the blade reach full speed.
- Begin the Feed: Gently push the wood into the blade. Use both hands to guide the wood, keeping it snug against the fence.
- Use a Table Saw Push Stick: For narrow pieces where your hands would come too close to the blade, a table saw push stick is essential. It allows you to push the wood through the danger zone while keeping your fingers safely away.
- Full Blade Engagement: Push the wood completely through the blade until the cut is finished.
- Withdraw the Wood: Once the cut is complete, wait for the blade to stop spinning before removing the cut pieces and the remaining stock. Do not try to remove the wood while the blade is still spinning.
Performing a Table Saw Crosscut Cut
- Positioning: Place the wood against the miter gauge or on the crosscut sled. Ensure the waste piece is on the side of the blade that will fall away.
- Start the Saw: Turn on the table saw and let the blade reach full speed.
- Begin the Feed: Hold the wood firmly against the miter gauge or sled fence. Smoothly push the wood through the blade.
- Maintain Contact: Keep the wood pressed firmly against the miter gauge or sled fence throughout the entire cut.
- Complete the Cut: Push the wood all the way through.
- Withdraw: Wait for the blade to stop spinning completely before removing the cut pieces.
5. Handling Small and Narrow Pieces
This is where advanced safety measures become critical.
Using a Table Saw Push Stick or Push Block
- Purpose: To maintain control and pressure on the workpiece, pushing it safely through the blade when the piece is too narrow for your hands to be a safe distance away.
- Technique: Place the push stick or block on the end of the wood being pushed and apply forward pressure. Keep your body positioned so that if kickback occurs, you are not in the direct line of fire.
Using Featherboards
- Function: Featherboards are spring-loaded devices that apply lateral pressure to the workpiece, holding it against the fence or miter gauge. This significantly reduces the risk of kickback.
- Placement: Position the featherboard so its fingers press against the side of the workpiece being guided.
6. Dado Blades and Specialized Cuts
A table saw dado blade set allows you to cut wider grooves or dados in wood for joinery.
Using a Table Saw Dado Blade
- Blade Compatibility: Ensure your table saw is designed to accept dado blades and has the necessary arbor length and clearance.
- Installation: Dado blades are installed like regular blades, but they often involve multiple blades and chippers that are stacked together with spacers to achieve the desired width. Follow the manufacturer’s instructions carefully for correct assembly and installation.
- Riving Knife Removal: When using a dado blade, you typically remove the riving knife or splitter. This is a critical point where extreme caution is needed. Because the dado blade cuts a wider kerf, the riving knife might not align or could be damaged.
- Safety Precautions: With no riving knife, preventing kickback is even more critical. Use featherboards and ensure the workpiece is held firmly against the fence and the table. Never reach over the dado blade.
Advanced Table Saw Safety Practices
Beyond the fundamental steps, there are advanced considerations for maximizing safety.
Preventing Kickback
Kickback is when the wood is violently thrown back towards the operator. It’s one of the most dangerous table saw accidents.
- Causes of Kickback:
- Blade Contact with the Wood Kerf: Wood closing in on the blade, especially if the riving knife is missing or misaligned.
- Binding: The wood catching on the blade due to warped or twisted stock, or incorrect fence alignment.
- Improper Support: Unbalanced or unsupported wood being fed into the blade.
- Reaching Back: Trying to retrieve a cut-off piece before the blade stops.
- Prevention:
- Always use a riving knife or splitter.
- Ensure the fence is parallel to the blade.
- Use featherboards.
- Never cut freehand.
- Avoid cutting warped, twisted, or knotted wood unless you take extra precautions.
- Use a table saw crosscut sled or miter gauge for crosscuts.
- Use a table saw push stick for narrow rips.
- Never stand directly behind the blade. Position yourself to the side.
- Wait for the blade to stop before removing wood.
Working with Warped or Twisted Lumber
Lumber that is not flat can be unpredictable on a table saw.
- Milling: Ideally, all lumber should be milled flat and straight before being used on a table saw.
- When Not Milled: If you must cut warped wood, use a jointer first. If that’s not an option, rip the board first with a wider fence setting than you need, then rip it to the final dimension. Use featherboards and push sticks diligently.
When to Call for Backup or Reassess
- Large or Heavy Materials: If you are working with large sheet goods or heavy lumber, ensure you have adequate support for both the infeed and outfeed. A helper or roller stands are invaluable.
- Complex Cuts: If a cut feels awkward or unsafe, stop. Reassess your setup, consider a different tool, or seek advice.
Table Saw Maintenance for Optimal Safety and Performance
Regular maintenance ensures your saw operates reliably and safely.
Blade Care
- Sharpening: A dull blade is a dangerous blade. It forces you to push harder, increasing the risk of binding and kickback, and it produces poor quality cuts. Have your blades professionally sharpened or replace them when they become dull.
- Cleaning: Keep blades clean. Resin and sawdust buildup can affect performance and increase heat.
Checking the Fence and Miter Gauge
- Alignment: Periodically check that your fence is parallel to the blade and that your miter gauge is square to the blade when set to 90 degrees.
- Locking Mechanism: Ensure the fence locks firmly and does not shift during use.
Lubrication and Cleaning
- Moving Parts: Lubricate any moving parts, such as the blade height and tilt mechanisms, as recommended by your saw’s manufacturer.
- Dust Management System: Keep your table saw dust collection system clear and functional. Regularly clean out dust collection bags or bins.
- Table Surface: Keep the table surface clean and free of debris. A coat of paste wax can help lumber slide more easily.
Inspecting Guarding and Safety Features
- Riving Knife/Splitter: Ensure it is straight, properly aligned with the blade, and not damaged.
- Blade Guard: Make sure it is functioning correctly and is in place during operations where it is appropriate.
- Anti-Kickback Pawls: Check that they are free to move and can engage the wood.
Frequently Asked Questions (FAQ)
Q: What is the most important safety rule for table saw operation?
A: The most critical rule is to always wear safety glasses. Beyond that, preventing kickback through the use of a riving knife, proper fence alignment, and push sticks/featherboards is paramount.
Q: Can I remove the blade guard for easier cuts?
A: It is strongly not recommended to remove the blade guard. Guards are designed for your safety. If the guard interferes with a specific operation, consider if there’s a safer way to achieve that cut or if a different tool is more appropriate.
Q: How often should I sharpen my table saw blades?
A: The frequency depends on the type of wood you cut and how much you use the saw. Generally, when you notice increased effort to push the wood, rougher cut quality, or excessive heat, it’s time for sharpening or replacement.
Q: What is the purpose of a table saw push stick?
A: A table saw push stick is a tool used to push narrow or small workpieces through the blade, keeping your fingers safely away from the spinning blade.
Q: How do I ensure my table saw fence is properly adjusted?
A: The table saw fence adjustment should be checked for parallelism to the blade. Most fences have a locking mechanism that needs to be engaged securely. Measure the distance from the blade to the fence at both the front and back of the blade; they should be the same for accurate ripping.
Q: Is it safe to use a table saw without a riving knife?
A: It is significantly less safe to operate a table saw without a riving knife or splitter. The riving knife is a critical component for preventing kickback by keeping the kerf open behind the blade. Use one whenever possible.
By following these comprehensive steps and prioritizing table saw safety at every stage, you can harness the power and precision of this essential woodworking tool while minimizing the risks. Remember, patience, practice, and a commitment to safety are your best allies in the workshop.