
Can you measure a drill bit with a ruler? Yes, you can use a ruler to get a general idea of a drill bit’s size, especially for larger bits, but for precise measurements, specialized tools are recommended. This guide will walk you through the essentials of accurately determining drill bit sizes, a crucial skill for any DIY enthusiast or professional tradesperson. Knowing the correct drill bit size is vital for successful drilling. Using a bit that’s too large can widen the hole beyond your needs, while one that’s too small might not be strong enough or create the desired aperture. This guide aims to demystify drill bit measurement, ensuring you always choose the right tool for the job.
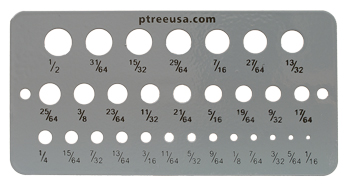
Image Source: www.ptreeusa.com
The Importance of Accurate Drill Bit Measurement
When you’re working on a project, from a simple shelf mounting to intricate woodworking or metal fabrication, the size of your drill bit matters. It’s not just about making a hole; it’s about making the right hole.
Why Precision is Key
- Screw Fitment: For screws, you need to pre-drill a pilot hole that’s slightly smaller than the screw’s shank diameter. If the pilot hole is too large, the screw won’t have enough thread to grip, and your fastening will be weak.
- Bolt Clearance: When drilling holes for bolts that need to pass freely through materials, the hole should be only slightly larger than the bolt’s diameter.
- Material Integrity: Drilling with the correct size bit helps prevent stress fractures or excessive material removal, preserving the integrity of your workpiece.
- Component Assembly: In many assemblies, multiple parts fit together, and precise hole sizes are critical for proper alignment and function.
Common Pitfalls of Incorrect Sizing
- Stripped Screw Heads: Drilling a pilot hole that’s too large can lead to the screw’s threads stripping, making it impossible to tighten effectively.
- Wobbly Fasteners: If a hole for a bolt is too big, the bolt will be loose, leading to a wobbly or unstable connection.
- Material Damage: Over-drilling or using a bit that’s too aggressive can chip, crack, or tear delicate materials.
- Project Failure: Ultimately, incorrect drill bit sizing can lead to a poorly executed project, requiring rework or starting over.
Deciphering Drill Bit Markings
Many drill bits come with markings that indicate their size. However, these markings can vary, and sometimes they wear off or are simply not present.
Standard Markings
You’ll often find the drill bit diameter stamped directly onto the shank of the bit. This marking can be in several formats:
- Imperial (Fractions): Common for wood and general-purpose bits, these are usually in fractions of an inch, like 1/8″, 1/4″, 5/16″, etc.
- Metric (Millimeters): Standard for many European and specialized bits, these will be in millimeters, such as 3mm, 6mm, 10mm.
- Number Sizes: These are a series of numbered bits, typically from #1 to #80, with #1 being the smallest and #80 the largest. These are very common in the US for smaller, precise drilling tasks, often in metalworking.
- Letter Sizes: Similar to number sizes, these range alphabetically from A (smallest) to Z (largest).
When Markings Aren’t Enough
Sometimes, markings can be faint, worn away, or absent altogether, especially on older or heavily used bits. In these cases, you’ll need to measure them directly.
Tools for Measuring Drill Bit Diameter
Having the right tools makes measuring drill bit diameter a straightforward process. Here are the most common and effective methods:
1. The Ruler or Tape Measure
For larger drill bits, a standard ruler or tape measure can provide a rough estimate.
- How to Use: Place the drill bit on a flat surface. Align the zero mark of your ruler with one edge of the drill bit’s cutting edge (the widest part). Read the measurement at the opposite edge.
- Limitations: This method is not very precise due to the difficulty in aligning the ruler perfectly parallel to the bit’s diameter and reading the exact edge. It’s best for quick checks on larger bits.
2. The Caliper
Calipers are precision measuring instruments that offer much higher accuracy than a ruler. There are several types:
- Vernier Calipers: These use a sliding jaw and a vernier scale for precise readings, often to within 0.02mm or 0.001 inches.
- Dial Calipers: Similar to Vernier calipers but with a dial indicator for easier reading of the measurement.
-
Digital Calipers: These are the most user-friendly, displaying the measurement on a digital screen. They are highly accurate, often to 0.01mm or 0.0005 inches.
-
How to Use (Digital Caliper):
- Ensure the caliper is clean and closed, then zero it out.
- Gently open the jaws of the caliper.
- Place the drill bit between the jaws. Position the jaws on the widest part of the cutting edge, ensuring they are perpendicular to the bit’s axis.
- Close the jaws gently until they make contact with the drill bit without deforming it.
- Read the measurement on the digital display.
3. The Drill Bit Gauge
A drill bit gauge is a specialized tool designed specifically for quickly identifying drill bit sizes.
- What it is: It’s typically a metal plate or a circular disc with a series of precisely sized holes drilled into it. Each hole is clearly labeled with its corresponding drill bit size (fractional, letter, or number).
-
How to Use:
- Take your drill bit and try inserting its shank into the various holes on the gauge.
- The correct size is the hole that the drill bit fits snugly into, without much play or needing to be forced.
- The hole will be labeled with the measurement.
-
Advantages: Drill bit gauges are very fast and convenient for identifying common bit sizes, especially number and letter sizes. They are also very durable.
- Disadvantages: They are limited to the sizes present on the gauge. If you have an unusually sized bit, a gauge might not have a matching hole. They are also less precise than calipers for exact measurements.
4. Thread Pitch Gauges (for Tap Sizes)
While not directly for drill bits, if you’re drilling for a tap, you’ll need to know how to measure tap size. Tap size is related to the screw thread it will create.
- How to Measure Tap Size: Tap sizes are often indicated by the nominal diameter and the thread pitch (threads per inch for imperial, or pitch in millimeters for metric). For example, a 1/4-20 tap means a 1/4-inch nominal diameter with 20 threads per inch.
- Tools for Measurement:
- Thread Gauges: These are sets of metal leaves with teeth shaped like screw threads. You match the teeth of the gauge to the threads on the tap to determine the thread pitch.
- Calipers: You can measure the major diameter (outermost diameter) of the tap with calipers. However, this doesn’t tell you the thread pitch.
Navigating Different Measurement Systems
Drill bit sizes are expressed in various systems, and it’s essential to know how they relate to each other. The most common are imperial drill bit sizes and metric drill bit sizes.
Imperial Drill Bit Sizes
These are typically expressed as fractions of an inch or as number/letter designations.
- Fractional Sizes: These are common for woodworking and general construction. Examples include 1/8″, 3/16″, 1/4″, 5/16″, 3/8″, 1/2″.
- Number Sizes: These range from #1 to #80.
-
1 bit is approximately 0.0700 inches.
-
80 bit is approximately 0.0135 inches.
-
- Letter Sizes: These range from A to Z.
- A bit is approximately 0.2340 inches.
- Z bit is approximately 0.4130 inches.
Table 1: Common Imperial Drill Bit Size Conversions (Examples)
| Fractional Size | Decimal Inches | Number Size | Letter Size |
|---|---|---|---|
| 1/32″ | 0.0313 | #70 | |
| 1/16″ | 0.0625 | #53 | |
| 3/32″ | 0.0938 | #42 | |
| 1/8″ | 0.1250 | #33 | |
| 5/32″ | 0.1563 | #25 | |
| 3/16″ | 0.1875 | #18 | C |
| 7/32″ | 0.2188 | #12 | A |
| 1/4″ | 0.2500 | #7 | D |
| 9/32″ | 0.2813 | #3 | G |
| 5/16″ | 0.3125 | #1 | J |
| 11/32″ | 0.3438 | M | |
| 3/8″ | 0.3750 | P | |
| 13/32″ | 0.4063 | S | |
| 7/16″ | 0.4375 | V | |
| 15/32″ | 0.4688 | X | |
| 1/2″ | 0.5000 | Z |
Metric Drill Bit Sizes
These are measured in millimeters (mm) and are widely used globally.
- Common Sizes: 1mm, 2mm, 3mm, 4mm, 5mm, 6mm, 8mm, 10mm, 12mm, etc.
- Precision Sizes: Smaller metric bits can go down to tenths of a millimeter, like 0.5mm, 1.5mm, 2.5mm, etc.
Table 2: Common Metric Drill Bit Size Conversions (Examples)
| Metric Size (mm) | Decimal Inches | Fractional Size (Approx.) |
|---|---|---|
| 1.0 | 0.0394 | 1/32″ |
| 1.5 | 0.0591 | ~1/16″ |
| 2.0 | 0.0787 | ~5/64″ |
| 3.0 | 0.1181 | ~1/8″ |
| 4.0 | 0.1575 | ~5/32″ |
| 5.0 | 0.1969 | ~3/16″ |
| 6.0 | 0.2362 | ~15/64″ |
| 6.35 | 0.2500 | 1/4″ |
| 7.0 | 0.2756 | ~9/32″ |
| 8.0 | 0.3150 | 5/16″ |
| 9.0 | 0.3543 | ~23/64″ |
| 10.0 | 0.3937 | 25/64″ |
| 12.0 | 0.4724 | 15/32″ |
Converting Between Systems
If you need to use a metric drill bit with an imperial fastener or vice versa, you’ll need to convert.
- Inches to Millimeters: Multiply the inch measurement by 25.4.
- Example: 1/4 inch = 0.25 inches * 25.4 mm/inch = 6.35 mm
- Millimeters to Inches: Divide the millimeter measurement by 25.4.
- Example: 8 mm / 25.4 mm/inch = 0.315 inches (which is very close to 5/16″)
The Drill Bit Gauge Chart
A drill bit gauge chart is an invaluable reference. It lists the corresponding values for fractional, decimal, number, and letter sizes. You can find these charts online or sometimes printed on drill bit gauges themselves. Keeping a drill bit size chart handy is a good practice.
How to Measure Specific Drill Bit Types
While the general principles apply, some drill bits have features that might influence how you measure them.
Twist Drills
These are the most common type. Measuring drill bit diameter for twist drills involves checking the diameter of the fluted section.
- Measurement Point: Always measure at the widest part of the flutes, just above the cutting edges.
Spade Bits / Paddle Bits
These are flat bits used for drilling larger holes in wood.
- Measurement: The size of a spade bit refers to the diameter of the main cutting surface. Measure the widest point of the spade using calipers or a ruler.
Forstner Bits
Forstner bits create clean, flat-bottomed holes in wood.
- Measurement: Their size is also indicated by their diameter. Use calipers for accurate measuring drill bit diameter on these.
Hole Saws
These are cylindrical saws with teeth on the edge, used for cutting large-diameter holes.
- Measurement: The size is marked on the side of the saw body and refers to the diameter of the hole it creates.
Practical Tips for Accurate Measurement
- Cleanliness is Crucial: Always ensure the drill bit and your measuring tool are clean and free of debris. Dust or metal shavings can significantly affect your readings.
- Proper Lighting: Work in a well-lit area so you can clearly see the markings and the measurement on your tools.
- Use the Right Tool: For anything beyond a rough estimate, use calipers or a drill bit gauge. A ruler is rarely accurate enough for critical tasks.
- Check Multiple Points: For maximum accuracy, especially with calipers, try measuring at a couple of slightly different points along the cutting edge to ensure you’ve found the true diameter.
- Keep Track: For frequently used bits, consider marking them with their size if the original markings are worn.
When to Use Specific Measurement Systems
- Imperial (Fractional/Number/Letter):
- Common in the US for general woodworking, DIY, and smaller metalworking tasks.
- Essential for matching pilot hole sizes to common screw sizes (e.g., a #7 drill bit for a 1/4″ screw).
- Metric:
- Used globally, especially in Europe and for automotive or precision engineering.
- Necessary for tasks involving metric fasteners or components.
The Role of Drill Bit Sets
Purchasing drill bit sets often simplifies the process. They typically come organized by size (either in imperial or metric) in a case, often with the size clearly marked on each bit or its holder. This minimizes the need for frequent measurement if you’re working within a specific system.
Common Drill Bit Sets
- General Purpose Woodworking Sets: Usually contain a range of fractional inch sizes.
- Metalworking Sets: Often include a full range of number and letter sizes, as well as common metric sizes.
- Metric Sets: Will contain bits sized in millimeters.
FAQ: Frequently Asked Questions
Q1: How do I know if a drill bit is metric or imperial?
A1: Check the markings on the shank. Imperial bits will have fractions (like 1/4″) or numbers/letters (#7, A). Metric bits will have millimeters (like 6mm). If there are no markings, use a caliper or gauge to measure. If the measurement is close to a common fractional size (e.g., 6.35mm), it’s likely an imperial 1/4″ bit. If it’s closer to a metric standard (e.g., 6mm), it’s metric.
Q2: Can I use a metric drill bit for an imperial screw?
A2: Yes, but you need to find the closest equivalent size. For example, a 5mm metric bit is approximately 0.197 inches, which is very close to a 13/64″ or 7mm bit in imperial sizing. You might need to consult a drill bit size chart for precise conversions. Ensure the pilot hole is slightly smaller than the screw’s shank diameter for a good grip.
Q3: What is the smallest drill bit size?
A3: The smallest common drill bit sizes are typically found in number series. In the US system, the #80 drill bit is the smallest standard size, measuring about 0.0135 inches (0.343 mm). Very fine needle files or specialized micro-drilling tools might go even smaller.
Q4: How do I measure a broken drill bit?
A4: If the shank is intact, you can measure the remaining portion of the shank with calipers or a gauge. If only the cutting end is broken, measuring its diameter might be difficult and less useful. If you need to replace it, try to recall its original size or estimate based on the hole it was drilling.
Q5: What is a drill bit gauge chart used for?
A5: A drill bit gauge chart is a reference that lists different measurement systems for drill bits (fractional, decimal, letter, number, and metric) and shows how they correspond to each other. It’s essential for converting sizes or identifying a bit when the markings are unclear.
Q6: How do I measure tap size?
A6: To measure tap size, you need to identify its nominal diameter and thread pitch. Use a thread pitch gauge to match the teeth of the gauge to the tap’s threads to find the pitch (threads per inch or millimeters). Use calipers to measure the major diameter (outermost diameter) of the tap.
Q7: What are the most common drill bit measurement tools?
A7: The most common tools for measuring drill bits are rulers (for rough estimates), digital calipers (for precision), and specialized drill bit gauges (for quick identification of standard sizes).
Mastering the art of measuring drill bit diameter is a fundamental skill that enhances precision and success in all your drilling projects. By using the right tools and knowing how to interpret different sizing systems, you can confidently select the perfect drill bit for any task.