
Image Source: www.lathamshardware.co.uk
How To Drill Out A Lock Cylinder Safely
Can you drill out a lock cylinder? Yes, drilling out a lock cylinder is a method used to bypass a lock when the key is lost, broken, or the lock mechanism is seized. This process is often considered a last resort and is typically performed by locksmiths or individuals with specific knowledge of lock mechanisms and the proper tools. Attempting to drill a lock without the correct equipment and technique can damage the lock, the surrounding door, and potentially cause injury.
When To Consider Drilling A Lock Cylinder
Drilling a lock cylinder is a destructive entry method. It’s usually reserved for situations where other methods, like key extraction or lock picking alternative approaches, have failed, or when immediate access is critical.
- Lost Keys: When all copies of the key are lost and no other means of entry are available.
- Broken Keys: If a key has broken off inside the lock and cannot be removed using key extraction tools.
- Seized or Damaged Locks: If the lock mechanism is rusted, corroded, or otherwise damaged, making it impossible to operate with a key or bypass techniques.
- Emergency Access: In urgent situations where immediate entry is required, and the lock is preventing it.
Fathoming The Lock Cylinder’s Internal Structure
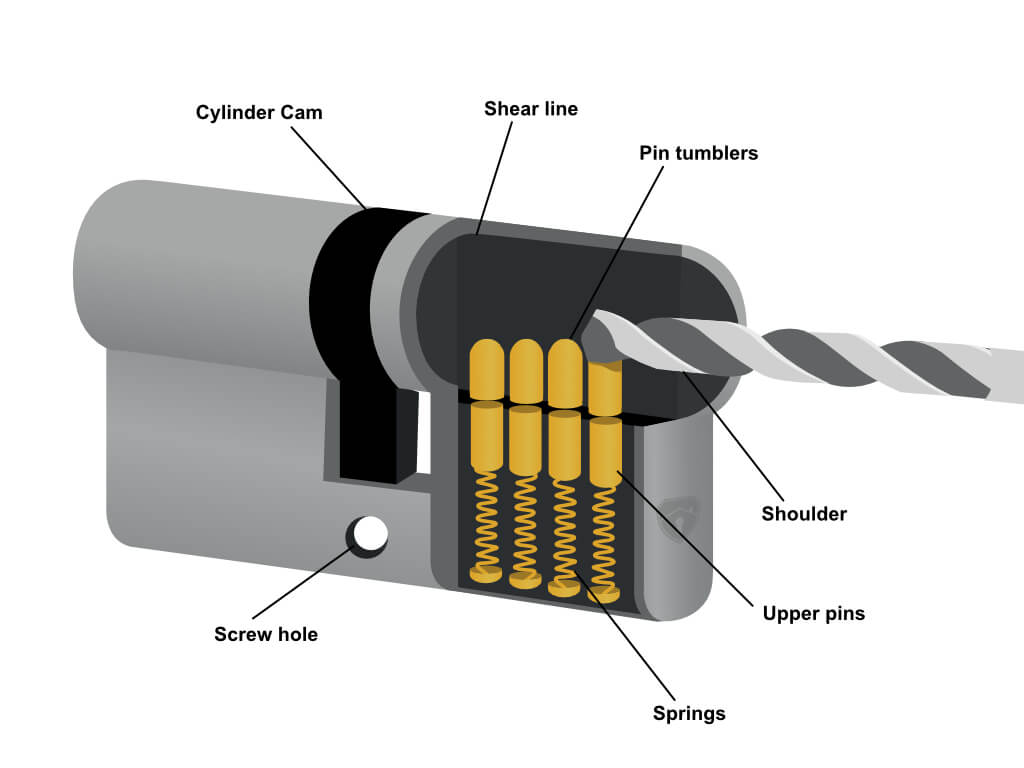
Before you even think about drilling, it’s crucial to understand what you’re dealing with. A standard pin tumbler lock cylinder contains several key components:
- Cylinder (or Shell): The outer housing of the lock.
- Plug (or Barrel): The part that rotates when the correct key is inserted.
- Pins: Small metal pieces that are split into two parts (key pins and driver pins). These pins must align perfectly with the shear line for the plug to turn.
- Shear Line: An imaginary line between the cylinder and the plug. When the pins are aligned at this line, the plug can rotate.
- Springs: Located above the driver pins, these push the pins down into the plug.
The goal of drilling is to destroy the pins and the shear line, allowing the plug to be turned or removed.
Essential Locksmith Tools For Drilling
Using the right tools is paramount for safety and effectiveness. Attempting to drill with inadequate tools can lead to frustration, damage, and danger.
1. Drill:
- Corded Drill: Offers more consistent power and torque than cordless drills, which can be beneficial for drilling metal.
- Cordless Drill (High Torque): A powerful cordless drill can also be effective, especially if it has variable speed settings.
2. Drill Bits:
- High-Speed Steel (HSS) Drill Bits: These are designed for drilling harder materials like metal.
- Cobalt Drill Bits: Even harder than HSS, cobalt bits are ideal for drilling through tough metals often found in lock cylinders.
- Carbide-Tipped Drill Bits: The hardest option, suitable for very stubborn metals but can be brittle.
- Sizes: You’ll typically need a range of sizes, starting with smaller bits to create pilot holes and progressing to larger bits to destroy the internal components. A common progression might be from 1/16 inch up to 1/4 inch or 3/8 inch depending on the lock.
3. Safety Gear:
- Safety Glasses: Absolutely essential to protect your eyes from metal shavings and debris.
- Gloves: To protect your hands from sharp edges and provide a better grip.
- Hearing Protection: Drills can be loud, especially when working with metal.
4. Other Useful Tools:
- Center Punch: To create a small indentation where you want to start drilling, preventing the drill bit from wandering.
- Hammer: To strike the center punch.
- Penetrating Oil: Can help lubricate the lock and make drilling easier.
- Pliers (Needle-Nose): For removing debris or partially drilled pins.
- Screwdriver: Once the pins are destroyed, a flathead screwdriver can often be used to turn the plug.
- Lock Bypass Tool or Shim: Sometimes needed after drilling to turn the cylinder.
Deciphering Lock Cylinder Vulnerabilities For Drilling
Different types of locks have different vulnerabilities when it comes to drilling. Knowing these can help you choose the correct drilling points and bits.
1. Pin Tumbler Locks:
These are the most common type of lock. The key vulnerability is the shear line.
- Drilling Point: The most common drilling point is directly above the shear line, usually a few millimeters below the keyway entrance.
- Goal: To drill through the shear line and destroy the pins.
2. Mortise Locks:
These are often found in older doors and commercial settings. They can be more robust.
- Drilling Point: Similar to pin tumblers, targeting the shear line is key. However, mortise locks often have thicker casings, requiring more powerful drills and tougher bits.
- Cylinder Removal: Sometimes, the focus is on drilling out the screws that hold the cylinder in place for cylinder removal, rather than the pins themselves.
3. Rim Cylinder Locks:
Typically mounted on the surface of a door.
- Drilling Point: Again, targeting the shear line is the primary method.
- Bypass Lock: In some cases, drilling can be used to create a point of entry to manipulate other locking mechanisms or bypass the cylinder entirely.
The Drilling Process: A Step-By-Step Guide
This section details the actual steps involved in drilling a lock cylinder. Remember to prioritize safety at all times.
Step 1: Preparation and Safety
- Wear Safety Gear: Put on your safety glasses and gloves.
- Assess the Lock: Identify the type of lock and its material.
- Clean the Area: Remove any loose debris from around the keyway.
- Apply Penetrating Oil (Optional): If the lock seems stiff, a shot of penetrating oil might help.
Step 2: Marking the Drilling Point
- Locate the Shear Line: This is the critical point. For most pin tumbler locks, it’s about 1/8 to 1/4 inch (3-6 mm) down from the top edge of the keyway. Imagine where the plug meets the cylinder when the correct key is inserted.
- Use the Center Punch: Place the tip of the center punch on the intended drilling spot and strike it firmly with the hammer. This creates a small divot that will guide the drill bit and prevent it from slipping.
Step 3: Initial Drilling (Pilot Hole)
- Select a Small Drill Bit: Start with a small bit, typically around 1/16 or 3/32 inch.
- Drill Slowly and Steadily: Apply firm, consistent pressure. Let the drill bit do the work.
- Drill Straight: Ensure the drill is perpendicular to the face of the lock cylinder.
- Clear Debris: Periodically pull the drill bit out to clear metal shavings.
Step 4: Progressing to Larger Bits
- Increase Bit Size: Gradually move to larger drill bits. The goal is to reach a size that will destroy the pins and springs at the shear line. A common size to aim for is around 1/4 inch.
- Target the Shear Line: As you increase the bit size, focus on drilling directly through the identified shear line. You are aiming to obliterate the pins and their springs.
- Listen and Feel: You might hear a change in sound or feel the drill bit break through as it enters the plug or destroys the pins.
- Clean Out Debris: Frequently remove metal shavings with pliers or by tapping the lock.
Step 5: Destroying the Pins
- Drill Through All Pin Chambers: Continue drilling with the appropriate bit size until you are confident that all the pins and springs have been destroyed. You are essentially creating a channel through the shear line.
- Potential for Key Extraction: Sometimes, after drilling out the pins, you might still need to perform a key extraction if parts of the broken key remain lodged.
Step 6: Operating the Lock
- Attempt to Turn the Plug: Once you believe the pins are destroyed, use a flathead screwdriver or a dedicated plug-turning tool to try and rotate the plug.
- Use Pliers (Carefully): If the plug doesn’t turn easily, you might be able to grip it with strong pliers and turn it, but be careful not to damage the surrounding door.
- Cylinder Removal (If Necessary): In some cases, after drilling, you might need to remove the cylinder entirely. This might involve drilling out retaining screws or using a slide hammer if the cylinder is designed for it.
Step 7: Lock Replacement or Repair
- Evaluate the Damage: After successful drilling, the lock cylinder is rendered useless and will require lock replacement.
- Install New Cylinder: Fit a new lock cylinder of the appropriate type and size.
- Test the New Lock: Ensure the new lock operates smoothly with its key.
What If Drilling Doesn’t Work?
Sometimes, even with careful drilling, a lock might prove exceptionally difficult to bypass.
- Incorrect Drilling Point: You might have missed the shear line.
- Underpowered Drill: The drill may not have enough power to penetrate the hardened metal.
- Wrong Drill Bits: Using bits not designed for metal can lead to overheating and dulling.
- Internal Mechanisms: Some high-security locks have hardened steel pins or other features that resist drilling.
If drilling fails, it’s time to call a professional locksmith. They have specialized locksmith techniques and tools, including diamond-tipped bits or specialized drilling jigs for complex locks. They can often perform cylinder removal or offer a more effective bypass lock strategy.
Security Bypass: Beyond Drilling
While drilling is a direct approach, there are other security bypass methods, though they often require specialized knowledge or tools and may still be considered destructive or have legal implications if not performed on your own property.
- Shimming: Used on certain types of latches (often found on interior doors or padlocks) to slide between the latch bolt and the strike plate.
- Bumping: A technique using a specially cut “bump key” to temporarily align the pins. This is a lock picking alternative that can be very quick.
- Loiding/Carding: Using a thin, flexible piece of plastic (like a credit card or a dedicated loiding tool) to push back the latch bolt on doors that don’t have deadbolts.
Drilling is a more brute-force method compared to these finesse techniques.
When to Call a Locksmith
Drilling a lock cylinder is not a casual DIY task. It requires skill, the right tools, and an understanding of lock mechanics.
- Unfamiliarity with Locks: If you don’t know what kind of lock you’re dealing with.
- Lack of Proper Tools: If you don’t have a powerful drill and a good set of metal drill bits.
- High-Security Locks: Many modern locks are designed with anti-drilling features.
- Valuable Property: If you’re concerned about damaging the door or surrounding frame.
- Legal Concerns: Ensure you have the right to access the property you are attempting to bypass.
A professional locksmith can efficiently and safely perform cylinder removal, execute a proper lock repair, or advise on lock replacement, often without causing unnecessary damage. They are skilled in various locksmith techniques and can assess the best course of action.
Frequently Asked Questions (FAQ)
Q1: Will drilling destroy my lock?
A1: Yes, drilling a lock cylinder is a destructive method. The process aims to destroy the internal pin mechanism, rendering the lock inoperable and requiring lock replacement.
Q2: Can I drill any lock?
A2: While you can attempt to drill most standard pin tumbler locks, some high-security locks have anti-drilling features, such as hardened steel pins or rotating collars, making them significantly more difficult or impossible to drill with standard tools.
Q3: What is the most common place to drill a lock cylinder?
A3: The most common drilling point is directly above the shear line, approximately 1/8 to 1/4 inch (3-6 mm) down from the top edge of the keyway. This is where the cylinder and plug separate and where the pins are located.
Q4: What happens if I drill in the wrong place?
A4: Drilling in the wrong place might miss the shear line, failing to destroy the pins. You might damage the lock housing or the plug without rendering the lock inoperable. It could also make subsequent attempts more difficult.
Q5: Is drilling a lock considered a security bypass?
A5: Yes, drilling is a method of security bypass, specifically a destructive one, used to gain access when other methods have failed or are not possible. It’s a last resort when a key extraction or lock picking alternative isn’t feasible.
Q6: Can I fix my lock after drilling it?
A6: No, once a lock cylinder has been drilled out, it cannot be repaired. The cylinder must be replaced. The door may be salvaged, but the lock mechanism itself is destroyed.
Q7: What are the legal implications of drilling a lock?
A7: You should only drill out a lock cylinder on property you own or have explicit permission to access. Illegally drilling a lock can have serious legal consequences, including charges of property damage or breaking and entering.
Q8: Are there safer alternatives to drilling?
A8: Yes, depending on the situation, alternatives like key extraction (if a key is broken off), using a master key (if applicable), or employing lock picking techniques (if you have the skill and tools) can be non-destructive bypass lock methods. If keys are lost, rekeying the lock is an option that doesn’t require drilling.
Q9: What kind of drill bits are best for drilling locks?
A9: High-speed steel (HSS) or cobalt drill bits are recommended for drilling metal locks. Cobalt bits are harder and more durable for tougher metals.
Q10: How do I know if I’ve drilled enough to open the lock?
A10: You’ll typically know you’ve drilled sufficiently when you can no longer feel distinct pins or springs, and you can attempt to turn the plug with a screwdriver or bypass tool. You might hear a change in the drilling sound as you break through the shear line.