
Can you drill out a cylinder lock? Yes, you can drill out a cylinder lock. This guide will show you how to do it safely. It’s a destructive method, meaning it will damage the lock, and is typically a last resort when other methods like lock picking bypass or keyless lock override are not possible or have failed. This process falls under cylinder lock destruction and is often performed by a forced entry locksmith when non-destructive entry methods are exhausted or when dealing with a removing seized lock situation where the key is lost or broken.
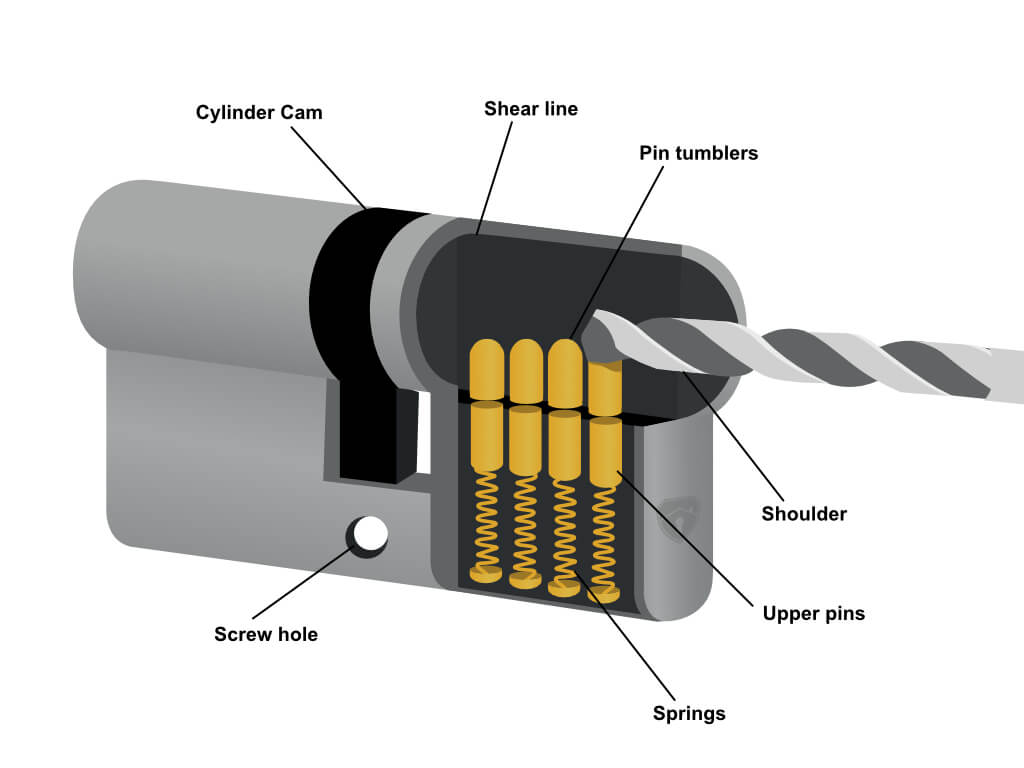
Image Source: www.lathamshardware.co.uk
When to Consider Drilling a Lock
There are several scenarios where drilling a lock cylinder becomes a necessary solution. Understanding these situations can help you decide if this is the right approach for your needs.
Lost Keys or Broken Keys
The most common reason to drill out a cylinder lock is when the key is lost or broken, and no spare key is available. This is particularly common with older locks or when the lock has been exposed to harsh conditions. Trying to extract a broken key piece can be difficult and may damage the lock further.
Malfunctioning Locks
Sometimes, a lock cylinder can become jammed or worn out, preventing the key from turning or even being inserted. If lubrication and other simple fixes don’t work, drilling might be the only way to gain access. This is especially true for older locks that may not respond to standard repair attempts.
Emergency Situations
In emergencies, such as a fire or a medical situation where immediate access is critical, drilling out a lock can be the fastest way to open a door. Professional locksmiths are often called for these situations due to their expertise and tools.
Security Upgrades
When upgrading to a more secure lock system, the old cylinder may need to be removed. While some new locks can be installed with the old cylinder in place temporarily, drilling offers a clean and definitive way to remove the old hardware.
When Other Methods Fail
This method is usually a last resort. Before resorting to drilling, consider other lock picking bypass techniques or professional locksmith services. These methods might save the lock, which could be more cost-effective than replacing the entire lock mechanism. However, if you’ve tried these and they haven’t worked, drilling a lock cylinder becomes the next logical step.
Safety First: Essential Precautions
Before you begin drilling a lock cylinder, safety must be your top priority. This process involves sharp tools and can create flying debris. Taking proper precautions will prevent injuries and ensure a smoother operation.
Personal Protective Equipment (PPE)
- Safety Glasses or Goggles: This is non-negotiable. Metal shavings and fragments can fly off at high speeds. Always wear sturdy eye protection that covers your eyes completely.
- Gloves: Work gloves will protect your hands from sharp edges of the lock and any debris. They also provide a better grip on your tools.
- Dust Mask: Drilling metal can create fine dust particles. A simple dust mask will prevent you from inhaling these particles.
Tool Safety
- Secure Your Workpiece: If you’re practicing on a spare lock, ensure it’s firmly clamped or held. If you’re working on a door, make sure the door is stable and won’t move unexpectedly.
- Proper Drill Bit Selection: Using the wrong drill bit can lead to overheating, breakage, or ineffective drilling. Ensure you have the correct bits for metal.
- Tool Maintenance: Ensure your drill is in good working order and that your drill bits are sharp. Dull bits require more force, increasing the risk of slipping.
Environmental Safety
- Ventilation: If drilling indoors, ensure the area is well-ventilated to disperse any dust or fumes from lubricants.
- Fire Hazard: Be aware that drilling can create sparks. Keep flammable materials away from the work area. Have a fire extinguisher nearby, especially if working with power tools.
Tools and Materials Needed
Having the right tools makes the job easier and safer. Here’s a list of what you’ll typically need for cylinder lock destruction:
The Drill and Bits
- Electric Drill: A corded drill often provides more consistent power, but a good quality cordless drill will also work. Variable speed is a significant advantage.
- Drill Bits:
- Cobalt Drill Bits: These are essential for drilling into hard metals like those found in lock cylinders. They are more heat-resistant than standard high-speed steel bits.
- Assortment of Sizes: You’ll need a range of sizes, starting small and gradually increasing. Common sizes to have include 1/8″, 3/16″, 1/4″, and 5/16″ (or metric equivalents like 3mm, 4mm, 5mm, 6mm).
- Center Punch: This tool creates a small indentation to guide the drill bit and prevent it from wandering.
Lubricants and Coolants
- Cutting Oil or Lubricant: This is crucial for reducing friction, preventing the drill bit from overheating, and extending the life of your bits. WD-40 can be used in a pinch, but a dedicated cutting fluid is better.
Measuring and Marking Tools
- Marker Pen: To mark your drilling points.
Lock Manipulation Tools (Optional, but Recommended)
- Screwdriver: A flathead screwdriver is often needed to help manipulate the cylinder after drilling.
- Pliers or Vise Grips: To grip and turn the cylinder once it’s been drilled enough to allow for manipulation.
Cleaning Supplies
- Brush or Compressed Air: To clear away metal shavings.
Step-by-Step Guide to Drilling a Cylinder Lock
This section provides a detailed breakdown of the process. Remember that drilling a lock cylinder is a destructive process. The goal is to destroy the internal components of the lock, specifically the pins and springs, to allow the cylinder to turn. This is often done to bypass security pins, a common tactic in security pin bypass scenarios if one were to attempt lock picking bypass and fail due to advanced pin designs.
Step 1: Identify the Keyway and Target Points
- Locate the Keyway: This is the slot where the key is inserted.
- Target the Shear Line: The most effective drilling point is along the shear line. This is the imaginary line where the cylinder (plug) meets the housing. The pins are pushed to this line when the correct key is inserted. On most common pin-tumbler locks, this is typically about 1/4 to 3/8 of an inch (6mm to 10mm) down from the top of the keyway.
- Marking: Use a marker to make a small dot on the housing directly above the shear line. This is where you’ll start drilling. For many common locks, this will be slightly off-center from the top of the keyway, following the natural curve.
Step 2: Prepare the Lock for Drilling
- Position the Drill: Hold the drill perpendicular to the lock cylinder at your marked point. Ensure a stable grip.
- Start Small: Begin with a small drill bit (e.g., 1/8″ or 3mm). This allows for precise control and helps create a clean starting hole.
Step 3: Begin Drilling – The Initial Holes
- Apply Lubricant: Apply a drop of cutting oil to the marked spot and the tip of the drill bit.
- Gentle Pressure: Start drilling with slow to medium speed. Apply steady, consistent pressure. Let the drill bit do the work. Avoid forcing it.
- Drill Through the Housing: The initial goal is to drill through the outer housing of the lock and into the plug, specifically targeting the pins. You should feel the drill bit bite into the metal.
- Clear Debris: Periodically pull the drill bit out to clear metal shavings and reapply lubricant. This prevents overheating and binding.
Step 4: Increasing Drill Bit Size
- Gradual Increase: Once you have a small hole, switch to a slightly larger drill bit (e.g., 3/16″ or 4mm). If you are targeting security pin bypass, you might need to go slightly deeper or use a slightly larger bit to ensure you destroy the pin stacks.
- Repeat Lubrication and Drilling: Continue the process of applying lubricant, drilling at a moderate speed, and clearing debris.
- Targeting Pin Stacks: You are essentially drilling through the pin chambers. As you increase the bit size, you will likely encounter the top pins and springs. The goal is to break them or push them out of the way. You may hear distinct “pops” as you break through these components.
- Drilling Multiple Holes: For some locks, especially those with robust security features or if you encounter resistance, you might need to drill multiple holes along the shear line. Aim to drill into the path of each pin chamber. A common practice involves drilling 2-4 holes spaced along the shear line.
Step 5: Penetrating the Cylinder Plug
- Larger Bits: Continue increasing the drill bit size (e.g., 1/4″ or 5/16″ or 6mm or 8mm). The objective now is to drill deep enough to destroy enough of the pins and springs within the plug to allow it to turn.
- Focus on Destruction: The aim isn’t to perfectly align holes but to obliterate the internal mechanism. You’re destroying the pin stacks that prevent the cylinder from rotating.
- Listen and Feel: Pay attention to the sound and feel of the drill. You’ll notice changes as you break through different components.
Step 6: Manipulating the Cylinder
- Test for Movement: Once you believe you have sufficiently drilled out the pins, stop drilling.
- Insert a Tool: Try inserting a flathead screwdriver or a similar flat tool into the keyway.
- Apply Turning Force: Gently try to turn the screwdriver. If the pins and springs are sufficiently destroyed, the cylinder should rotate.
- If It Doesn’t Turn: If the cylinder doesn’t budge, you may need to drill a bit more, potentially with a slightly larger bit, or in slightly different locations along the shear line. Be careful not to over-drill and damage the surrounding door or frame. This is where a professional forced entry locksmith would have the experience to know precisely how much more drilling is needed.
Step 7: Removing the Cylinder
- Secure the Cylinder: Once the cylinder can be turned, you might be able to remove it using pliers or by turning it with the screwdriver. Often, the cylinder will simply pull out after being rotated sufficiently.
- Dealing with Stuck Cylinders: Sometimes, the cylinder might still be partially held in place by retaining clips or screws. If this is the case, you might need to further pry or cut these components.
Step 8: Cleaning Up and Replacing the Lock
- Remove Debris: Thoroughly clean the area of all metal shavings and dust.
- Install New Lock: Once the old cylinder is removed, you will need to install a lock cylinder replacement. This might involve replacing the entire lock mechanism or just the cylinder component, depending on the type of lock.
Specific Lock Types and Drilling Considerations
While the general principles remain the same, different lock types might require slight variations in the drilling a lock cylinder process.
Standard Pin Tumbler Locks
These are the most common locks found on residential doors. The steps outlined above are primarily for these types. The key is to drill through the shear line to destroy the driver pins and key pins.
Deadbolts
Drilling out a deadbolt follows the same principles but may require drilling through a thicker, more robust housing. You will need to ensure you have enough drill bit length to reach the pins and that your drill has sufficient power. The shear line for a deadbolt is also typically located in a similar position relative to the keyway. The main difference is the increased strength of the materials used in deadbolt construction.
High-Security Locks
Many high-security locks incorporate features like security pin bypass mechanisms (e.g., spool pins, serrated pins, mushroom pins) or multiple locking elements (like sidebars or magnetic pins). Drilling these can be significantly more challenging and may require specialized knowledge or tools. Sometimes, non-destructive bypass methods are more viable here before resorting to brute force. Attempting to drill without proper knowledge can easily lead to damaging the lock beyond repair without actually opening it.
Car Door Locks
Car door locks often have complex internal mechanisms and use different types of pins. Drilling a lock cylinder on a car is generally not recommended for individuals without locksmith training, as it’s easy to damage the door panel, the internal locking actuator, or the ignition system. A professional locksmith is the best option for vehicle locks.
Common Pitfalls and How to Avoid Them
Even with a detailed guide, things can go wrong. Here are common issues and how to troubleshoot them:
Drill Bit Binding or Breaking
- Cause: Applying too much pressure, drilling too fast, using a dull bit, or not using lubricant.
- Solution: Use steady, moderate pressure. Go slower. Ensure your drill bits are sharp and appropriate for metal. Always use cutting oil. If a bit breaks, try to carefully extract the broken piece with pliers or magnets. If that’s not possible, you may need to drill around it with a larger bit.
Not Drilling Deep Enough
- Cause: Insufficient penetration into the cylinder plug.
- Solution: Continue drilling, gradually increasing bit size. Ensure you’re drilling along the shear line and not just into the front of the keyway.
Drilling Too Far or Crooked
- Cause: Lack of precision, unstable drill, or drilling at an angle.
- Solution: Use a drill guide if possible, or ensure your drill is held perfectly perpendicular to the lock surface. Start with smaller bits for accuracy. If you’ve gone too far, you might have damaged the locking mechanism itself or the door.
Damage to the Door or Frame
- Cause: Slipping drill, uncontrolled drilling, or drilling into surrounding materials.
- Solution: Be mindful of your surroundings. Secure the drill and the workpiece. Mark your drilling points carefully. If drilling on a door, consider removing the door from its hinges or blocking it securely.
When to Call a Professional Locksmith
While this guide aims to empower you, there are times when calling a professional is the wisest and safest course of action.
Complex or High-Security Locks
If you are dealing with locks that are specifically designed to resist drilling (often advertised as drill-resistant or pick-resistant), it is best to consult a locksmith. These locks may have hardened steel inserts that will quickly dull or break standard drill bits. A forced entry locksmith has specialized tools and techniques for these situations.
Lack of Experience or Tools
If you are uncomfortable with power tools, lack the necessary PPE, or don’t have the right drill bits, it’s safer to let a professional handle it. Mistakes can lead to costly damage to your door or property.
Emergency Situations Requiring Speed
In true emergencies where time is critical, a locksmith can often gain entry much faster and more efficiently than an inexperienced individual. They can also assess the situation and recommend the best course of action, which might not always be destructive.
Desire for Non-Destructive Entry
If you want to avoid damaging the lock or door, a locksmith can attempt non-destructive entry methods first. This is often preferable if you intend to reuse the lock or if it’s a particularly valuable or unique lock.
Frequently Asked Questions (FAQ)
Q1: Will drilling out my lock destroy it?
A1: Yes, drilling out a cylinder lock is a destructive process. The goal is to break the internal pins and springs, rendering the lock inoperable. You will need to replace the lock cylinder afterward.
Q2: Can I drill out any type of lock?
A2: While you can attempt to drill most common locks, high-security locks often have features that make them drill-resistant or require specialized drilling techniques. Attempting to drill such locks without the proper knowledge and tools may be ineffective and could cause more damage.
Q3: How long does it take to drill out a lock?
A3: The time can vary significantly depending on the type of lock, the tools you are using, and your experience. For a standard residential lock with the right tools and a bit of practice, it might take anywhere from 15 minutes to an hour. However, if you encounter difficulties or use inappropriate tools, it can take much longer, or you might fail to open the lock.
Q4: What happens to the pins when you drill a lock?
A4: When you drill through the pin chambers at the shear line, the drill bit shatters or pushes out the key pins (the bottom pins) and driver pins (the top pins) and their springs. This action destroys the mechanism that prevents the cylinder from turning, allowing the lock to be bypassed.
Q5: Is drilling a lock considered a type of bypass?
A5: Drilling is a method of bypassing the lock’s intended operation by destroying its internal mechanism. It’s a form of forced entry locksmith technique, distinct from lock picking bypass which aims to manipulate the pins without damage. It is a method of cylinder lock destruction to achieve a keyless lock override.
Q6: Do I need special drill bits for drilling out a lock?
A6: Yes, it is highly recommended to use cobalt drill bits. These bits are harder and more heat-resistant than standard high-speed steel bits, making them much more effective for drilling through the hard metals typically found in lock cylinders.
Q7: What if I’m trying to open a deadbolt?
A7: Drilling out a deadbolt is similar to drilling other cylinder locks, but deadbolts are often built with stronger materials and may have additional security features. Ensure you have adequate drill bit length and power, and follow the same safety precautions and step-by-step process, focusing on the shear line.
Q8: Can I repair the lock after drilling it?
A8: No, once a lock cylinder has been drilled out, it cannot be repaired. The internal mechanism is destroyed, and the entire cylinder or the entire lock unit will need to be replaced. This is why it’s often a last resort.