
Can you drill holes in stones for jewelry? Yes, you absolutely can! Drilling stones for jewelry is a rewarding skill that allows you to create unique pieces. It might seem daunting at first, especially when dealing with beautiful gemstones, but with the right tools and techniques, drilling holes in rocks for your creations can be surprisingly easy. This guide will walk you through everything you need to know, from choosing the right drill bits to safely and effectively making those all-important holes.
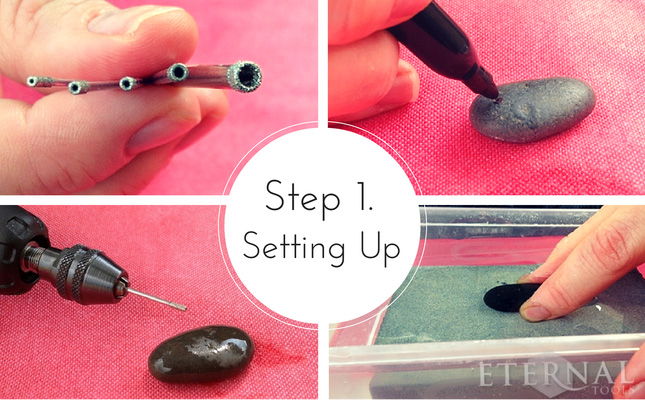
Image Source: theme-assets.ecommercedns.uk
Essential Tools for Stone Drilling
Before you start, gathering the correct equipment is crucial. The right tools make the job easier and prevent damage to both your stones and your drill.
Choosing the Right Drill Bits
This is arguably the most important decision you’ll make. Not all drill bits are created equal when it comes to working with hard materials like stones.
Diamond Drill Bits for Stone
When you’re thinking about drilling gemstones, diamond drill bits for stone are your best friends. Diamonds are the hardest known material, which means they can cut through even the toughest rocks and minerals without dulling quickly. These bits are typically hollow or have a core design, allowing water to flow through and cool the bit and the stone. This cooling is vital to prevent cracking.
- Types of Diamond Bits:
- Hollow Diamond Core Bits: These are excellent for drilling clean, round holes. They have a hollow center that allows the material to be removed as you drill.
- Diamond Grinding Bits: While not strictly for drilling holes, some of these can be used to slowly grind openings. However, for clean holes, core bits are preferred.
Other Jewelry Making Drill Bits
While diamond bits are superior for most stones, other specialized bits exist for softer materials or specific effects:
- Tungsten Carbide Bits: These are harder than standard steel bits but not as hard as diamond. They can be used for softer stones or for initial pilot holes in harder materials before switching to diamond. They are often less expensive.
- Carbide-Tipped Masonry Bits: These are designed for concrete and brick. They can work on very soft, porous rocks, but they will wear down quickly and are not suitable for precious or semi-precious gemstones.
Drills and Power Tools
The type of drill you use will also impact the ease and success of your stone drilling.
- Rotary Tools (e.g., Dremel): These are popular for jewelry making because they are versatile and offer good control. Look for models with variable speed control.
- Drill Press: A drill press provides stability and accuracy, making it ideal for drilling straight holes, especially in larger or more valuable stones.
- Handheld Rotary Tools with a Flex Shaft: This attachment can offer more comfort and maneuverability, allowing you to hold the stone more easily.
Essential Accessories
- Water Source: Crucial for cooling. This can be a spray bottle, a steady drip from a hose, or the water flow integrated into some diamond bits.
- Safety Glasses: Always protect your eyes from debris and water splashes.
- Gloves: Provide a better grip and protect your hands.
- Mask: Protect yourself from any fine dust, especially when drilling porous stones.
- Clamps or Vises: For securing stones for drilling.
Comprehending Stone Properties for Drilling
Different stones have different hardness and compositions, which will dictate the best approach for drilling. Understanding these properties is key to successful stone drilling techniques.
The Mohs Hardness Scale
The Mohs Hardness Scale ranks the scratch resistance of minerals. Knowing where your stone falls on this scale helps you choose the right tools and techniques.
| Mohs Hardness | Mineral | Examples of Gemstones | Drilling Suitability |
|---|---|---|---|
| 1 | Talc | None commonly used in jewelry | Very easy to drill, even with basic tools. |
| 2 | Gypsum | Selenite, Alabaster | Easy to drill, but soft and can chip easily. |
| 3 | Calcite | Aragonite, some Turquoise | Drills easily, but can fracture under pressure. |
| 4 | Fluorite | Fluorite | Drills well with diamond bits, can be brittle. |
| 5 | Apatite | Apatite | Requires diamond bits for efficient drilling. |
| 6 | Orthoclase | Feldspar, Moonstone, Sunstone | Needs diamond bits; can scratch easily. |
| 7 | Quartz | Amethyst, Citrine, Agate, Jasper | Requires diamond bits; good hardness for jewelry. |
| 8 | Topaz | Topaz | Drills well with diamond bits; can be brittle. |
| 9 | Corundum | Ruby, Sapphire | Difficult to drill; requires high-quality diamond bits. |
| 10 | Diamond | Diamond | Extremely difficult; usually pre-drilled by professionals. |
- Softer Stones (1-4): Can be drilled with care using diamond bits or even carbide bits. Be gentle to avoid breakage.
- Medium Hardness Stones (5-7): Diamond bits are essential for efficient and clean drilling. These include popular stones like quartz varieties.
- Harder Stones (8-9): Require high-quality diamond bits and patience. Water cooling is critical.
- Extremely Hard Stones (10): Drilling these at home is generally not recommended due to the difficulty and risk of breakage.
How to Drill Jade
How to drill jade requires special attention because jade is a tough but also brittle material.
- Use Diamond Core Bits: Always use a diamond-tipped core bit.
- Slow and Steady: Start at a low speed and apply very light pressure.
- Constant Cooling: Keep the area wet with water to prevent heat buildup, which is a primary cause of cracking jade.
- Secure the Stone: Ensure the jade is firmly secured to prevent it from moving.
- Patience: Rushing the process will likely lead to a broken stone.
Drilling Lapidary Stones
Drilling lapidary stones refers to the practice of creating holes in stones for cabochons, beads, or other jewelry components. This is where diamond bits shine. Whether you’re drilling a hole through the center of a cabochon for a pendant bail or drilling a hole to create a bead, the principles remain the same: control, cooling, and the right tools.
Step-by-Step Guide to Drilling Stones
This section breaks down the process into manageable steps, focusing on safety and effectiveness for drilling holes in rocks and gemstones.
Step 1: Preparation and Safety First
- Gather Your Tools: Ensure you have your drill, the correct drill bit, water, safety gear, and something to secure the stone.
- Prepare Your Workspace: Set up in a well-ventilated area. Have a container or tray to catch water and debris.
- Secure the Stone: This is vital for preventing accidents and ensuring accurate drilling.
Securing Stones for Drilling
Properly securing stones for drilling is paramount. A loose stone can spin, leading to a broken bit, a damaged stone, or injury.
- Bench Vise with Soft Jaws: If you have a bench vise, use rubber, cork, or wood inserts to protect the stone from cracking.
- Drill Press Clamp: Drill presses often come with clamps that can hold the stone firmly.
- Wax or Clay: For smaller or irregularly shaped stones, you can use a strong adhesive wax (like epoxy putty or specialized jewelry wax) or modeling clay to adhere the stone to a stable base or jig. Ensure the wax is strong enough to hold the stone against the drilling force.
- Specialized Drilling Jigs: These are often available for lapidary work and provide a stable platform for holding stones of various shapes and sizes.
Step 2: Setting Up Your Drill
- Attach the Drill Bit: Securely attach the chosen diamond drill bit to your rotary tool or drill press.
- Set the Speed: Start with a low to medium speed. High speeds can generate excessive heat and cause chipping. For most stones, a speed between 5,000 and 15,000 RPM is a good starting point for rotary tools. A drill press allows for more precise speed control.
- Lubrication: Ensure your water source is ready. You want a constant flow of water to the drilling point.
Step 3: The Drilling Process
This is where small hole drilling stone becomes achievable.
- Mark the Spot: If you need a precise location, lightly mark the spot with a pencil or marker.
- Start Gently: Begin by gently touching the stone with the spinning drill bit. Let the diamond abrasive do the work. Do not force the bit.
- Apply Steady, Light Pressure: Use consistent, light pressure. Imagine you are guiding the drill rather than pushing it.
- Keep it Cool: Constantly apply water to the drilling area. You’ll see a slurry of water and stone dust form. This is normal and indicates the cooling and cutting are working. If the area looks dry, pause and add more water.
- Clear Debris: Periodically lift the drill bit out of the hole while it’s still spinning to allow water to flush away debris and prevent clogging. This is especially important for hollow core bits.
- Drill Partway, Then Pull Back: For deeper holes, it’s often beneficial to drill partway through, then pull the bit back out to clear debris and cool the stone. Repeat this process until you reach the desired depth.
- Patience is Key: Drilling stones for jewelry takes time. Don’t rush the process. It’s better to take longer and have a successful outcome than to break a beautiful stone.
Step 4: Finishing Touches
- Clean the Stone: Once the hole is complete, gently rinse the stone with water to remove any remaining slurry or dust.
- Smooth the Hole (Optional): Sometimes, the edges of the drilled hole can be a bit rough. You can use a small piece of sandpaper or a fine-grit diamond file to gently smooth the inside edges if needed. Be very careful not to enlarge the hole significantly.
Troubleshooting Common Drilling Issues
Even with the best preparation, you might encounter problems. Here’s how to address them.
Stone Cracking or Chipping
- Cause: Excessive heat, too much pressure, a dull drill bit, or uneven drilling.
- Solution: Ensure constant water flow, use light pressure, check your drill bit for wear, and drill at a consistent angle. If drilling a hard stone, consider using a slower speed and more frequent pauses to cool.
Slow Drilling Progress
- Cause: Dull drill bit, insufficient speed, or too much pressure.
- Solution: If you’re using a diamond bit, ensure it’s not worn out. Try increasing the speed slightly (if safe for the stone) and applying a bit more, but still light, pressure. Ensure water is flushing the debris away.
Hole Not Straight
- Cause: The stone moved during drilling, or the drill bit wandered.
- Solution: Improve your securing method. For drill presses, ensure the bit is centered and the stone is perfectly aligned. For rotary tools, consider using a drill press attachment or a jig.
Drilling Different Types of Stones for Jewelry
Here’s a look at specific considerations for various popular jewelry stones.
Drilling Gemstones Safely
Drilling gemstones requires a keen eye and a gentle hand. The value and beauty of gemstones make the risk of breakage higher.
- Peridot, Topaz, Aquamarine: These are moderately hard but can be brittle. Focus on excellent cooling and light pressure.
- Garnet, Spinel: These are generally a bit tougher. Diamond bits are essential, and you can usually apply slightly more consistent pressure than with more brittle stones.
- Quartz Varieties (Amethyst, Citrine, Agate, Jasper): These are robust and generally drill well with diamond bits. They are excellent stones for beginners learning how to drill jade or other harder materials.
- Turquoise: This is a softer, often porous stone. It can chip easily. Use a lower speed and very light pressure with diamond bits. Sometimes, stabilizing turquoise with resin is recommended before drilling to prevent breakage.
Drilling Holes in Rocks for Jewelry
When you’re drilling holes in rocks, you might be working with materials like river stones, sea glass, or petrified wood.
- Porosity: Some rocks are porous and might absorb water, requiring more frequent cooling.
- Inclusions: Look out for internal fractures or inclusions that could cause the rock to break during drilling.
- Hardness Variation: A single rock might have areas of different hardness, requiring adjustments to your technique.
Advanced Techniques and Tips
Once you’re comfortable with the basics, you can explore more advanced methods.
Creating Counter-sunk Holes
For a flush setting, you might need to create a counter-sunk hole, where the top of the hole is widened.
- Method: After drilling the initial hole, switch to a larger, shallow diamond grinding bit or a small ball-shaped diamond bit. Carefully grind the top edge of the hole to create a slight recess. Use extreme caution to avoid making the hole too large.
Drilling Small Holes in Stone
Small hole drilling stone for very fine wire or delicate findings requires precision.
- Use Fine Diamond Bits: Opt for very thin diamond core bits designed for intricate work.
- Ultra-Low Speed: Sometimes, starting at a very low speed with a diamond bit can help guide it accurately before increasing speed.
- Stabilize Thoroughly: Ensure the stone is absolutely immovable. Even a tiny shift can break a fine drill bit.
Drilling Wire-Wrapped Jewelry Components
If you’re drilling holes to pass wire through for wrapping, consider the size of the wire.
- Hole Size: Drill a hole slightly larger than your wire gauge to allow it to pass through smoothly without snagging.
- Placement: Think about the aesthetic. Where will the wire enter and exit the stone? Mark your points carefully.
Frequently Asked Questions (FAQ)
Q: Can I drill holes in stones without a special drill?
A: While it’s possible to try with a very basic drill and a diamond bit, it’s not recommended. A proper rotary tool with variable speed or a drill press provides the control and stability needed for safe and effective stone drilling. Standard metal or wood drill bits will not work.
Q: How do I prevent my stones from breaking when drilling?
A: The keys are: constant water cooling, light and steady pressure, using the correct diamond drill bits, and securely securing the stone. Patience is also crucial – don’t rush the process.
Q: What is the best speed for drilling stones?
A: Speeds vary depending on the stone and drill bit, but generally, low to medium speeds (around 5,000-15,000 RPM for rotary tools) are best. Too much speed generates heat, which can cause cracking.
Q: How long does it take to drill a hole in a stone?
A: This can vary greatly, from a few minutes for a small, soft stone to an hour or more for a large, hard gemstone. It depends on the stone’s hardness, size, the drill bit’s quality, and your technique.
Q: Do I need to use water when drilling stones?
A: Yes, absolutely. Water acts as a coolant, preventing the stone and the drill bit from overheating, which is a major cause of breakage. It also helps flush away debris, keeping the hole clear.
Conclusion
Drilling stones for jewelry is an accessible skill that opens up a world of creative possibilities. By choosing the right tools, especially high-quality diamond drill bits for stone, and employing careful stone drilling techniques, you can confidently create beautiful jewelry. Remember to prioritize safety, keep your work area clean, and be patient. With practice, you’ll master the art of drilling gemstones and adding unique, drilled stones to your handmade jewelry designs.