
Image Source: theme-assets.ecommercedns.uk
How To Drill Holes In Rocks and Stones: A Step-by-Step Guide
Yes, you can drill holes in rocks and stones, but it requires the right tools, techniques, and a good dose of patience. This guide will walk you through the process, from selecting the appropriate equipment to executing the drilling safely and effectively. Whether you’re a hobbyist looking to create unique garden art, a craftsperson making jewelry, or a professional working on a construction project, knowing how to drill through rock is a valuable skill.
Choosing the Right Tools for Stone Drilling
The success of drilling through rock or stone hinges on selecting the right tools. This isn’t a job for your average wood drill. You’ll need specialized equipment designed to handle the hardness and density of geological materials.
Understanding Drill Bits for Rocks and Stones
The heart of rock drilling lies in the drill bit. Different types of stone require different bits, and choosing the wrong one can lead to frustration, broken bits, or damage to your material.
Masonry Drill Bits
These are a good starting point for softer stones like sandstone or some types of slate. They typically have a carbide tip that’s shaped to chip away at the material.
- Carbide-Tipped Bits: These are robust and can handle moderate hardness. They work by grinding and chipping the stone.
- Spiral Flutes: These help to clear dust and debris from the hole, which is crucial for preventing the bit from overheating and jamming.
Diamond Core Drill Bits
For harder stones such as granite, marble, or quartz, diamond core drill bits are essential. These bits have diamond particles embedded in their cutting edge, which grinds through the rock.
- Wet Drilling: Diamond core bits are almost always used with water. The water acts as a coolant, preventing the bit from overheating and prolonging its life. It also helps to flush away the stone dust, creating a cleaner cut.
- Hollow Core: These bits are hollow in the center, meaning they cut a ring rather than a solid plug of stone. This makes them more efficient for creating holes.
Specialty Bits
Depending on the specific rock and the desired outcome, you might encounter other specialized bits:
- Percussion Bits: These are designed for hammer drills and are excellent for breaking up hard materials.
- Bullet Bits: These have a pointed, hardened tip and are often used in mining and construction for initial hole penetration.
Selecting the Right Drill
The drill itself plays a crucial role. You can’t just grab any old drill from your toolbox.
Hammer Drill for Stone
A hammer drill is ideal for drilling into harder materials. It combines a rotating action with a hammering motion.
- Percussion Action: This hammering action helps to break up the rock as the bit rotates, making it much more effective than a standard drill.
- Variable Speed: Look for a drill with variable speed settings. Starting slow allows you to control the bit and prevent it from skipping.
Rotary Hammer Drill
For very dense or large-scale drilling jobs, a rotary hammer drill is superior. It offers a more powerful hammering action than a standard hammer drill.
- SDS Chuck: Most rotary hammer drills use an SDS (Slotted Drive System) chuck, which provides a secure grip and efficient power transfer.
Diamond Core Drill Rig
For precise, clean holes in very hard materials or for larger diameter holes, a dedicated diamond core drill rig is the best option. These are typically used by professionals.
- Water Supply: Core drill rigs often have integrated water supply systems.
- Stable Base: They have a stable base that can be anchored, ensuring accuracy and preventing the rig from moving.
Portable Rock Drill
For on-site work where a large rig isn’t feasible, a portable rock drill can be a lifesaver. These are more compact versions of industrial drills.
- Power Source: They can be powered by electricity, compressed air, or gasoline engines.
- Vibration Dampening: Many portable rock drills are designed with features to reduce operator fatigue from vibration.
Preparing Your Workspace and Stone
Before you even think about drilling, careful preparation is key. This ensures safety, prevents damage to your stone, and makes the drilling process smoother.
Safety First: Essential Precautions
Drilling stone can be hazardous. Always prioritize safety to protect yourself and others.
- Eye Protection: Wear safety glasses or goggles at all times. Stone chips can fly at high speeds.
- Hearing Protection: Drills, especially hammer drills, can be very loud. Use earplugs or earmuffs.
- Dust Mask/Respirator: Stone dust, especially from silica-containing rocks, can be harmful to your lungs. Wear a dust mask or respirator rated for fine particulate matter.
- Gloves: Wear sturdy gloves to protect your hands from sharp edges and vibrations.
- Secure the Stone: Never try to hold the stone with your hands while drilling. Use clamps, a vise, or a workbench to secure it firmly.
- Clear the Area: Remove any flammable materials or trip hazards from your workspace.
Preparing the Stone for Drilling
- Marking the Spot: Use a pencil or marker to clearly mark the exact spot where you want to drill.
- Center Punching: For harder stones, a center punch can help guide the drill bit and prevent it from wandering. Lightly tap the center punch with a hammer on your marked spot.
- Cooling Strategy: Decide on your cooling method. For diamond core bits, this will involve a water supply. For other bits, you might periodically dip the bit in water or have a spray bottle handy.
Step-by-Step Stone Drilling Process
Here’s a breakdown of how to drill holes in rocks and stones, adaptable for different materials and tools.
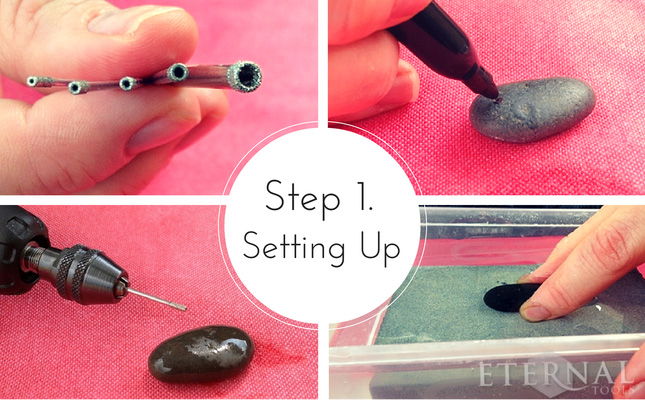
Step 1: Secure the Stone
This is paramount. A moving stone can cause the drill bit to break or the stone itself to crack. Use sturdy clamps to attach the stone to a workbench or a solid surface. If the stone is large and heavy, ensure it’s stable and won’t tip or shift.
Step 2: Choose Your Bit and Drill
Refer back to the tool selection section. For softer stones like sandstone, a masonry bit with a hammer drill might suffice. For granite, you’ll need a diamond core bit and a drill that can handle water.
Step 3: Setting Up for Drilling
- Positioning: Place the stone so that the drill bit will enter perpendicular to the surface.
- Water (if using diamond core bits): If you’re using a diamond core bit, ensure you have a steady supply of water. You can create a dam around the drilling area with clay or putty to keep the water in place, or use a drill rig with a water feed.
Step 4: Starting the Drill
- Low Speed: Begin at a slow speed. This gives you control and prevents the bit from “walking” or jumping across the surface.
- Angle: Start drilling at a slight angle (almost horizontal) to create a groove, then slowly bring the drill up to a vertical position. This helps to establish a clean starting point.
- Gentle Pressure: Apply steady, consistent pressure. Don’t force the drill. Let the bit do the work.
Step 5: Drilling the Hole
- Maintain Coolant: If using water, ensure the drilling area remains wet. Periodically lift the bit to let water flow into the hole.
- Clear Debris: For non-cored holes, periodically pull the drill bit out of the hole to clear away dust and small stone fragments. This prevents the hole from becoming clogged and the bit from overheating. You can use compressed air or a brush for this.
- Patience is Key: Drilling through stone takes time. Don’t rush the process. If the drill starts to overheat or the stone seems to be getting too hot, stop and let it cool down.
Step 6: Finishing the Hole
- As You Break Through: As you approach the other side of the stone, reduce pressure and slow down the drill speed. This helps prevent chipping or blowout on the exit side.
- Clean Out the Hole: Once the hole is complete, use compressed air or water to thoroughly clean out any remaining dust or debris.
Specific Stone Drilling Scenarios
Let’s look at some common materials and how the process might vary.
Drilling Granite
Drilling granite is a challenging task. Its extreme hardness and density demand the right approach.
- Tools: Diamond core drill bits are non-negotiable. A powerful drill, preferably a diamond core drill rig or a high-quality hammer drill, is necessary.
- Cooling: Constant water cooling is critical. Without it, the diamond bits will overheat and wear out rapidly, and the granite can crack.
- Technique: Start slow, use steady pressure, and keep the bit lubricated with water. Be prepared for a lengthy drilling time.
Drilling Sandstone
Sandstone is a much softer and more porous rock, making it easier to drill.
- Tools: Carbide-tipped masonry drill bits are usually sufficient. A standard hammer drill or even a powerful regular drill can work.
- Cooling: While not as critical as with granite, some water can help keep dust down and extend the life of the bit.
- Technique: You can use higher speeds than with granite, but still start slow to prevent the bit from wandering. The softer material will drill more quickly. Be mindful of over-drilling, which can enlarge the hole or cause the sandstone to crumble.
Drilling Through Rock (General Applications)
Whether you’re drilling through sedimentary rock, metamorphic rock, or igneous rock, the core principles remain the same: use the right bit, secure the material, maintain cooling, and apply steady pressure.
Troubleshooting Common Drilling Issues
Even with preparation, you might encounter problems. Here are some common issues and how to address them.
- Bit Wandering: This often happens at the start. Ensure the stone is well-secured and use a center punch. Start at a slow speed and at a slight angle to create a starting groove.
- Overheating: If your bit feels hot to the touch or you see smoke, stop immediately. Let the bit and the stone cool down. Increase your use of coolant if you’re not using enough.
- Bit Jamming: This can happen if the hole fills with debris. Pull the bit out periodically to clear it. Ensure you’re using enough cooling water to flush debris away.
- Chipping or Cracking: This is often due to too much pressure, too high a speed, or drilling too quickly on exit. Slow down, reduce pressure, and be extra careful as you break through the other side.
- Slow Progress: If you’re making very slow progress, re-evaluate your tools. Are you using the correct bit for the stone’s hardness? Is your drill powerful enough?
Maintaining Your Drilling Equipment
Proper maintenance will extend the life of your tools and ensure consistent performance.
- Cleaning Bits: After each use, clean your drill bits thoroughly. For diamond bits, rinse them well with water to remove all stone particles.
- Coolant Systems: If you have a rig with a water system, clean it regularly to prevent blockages.
- Drill Maintenance: Follow the manufacturer’s instructions for your drill. Keep it clean, lubricated, and check for any signs of wear.
Frequently Asked Questions About Drilling Stone
Q: Can I use a regular drill for drilling stone?
A: For very soft stones like chalk or certain types of slate, a powerful regular drill with a good masonry bit might work for small holes. However, for most stones, especially harder ones like granite, marble, or even dense sandstone, a hammer drill or a diamond core drill is highly recommended for efficiency and to prevent damage to your drill and bits.
Q: How long does it take to drill a hole in granite?
A: The time it takes to drill a hole in granite can vary significantly. Factors include the diameter and depth of the hole, the power and type of your drill, the quality of your diamond core bit, and how consistently you maintain water cooling. A small hole might take 10-30 minutes, while a larger, deeper hole could take several hours.
Q: What is the best way to drill a hole in a rock for a pendant?
A: For making jewelry or small decorative items, you’ll want precise, small holes. Diamond core drill bits designed for jewelry making are ideal. They often come in small diameters. Use a small bench-mounted drill press or a Dremel with a drill press attachment for stability and control. Always use water to cool the bit and the stone.
Q: How do I prevent the stone from cracking when drilling?
A: To prevent cracking, ensure the stone is well-supported and doesn’t shift. Start the drill slowly and at a slight angle to create a groove before going vertical. Apply steady, even pressure, and avoid forcing the drill. Reduce pressure as you approach the exit point, and be extra gentle when the bit is about to break through. Proper cooling also helps by reducing thermal stress.
Q: What are concrete drill bits?
A: Concrete drill bits are specifically designed for drilling into concrete and masonry. They typically have carbide tips and robust flutes to handle the abrasive nature of these materials. While they can work on softer stones, they are not as effective or durable as diamond core bits for harder rocks like granite.
By following these guidelines, you can confidently approach the task of drilling holes in rocks and stones, opening up a world of creative possibilities. Remember to always prioritize safety and select the right tools for the job.