
Can I drill holes in ceramic tile? Yes, you can drill holes in ceramic tile, but it requires specific tools and techniques to avoid cracking or shattering the tile.
Ceramic tile, a popular choice for both floors and walls, offers durability and aesthetic appeal. However, when DIY projects require fixtures, plumbing, or decorative elements, drilling holes becomes a necessary step. Many homeowners shy away from this task, fearing they’ll damage the tile. This guide will equip you with the knowledge and confidence to drill holes in ceramic tile safely and properly, just like a seasoned pro. We’ll cover everything from selecting the right drill bits to mastering the drilling technique.
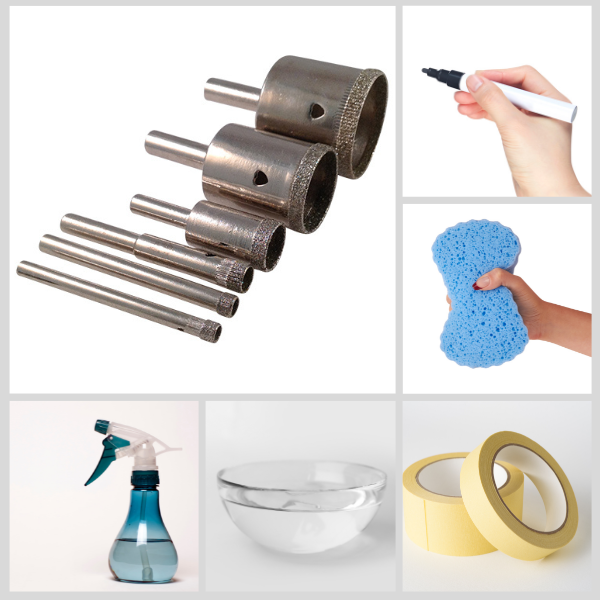
Image Source: cdn.ecommercedns.uk
Deciphering Tile Drill Bits: Choosing the Right Tool
The key to successful ceramic tile drilling lies in using the correct drill bits. Standard drill bits designed for wood or metal will likely cause the tile to chip, crack, or shatter. Here’s a breakdown of the most effective tile drill bits:
Masonry Drill Bits vs. Specialty Bits
While “masonry drill bits” are a broad category, they aren’t always ideal for the delicate nature of ceramic tile.
-
Masonry Drill Bits (Tungsten Carbide Tipped): These bits have a carbide tip designed for harder materials like concrete and brick. They can be used for ceramic tile, but they are more prone to causing chipping and require a very slow drilling speed. They are a budget-friendly option but come with a higher risk of tile damage.
-
Ceramic Tile Drill Bits: These are specifically engineered for drilling through ceramic and porcelain. They are generally more effective at preventing chipping and cracking.
Diamond Drill Bits: The Ultimate Choice for Hard Tiles
When it comes to drilling through hard, dense ceramic or porcelain tiles, “diamond drill bits” are the undisputed champions.
-
How They Work: Diamond drill bits have a crown or tip coated with industrial-grade diamond particles. These particles act as tiny, super-hard abrasives, effectively grinding through the tile material rather than cutting it. This grinding action is much gentler and significantly reduces the risk of chipping.
-
Types of Diamond Bits:
- Core Bits/Hole Saws for Tile: These are shaped like a cylinder with a diamond-coated edge. They are excellent for creating larger, clean holes, such as for pipes or plumbing fixtures. They essentially grind out a circle of material.
- Spear-Point Diamond Bits: These have a sharp, spear-like tip coated in diamond. They are ideal for smaller holes, like those needed for mounting brackets or electrical boxes. They start the hole with a piercing action and then grind their way through.
Other Specialty Bits
- Carbide-Tipped Glass and Tile Bits: These are often a step up from basic masonry bits and are specifically designed for glass and tile. They usually feature a spear-point design and are coated with carbide. They offer a good balance of performance and price for many DIYers.
Table 1: Drill Bit Comparison for Ceramic Tile
| Drill Bit Type | Best For | Pros | Cons |
|---|---|---|---|
| Masonry (Tungsten Carbide) | Softer ceramic tiles, light-duty jobs | Inexpensive, widely available | Higher risk of chipping/cracking, slower drilling, not ideal for porcelain |
| Carbide-Tipped Glass & Tile | Most ceramic tiles, glass tiles | Good balance of price and performance, less chipping than masonry | Still can chip denser tiles, may require more passes |
| Diamond Core Bits / Hole Saws | Larger holes (pipes, fixtures) in any tile | Very clean cuts, minimal chipping, works on very hard tiles | More expensive, requires water for cooling, slower process |
| Diamond Spear-Point Bits | Smaller holes (screws, anchors) in any tile | Excellent precision, minimal chipping, works on very hard tiles | More expensive than carbide, slower for larger holes |
Preparing for Drilling Ceramic Tile: Essential Steps
Before you even think about putting a drill bit to tile, proper preparation is crucial for a safe and successful outcome.
Gathering Your Tools and Materials
- Drill: A corded drill is often preferred for its consistent power, but a powerful cordless drill can also work. Ensure it has variable speed settings.
- Tile Drill Bits: As discussed above, choose the right bit for your tile type and hole size.
- Safety Glasses: Non-negotiable. Tile shards can fly with surprising force.
- Work Gloves: To protect your hands and improve grip.
- Dust Mask: While ceramic tile dust isn’t as harmful as some other materials, it’s still good practice to wear one.
- Painter’s Tape or Masking Tape: To create a stable surface and help prevent the drill bit from wandering.
- Water Source (for wet drilling): A spray bottle filled with water is essential for cooling the drill bit.
- Bucket or Container: To catch water and debris, especially when “wet drilling ceramic” is employed.
- Drill Guide or Template (Optional but Recommended): For precise hole placement, especially for multiple holes.
- Measuring Tape and Pencil/Marker: For accurate marking.
- Sponge or Rag: For cleaning up water and dust.
Marking the Drilling Spot
Precision is key.
- Measure and Mark: Use your measuring tape and a pencil or marker to indicate the exact center of where you want the hole.
- Apply Painter’s Tape: Place a piece of painter’s tape over the marked spot. This tape serves two critical purposes:
- It provides a stable surface for the drill bit to grip, preventing it from “walking” or skittering across the smooth tile surface.
- It helps to catch some of the dust and debris generated during drilling.
- Re-Mark the Spot: Use your pencil or marker to re-mark the center of the hole directly on top of the painter’s tape.
Securing the Tile (If Necessary)
If you are drilling a loose tile (e.g., before installation), ensure it is firmly supported. If you are drilling a tile already installed on a wall or floor, ensure the substrate behind it is solid and can handle the pressure. Avoid drilling into empty space.
The Drilling Process: Step-by-Step Guide
Now that you’re prepared, let’s get to the core of “drilling ceramic.”
Setting Up Your Drill
- Variable Speed is Key: Ensure your drill is set to its lowest speed setting. High speeds generate excessive heat, which can damage the drill bit and the tile.
- No Hammer Function: Absolutely do not use the hammer or ضرب drill function. This is designed for masonry and will shatter your tile instantly. Ensure the hammer function is turned OFF.
Initial Hole Creation: Starting the Grind
This is where the magic happens, or where mistakes can be made.
- Pilot Hole (Optional but helpful): For very small holes or very hard tiles, you can start with a small pilot hole using a fine-point diamond bit to establish a starting point.
- Applying Gentle Pressure: Position the tip of your chosen tile drill bit (e.g., a diamond spear-point bit or the edge of a hole saw) directly on the marked spot on the painter’s tape.
- Slow Speed Drilling: Begin drilling at a very slow speed. Apply light, consistent downward pressure. Let the drill bit do the work. Forcing the drill will almost certainly lead to chipping or cracking.
- Cooling the Bit: This is a critical step, especially when “drilling ceramic” or “drilling glass tile.”
- Water Lubrication: Periodically stop drilling and apply water to the drilling area. A spray bottle is ideal. The water lubricates the bit, cools it down, and washes away debris, all of which are vital for preventing overheating and extending the life of your bit.
- Wet Drilling Ceramic: Some professionals advocate for continuous “wet drilling ceramic” using a low-flow water source. You can create a small dam around the drilling area with plumber’s putty or a damp sponge to keep the water concentrated. This is the most effective way to manage heat and dust.
- Create a Groove: As the bit begins to grind into the tile, it will start to create a small groove or indentation. Continue drilling slowly and applying steady, light pressure, always with water.
Enlarging the Hole
Once you have a sufficient groove or pilot hole, you can proceed to enlarge it.
- For Spear-Point Bits: Continue drilling slowly, applying light pressure, and using water. The bit will gradually grind its way through the tile. You might need to move the drill in a slight circular motion to help clear debris and maintain a consistent grind.
- For Hole Saws/Core Bits: Keep the hole saw centered on your mark. Apply steady, light pressure. As the diamond-coated edge grinds through, the center “slug” of tile will eventually break free.
Clearing Debris
- Regularly Remove Debris: Periodically lift the drill bit out of the hole to clear away the ground tile dust and water. This prevents the bit from getting clogged and allows for better cooling.
- Clean the Area: Use a sponge or rag to soak up excess water and debris.
Finishing the Hole
- Smooth Edges: Once you’ve drilled through the tile, you may have some rough edges. You can gently smooth these with a fine-grit sandpaper or a small diamond file if necessary.
- Clean Up: Thoroughly clean the area with water and a sponge.
Advanced Techniques for Specific Situations
While the basic process applies broadly, some situations warrant special attention.
Drilling Glass Tile
“Drilling glass tile” shares many similarities with drilling ceramic tile, but glass can be even more brittle.
- Use Diamond Bits Exclusively: Do not attempt to drill glass tile with anything less than diamond-coated bits.
- Extra Caution with Pressure: Apply even lighter pressure than you would with ceramic.
- Generous Cooling: Water is paramount. Keep the bit and the glass thoroughly lubricated and cooled.
- Support is Crucial: Ensure the glass tile is fully supported to prevent flexing.
Using a Hole Saw for Tile
When you need a larger diameter hole, a “hole saw for tile” is your go-to.
- Centering Guide: Most tile hole saws come with a centering point or pilot bit. Ensure this is accurately placed on your marked spot.
- Start Slowly: Begin drilling at a very low speed to allow the pilot bit to engage and the diamond edge to start grinding.
- Maintain Water Flow: A steady stream of water is essential to keep the large cutting surface cool and to flush away the significant amount of debris generated.
- Patience: Drilling larger holes takes time. Don’t rush the process. Let the diamond abrasives do the work.
Common Issues and Troubleshooting
Even with the best preparation, you might encounter hiccups.
-
Drill Bit Slipping:
- Cause: The surface is too smooth, or insufficient pressure is applied to start.
- Solution: Ensure you’ve applied painter’s tape firmly. Start with very light pressure and allow the bit to grind a small indentation before increasing pressure slightly. A drill guide can also help.
-
Chipping:
- Cause: Drilling too fast, too much pressure, using the wrong bit, or not enough cooling.
- Solution: Reduce speed, ease up on pressure, ensure you’re using the correct tile drill bits (diamond is best), and keep the bit cool with water.
-
Overheating Bit:
- Cause: Lack of lubrication, drilling too fast, or drilling continuously without pauses.
- Solution: Stop frequently to apply water. Ensure ample water is reaching the bit. If the bit feels hot to the touch (carefully!), let it cool down completely.
-
Cracking the Tile:
- Cause: Excessive force, uneven pressure, hitting a hidden flaw in the tile, or drilling too close to the edge.
- Solution: This is often irreversible. Prevention is key: use light, steady pressure, drill slowly, and use the right bits. If drilling near an edge, be extra cautious.
Maintaining Your Drill Bits
Proper care will extend the life of your specialized bits.
- Clean After Use: Rinse diamond and carbide bits with water to remove all tile dust and debris.
- Dry Thoroughly: Allow bits to air dry completely before storing them.
- Store Properly: Keep bits in their original packaging or a dedicated bit organizer to prevent damage and keep them organized.
- Avoid Metal-to-Metal Contact: Do not store diamond bits where they can rub against harder metal surfaces, as this can damage the diamond coating.
Frequently Asked Questions (FAQ)
Q1: What is the best drill bit for ceramic tile?
The best drill bit for ceramic tile is generally a diamond-tipped drill bit, especially for harder porcelain or glazed tiles. For softer ceramic tiles, a carbide-tipped glass and tile bit can also work effectively.
Q2: Can I use a regular drill for ceramic tile?
Yes, you can use a regular drill for ceramic tile, but it must be set to a slow speed and have the hammer function turned off. A powerful cordless drill or a corded drill with variable speed is recommended.
Q3: How do I prevent ceramic tile from cracking when drilling?
To prevent ceramic tile from cracking, use diamond drill bits, drill at a slow speed, apply light and steady pressure, and cool the drill bit with water frequently. Using painter’s tape on the surface also helps prevent the bit from slipping and causing initial stress.
Q4: What is the best speed for drilling ceramic tile?
The best speed for drilling ceramic tile is very slow. Use the lowest speed setting on your drill and let the drill bit do the grinding work. High speeds generate excessive heat, which is a primary cause of tile cracking and bit damage.
Q5: Can I drill tile without water?
While it’s possible to drill tile without water for very small holes in softer ceramic, it is strongly discouraged for most applications. Water is crucial for cooling the drill bit and the tile, lubricating the cut, and flushing away debris. Drilling without water significantly increases the risk of overheating the bit, dulling it quickly, and cracking the tile. For best results and to prolong the life of your bits, always use water when drilling ceramic tile.
Q6: How do I drill a clean hole in ceramic tile?
To drill a clean hole, start by applying painter’s tape to the marked spot. Use a diamond-tipped drill bit at slow speed, apply light, consistent pressure, and use plenty of water for cooling and lubrication. Periodically clear debris from the hole. For larger holes, a hole saw for tile is ideal.
Q7: Can I drill through porcelain tile?
Yes, you can drill through porcelain tile, but it is significantly harder than standard ceramic tile. You must use diamond drill bits (either spear-point or core bits/hole saws) and be exceptionally careful with slow speed drilling and constant cooling with water. Patience is key when drilling porcelain.
Q8: What if I don’t have a diamond drill bit?
If you don’t have a diamond drill bit, a carbide-tipped glass and tile bit is the next best option. However, be aware that these bits are more prone to chipping and require even more caution with speed, pressure, and cooling. Avoid standard masonry bits if at all possible.
By following these expert DIY tips, you can confidently tackle drilling holes in ceramic tile for your home improvement projects, achieving professional-looking results without the common pitfalls.