
Can you drill a well for water yourself? Yes, in many cases, you can drill a well for water yourself, but it requires significant knowledge, the right equipment, and a strong emphasis on well drilling safety. This comprehensive guide will walk you through the essential steps and considerations for drilling your own home water well.
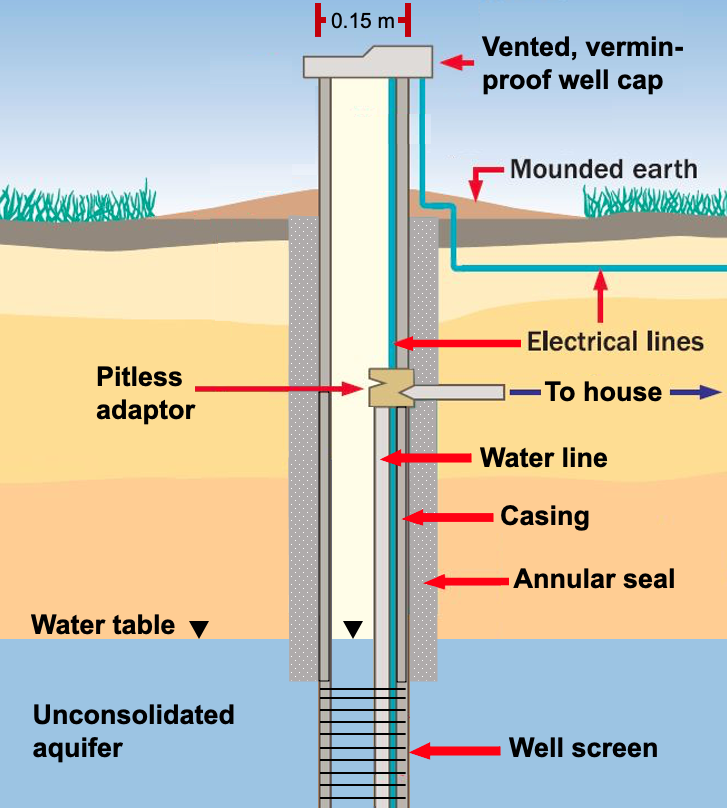
Image Source: books.gw-project.org
Fathoming the Process of Well Drilling
Drilling a well for water is a significant undertaking that can provide a reliable and independent water source for your home. It involves accessing underground aquifers to tap into a consistent supply of potable water. This guide aims to equip you with the necessary knowledge to embark on this project.
Deciphering Well Drilling Methods
There are several well drilling methods used to access groundwater, each suited to different geological conditions and depths. Selecting the right method is crucial for efficient and successful water source drilling.
Percussion Drilling (Cable Tool Drilling)
This is one of the oldest well drilling methods. A heavy chisel-like bit is repeatedly dropped onto the ground. This action breaks up the soil and rock. Water is then mixed with the debris to create a slurry, which is removed using a sand pump.
- Pros: Relatively simple equipment, can be effective in hard rock formations.
- Cons: Slow, labor-intensive, not ideal for unconsolidated formations.
Rotary Drilling
This is the most common method today. A rotating drill bit, powered by a motor, grinds through the earth. A drilling fluid (often water or a mud mixture) is pumped down the drill pipe. This fluid cools the bit, lubricates the hole, and carries cuttings to the surface.
- Rotary Wash Drilling: Uses water as the drilling fluid.
-
Mud Rotary Drilling: Uses a specialized drilling mud. This mud helps to stabilize the borehole walls, cool the bit, and suspend rock cuttings.
-
Pros: Faster than percussion drilling, more versatile, can handle various formations.
- Cons: Requires more complex equipment and skilled operators.
Auger Drilling
This method uses a rotating screw-like bit to bore into the ground. It’s best suited for shallow wells in softer soils and unconsolidated formations.
- Pros: Simple, effective for shallow depths, less water required.
- Cons: Limited to shallow depths and softer soils, not effective in rock.
Air Hammer Drilling
This method uses compressed air to power a pneumatic hammer at the end of the drill string. The hammer strikes the drill bit, breaking up rock. Air also blows the cuttings to the surface.
- Pros: Fast drilling in hard rock, cleaner than mud rotary in some cases.
- Cons: Requires powerful air compressors, can be noisy, may not be suitable for all formations.
The Nuances of Shallow Well Drilling vs. Deep Well Drilling
The depth of your well significantly impacts the well drilling cost, the equipment needed, and the potential water yield.
Shallow Well Drilling
Shallow wells typically tap into the first water-bearing layer encountered, often at depths of 25 to 50 feet.
- Characteristics:
- Easier and quicker to drill.
- Generally less expensive.
- More susceptible to surface contamination and drought conditions.
- Often requires a jet pump or submersible pump.
- Considerations:
- Requires a geological survey to identify shallow water tables.
- Water quality needs careful monitoring.
Deep Well Drilling
Deep wells penetrate multiple layers of soil and rock to reach deeper, more consistent aquifers, often exceeding 100 feet and sometimes going down hundreds of feet.
- Characteristics:
- More expensive due to time, equipment, and complexity.
- Provides a more reliable water supply, less affected by drought.
- Water is generally of higher quality, filtered by geological layers.
- Almost always requires a submersible pump.
- Considerations:
- Requires more robust well drilling equipment.
- Geological surveys are essential to pinpoint deep aquifers.
- Permitting processes can be more involved.
Is DIY Well Drilling Feasible for You?
DIY well drilling is an option for the determined homeowner, but it’s not a decision to be taken lightly.
Factors to Consider for DIY Well Drilling
- Local Regulations: Many areas have strict regulations regarding well construction, including permits, depth requirements, and construction standards. Always check with your local health department or environmental agency.
- Geological Conditions: The type of soil and rock in your area will dictate the feasibility of DIY drilling. Hard rock or unstable soil can make DIY drilling extremely challenging or impossible without specialized equipment and expertise.
- Required Equipment: You will need specialized well drilling equipment, which can be rented or purchased. This is a significant investment.
- Time Commitment: Drilling a well, even a shallow one, is a time-consuming process.
- Skill and Knowledge: A good understanding of geology, drilling techniques, and well drilling safety is essential. Mistakes can be costly and dangerous.
- Water Well Drilling Cost: While DIY can save on labor, the cost of equipment rental or purchase, materials, and potential mistakes can still be substantial.
Estimating Water Well Drilling Cost
The water well drilling cost varies widely based on several factors:
| Factor | Impact on Cost |
|---|---|
| Depth | Deeper wells cost significantly more due to time and materials. |
| Geology | Drilling through rock is more expensive than drilling through soil. |
| Location | Accessibility for drilling rigs and proximity to water sources impact costs. |
| Well Diameter | Larger diameter wells require more material and drilling time. |
| Pump System | Cost of the pump, pressure tank, and installation varies. |
| Permits/Testing | Fees for permits and water quality testing add to the overall expense. |
| Professional vs. DIY | Professional services include labor and expertise, increasing upfront cost but reducing risk. |
Average Cost Range (Estimates – varies greatly by region):
- Shallow Well (25-50 ft): $1,500 – $4,000
- Average Well (50-150 ft): $4,000 – $10,000
- Deep Well (150+ ft): $10,000 – $25,000+
Planning Your Home Water Well Project
A successful water source drilling project starts with thorough planning.
Site Selection
- Proximity to House: Shorter pipe runs from the well to your house reduce pressure loss and installation costs.
- Drainage: Choose a location that drains away from the wellhead to prevent surface water contamination.
- Setbacks: Adhere to local regulations for setbacks from property lines, septic systems, and buildings.
- Accessibility: Ensure the site is accessible for a drilling rig and future maintenance.
- Aquifer Potential: Consult geological surveys or local water well drillers for information on likely aquifer locations.
Obtaining Permits and Approvals
- Local Authorities: Contact your local health department, building department, or environmental agency.
- Permit Requirements: Understand what permits are needed, including drilling permits, construction permits, and potentially water use permits.
- Water Testing: Plan for initial water quality testing and ongoing testing.
Acquiring Well Drilling Equipment
For DIY well drilling, you’ll need to source appropriate well drilling equipment. This can involve renting or purchasing.
- Drilling Rig: The core piece of equipment. Options range from truck-mounted rigs to smaller, portable units.
- Drill Bits: Different types are needed for various soil and rock formations.
- Drill Pipe: Sections of pipe that connect to the drill bit and are lowered into the ground.
- Drilling Fluid System: Pumps, tanks, and hoses for circulating drilling fluid.
- Casing: Pipes installed in the borehole to prevent collapse and seal off unwanted water layers.
- Well Screen: A section of screened casing placed at the water-bearing zone to allow water in but keep sediment out.
- Sand Pump: For removing cuttings and slurry.
- Safety Gear: Essential for well drilling safety.
The Step-by-Step Process of Drilling a Well
This outlines the general steps involved in drilling a water well.
1. Site Preparation
- Clear the area where the well will be drilled.
- Ensure access for the drilling rig and support vehicles.
- Mark the exact location of the wellhead.
2. Mobilizing Equipment
- Position the drilling rig over the marked well location.
- Set up the drilling fluid circulation system.
3. Drilling the Borehole
- Begin drilling using the selected well drilling methods.
- Continuously circulate drilling fluid.
- Monitor drilling progress and geological formations encountered.
- Periodically flush the hole to remove cuttings.
4. Installing Casing
- As the borehole is deepened, sections of casing are added.
- Casing prevents the hole from collapsing and seals off contaminated shallow water zones.
- The casing is typically driven into the ground or cemented in place.
5. Reaching the Aquifer
- Drilling continues until a productive aquifer is reached, indicated by increased water flow.
- The depth at which water is encountered is recorded.
6. Installing the Well Screen
- A well screen is fitted to the bottom section of the casing, positioned within the aquifer.
- This allows water to enter the well while filtering out sand and gravel.
7. Development and Testing
- Well Development: This process cleans the borehole and aquifer surrounding the screen to improve water flow. Techniques include surging, bailing, or pumping.
- Pumping Test: Once developed, the well is pumped at a high rate for an extended period to determine its yield (gallons per minute) and drawdown (how much the water level drops).
8. Installing the Well Cap and Seal
- A sanitary well cap is installed to prevent contaminants from entering the wellhead.
- A surface seal is created to further protect the well from surface pollution.
Crucial Aspects of Well Drilling Safety
Well drilling safety cannot be overstated. This is a dangerous operation, and proper precautions are vital.
Personal Protective Equipment (PPE)
- Hard Hat: Protects against falling objects.
- Safety Glasses/Goggles: Shields eyes from debris and drilling fluid.
- Steel-Toed Boots: Protects feet from heavy equipment and falling objects.
- Work Gloves: Protects hands from abrasion and cuts.
- Hearing Protection: Essential when operating noisy machinery.
- High-Visibility Clothing: For visibility around moving equipment.
Equipment Safety
- Regular Maintenance: Ensure all well drilling equipment is in good working order.
- Safe Operation: Follow manufacturer instructions and best practices for operating drilling rigs and other machinery.
- Securing Equipment: Properly secure the drilling rig and other heavy components to prevent movement.
- Awareness of Surroundings: Maintain awareness of other workers, equipment, and potential hazards.
Site Safety
- Clearance Zones: Establish and maintain clear zones around the drilling operation.
- Electrical Hazards: Be aware of overhead power lines and underground utilities.
- Trench Safety: If any trenches are dug, ensure they are properly shored and protected.
- Confined Spaces: If accessing any part of the wellbore requires entry, follow strict confined space safety protocols.
- Emergency Preparedness: Have a plan in place for emergencies, including first-aid supplies and emergency contact information.
Well Pump Installation: Delivering Water to Your Home
Once the well is drilled and developed, the next critical step is well pump installation. The type of pump depends on the well’s depth and yield.
Types of Well Pumps
- Submersible Pumps: These are the most common type for deeper wells. They are placed directly in the water inside the well casing. They push water up to the surface.
- Pros: Efficient, quiet, good for deep wells.
- Cons: More difficult to access for repairs.
- Jet Pumps: Typically used for shallower wells (under 25 feet). They are located above ground and use suction to draw water.
- Pros: Easier to access for maintenance.
- Cons: Limited depth capability, can be noisy.
- Centrifugal Pumps: Similar to jet pumps but use a different mechanism for drawing water. They are also generally for shallower applications.
Components of a Well Water System
- Well Pump: The device that moves water.
- Pressure Tank: Stores water and maintains pressure in the system, preventing the pump from cycling on and off too frequently.
- Pressure Switch: Controls the pump’s operation based on water pressure.
- Piping: Connects the pump, pressure tank, and your home’s plumbing.
- Check Valve: Prevents water from flowing back into the well.
- Pitless Adapter (optional but recommended): A device that allows the water line to exit the well below the frost line, preventing freezing and providing a sanitary seal at the surface.
Considerations for Well Pump Installation
- Pump Sizing: The pump must be sized correctly for the well’s depth, yield, and your home’s water demand.
- Voltage and Power: Ensure your electrical system can support the pump’s power requirements.
- Plumbing Connections: Proper sealing and connection of all plumbing is crucial to prevent leaks.
- Electrical Connections: All electrical work must be done by a qualified electrician following code.
Maintaining Your Home Water Well
Regular maintenance ensures the longevity and quality of your well water.
Routine Checks
- Water Quality: Test your water annually for bacteria and nitrates. Test for other contaminants if you suspect issues.
- Wellhead Inspection: Check for any damage or signs of contamination around the wellhead.
- Pump Performance: Listen for unusual noises from the pump and monitor water pressure.
- Pressure Tank: Check the air charge in the pressure tank periodically.
Preventative Measures
- Prevent Freezing: Ensure exposed piping is insulated.
- Protect from Contamination: Keep the area around the wellhead clean and free of debris, chemicals, and animal waste.
- Regular Pumping: If the well is used infrequently, pump it periodically to ensure water doesn’t stagnate.
Frequently Asked Questions (FAQ)
Q1: How long does it take to drill a well?
A: The time can vary greatly, from a few days for a shallow well in soft soil to several weeks for a deep well in hard rock. Factors like drilling speed, depth, geology, and weather can influence the timeline.
Q2: What is the average cost of drilling a well?
A: The water well drilling cost can range from $1,500 to over $25,000 depending on depth, geology, location, and the type of pump system installed.
Q3: Can I drill my own well?
A: DIY well drilling is possible, but it requires specialized well drilling equipment, significant knowledge, adherence to well drilling safety protocols, and compliance with local regulations. It is a complex and potentially hazardous undertaking.
Q4: What is the difference between shallow well drilling and deep well drilling?
A: Shallow well drilling accesses water closer to the surface (typically under 50 feet), is less expensive, but can be more susceptible to contamination and drought. Deep well drilling goes deeper to tap more consistent and often purer aquifers, offering a more reliable supply but at a higher cost and complexity.
Q5: What kind of pump do I need for my well?
A: The type of pump depends on your well’s depth and yield. Submersible pumps are common for deeper wells, while jet pumps are typically used for shallower wells. Well pump installation should be performed by a qualified professional.
Q6: What are the key safety considerations for well drilling?
A: Well drilling safety involves wearing appropriate Personal Protective Equipment (PPE), ensuring all well drilling equipment is in good working order and operated correctly, maintaining safe clearance zones, and being aware of potential electrical and physical hazards.
Q7: What is a well screen?
A: A well screen is a screened section of casing placed at the bottom of the well, within the aquifer. It allows groundwater to enter the well while preventing sand, gravel, and other sediment from entering the borehole and pump.