
Can I drill a hole in porcelain? Yes, you can drill a hole in porcelain, but it requires the right tools, techniques, and a bit of patience. This guide will walk you through the process, ensuring you achieve a clean hole without damaging your delicate porcelain tile or fixture. Drilling into porcelain might seem daunting because it’s a hard, dense material that can easily chip or crack if not handled with care.
Porcelain is a type of ceramic tile that is fired at very high temperatures, making it exceptionally hard and durable. This hardness is what makes it resistant to wear and tear but also challenging to work with. Whether you’re hanging a shelf, installing a faucet, or need to run a pipe through a porcelain surface, knowing the correct approach is crucial. This isn’t like drilling into wood or drywall; it’s a different ballgame that demands specific equipment and a gentle, consistent method.
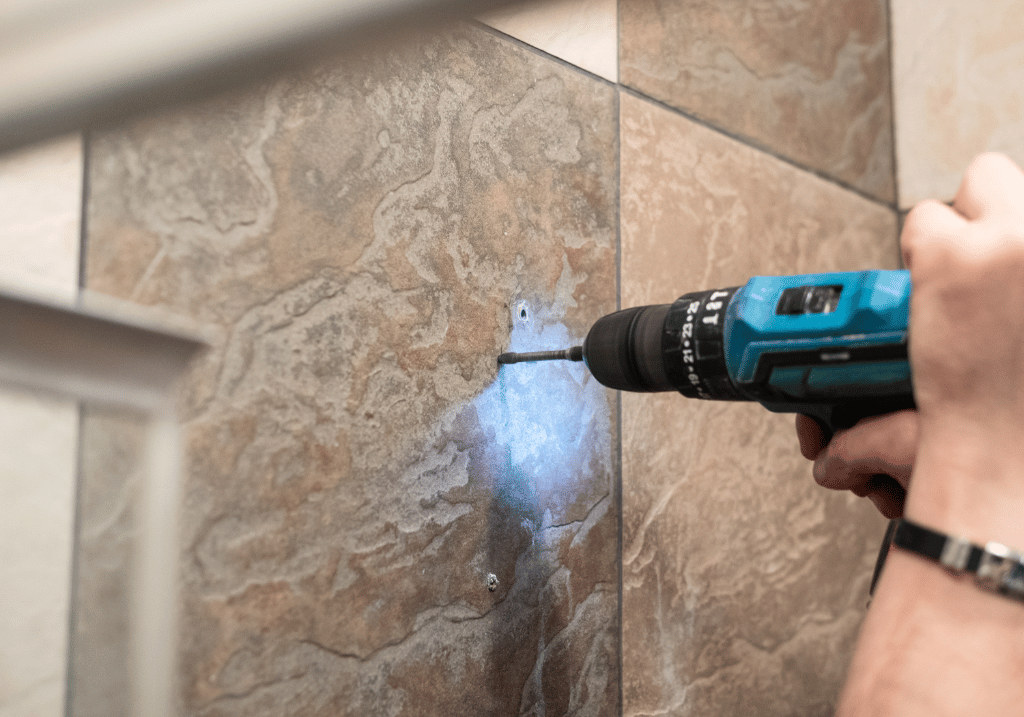
Image Source: ceramiccity.ie
Essential Tools for Drilling Porcelain
To successfully drill a hole in porcelain, you’ll need a few key items. Using the wrong tools is a fast track to disaster, resulting in a cracked tile, a broken drill bit, or a messy, uneven hole. Investing in the right equipment beforehand will save you time, frustration, and the cost of replacing damaged materials.
Drill Bits: The Heart of the Operation
The type of drill bit you use is paramount. Regular metal or wood drill bits will simply not cut it. They’ll either skate across the surface, refuse to penetrate, or generate excessive heat, causing the porcelain to fracture.
- Diamond Drill Bits: These are the undisputed champions for drilling hard materials like porcelain, ceramic tile, glass, and stone. They have a special coating of industrial diamonds on their tips. This diamond coating grinds away the material rather than cutting it, allowing for a controlled penetration.
- Types of Diamond Bits: You’ll find diamond hole saws (which create larger holes) and smaller diamond-tipped drill bits for more precise work. For most common tasks, like mounting fixtures, smaller diamond-tipped bits are ideal.
- Bit Size: Ensure you have the correct size drill bit for the hole you need. It’s always better to start with a slightly smaller bit and enlarge the hole if necessary than to start too big.
- Glass Drill Bits: While diamond bits are preferred for porcelain, high-quality glass drill bits can also be used. These often have a spear-shaped tip that’s also coated with diamond or carbide. They work similarly by grinding the material.
Your Drill: Power and Control
Your choice of drill also matters. While most modern drills can handle the job, having variable speed and a clutch can make a significant difference.
- Cordless Drill: A good quality cordless drill is usually sufficient. Look for one with decent torque and variable speed settings.
- Hammer Drill (Use with Caution): While a hammer drill has more power, the hammering action is generally not recommended for drilling porcelain. The percussive force can easily cause the tile to crack. If you must use a hammer drill, ensure you disable the hammer function entirely.
- Variable Speed Control: This is crucial. You need to be able to set your drill to a slow drill speed to maintain control and prevent overheating.
Support and Safety Gear
Beyond the drill bits and drill, other items are vital for safety and success.
- Safety Glasses: Always wear safety glasses to protect your eyes from flying debris.
- Gloves: Work gloves can provide a better grip and protect your hands.
- Dust Mask: Drilling porcelain creates fine dust, which can be harmful if inhaled. A dust mask is essential.
- Water Source (for Wet Drilling): As we’ll discuss, water is a critical component. This could be a spray bottle, a sponge, or a small continuous water supply.
- Masking Tape or Painter’s Tape: This helps prevent the drill bit from “walking” or sliding across the smooth surface when you start drilling.
- Pencil or Marker: For marking the drilling location.
- Bucket or Container: To catch water and debris, especially during wet drilling.
- Drill Guide or Jig (Optional but Recommended): A drill guide helps keep the drill bit perfectly perpendicular to the surface, significantly reducing the risk of chipping or the bit wandering.
Preparing for the Job: Setting Yourself Up for Success
Proper preparation is half the battle when drilling porcelain. Taking the time to set up correctly will prevent mistakes and ensure a cleaner, safer outcome.
Choosing Your Spot and Marking
- Location Check: Before you even pick up a drill, confirm the exact spot where you need the hole. Double-check measurements and ensure there are no hidden pipes or wires behind the tile, especially if you’re drilling into a wall.
- Marking the Spot: Use a pencil or marker to clearly indicate the center of where you want the hole. A small “X” is often best.
Preventing the Drill Bit from Wandering
The slick, hard surface of porcelain means drill bits can easily slip and slide when you first start. This can lead to an off-center hole or, worse, a crack.
- Masking Tape Method:
- Apply a few layers of good quality masking tape or painter’s tape over the marked spot.
- Re-mark the center of your hole precisely on top of the tape. The tape provides a slightly rougher surface for the drill bit to grip.
- Drill Guide: If you have a drill guide or jig, this is the time to use it. These devices often have a suction cup or clamp to hold them in place and a guide sleeve that ensures the drill bit stays straight.
Securing the Tile (If Applicable)
If you’re drilling into a loose tile or a piece of porcelain that isn’t permanently fixed, it’s crucial to secure it.
- Clamps: Use clamps to hold the porcelain firmly to a workbench or a sturdy surface.
- Support: Place scrap wood underneath the drilling area to support the porcelain from the back. This helps prevent blowout and cracking as the bit breaks through the other side.
The Drilling Process: Step-by-Step
Now that you’re prepared, it’s time to drill. Remember, patience and a steady hand are your greatest assets here.
Step 1: Setting Up for Slow and Steady
- Drill Speed: Set your drill to its lowest speed setting. This is non-negotiable for drilling porcelain. High speeds generate excessive heat and vibration, which are the primary culprits behind cracks.
- Clutch Setting (if applicable): If your drill has a clutch, set it to a low torque setting. This prevents over-tightening and potential damage.
Step 2: Starting the Hole – The Gentle Touch
- Pilot Hole (Optional but Recommended): For precise starting, you can create a small pilot divot first. You can do this with a carbide-tipped scriber or even the tip of a hardened nail, gently tapping it with a hammer at your marked spot. This gives the drill bit a small indentation to sit in.
- Initial Contact: Place the tip of your diamond drill bit on the marked spot.
- Slow and Steady Pressure: Begin drilling with very light, consistent pressure. Let the diamond coating do the work. Don’t force the drill. You should feel the bit start to grind into the surface.
Step 3: Introducing Water Cooling – The Key to Success
This is arguably the most critical step for preventing overheating and cracking. Wet drilling is essential.
- Why Water Cooling? As the diamond drill bit grinds through the hard porcelain, friction generates significant heat. This heat expands the material and can cause it to fracture. Water acts as a lubricant and a coolant.
- It dissipates heat, keeping the drill bit and the porcelain at a manageable temperature.
- It flushes away dust and debris, preventing it from clogging the bit and further increasing friction.
- Methods for Water Application:
- Spray Bottle: Continuously spray water onto the drilling area as you drill. Keep the area consistently wet.
- Sponge: Soak a sponge in water and hold it around the drilling area. As you drill, the water will be drawn to the bit.
- Water Reservoir (for larger holes/hole saws): For larger holes, you might create a small dam around the drilling area using plumber’s putty or clay. Fill this dam with water, and the bit will operate in a pool.
- Continuous Water Supply: For very demanding jobs, some professionals use a low-flow water feed directly to the bit.
- Maintaining the Flow: Ensure the water flow is consistent. Don’t let the drilling area dry out. If you see steam or smoke, stop immediately and add more water.
Step 4: The Drilling Action – Patience and Perpendicularity
- Maintain Perpendicularity: Keep the drill perfectly straight, perpendicular to the surface. Use a drill guide if you have one. Tilting the drill increases the chance of chipping the edges of the hole.
- Apply Gentle Pressure Control: Continue to apply light, steady pressure. Let the drill do the work. You’re grinding, not forcing. If the drill starts to bog down, ease up slightly and let the bit regain momentum. Avoid jamming the bit.
- Periodically Lift and Clear: Every so often, especially with smaller bits, lift the drill bit slightly out of the hole while it’s still spinning. This helps clear out debris and allows fresh water to get to the cutting surface.
- Listen to Your Drill: Pay attention to the sound of the drill. If it sounds strained or you feel excessive vibration, you’re likely applying too much pressure or the bit is getting too hot.
Step 5: Breaking Through – The Final Approach
As you get close to breaking through the other side of the porcelain, you need to be extra careful.
- Reduce Pressure Further: Significantly reduce the pressure you’re applying.
- Increase Water Flow: Ensure the area is well-lubricated with water.
- Watch for Breakout: The porcelain can chip or splinter outwards as the bit exits. Drilling slowly and with minimal pressure will help minimize this.
- Support the Back: If you’ve secured the tile with support underneath, this is where that support pays off by preventing a clean break or chip on the backside.
Step 6: Finishing the Hole
- Smooth Edges: Once the hole is drilled, you might have a slightly rough edge. You can often smooth this out by gently running the spinning diamond bit around the inside edge of the hole a few times, keeping it wet. For a very clean finish, a small diamond file can also be used.
- Clean Up: Thoroughly clean the area to remove all water and dust.
Dealing with Potential Problems
Even with the best preparation, issues can arise. Here’s how to handle common setbacks.
H3: Chipped Edges
- Cause: Too much pressure, drilling too fast, drill bit wandering, or no support on the back.
- Solution: If the chipping is minor, a diamond file can often smooth it out. For larger chips, you might need to consider if the fixture will cover the imperfection or if you need to start again with a new tile. Always use tape and a drill guide for future attempts.
H3: Drill Bit Not Cutting
- Cause: Not enough water, dull diamond coating, or insufficient pressure.
- Solution: Ensure you have plenty of water. If the bit is very old, the diamond coating might be worn out, and it’s time for a new one. Try applying slightly more consistent pressure, but never force it.
H3: Overheating
- Cause: Too much speed, insufficient water, or excessive pressure.
- Solution: Stop immediately! Add plenty of water and let the bit and the porcelain cool down before resuming. Slow down your drill speed.
Specific Scenarios: When and How
Here are some common situations where you might need to drill porcelain and specific considerations.
H4: Drilling Through Porcelain Tile on a Wall
- Challenge: Access to the back of the tile might be limited.
- Tips:
- Masking Tape is Key: Use plenty of tape to prevent the bit from wandering.
- Water Management: A sponge held around the drill area is often the most practical method. Be prepared to catch dripping water.
- Wall Material: Be aware of what’s behind the tile. You might be drilling into drywall, plaster, or concrete block. Choose the appropriate setting on your drill if it has one (though avoid the hammer function for the tile itself).
- Fixture Mounting: If you’re mounting a heavy fixture, you’ll need appropriate wall anchors that go through the tile and into the wall material behind it.
H4: Drilling Porcelain in a Bathroom or Kitchen
- Challenge: Water resistance and hygiene are important.
- Tips:
- Water Containment: Use a dam or a very absorbent sponge to catch water and prevent it from splashing everywhere or getting into electrical outlets.
- Dust Collection: Ensure good ventilation and use a dust mask. The fine dust can be irritating.
- Grouting: If drilling into an installed tile, be careful not to damage the grout around the area.
H4: Drilling Larger Holes (e.g., for Pipes)
- Challenge: Larger holes require more control and often specialized tools.
- Tools: Use a diamond hole saw for larger diameters. These are essentially cup-shaped bits with diamond grit on the cutting edge.
- Technique:
- Pilot Bit: Many diamond hole saws have a small pilot bit in the center. Ensure this is sharp and centered correctly.
- Water Dam: Create a substantial water dam around the area.
- Slow and Steady: Start very slowly and gradually increase speed as the pilot bit establishes the hole. Maintain consistent water flow throughout.
- Clear Debris: Periodically lift the hole saw to clear out the cut material and water.
Tips for Different Types of Porcelain
While the general principles apply to all porcelain, there can be slight variations.
H5: Glazed Porcelain vs. Unglazed Porcelain
- Glazed Porcelain: The glaze layer is very hard and smooth, making the initial contact with the drill bit critical. Tape is essential to prevent wandering. The glaze can also chip more easily if too much pressure is applied.
- Unglazed Porcelain: Often has a more porous surface, which can make it slightly easier for the drill bit to bite into. However, it can still be prone to chipping, especially on the edges. The dust from unglazed porcelain might be finer.
H5: Porcelain Pavers and Slabs
- Challenge: These are often thicker and can be more prone to cracking due to their size and the stresses they might have undergone during manufacturing or installation.
- Tips:
- Thick Support: Ensure you have robust support underneath the entire section you are drilling into.
- Generous Water: Use ample water for cooling and lubrication.
- Patience is Paramount: These can take longer to drill through, so don’t rush the process.
Maintaining Your Diamond Drill Bits
To ensure your diamond drill bits last and perform well, follow these simple maintenance tips:
- Clean After Use: Rinse them thoroughly with water and allow them to air dry completely.
- Avoid Metal-on-Metal: Don’t store them loose in a toolbox where they can be scratched or damaged by other metal tools.
- Check for Wear: Periodically inspect the diamond coating. If you see large sections missing or the diamonds appear worn down, it’s time for a new bit.
Summary Table of Key Techniques
| Action | Why it’s Important | How to Do It |
|---|---|---|
| Diamond Drill Bits | Specifically designed to grind hard materials. | Use bits with a diamond coating; match size to your needs. |
| Slow Drill Speed | Prevents overheating and material stress. | Set drill to lowest speed setting. |
| Water Cooling | Lubricates, cools, and flushes debris, preventing cracks. | Spray water, use a sponge, or create a water reservoir around the drill site. |
| Masking Tape | Prevents drill bit from “walking” or slipping. | Apply multiple layers over the marked spot before drilling. |
| Light, Steady Pressure | Lets the diamonds grind without forcing or cracking. | Apply just enough pressure to keep the bit engaged; let the drill do the work. |
| Perpendicular Drilling | Prevents chipping and ensures a clean hole. | Keep the drill bit straight and upright; use a drill guide if possible. |
| Support the Back | Prevents blowout and cracking as the bit exits. | Place scrap wood or other support beneath the drilling area. |
| Dust Collection | Protects your health from inhaled silica dust. | Wear a dust mask; consider a vacuum with a dust shroud if available. |
Frequently Asked Questions (FAQ)
Q1: Can I use a regular drill bit for porcelain tile?
A1: No, regular drill bits are not suitable for porcelain. They will not penetrate the material and will likely cause the tile to crack or break. You must use specialized bits like diamond drill bits or glass drill bits.
Q2: How do I prevent porcelain tile from cracking when drilling?
A2: The key to preventing cracks is to use the right tools (diamond drill bits), drill at a slow speed, use water cooling to manage heat, apply light and steady pressure, keep the drill bit perpendicular, and support the back of the tile if possible. Using masking tape at the start also helps prevent the bit from wandering, which can lead to cracks.
Q3: What is the best drill bit for porcelain?
A3: The best drill bit for porcelain is a diamond-tipped drill bit or a diamond hole saw, depending on the size of the hole required. These are specifically designed to grind through extremely hard materials like porcelain.
Q4: Do I really need to use water when drilling porcelain?
A4: Yes, wet drilling is crucial. Water acts as a coolant, dissipating the heat generated by friction. This prevents the porcelain from overheating and cracking. It also lubricates the drill bit and flushes away debris, making the drilling process smoother and the cut cleaner.
Q5: How slow should I drill porcelain?
A5: You should always drill porcelain at the slowest possible speed setting on your drill. High speeds create excessive heat and vibration, which are the main causes of tile breakage.
Q6: What if I don’t have a drill guide?
A6: While a drill guide is highly recommended for accuracy and preventing the bit from wandering, you can achieve good results without one by carefully marking your spot, using masking tape, and maintaining a very steady hand to keep the drill perpendicular.
Q7: How do I know when I’m about to break through the porcelain?
A7: You’ll often notice a change in the resistance or sound as the drill bit gets close to exiting the material. Reduce your pressure significantly and increase the water flow as you approach the breakthrough point to minimize chipping on the exit side.
Q8: Can I drill through porcelain without making a mess?
A8: Drilling porcelain will always create dust and water. You can minimize the mess by using a wet drilling method with a sponge or a dam to contain the water and debris. A shop vacuum with a HEPA filter can also be used to collect dust, though it’s tricky to use effectively while simultaneously drilling and managing water. Always wear a dust mask.
By following these expert tips, you can confidently drill a hole in porcelain, achieving a clean and precise result while keeping yourself and your materials safe. Remember, the process is about controlled grinding, not aggressive cutting.