
Yes, you can drill a hole in a mirror, but it requires special tools and careful techniques to avoid shattering the glass. This guide will walk you through the safest and most effective methods for glass drilling in mirrors.
Drilling into a mirror might seem like a daunting task, conjuring images of shattered glass and frustration. However, with the right approach and a bit of patience, it’s entirely achievable. Whether you’re looking to mount a shelf, create a custom light fixture, or simply add a decorative touch, knowing how to drill a hole in a mirror opens up a world of DIY possibilities. This comprehensive guide will detail everything you need to know, from selecting the right tools to executing the process flawlessly. We’ll cover essential safety precautions, the best mirror drilling techniques, and tips for a clean, successful outcome.
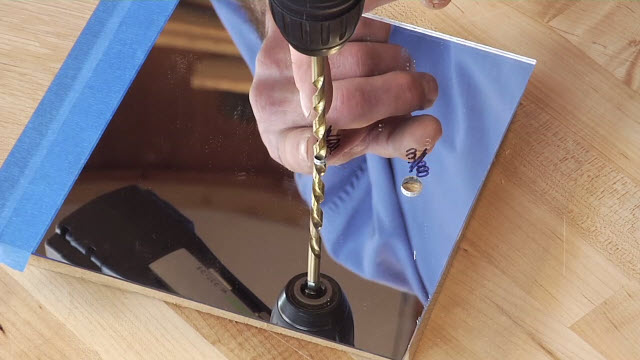
Image Source: d2culxnxbccemt.cloudfront.net
Gathering Your Essential Tools and Materials
Before you even think about making a mark, it’s crucial to have all the necessary equipment ready. Using the wrong tools is the fastest way to a broken mirror.
The Star of the Show: Your Drill Bit
For glass drilling, standard drill bits are a no-go. You absolutely need a specialized bit.
- Diamond Drill Bit: This is non-negotiable. Diamond-tipped or diamond-coated drill bits are designed to cut through hard materials like glass and tile without generating excessive heat or pressure that can cause cracks. They come in various sizes, so choose the one that matches the diameter of the hole you need.
- Tungsten Carbide Bits: While sometimes marketed for glass, these are generally less effective and more prone to breakage than diamond bits for true glass drilling. Stick with diamond for mirrors.
Your Drill
The type of drill you use can also impact the outcome.
- Cordless Drill: A standard cordless drill is often sufficient for most mirror drilling tasks. However, ensure it has an adjustable speed setting.
- Drill Press for Mirrors: For ultimate precision and control, especially for larger or multiple holes, a drill press for mirrors is highly recommended. It keeps the drill bit perfectly perpendicular to the surface, reducing the risk of wobbling and cracking.
Other Crucial Supplies
- Safety Glasses: Essential for protecting your eyes from flying glass shards.
- Work Gloves: Protect your hands from sharp edges.
- Masking Tape or Painter’s Tape: To create a surface for marking and to help prevent the drill bit from wandering.
- Center Punch for Glass (or a Nail): To create a small indent for the drill bit to start in, preventing it from skidding.
- Coolant (Water or Specialty Glass Coolant): Crucial for cooling drilling and preventing the drill bit and the glass from overheating.
- Spray Bottle or Sponge: For applying the coolant.
- Rags or Paper Towels: For cleanup.
- Drop Cloth or Newspaper: To protect your work surface.
- Clamps (if using a drill press): To securely hold the mirror in place.
- Marker or Pencil: For marking your drilling spot.
- Scrap Piece of Wood: To place behind the mirror for support during drilling.
Preparing Your Workspace and the Mirror for Drilling
Preparation is key to a successful and safe drilling operation. Rushing this stage is a common mistake.
Setting Up Your Work Area
- Clear the Space: Ensure you have a well-lit, stable work area free from clutter.
- Protect Surfaces: Lay down a drop cloth or newspaper to catch any water or glass dust.
- Mirror Placement: If possible, lay the mirror flat on a stable, padded surface. A piece of plywood or a thick towel can provide a good base. If the mirror is already installed, you’ll need to work with it in situ, which requires even more care.
- Ventilation: Ensure good ventilation, especially if using any specialty coolants.
Preparing the Mirror Surface
- Clean the Mirror: Thoroughly clean the area where you intend to drill. Any dirt or debris can interfere with the drilling process or cause the bit to slip.
- Mark the Spot:
- Using a marker or pencil, carefully mark the exact center of where you want the hole.
- For extra security against the drill bit wandering, apply a few strips of masking tape or painter’s tape over the marked spot. This also provides a slightly rougher surface for the bit to grip.
- Use your center punch for glass (or a small nail held at an angle) to create a tiny indentation at the exact center of your marked spot. This indent will guide the tip of the drill bit and prevent it from skidding. Apply gentle taps; you don’t need to break the glass.
The Drilling Process: Step-by-Step Mastery
Now that you’re prepped, it’s time to get to work. Patience and a steady hand are your best allies here.
Step 1: Securing the Mirror (If Necessary)
- On a Workbench: If drilling a loose mirror, ensure it’s flat and won’t move. You can place a piece of scrap wood behind the mirror, directly under your marked spot. This provides a backing and can help prevent blowout on the back side of the mirror as the bit emerges. Clamp the mirror securely if using a drill press.
- Installed Mirror: If the mirror is already mounted, you’ll need to be extra careful. Ensure the wall behind it is solid and can take the slight pressure. The backing piece of wood is even more important in this scenario.
Step 2: Setting Up Your Drill
- Speed: Set your drill to a low speed setting. High speeds generate more heat, which is the enemy of glass.
- Chuck: Ensure the diamond drill bit is securely tightened in the drill chuck.
Step 3: Initiating the Hole – The Gentle Approach
- Coolant Application: Before you start drilling, apply a small pool of water or coolant around the marked spot. This is the beginning of wet drilling, which is crucial for cooling drilling. You can create a small dam with plumber’s putty or even just rely on the taped area to hold a bit of water.
- First Contact: Hold the drill at a slight angle (around 45 degrees) initially, allowing the diamond tip to make contact with the taped surface and the small indent.
- Starting the Cut: As the bit begins to cut, slowly and gently bring the drill to a perpendicular (90-degree) angle to the mirror’s surface. Maintain this angle throughout the process.
Step 4: The Drilling Action – Slow and Steady Wins
- Apply Steady, Light Pressure: Do not force the drill. Let the diamond bit do the work. Excessive pressure will cause the glass to crack.
- Maintain Cooling: Continuously apply coolant to the drilling area.
- Cordless Drill: Periodically stop drilling to add more water or coolant with a spray bottle or sponge. Don’t let the area dry out.
- Drill Press: You can often set up a continuous drip system or have a helper apply coolant.
- Listen to the Drill: You should hear a consistent grinding sound. If the pitch changes dramatically or you hear any cracking noises, stop immediately.
- Clear Debris: Periodically lift the drill bit slightly out of the hole (while it’s still spinning slowly and the area is wet) to allow the slurry of water and glass dust to escape. This prevents the bit from binding and helps with cooling.
Step 5: Emerging from the Other Side
- Reduce Pressure: As you feel the drill bit getting close to breaking through the other side of the mirror, reduce your pressure even further.
- Support the Back: If drilling a loose mirror, ensure the scrap wood backing is directly under where the bit will emerge.
- Complete the Hole: Continue drilling with very light pressure until the bit has fully passed through.
- Withdraw Carefully: Once the hole is complete, keep the drill spinning slowly as you carefully withdraw it from the mirror. This helps to smooth the edges of the hole.
Post-Drilling Care and Finishing Touches
You’ve drilled the hole – congratulations! Now for the final touches.
Cleaning Up
- Carefully remove the mirror from your work surface.
- Rinse the mirror thoroughly with clean water to remove all glass dust and coolant residue.
- Wipe dry with a soft cloth.
- Clean your work area, disposing of any glass fragments safely.
Smoothing the Edges
Even with careful drilling, mirror edges can sometimes be a bit sharp or have minor imperfections.
- Sanding (Carefully): For very minor burs, you can use a very fine-grit sandpaper (like 220 or 400 grit) or a diamond filing stone.
- Apply water or a lubricant.
- Use a light, circular motion.
- Be extremely gentle, as applying too much pressure can still cause damage.
- Mirror Repair Kits: If you have a chip or a small crack near the edge of the hole (which can happen with less than ideal drilling), specific mirror repair kits or epoxy designed for glass might be useful for sealing it, although this won’t fix a significant break.
Alternative Techniques for Cutting Glass
While drilling is the most common method for making holes, it’s worth noting other ways to manipulate glass, though not always suitable for creating precise holes within a mirror.
Scoring and Breaking
This technique is more for straight cuts or making shapes. It involves scoring the glass surface with a glass cutter and then applying pressure to snap it along the score line. This is not practical for making holes in mirrors where precision is needed, but it’s a fundamental aspect of cutting glass.
Using Specialized Glass Cutting Tools
There are various powered tools for cutting glass, such as wet saws with diamond blades. These are typically used for larger projects like cutting tile or glass sheets and are overkill for drilling a single hole in a mirror.
Essential Safety Precautions to Remember
Drilling glass carries inherent risks. Prioritizing safety is paramount.
- Eye Protection: Always wear safety glasses. Glass shards can fly unexpectedly.
- Hand Protection: Wear sturdy gloves to protect against sharp edges and potential cuts.
- Stable Base: Ensure the mirror is stable and won’t shift or fall during the process.
- Low Speed, Light Pressure: This cannot be stressed enough. Patience is key.
- Cooling is Critical: Overheating is a primary cause of mirror cracking.
- No Jerky Movements: Keep your drilling smooth and consistent.
- Work Area Awareness: Be mindful of your surroundings and anyone else in the vicinity.
Troubleshooting Common Issues
Even with the best preparation, things can sometimes go awry.
The Drill Bit is Slipping
- Check your mark: Ensure you used a center punch or nail to create a small indentation.
- Apply tape: The masking tape should help prevent slipping.
- Start at an angle: Begin drilling at a slight angle before moving to perpendicular.
The Glass is Cracking
- Reduce speed: Slow down your drill.
- Reduce pressure: Let the bit do the work.
- Increase coolant: Ensure the area is adequately cooled.
- Check the bit: Is it a genuine diamond bit? Is it worn out?
- Mirror quality: Older or lower-quality mirrors might be more brittle.
Hole Edges are Rough
- More coolant: Ensure ample cooling throughout the process.
- Gentle withdrawal: Keep the drill spinning slowly when backing out.
- Sanding: Use fine-grit sandpaper or a diamond file with water for smoothing.
Frequently Asked Questions (FAQ)
Q: Can I drill a hole in a mirror with a regular drill bit?
A: No, you cannot drill a hole in a mirror with a regular drill bit. You must use a diamond-tipped or diamond-coated drill bit specifically designed for glass drilling.
Q: How do I stop the mirror from cracking while drilling?
A: The key is to use a diamond drill bit, drill at a low speed, apply only light and steady pressure, and most importantly, keep the drilling area consistently cooled with water or a special glass coolant.
Q: What speed should I use on my drill for drilling a mirror?
A: Always use the lowest speed setting on your drill when drilling into glass or mirrors.
Q: Is it safe to drill a mirror that is already installed?
A: Yes, but it requires even more caution. Ensure the wall behind the mirror is solid and provides good support. You’ll need to manage the coolant carefully to avoid water damage to the wall or surroundings.
Q: What is the best way to cool the drill bit while drilling glass?
A: Wet drilling is essential. Use a constant supply of water or a specialized glass coolant. You can achieve this with a spray bottle, a sponge, or by creating a small dam around the drilling area to hold the liquid.
Q: My mirror chipped around the hole. Can I fix it?
A: Minor chips or burrs can sometimes be smoothed with very fine-grit sandpaper or a diamond file used with water. For more significant damage, specific mirror repair kits or clear epoxy designed for glass might help seal it, but it won’t restore the mirror’s original appearance.
Drilling a hole in a mirror is a skill that can be mastered with the right knowledge and tools. By following these detailed steps, prioritizing safety precautions, and employing proper mirror drilling techniques like wet drilling and cooling drilling, you can confidently tackle this project and achieve professional-looking results. Remember, the combination of a quality diamond drill bit, a steady hand, and ample coolant is your path to success.