
Can I cut tile with a tile saw? Yes, absolutely! Cutting tile with a tile saw is a fundamental skill for anyone undertaking a tiling project, whether it’s a backsplash, a floor, or a bathroom renovation. This guide will walk you through the process, from choosing the right saw to making precise cuts safely and effectively. We’ll cover tile saw types, including the popular wet tile saw and the less common dry tile saw, and the crucial role of a diamond blade for tile. You’ll learn about scoring tile, the nuances of cutting ceramic tile versus cutting porcelain tile, and best practices for cutting floor tile. We’ll delve into various tile cutting techniques and essential tile saw safety tips.
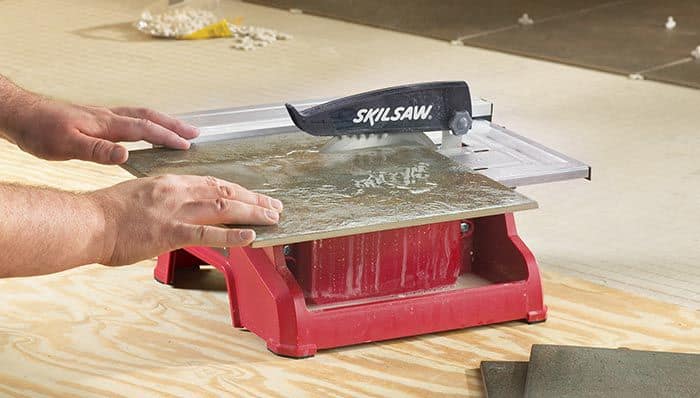
Image Source: mobileimages.lowes.com
Choosing Your Tile Saw
There are several tile saw types available, each suited for different tasks and user preferences. The most common distinction is between wet and dry saws.
Wet Tile Saws
A wet tile saw is the professional’s choice for good reason. It uses a continuous flow of water to cool the diamond blade for tile and suppress dust. This makes it ideal for cutting harder materials like porcelain and natural stone, and it drastically reduces airborne silica dust, a significant health hazard.
Advantages of Wet Tile Saws:
- Dust Control: The water dramatically reduces dust, making it a healthier choice.
- Cooler Blade: The water keeps the blade cool, preventing overheating and extending its lifespan.
- Smoother Cuts: The lubrication often results in cleaner, chip-free edges.
- Versatility: Can handle a wide range of tile materials, including porcelain and natural stone.
Disadvantages of Wet Tile Saws:
- Mess: Water can splash, creating a wet work area.
- Maintenance: Requires cleaning and refilling of the water reservoir.
- Cost: Generally more expensive than dry saws.
Dry Tile Saws
A dry tile saw operates without water. It relies on a specialized diamond blade for tile designed to withstand the heat generated by dry cutting. These saws are typically smaller and more portable, making them suitable for quick, small jobs.
Advantages of Dry Tile Saws:
- Portability: Lighter and easier to transport for small tasks.
- No Water Mess: Avoids the cleanup associated with water.
- Cost-Effective: Often less expensive than wet saws.
Disadvantages of Dry Tile Saws:
- Dust: Produces significant amounts of dust, requiring robust dust collection and personal protective equipment.
- Blade Overheating: The blade can overheat quickly, leading to reduced performance and lifespan if not managed properly.
- Chipping: Can be more prone to chipping, especially on harder tiles.
- Limited Material Range: Best suited for softer materials like ceramic tile; less ideal for porcelain or stone.
Table 1: Comparing Tile Saw Types
| Feature | Wet Tile Saw | Dry Tile Saw |
|---|---|---|
| Water Use | Yes (for cooling and dust suppression) | No |
| Dust | Minimal | Significant |
| Blade Life | Longer due to cooling | Shorter if not managed carefully |
| Material | Ceramic, porcelain, stone, glass | Ceramic, some softer natural stones |
| Portability | Moderate to Heavy | Light to Moderate |
| Mess | Water splash | Dust |
| Cost | Higher | Lower |
| Ideal For | Most tiling projects, frequent use, harder tiles | Small repairs, occasional use, softer tiles |
Essential Components of a Tile Saw
Regardless of the tile saw type you choose, understanding its key components is vital for operation and maintenance.
The Motor
The motor powers the blade. Its horsepower (HP) rating dictates its cutting capability. Higher HP motors are better for cutting porcelain tile and thicker materials.
The Blade
The diamond blade for tile is the cutting tool. Blades are categorized by their grit and the type of diamond used.
* Continuous Rim Blades: Offer the smoothest cut and are best for delicate tiles like glass or polished porcelain.
* Segmented Blades: Have gaps in the rim, allowing for faster cutting and better cooling, suitable for general-purpose cutting ceramic tile and concrete.
* Turbo Blades: Have a wavy or serrated edge, providing a balance between speed and finish, good for many types of tile.
Choosing the Right Diamond Blade:
- For Ceramic Tile: A good quality segmented or turbo blade will suffice.
- For Porcelain Tile: A high-quality, continuous rim or turbo blade with a fine grit is recommended to minimize chipping.
- For Natural Stone: Blades designed for stone, often with a continuous rim and specific diamond composition, are necessary.
The Table and Fence
The table provides a surface to support the tile, and the fence ensures straight cuts. Many tables are adjustable to allow for angled cuts.
The Water Reservoir (Wet Saws)
The reservoir holds the water that cools the blade. It typically has a pump to circulate the water.
The Blade Guard
This safety feature covers the majority of the spinning blade.
Preparing for Tile Cutting
Proper preparation is key to safe and accurate tile cutting.
Safety First: Tile Saw Safety Tips
Before you even plug in the saw, prioritize safety.
- Eye Protection: Always wear safety glasses or goggles. The spinning blade can chip off small tile fragments.
- Hearing Protection: Tile saws can be noisy. Earplugs or earmuffs are recommended.
- Dust Mask/Respirator: Absolutely crucial when using a dry saw, and good practice even with a wet saw to avoid inhaling any airborne particles. Look for a mask rated for silica dust.
- Gloves: Protect your hands from sharp edges and water.
- Appropriate Clothing: Wear sturdy, closed-toe shoes. Avoid loose clothing or jewelry that could get caught in the saw.
- Stable Work Surface: Ensure the saw is on a level, stable surface to prevent it from tipping.
- Know Your Saw: Read the manufacturer’s manual thoroughly before operating.
Setting Up Your Tile Saw
- Placement: Position your saw in a well-lit, well-ventilated area. For a wet saw, ensure it’s near a power outlet and a water source. Protect the surrounding area from water or dust.
- Water Reservoir (Wet Saw): Fill the reservoir with clean water. Some pros add a drop of dish soap to help break the surface tension and reduce splashing.
- Blade Installation: Ensure the correct diamond blade for tile is securely attached to the saw. Check the direction of rotation indicated on the blade and the saw.
Measuring and Marking Your Tile
Accuracy here is paramount.
- Measure Twice, Cut Once: Use a reliable tape measure.
- Marking: Use a pencil or a china marker to draw your cut line on the tile. For darker tiles, a silver or white marker works best.
- Considerations for Floor Tile: When cutting floor tile, always account for grout lines and the placement of the tile in the overall layout.
Mastering Tile Cutting Techniques
Once set up, it’s time to cut.
Straight Cuts
This is the most common type of cut.
- Position the Tile: Place the tile flat on the saw’s table, aligning your marked cut line with the blade.
- Use the Fence: Align the edge of the tile against the rip fence for a perfectly straight cut.
- Engage the Blade:
- Wet Saw: Turn on the saw and allow the blade to reach full speed. Gently guide the tile through the blade. Do not force it. Let the blade do the work.
- Dry Saw: Turn on the saw and let the blade spin up. Gently feed the tile into the blade.
- The Cutting Motion:
- For both cutting ceramic tile and cutting porcelain tile, a smooth, steady feed rate is essential.
- Start the cut with the leading edge of the tile against the fence.
- Slowly push the tile forward, allowing the blade to do the cutting.
- Continue pushing until the tile is completely through the blade.
- Remove the Cut Piece: Turn off the saw and wait for the blade to stop completely before removing the cut tile.
Making a 45-Degree Bevel Cut
Bevel cuts are useful for creating a clean edge where a tile meets a wall or for decorative purposes.
- Adjust the Table: Most tile saws have a tilting table or a tilting blade assembly. Adjust this to the desired angle (usually 45 degrees).
- Marking: Mark your cut line as usual.
- Position and Cut: Feed the tile through the blade at the set angle, maintaining a consistent speed.
Cutting Curves and Circles (Using a Wet Saw)
Scoring tile with a scoring tool is common for straight cuts, but for curves, a wet saw is essential.
- Marking the Curve: Draw your curve on the tile.
- Plunge Cuts: For internal curves or intricate shapes, you might need to make “plunge cuts.” This involves lowering the blade into the tile at the start of the curve.
- Wet Saw Technique: With the blade at full speed, carefully lower the blade a short distance into the tile on your marked line. Then, proceed with the curved cut. Be cautious and take small bites.
- Multiple Cuts: For tight curves, it’s often best to make a series of small, straight cuts along the curve. This allows the blade to remove small pieces of the tile, gradually forming the desired shape.
- Gentle Pressure: Always use gentle pressure and guide the tile slowly.
Making Small Cuts and Nudges
Sometimes you just need to take off a tiny sliver.
- Wet Saw: For very small adjustments, it’s often easier to use a handheld tile nipper or a wet grinder. However, if using the saw, approach with extreme caution. Position the tile carefully and make a very light, quick pass.
- Dry Saw: Similar caution is advised.
Advanced Tile Cutting Techniques
Beyond the basics, some techniques elevate your tiling.
Cutting Porcelain Tile
Cutting porcelain tile is more challenging than ceramic due to its density and hardness.
- Blade Choice: Use a high-quality diamond blade for tile specifically designed for porcelain. A continuous rim or a fine-grit turbo blade is ideal.
- Blade Speed: Ensure the blade is spinning at its optimal RPM.
- Feed Rate: Slow and steady wins the race. Don’t force the tile. Let the blade cut.
- Water Supply (Wet Saw): Maintain a consistent water flow. If the water level drops too low, the blade will overheat, reducing its effectiveness and lifespan.
Cutting Floor Tile
When cutting floor tile, consider the overall layout and the required size of each piece.
- Layout Planning: Have your floor layout plan handy. Mark each tile that needs cutting and the specific dimensions.
- Grout Line Allowance: Remember to factor in grout line spacing when measuring and marking.
- Edge Cuts: For edges that meet walls, a clean, straight cut is essential. Beveling the edge slightly can sometimes help create a tighter fit.
Scoring Tile (Alternative Method)
While a tile saw is for precise cuts, scoring tile with a manual tile cutter is an alternative for straight cuts on ceramic and some porcelain tiles.
- Marking: Mark your cut line.
- Scoring: Place the tile on a flat, stable surface. Using a manual tile cutter, firmly run the scoring wheel along your marked line. This creates a deep groove.
- Breaking: Place the tile on the edge of a table or with the score line over a straight edge. Apply firm, even pressure to snap the tile along the scored line.
- Limitations: This method is less effective for hard porcelain or intricate shapes and can lead to chipping.
Maintaining Your Tile Saw
Proper maintenance ensures your saw performs well and lasts longer.
After Each Use (Wet Saw)
- Drain and Rinse: Drain the water reservoir and rinse it thoroughly to remove debris and sludge.
- Clean the Blade: Rinse the diamond blade for tile to remove any residual slurry.
- Wipe Down: Wipe down the saw’s surfaces to prevent rust and corrosion.
- Check Water Pump: Ensure the water pump is clean and free of obstructions.
After Each Use (Dry Saw)
- Dust Removal: Use a brush or compressed air to remove dust from the motor housing, blade area, and table.
- Blade Inspection: Check the diamond blade for tile for any damage or excessive wear.
Regular Maintenance
- Blade Sharpness: A dull blade will make cutting difficult and can lead to chipping. Replace the blade when it shows signs of wear.
- Lubrication: Check the manufacturer’s recommendations for lubricating any moving parts.
- Water Filter (Wet Saw): If your saw has a water filter, clean or replace it as recommended.
Troubleshooting Common Tile Cutting Issues
Even with preparation, you might encounter problems.
Chipping or Cracking
- Cause: Dull blade, forcing the tile, using the wrong blade for the material, or insufficient water flow (wet saw).
- Solution: Use a sharp, appropriate blade. Let the saw do the work with gentle, steady pressure. Ensure adequate water flow for wet saws.
Inaccurate Cuts
- Cause: Unstable saw, worn-out fence or table, or inaccurate measuring.
- Solution: Ensure the saw is on a stable surface. Check the fence and table for damage. Always double-check measurements.
Overheating Blade
- Cause: Insufficient water (wet saw), pushing the tile too fast, or using a blade not suited for the material.
- Solution: Ensure the water reservoir is full and the pump is working. Slow down your feed rate. Use a more appropriate blade.
Frequently Asked Questions (FAQ)
What is the difference between a wet tile saw and a dry tile saw?
A wet tile saw uses water to cool the blade and suppress dust, making it better for harder materials and healthier to use. A dry tile saw cuts without water, producing dust and is generally better for softer tiles.
Can I cut porcelain tile with a ceramic tile saw?
You can, but it’s highly recommended to use a diamond blade for tile specifically designed for porcelain. Porcelain is much harder and denser than ceramic, and a blade not suited for it will dull quickly and likely result in chipped cuts.
How do I make a straight cut with a tile saw?
Align your marked line with the blade and use the saw’s fence to guide the tile. Feed the tile smoothly and steadily through the blade, letting the saw do the cutting.
Is it safe to cut tile indoors?
It is generally safer to cut tile outdoors or in a well-ventilated area. If cutting indoors, especially with a dry saw, ensure you have excellent ventilation and wear a high-quality dust mask or respirator to protect yourself from silica dust. A wet tile saw is a better option for indoor use due to its dust suppression.
How often should I change the diamond blade for tile?
The lifespan of a diamond blade for tile depends on the material being cut, the quality of the blade, and how often it’s used. You’ll know it’s time to change the blade when you notice increased chipping, slower cutting, or a dull sound when cutting.
By following these steps and tips, you can confidently approach any tiling project, making precise and clean cuts with your tile saw. Happy tiling!