
Image Source: i.ytimg.com
How To Cut Laminate Flooring Without A Saw: Simple Guide
Can you cut laminate flooring without a saw? Yes, you absolutely can! While a saw is the traditional tool for cutting laminate flooring, several other effective methods allow you to achieve clean, precise cuts without one. This guide will walk you through simple and accessible ways to tackle your DIY laminate cutting project, making a no saw laminate install a reality.
Laying laminate flooring is a popular choice for homeowners looking for an affordable and attractive flooring solution. Its click-and-lock system makes it relatively easy to install, but cutting the planks to fit around obstacles, doorways, and walls can seem daunting, especially if you don’t own a power saw or prefer not to use one. Fortunately, there are several effective hand laminate cutting techniques that produce professional-looking results. This article will explore these methods, providing you with the knowledge and confidence to complete your laminate floor installation tools arsenal with everyday items or specialized, non-saw tools.
The Essential Tools for Saw-Free Laminate Cutting
Before we dive into the techniques, let’s familiarize ourselves with the key laminate floor installation tools you might need when avoiding a saw. Each plays a crucial role in achieving accurate cuts and a seamless finish.
- Scoring Knife/Utility Knife: This is your primary tool for many saw-free methods. A sharp scoring knife or a good quality utility knife with a fresh blade is essential. Look for knives with a comfortable grip and a locking mechanism for safety.
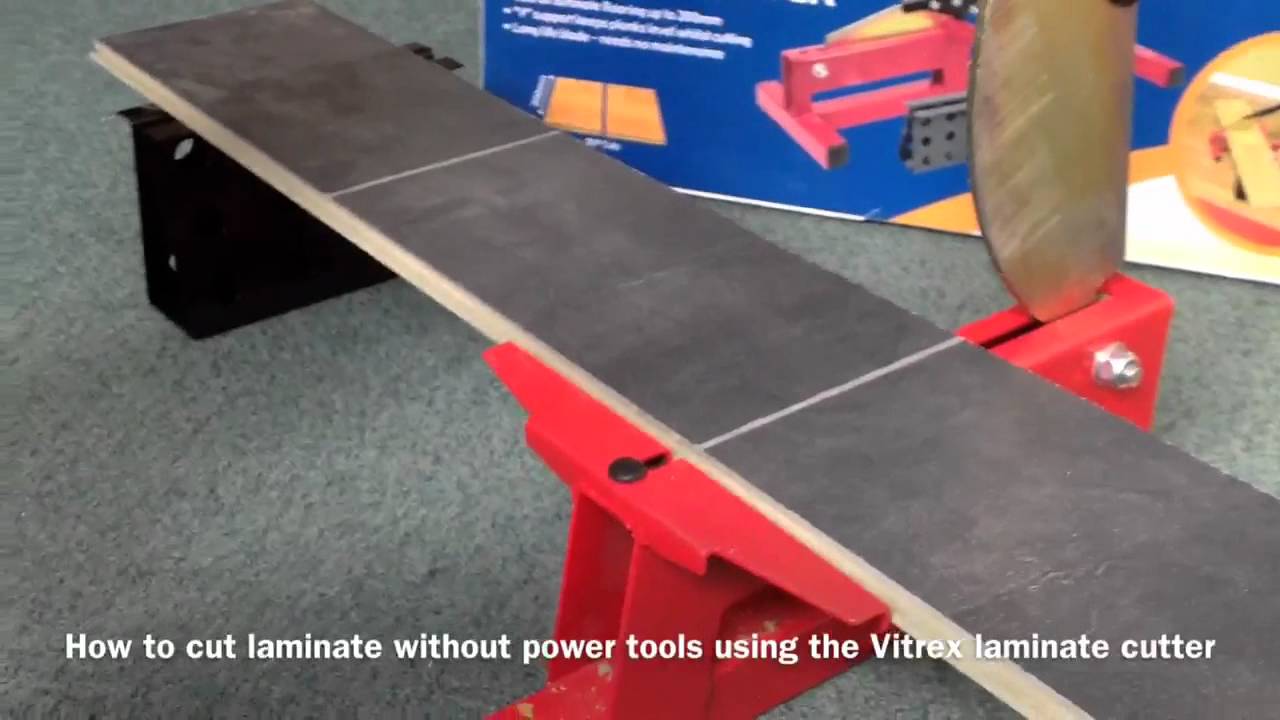
- Laminate Cutter/Snap Cutter: These specialized tools are designed specifically for cutting laminate flooring without a saw. A laminate cutter, also known as a snap cutter, offers a guillotine-like action that shears through the laminate. They are incredibly effective for straight cuts and can make the process much faster.
- Measuring Tape: Accuracy is key in any flooring project. Ensure you have a reliable measuring tape.
- Pencil or Marker: For marking your cut lines on the laminate planks.
- Straight Edge or Ruler: To guide your scoring knife for straight and clean breaks.
- Safety Glasses: Always protect your eyes, even when not using power tools.
- Work Gloves: To protect your hands from sharp edges and the scoring process.
- Knee Pads: If you’re working on the floor for extended periods.
The “Score and Snap” Method: Your Go-To for Saw-Free Cuts
The laminate score and snap technique is perhaps the most popular and accessible method for cutting laminate flooring without a saw. It relies on creating a deep score line along the desired cut path, weakening the plank, and then snapping it cleanly.
How to Master the Score and Snap
This method is excellent for both straight cuts and cuts across the width of the plank.
Step-by-Step Guide:
-
Measure and Mark:
- Place the laminate plank in position.
- Use your measuring tape to determine the required length or width.
- Use a pencil or marker to draw a clear cutting line on the top surface of the plank. Ensure the line is straight and precise.
-
Prepare for Scoring:
- Lay the laminate plank on a flat, stable surface. A workbench or sawhorses are ideal.
- Position a straight edge or ruler firmly along your marked line. This will act as a guide for your scoring knife.
-
The Scoring Process:
- Take your sharp utility knife or flooring knife.
- Apply firm, consistent pressure.
- Draw the scoring knife firmly along the marked line, using the straight edge as a guide.
- Repeat this process multiple times (typically 5-10 passes), increasing the depth of the score with each pass. The goal is to cut through the decorative layer and into the core of the laminate. You should aim to score deep enough so that the score line is clearly visible and feels substantial.
-
The Snap:
- Once you have a sufficiently deep score line, carefully lift the plank.
- Position the plank so the score line is at the edge of your workbench or support.
- Apply firm, steady pressure downwards on the part of the plank you want to remove. The plank should snap cleanly along the score line. If it doesn’t break cleanly, it means the score wasn’t deep enough, or the break isn’t aligned perfectly.
-
Refining the Cut (If Necessary):
- Sometimes, the snapped edge might have a slight rough patch or burr. You can use your scoring knife to carefully trim away any imperfections for a cleaner finish.
Tips for a Perfect Score and Snap:
- Blade Sharpness: A dull blade will make scoring difficult and result in ragged cuts. Change your blade frequently.
- Consistent Pressure: Uneven pressure can lead to an inconsistent score line and a poor snap.
- Multiple Passes: Don’t try to cut too deep in a single pass. Multiple shallow scores are more effective than one deep, uncontrolled cut.
- Support: Ensure the plank is well-supported during the scoring and snapping process to prevent it from breaking prematurely or unevenly.
- Practice: Like any skill, DIY laminate cutting using this method improves with practice. Start with a scrap piece of laminate to get a feel for it.
Using a Laminate Cutter (Snap Cutter)
For those who plan to do a significant amount of laminate flooring installation, investing in a specialized laminate cutter or snap cutter can be a game-changer. These tools are designed for efficiency and accuracy, making no saw laminate install significantly easier.
How to Use a Laminate Cutter
A laminate cutter operates like a heavy-duty paper cutter or a guillotine. It has a sharp blade that is brought down with force to shear through the laminate plank.
Step-by-Step Guide:
-
Measure and Mark:
- As with the score and snap method, accurately measure and mark your cutting line on the laminate plank.
-
Position the Plank:
- Place the laminate plank into the laminate cutter, aligning the marked line with the cutter’s blade.
- Ensure the plank is positioned correctly so the blade will make the desired cut.
-
Make the Cut:
- Apply firm, steady pressure to the handle of the laminate cutter.
- The blade will descend, shearing through the laminate plank in a single, clean motion.
-
Check the Cut:
- Lift the lever and remove the cut plank. Inspect the edge for smoothness and accuracy.
Benefits of Using a Laminate Cutter:
- Speed: Much faster than the score and snap method for repetitive cuts.
- Cleanliness: Typically produces very clean, straight cuts with minimal effort.
- Ease of Use: Requires less physical exertion than repeated scoring with a knife.
- Consistency: Offers highly consistent results once you get the hang of positioning.
Considerations for Laminate Cutters:
- Cost: They are an upfront investment, but can be cost-effective for larger projects.
- Size Limitations: Most laminate cutters are designed for standard plank widths. Check the specifications to ensure it can handle the thickness and width of your chosen laminate.
- Not for Complex Cuts: While excellent for straight cuts, they are not suitable for intricate shapes or curves.
Cutting Laminate Flooring for Angles and Curves
While the score and snap and laminate cutter methods are great for straight cuts, you’ll inevitably encounter situations requiring angled cuts (e.g., around door frames) or even curved cuts (less common but possible).
Angled Cuts with the Score and Snap Method
Achieving precise angled cuts requires careful marking and a steady hand.
-
Marking the Angle:
- Use a measuring tape and a pencil to mark the starting point of your angle.
- You might need a protractor or a piece of cardboard cut to the correct angle to accurately transfer the angle onto the laminate.
- Draw a clear line representing the angle.
-
Scoring the Angle:
- The principle remains the same: use a scoring knife and a straight edge. For angled cuts, you’ll need a longer, more rigid straight edge that can accommodate the angle. A metal ruler or a carpenter’s square can be helpful here.
- Make multiple passes along the angled line with firm pressure.
-
Snapping the Angle:
- Carefully position the plank for the snap. You might need to support both sides of the plank to ensure a clean break along the angled score.
Cutting for Obstacles (Door Frames, etc.)
When fitting laminate around door frames or other fixed objects, you’ll often need to “undercut” them. This involves cutting the laminate to fit snugly beneath the trim.
-
Template Creation:
- The best way to do this is to create a template of the area you need to fit.
- Use a piece of paper or thin cardboard.
- Trace the profile of the door frame or obstacle onto the paper, paying close attention to the baseboard and any molding.
-
Transferring to Laminate:
- Place the template on your laminate plank and trace the outline.
-
Cutting the Template:
- For straight edges of the template, use the score and snap method or a laminate cutter.
- For curved or irregular shapes, you might need to reconsider the “no saw” rule or use a jigsaw for these specific, limited cuts if precision is paramount. However, for most DIYers aiming for a no saw laminate install, fitting the straight edges under the trim with careful scoring and snapping is often sufficient, especially if the irregularity is minor.
Other Tools for Saw-Free Cutting
While the scoring knife and laminate cutter are the primary tools, other accessories can assist in hand laminate cutting.
Heavy-Duty Scissors or Shears
For very thin laminate or underlayment materials, heavy-duty scissors or specialized flooring shears might work for small cuts. However, they are generally not recommended for cutting the actual laminate flooring planks as they can crush or split the material.
Preparing for Your Laminate Installation
Before you start cutting, ensure you have all your laminate floor installation tools ready and that your subfloor is properly prepared.
Subfloor Preparation:
- Cleanliness: Ensure the subfloor is free of dust, debris, and old adhesive.
- Levelness: The subfloor must be level. Use a long, straight edge to check for high or low spots. Any imperfections can be corrected with leveling compound.
- Moisture: Check for moisture issues. Many laminate floors require a moisture barrier (vapor barrier), especially over concrete subfloors.
Acclimatization:
- Allow the laminate planks to acclimatize to the room’s temperature and humidity for at least 48-72 hours before installation. Store them flat in the room where they will be installed.
When Might a Saw Be Unavoidable?
While this guide focuses on no saw laminate install, it’s important to acknowledge that some situations might make a saw more practical or even necessary.
- Very Thick Laminate: Extremely thick or high-density laminate might be challenging to cut cleanly with manual methods.
- Complex Cuts: Intricate curves, circles, or cutouts for vents might be easier with a jigsaw.
- Speed and Volume: If you have a very large area to cover, a power saw can significantly speed up the process.
However, for the average homeowner undertaking a standard DIY laminate cutting project, the methods described above are highly effective.
Summary of Saw-Free Cutting Techniques
| Method | Description | Best For | Tools Needed | Pros | Cons |
|---|---|---|---|---|---|
| Score and Snap | Repeatedly scoring a line and then snapping the plank. | Straight cuts, width cuts, minor adjustments. | Scoring knife/utility knife, straight edge, pencil | Accessible, inexpensive, requires no special tools. | Can be time-consuming, requires practice for clean breaks. |
| Laminate Cutter | A specialized guillotine-style tool that shears through the plank. | Straight cuts, repetitive cuts. | Laminate cutter/snap cutter, pencil. | Fast, clean cuts, easy to use, consistent results. | Upfront cost, not suitable for complex shapes, size limitations. |
| Angle Cutting | Adapting the score and snap method for angled cuts. | Door frames, corners, angled adjustments. | Scoring knife, straight edge, ruler, pencil. | Allows for fitting into angled spaces without a saw. | Requires precision in marking and scoring. |
| Undercutting Trim | Cutting laminate to fit beneath baseboards or door casings. | Fitting around door frames, baseboards. | Scoring knife, pencil, possibly a template. | Creates a clean, professional look by hiding cut edges. | Requires careful measurement and precise scoring. |
Frequently Asked Questions (FAQ)
Q1: Can I really install laminate flooring without any saw at all?
A1: Yes, for most standard installations, you can effectively cut laminate flooring using a scoring knife with the laminate score and snap technique or a dedicated laminate cutter (also known as a snap cutter). These methods allow for clean, precise cuts without the need for power saws.
Q2: What is the best tool for cutting laminate flooring without a saw?
A2: The “best” tool depends on your needs. For occasional use and budget-friendliness, a sharp utility knife or scoring knife is sufficient for the laminate score and snap method. For frequent installations or if you prioritize speed and cleaner cuts, a laminate cutter or snap cutter is an excellent investment.
Q3: How do I get a straight cut with a scoring knife?
A3: To get a straight cut with a scoring knife, use a sturdy straight edge or metal ruler as a guide. Align it perfectly with your marked cutting line and apply firm, consistent pressure as you draw the knife along the edge multiple times to create a deep score.
Q4: Will the snap part of the “score and snap” method damage the laminate?
A4: If done correctly, with a deep enough score line and a clean snap, it should not damage the laminate. The score weakens the material, allowing it to break cleanly along that line. If the snap is ragged or splits the laminate, it indicates the score wasn’t deep enough or the snap wasn’t aligned properly.
Q5: Can I cut laminate flooring with scissors?
A5: For the decorative layer or underlayment, heavy-duty scissors might work for very small cuts. However, for cutting the actual laminate plank, scissors are generally not recommended as they can crush or splinter the material, leading to a poor-quality cut.
Q6: How many passes do I need to make with a scoring knife?
A6: The number of passes varies depending on the thickness and quality of the laminate, as well as the sharpness of your scoring knife. Typically, 5 to 10 firm passes, with increasing pressure, are sufficient to create a deep enough score for a clean snap.
By mastering these simple techniques, you can confidently undertake your next flooring project, making DIY laminate cutting and no saw laminate install a straightforward and rewarding experience. Happy flooring!