
A grain drill is a farm machine that plants seeds in rows at a consistent depth and spacing. It works by having a seed hopper hold the seeds, which are then fed through a metering mechanism into seed tubes. These tubes guide the seeds into furrows created by furrow openers, with press wheels firming the soil around them to ensure good seed-to-soil contact and proper planting depth.
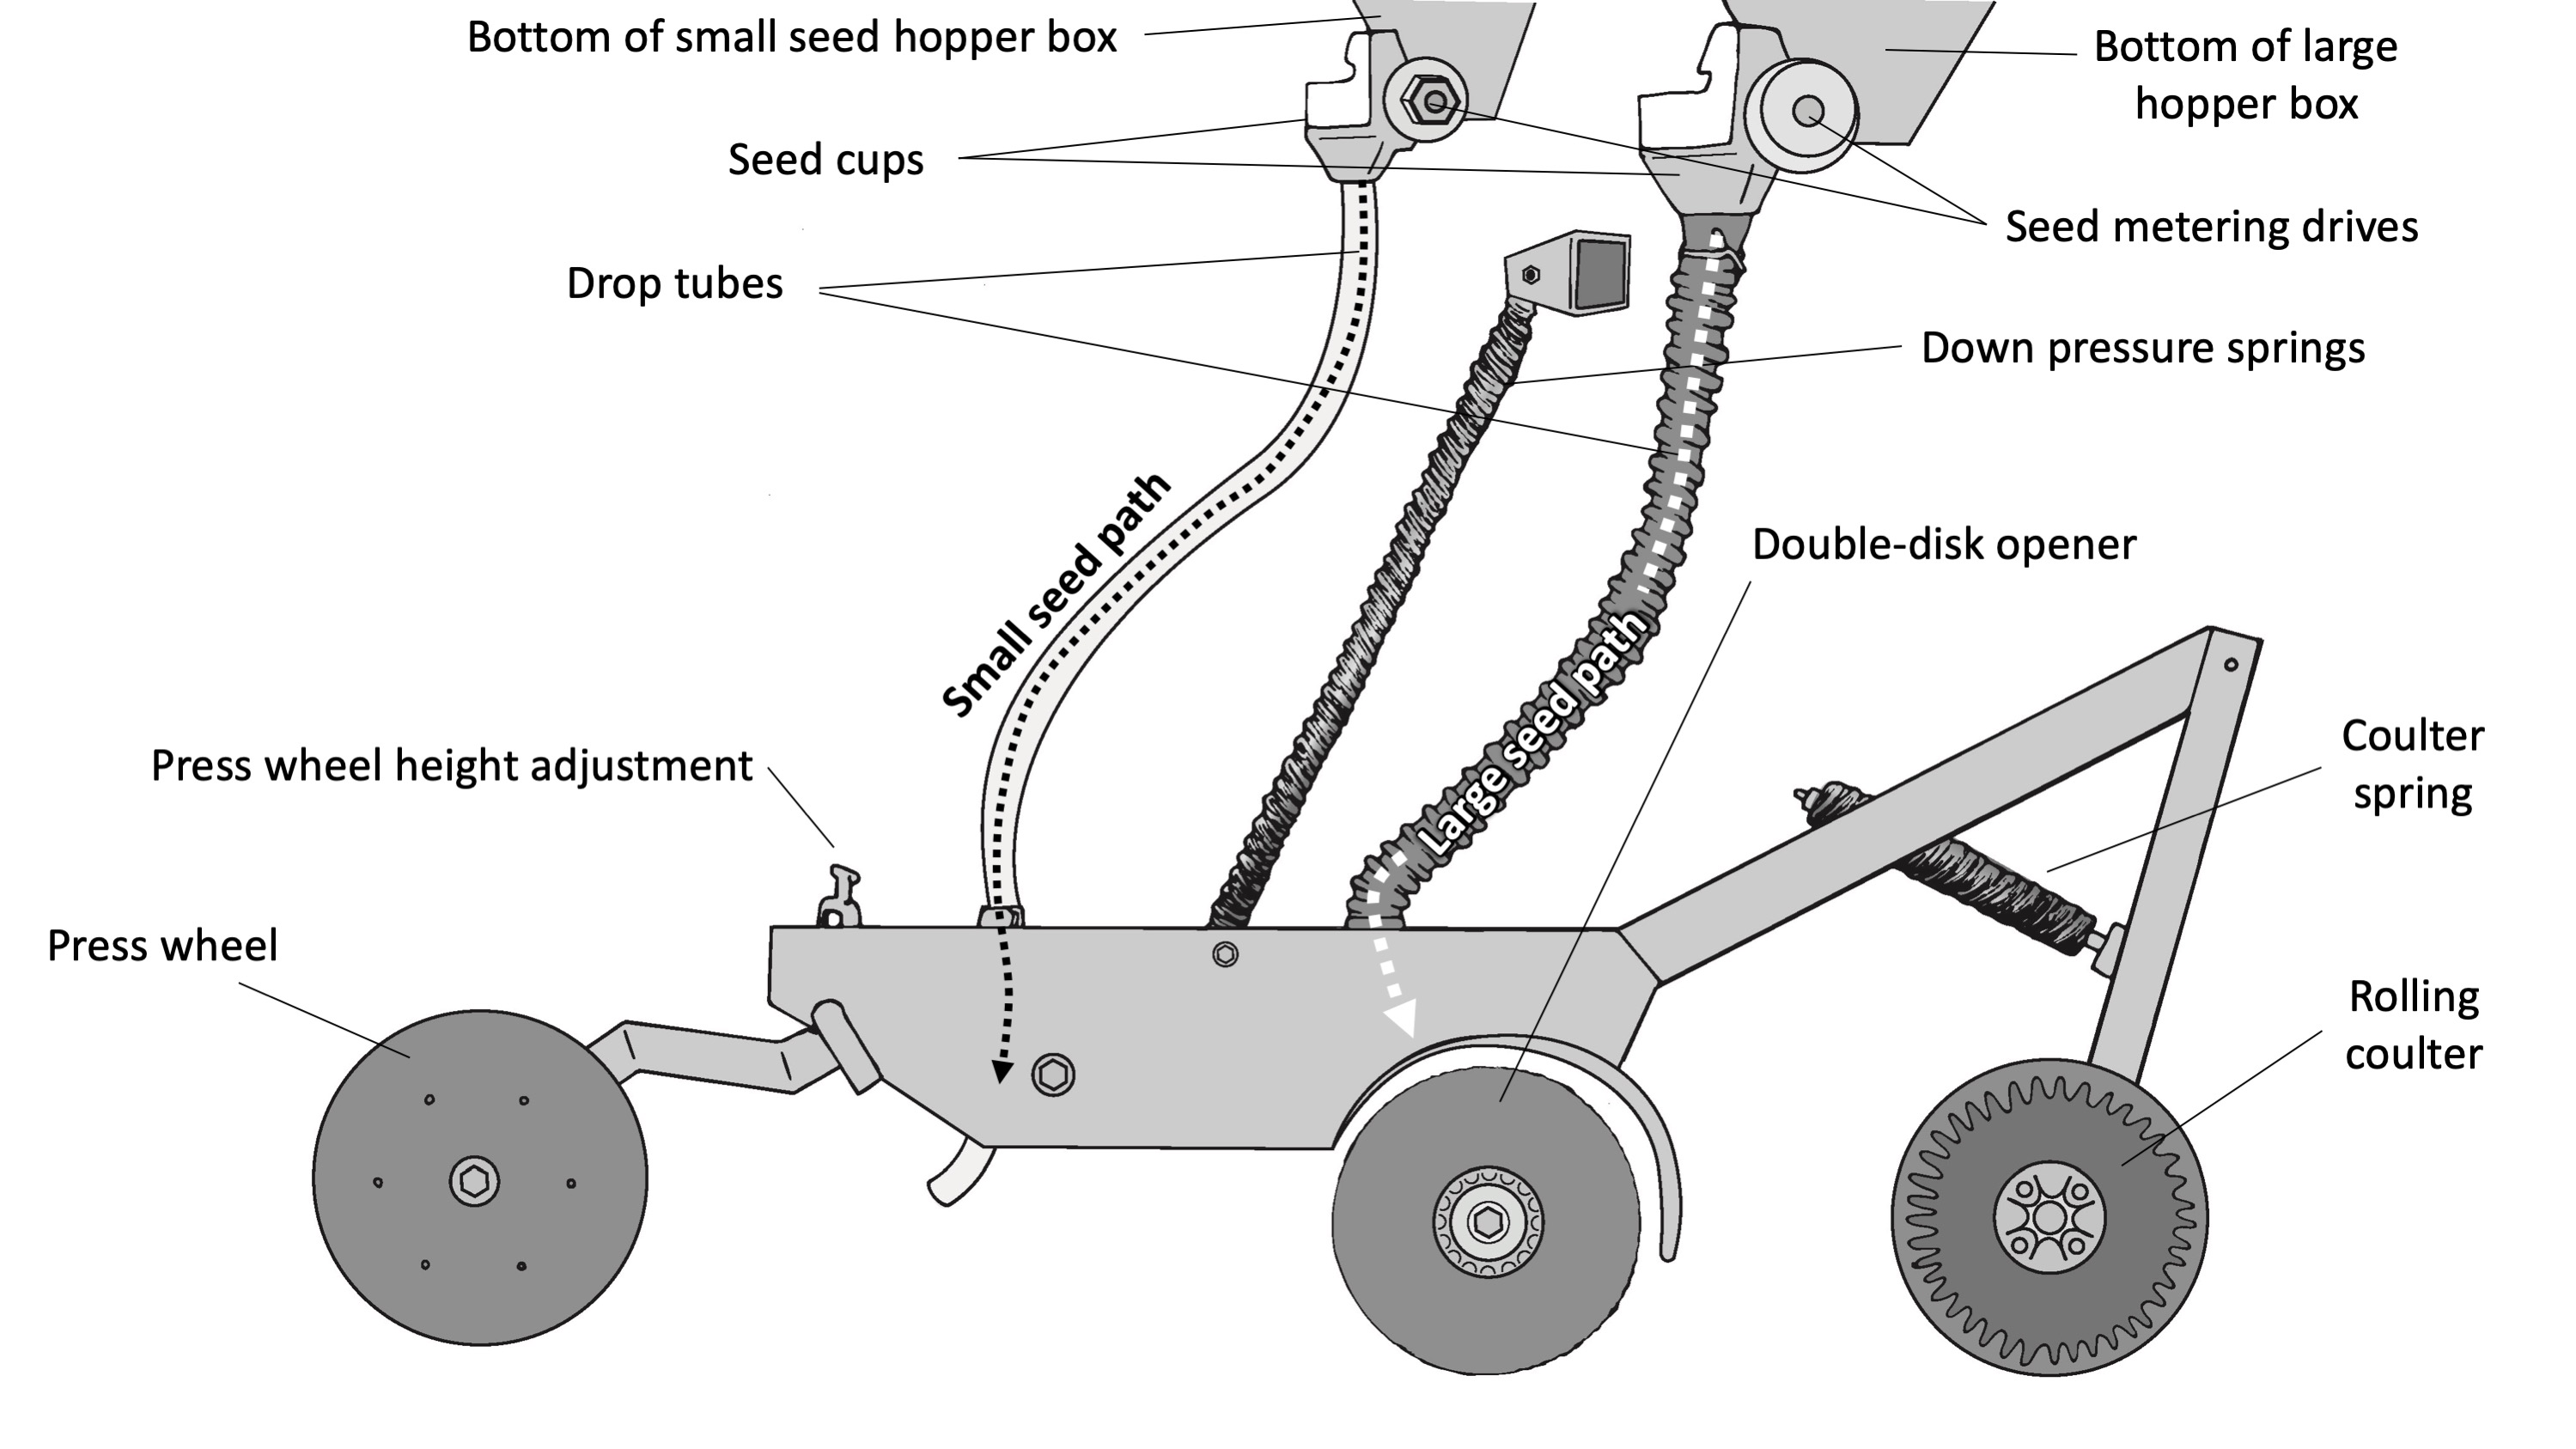
Image Source: secure.caes.uga.edu
The Core Components of a Grain Drill
A grain drill is a marvel of agricultural engineering, designed to efficiently and precisely place seeds into the soil. At its heart, it’s a system that ensures each seed gets the best possible start for healthy growth. Let’s break down the essential parts that make this vital farming tool tick.
The Seed Hopper: The Foundation of Planting
The seed hopper is the primary reservoir for your seeds. Think of it as the fuel tank for your planting operation. It’s typically a large, durable container mounted on the frame of the drill.
- Material and Design: Hoppers are often made from metal or heavy-duty plastic to withstand the rigors of farm work and the weight of a large volume of seeds. They are designed to feed seeds smoothly and evenly into the subsequent components. Some hoppers are divided to allow for planting different seed types or fertilizers simultaneously.
- Capacity: The size of the seed hopper dictates how much area you can cover before needing to refill. Larger hoppers mean fewer stops, increasing efficiency, especially on vast fields.
- Gravity Feed: In most designs, gravity plays a crucial role, pulling seeds from the hopper down towards the metering mechanism.
The Metering Mechanism: Precision Seed Placement
This is where the magic of consistent seed distribution happens. The metering mechanism is responsible for picking up individual seeds and dropping them at a predetermined rate. Without this component, seeds would either be planted too densely, leading to competition and stunted growth, or too sparsely, resulting in wasted seed and low yields.
- Types of Metering Mechanisms:
- Fluted Rollers: These are common for larger seeds like wheat, barley, or soybeans. The roller has grooves or flutes that pick up seeds and carry them to the bottom of the hopper, where they are released.
- Spiral Feeders: Similar to fluted rollers, these use a helical screw to move seeds. They offer good control for a variety of seed sizes.
- Earth Wheels/Ground Drive: Many drills are powered by the rotation of the tractor’s wheels or the drill’s own ground wheels. As the drill moves, these wheels turn, driving the metering mechanism at a speed proportional to the ground speed. This ensures consistent seed rates regardless of the tractor’s engine RPM.
- Electric/Hydraulic Drive: Modern drills often feature electric or hydraulic drives that allow for more precise control over seed rates, often adjustable from the tractor cab, and can maintain constant seed rates even when ground speed varies.
- Seed Rate Adjustment: The ability to change the seed rate adjustment is paramount. This allows farmers to tailor the planting density to the specific crop, soil conditions, and desired yield. Adjustments can be made through changing the speed of the metering mechanism, altering the engagement of the metering units, or using different-sized flutes or gears.
The Seed Tube: Guiding the Seed’s Journey
Once the metering mechanism has released a seed, it travels down the seed tube. This is a simple but critical component, a flexible or rigid conduit that guides each seed from the metering unit to the soil surface.
- Material: Seed tubes are typically made of flexible rubber or durable plastic to prevent seed damage as they pass through.
- Length and Angle: The length and angle of the seed tube are designed to ensure seeds are delivered vertically into the furrow, minimizing bouncing or scattering.
The Furrow Opener: Creating the Seed Bed
The furrow opener is the business end of the drill, the part that actually interacts with the soil. Its job is to create a narrow trench or furrow of the correct depth and width for the seed.
- Types of Furrow Openers:
- Coulters: These are sharp, disk-like blades that cut through residue and soil, creating a narrow slot. They are excellent for planting into stubble or no-till conditions.
- Single-Disk Openers: A single, angled disk cuts into the soil, forming a V-shaped furrow. They are effective in a variety of soil types but can struggle with heavy residue.
- Double-Disk Openers: These use two disks, angled towards each other, to create a more stable furrow, especially in softer soils. They offer good trash clearance.
- Chisel Points/Shanks: These are more aggressive openers that dig deeper and are often used in conservation tillage or when breaking up compacted soil is also a goal.
- Depth Control: The depth at which the furrow opener penetrates the soil is crucial for proper germination. This is often controlled by the tractor’s hydraulic system and can be adjusted to achieve the desired planting depth. Many drills have depth bands or adjustable stops on the opener arms.
The Press Wheel: Securing the Seed’s Future
After the seed has been dropped into the furrow, the press wheel follows directly behind the opener. Its primary function is to firm the soil around the seed.
- Purpose: This firming action eliminates air pockets, which can dry out the seed, and ensures good seed-to-soil contact. This contact is vital for moisture uptake and for the seed to anchor itself as it germinates and sends out roots.
- Types of Press Wheels:
- Ribbed or Pneumatic: These wheels are designed to apply consistent pressure without overly compacting the soil surface.
- Gauge Wheels: Some openers are equipped with smaller gauge wheels that control the depth of the opener itself, ensuring consistent planting depth across uneven terrain.
Covering Devices: Completing the Burial
Following the press wheel, covering devices are often employed to gently close the furrow and lightly cover the seed with soil.
- Types: These can include drag chains, spring-loaded scrapers, or small disks. Their main purpose is to ensure the seed is fully protected from drying winds and birds, while not burying it too deeply.
How It All Comes Together: The Planting Process
- Loading the Hopper: The farmer fills the seed hopper with the chosen crop seeds.
- Engaging the Drive: The tractor starts moving, and the ground drive (or electric/hydraulic system) engages the metering mechanism.
- Metering and Delivery: The metering mechanism precisely picks up seeds from the hopper and releases them down the seed tubes.
- Furrow Creation: As the drill moves forward, the furrow openers cut into the soil, creating a furrow at the set planting depth.
- Seed Drop: Seeds exit the seed tubes and fall into the freshly opened furrows, ensuring consistent seed distribution.
- Soil Firming: The press wheels immediately follow, pressing the soil around the seeds, eliminating air pockets and ensuring good seed-to-soil contact.
- Covering: Finally, covering devices gently pull soil over the seeds, protecting them and preparing the seedbed for germination.
Fine-Tuning Your Grain Drill: Calibration and Adjustment
Achieving optimal crop establishment relies heavily on correctly setting up your grain drill. This involves meticulous calibration and precise seed rate adjustment.
Calibration: The Key to Accuracy
Calibration is the process of ensuring your grain drill is delivering the exact amount of seed per acre that you intend. It’s a vital step to avoid under-seeding (low yield) or over-seeding (wasted seed, poor crop stand).
Steps for Calibration:
- Seed Hopper Preparation: Ensure the hopper is clean and free of debris.
- Set the Desired Rate: Determine the target seeding rate in pounds per acre or seeds per acre for your specific crop.
- Adjust the Metering Mechanism: Based on your desired rate and the seed size, adjust the settings on the metering mechanism (e.g., gear selection, fluted roller setting). Consult your drill’s manual for specific instructions.
- Measure and Collect Seed:
- Choose a designated area to plant, for example, 1/4 acre or 1/2 acre.
- Mark this area or use a GPS to track your travel.
- Plant the designated area, paying close attention to the drill’s settings.
- Carefully collect all the seed that was dropped in that measured area. You might need to measure the amount of seed put into the hopper before and after planting.
- Weigh the Seed: Weigh the collected seed accurately.
- Calculate the Actual Rate:
- If you planted for 1/4 acre: Actual Rate = (Weight of seed collected) x 4 x (Desired Rate / Expected Weight)
- If you planted for 1/2 acre: Actual Rate = (Weight of seed collected) x 2 x (Desired Rate / Expected Weight)
- Note: This is a simplified example. Always refer to your drill’s manual for precise calibration formulas.
- Adjust and Repeat: If the actual rate is not what you intended, readjust the metering mechanism and repeat the process until the desired rate is achieved.
Seed Rate Adjustment: Tailoring to Conditions
Seed rate adjustment is not a one-time calibration; it’s an ongoing process based on field conditions and crop needs.
- Crop Type: Different crops have vastly different seed sizes and optimal planting densities. A large soybean seed requires a different rate than a small wheat seed.
- Soil Fertility: In highly fertile soils, you might be able to plant at a slightly higher rate, while in less fertile soils, a slightly lower rate might be more appropriate to avoid excessive competition.
- Moisture Availability: In areas with limited rainfall, a lower seeding rate can help conserve moisture for fewer plants, potentially leading to better individual plant development.
- Weed Pressure: Higher seeding rates can sometimes help suppress early weed growth by shading the soil surface sooner.
- Hybrid/Variety Characteristics: Different seed varieties within the same crop species can have varying germination rates and plant vigor, which might necessitate slight adjustments to the seeding rate.
Achieving the Right Planting Depth
The planting depth is a critical factor for successful germination and seedling establishment. A seed drill is designed to deliver consistency.
- Why Depth Matters:
- Too Shallow: Seeds can dry out, be eaten by birds, or washed away by rain.
- Too Deep: Seeds may not have enough energy reserves to reach the surface, especially in heavy soils or if they are small.
- Factors Influencing Depth:
- Soil Type: Lighter, sandy soils may require slightly deeper planting than heavier clay soils to ensure adequate moisture.
- Soil Moisture: If the topsoil is dry, planting deeper to reach moisture is necessary.
- Residue Levels: High levels of surface residue can interfere with openers and affect depth control.
- Drill Settings: The primary control for planting depth is the adjustment of the furrow openers and their depth gauge wheels or the overall frame lift.
- Press Wheel Pressure: While primarily for firming, excessive press wheel pressure can sometimes cause openers to sink deeper than intended.
Ensuring Even Seed Distribution
Consistent seed distribution across the width of the drill is vital for uniform crop emergence and development.
- Causes of Uneven Distribution:
- Clogged Seed Tubes: Debris or damaged seeds can block tubes.
- Faulty Metering Mechanism: Worn flutes, gears, or agitators can lead to inconsistent seed pickup.
- Drift in Hopper: Seeds can settle unevenly in the hopper during transport, especially on uneven terrain, leading to temporary imbalances at the metering units.
- Uneven Terrain: The drill frame can tilt, affecting how seeds are fed to the metering units.
- Maintaining Evenness:
- Regularly inspect and clean seed tubes and metering units.
- Ensure agitators in the hopper are functioning correctly.
- Calibrate frequently to check for any imbalances.
- Modern drills often have features like cross-over blockage sensors that alert the operator to a problem in a specific seed run.
Maintenance and Best Practices
To ensure your grain drill performs optimally year after year, regular maintenance is essential.
- Cleaning: After each use, clean the seed hopper, metering mechanisms, seed tubes, and furrow openers to remove soil, residue, and any remaining seeds. This prevents corrosion and buildup.
- Lubrication: Lubricate all moving parts, including bearings, chains, and drive components, according to the manufacturer’s recommendations.
- Inspection: Regularly inspect all components for wear and tear. Check for damaged or worn furrow openers, dull blades, cracked seed tubes, and worn metering unit parts.
- Storage: Store the drill in a dry, protected location when not in use. Cover it to shield it from the elements.
- Tuning: Before planting season, perform a thorough check and calibration of the drill. Test all functions, adjust settings, and ensure everything is in good working order.
Frequently Asked Questions (FAQ)
What is the main function of a grain drill?
The main function of a grain drill is to plant seeds at a uniform depth and spacing, ensuring optimal seed-to-soil contact for germination and even crop establishment.
How often should I calibrate my grain drill?
It is recommended to calibrate your grain drill at least once at the beginning of the planting season. It is also advisable to re-calibrate if you change seed types, experience a significant change in field conditions, or notice inconsistencies in seed distribution.
Can I plant different types of seeds with the same grain drill?
Yes, most modern grain drills are designed to handle a variety of seed types, from small grains like wheat and barley to larger seeds like soybeans and corn. However, some adjustments to the metering mechanism and calibration will be necessary for each seed type. Some drills also have dual hoppers allowing for simultaneous planting of different seeds or seed and fertilizer.
What is the ideal planting depth for most crops?
The ideal planting depth varies by crop, soil type, and moisture conditions. Generally, seeds should be planted at a depth that ensures they are in moist soil, but not so deep that they lack the energy to emerge. For most small grains, this is typically 1 to 2 inches. Always consult specific recommendations for your crop.
What causes uneven seed distribution?
Uneven seed distribution can be caused by several factors, including clogged seed tubes, worn metering mechanisms, improper agitation in the seed hopper, and the drill operating on uneven terrain which can affect seed flow to the metering units.
How do press wheels contribute to successful planting?
Press wheels firmly press the soil around the seed after it’s placed in the furrow. This action eliminates air pockets, ensuring good seed-to-soil contact, which is crucial for moisture uptake and seedling establishment.