
Can you sharpen drill bits at home? Yes, you absolutely can sharpen drill bits at home, and it’s a worthwhile skill to master for any DIY enthusiast or professional. Keeping your drill bits sharp not only makes your work easier but also extends their lifespan and improves the quality of your drilling. Instead of constantly buying new bits, you can maintain your existing ones with a little knowledge and the right tools. This guide will walk you through the process of drill bit sharpening safely and effectively.
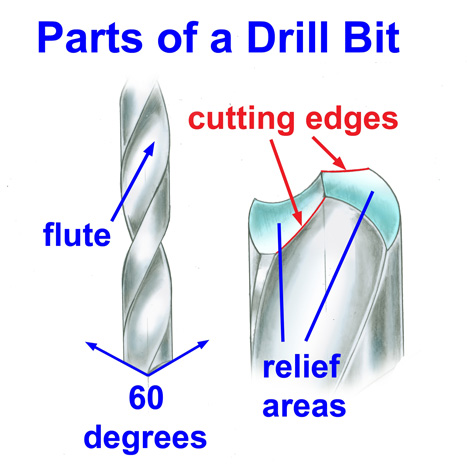
Image Source: www.gia.edu
Why Sharpen Drill Bits?
Drill bits, especially those used for metal and wood, dull over time. This dulling is a natural result of friction and contact with materials. A dull drill bit struggles to cut cleanly, requiring more force, which can lead to several problems:
- Increased Effort: You’ll need to push harder, straining your wrists and the drill itself.
- Heat Buildup: Friction from a dull bit generates more heat, which can damage the bit and the material you’re drilling.
- Poor Hole Quality: Holes will be rough, oversized, or uneven. For wood, you might get splintering. For metal, you might see burrs and a rough finish.
- Damage to Your Drill: A dull bit puts extra strain on your drill’s motor, potentially shortening its life.
- Reduced Efficiency: You’ll work slower and less effectively.
Regularly sharpening dull drill bits ensures they perform optimally, making your projects smoother and more enjoyable.
What You’ll Need for Drill Bit Sharpening
Before you begin sharpening drill bits at home, gather the necessary equipment. The tools you choose will depend on the type of drill bit and the method you employ.
Essential Tools:
- Safety Glasses: Always protect your eyes from metal shavings and debris.
- Gloves: Protect your hands from sharp edges and heat.
- Drill Bits: The bits you intend to sharpen.
- Sharpening Device: This could be a manual sharpener, a bench grinder, or a specialized jig.
Sharpening Devices:
- Manual Drill Bit Sharpeners: These are portable and relatively inexpensive. They typically have abrasive wheels or discs designed to match common drill bit angles.
- Bench Grinder: A powerful tool for sharpening, but it requires more skill and control to avoid overheating and damaging the bit. You’ll likely need a jig for precise sharpening.
- Drill Bit Grinder (Dedicated): These are standalone machines specifically designed for sharpening drill bits. They often include built-in jigs and offer greater precision and ease of use.
- Dremel or Rotary Tool: With the right attachments, a rotary tool can be used for hand drill bit sharpening. This offers flexibility but requires a steady hand.
Additional Helpful Items:
- Vise: To hold the drill bit or the sharpening device securely.
- Magnifying Glass or Loupe: To inspect the cutting edges closely.
- Marking Pen: To mark the bit for reference.
- Coolant or Water: To keep the bit cool during grinding, especially with a bench grinder.
Methods for Sharpening Drill Bits
There are several ways to approach drill bit sharpening. The best method for you will depend on your tools, the type of bits you have, and your comfort level. We’ll cover hand drill bit sharpening and methods using powered tools.
1. Manual Drill Bit Sharpeners
These are a great entry point for sharpening drill bits at home, especially for common twist drills.
How to Use a Manual Drill Bit Sharpener:
- Select the Right Slot: Most manual sharpeners have different slots for various drill bit sizes. Match your bit to the appropriate slot.
- Insert the Bit: Place the drill bit firmly into the designated slot.
- Angle and Rotate: Hold the sharpener at the correct angle (usually indicated on the device) and rotate the drill bit against the abrasive surface. Some sharpeners have a handle you turn to rotate the bit.
- Apply Light Pressure: Let the abrasive do the work. Excessive pressure can overheat or damage the bit.
- Sharpen Both Cutting Edges: Ensure you sharpen both sides of the cutting edge evenly.
- Check Progress: Periodically remove the bit to inspect the cutting edge. You should see a freshly ground edge.
- Repeat for All Bits: Work through your collection of dull bits.
Pros:
* Easy to use.
* Portable.
* Inexpensive.
* Good for general-purpose bits.
Cons:
* May not provide the sharpest edge for critical applications.
* Limited control over the exact angle.
* Can be less effective on larger or specialized bits.
2. Bench Grinder Sharpening
A bench grinder is a powerful tool, but it requires precision to avoid ruining your drill bits. Sharpening metal drill bits on a bench grinder is common, but proper technique is crucial.
Safety First:
- Always wear safety glasses and gloves.
- Ensure the grinding wheel is in good condition and properly mounted.
- Keep the tool rest adjusted close to the wheel.
Sharpening Twist Drills on a Bench Grinder:
- Set Up: Adjust the tool rest on your bench grinder to a shallow angle, typically around 20 degrees.
- Hold the Bit: Grasp the shank of the drill bit firmly with your dominant hand. Use your other hand to guide the bit.
- Position the Bit: Bring the heel (the thicker part of the flute) of the drill bit against the grinding wheel.
- Angle and Grind: As you grind, pivot the drill bit slightly so that the cutting edge contacts the wheel. The angle of the bit relative to the wheel should be maintained to create the correct clearance angle. You want to grind the bevel on the cutting lip.
- Rotate and Alternate: Grind one side of the cutting lip for a few seconds, then rotate the bit to grind the other side. Alternate between sides, applying light, consistent pressure.
- Cool the Bit: Dip the bit in water or a coolant periodically to prevent overheating, which can ruin the temper of the steel. Overheating will make the bit brittle.
- Check the Angle: Aim for a consistent bevel angle on both sides of the cutting lip. For most general-purpose bits, the primary clearance angle is around 12-15 degrees. The secondary clearance angle is usually a bit higher.
- Grind the Web Thinning (Optional but Recommended): As bits get resharpened, the “web” (the solid core in the center) thickens, making it harder for the bit to penetrate. You can grind the tip of the web to a point or a chisel shape to improve starting and reduce “wandering.” This is a more advanced technique.
- Inspect: Use a magnifying glass to check the sharpness and symmetry of the cutting edges.
Pros:
* Can achieve very sharp edges.
* Fast for sharpening multiple bits.
* Suitable for a wide range of bit materials.
Cons:
* Requires skill and practice.
* High risk of overheating and damaging the bit if not careful.
* Can be difficult to maintain the correct angles without a jig.
3. Dedicated Drill Bit Grinders
These machines are designed with jigs to hold the drill bit at the correct angles, making the process much simpler and more precise.
How to Use a Drill Bit Grinder:
- Select the Correct Collet: Most drill bit grinders come with interchangeable collets to hold different sizes of drill bits securely. Insert the collet that matches your drill bit shank.
- Insert the Drill Bit: Place the drill bit into the collet and tighten it.
- Align the Bit: The grinder’s jig will guide the bit to the grinding wheel at the correct angle for sharpening. Follow the manufacturer’s instructions for aligning the bit.
- Grind: Turn on the grinder. The machine will typically rotate the bit automatically or guide you through the rotation process against the abrasive wheel.
- Cooling: Many drill bit grinders have built-in cooling systems or recommend periodic dipping in water.
- Sharpen Both Sides: Ensure both cutting edges are sharpened evenly.
- Inspect: After sharpening, check the edges for sharpness and symmetry.
Pros:
* Highly accurate and consistent results.
* Easy to use, even for beginners.
* Reduces the risk of overheating.
* Often sharpens bits quickly.
Cons:
* More expensive than manual sharpeners.
* Takes up more space.
4. Rotary Tool (Dremel) Sharpening
This method offers a good balance of precision and control for hand drill bit sharpening.
How to Use a Rotary Tool for Sharpening:
- Choose the Right Attachment: You’ll need a grinding stone or a specialized drill bit sharpening attachment for your rotary tool. Grinding stones designed for metal are usually suitable.
- Secure the Bit: Place the drill bit in a small vise or clamp. A steady grip is essential.
- Set Up the Rotary Tool: Hold the rotary tool firmly. You might want to use a flex shaft attachment for better maneuverability.
- Grind the Bevel: Carefully bring the grinding stone to the cutting lip of the drill bit. Rotate the bit slowly as you grind the bevel. Aim for a consistent angle, similar to the bench grinder method.
- Cooling: Dip the bit in water frequently to prevent overheating.
- Sharpen Both Sides: Ensure both cutting edges are sharpened evenly.
- Inspect: Check the sharpness with a magnifying glass.
Pros:
* Versatile tool with other uses.
* Good control over the sharpening process.
* Relatively inexpensive if you already own a rotary tool.
Cons:
* Requires a very steady hand.
* Can be slow for large quantities.
* Risk of removing too much material if not careful.
Sharpening Different Types of Drill Bits
The materials and geometry of different drill bits require slightly different approaches to drill bit sharpening.
Sharpening Metal Drill Bits:
Sharpening metal drill bits (like HSS – High-Speed Steel) is common. The key is to maintain the correct lip angle and clearance angle to ensure they cut effectively without overheating. The typical lip angle for metal bits is 118 degrees, though some variations exist. The clearance angle, which prevents the flank of the bit from rubbing against the hole wall, is usually between 12 and 15 degrees.
- Key considerations: Use a fine-grit grinding wheel or stone. Cool the bit frequently to preserve its hardness. Ensure both cutting edges are identical.
Sharpening Wood Drill Bits:
Wood bits, especially brad-point bits, have different cutting geometries. The primary goal is to maintain the sharp point and the cutting spurs.
- Brad-Point Bits: These have a central point that pierces the wood, preventing the bit from wandering. You’ll want to sharpen the central point and the outer cutting edges (often called spurs). A fine-grit stone or file can be used. Be careful not to blunt the central point.
- Spade Bits: These are simpler. You’re essentially sharpening the leading edges that slice the wood. A file or a bench grinder with a controlled touch can work.
- Forstner Bits: These are more complex. They have a pilot point and radial cutting edges. Sharpening these accurately usually requires specialized jigs or careful work with a sharpening stone or rotary tool. The goal is to sharpen the outer circumference and the heel of the spurs.
Sharpening Masonry Bits:
Masonry bits (often with carbide tips) are generally harder to resharpen effectively at home. While some basic touch-ups might be possible on the carbide tip with a diamond grinding wheel, their effectiveness diminishes significantly with resharpening. It’s often more practical to replace them when dull.
What is a Jig for Sharpening Drill Bits?
A jig for sharpening drill bits is a device that holds the drill bit at a precise angle and guides it against the grinding wheel or abrasive surface. This eliminates the guesswork and makes it easier to achieve consistent, accurate sharpening angles.
- Types of Jigs:
- Bench Grinder Jigs: These attach to a bench grinder and have guides or holders for various drill bit sizes and angles.
- Handheld Sharpening Jigs: Some manual sharpeners incorporate a jig-like mechanism for better control.
- Rotary Tool Jigs: Specialized attachments for rotary tools can act as jigs.
Using a jig significantly improves the quality of your drill bit sharpening, especially if you’re using a bench grinder.
The Importance of the Cutting Angle and Clearance Angle
When sharpening twist drills, two angles are critical:
- Lip Angle (or Cutting Angle): This is the angle formed at the very tip of the drill bit. For most general-purpose bits, it’s 118 degrees. This angle determines how aggressively the bit cuts.
- Clearance Angle (or Relief Angle): This is the angle behind the cutting lip. It prevents the flank of the drill bit from rubbing against the wall of the hole. Without sufficient clearance, the bit will bind and generate excessive heat. A typical clearance angle is 12-15 degrees.
Table 1: Common Drill Bit Angles
| Drill Bit Type | Typical Lip Angle | Typical Clearance Angle | Notes |
|---|---|---|---|
| General Purpose Metal | 118 degrees | 12-15 degrees | Can vary slightly for different metals. |
| Soft Metals (Aluminum) | 90-118 degrees | 12-15 degrees | Sharper angle for softer materials. |
| Hard Metals | 135-140 degrees | 12-15 degrees | Wider angle for better stability and reduced heat. |
| Wood | 118 degrees | 12-15 degrees | Often has a pilot point and spurs for cleaner entry. |
Getting these angles correct is crucial for effective drill bit honing and performance.
Tips for Safe and Effective Sharpening
- Start with a Clean Bit: Remove any dirt, grease, or old cutting fluid.
- Don’t Overheat: This is the most common mistake. Overheating (tempering) the bit will soften the cutting edge, making it useless. Dip the bit in water frequently.
- Grind Evenly: Ensure both cutting edges are sharpened to the same angle and length. An asymmetrical bit will wobble and cut poorly.
- Light Pressure: Let the abrasive material do the work. Forcing the bit can damage the abrasive and the bit.
- Inspect Regularly: Use a magnifying glass to check your progress. You want a clean, sharp bevel.
- Match the Grinding Wheel Grit: Use a finer grit wheel for sharpening and a coarser grit for shaping or repairing.
- Know Your Bit Material: Different materials require different sharpening approaches and cooling methods.
- Practice on Old Bits: If you’re new to sharpening drill bits at home, practice on bits you don’t mind potentially damaging.
Frequently Asked Questions (FAQ)
How often should I sharpen my drill bits?
This depends on how often you use them and what materials you drill. If you notice your drill bits are struggling to cut, producing rough holes, or requiring excessive force, it’s time to sharpen them. For heavy use, you might need to sharpen them regularly.
Can I use a diamond file to sharpen drill bits?
Yes, diamond files or diamond grinding stones are excellent for sharpening metal drill bits, especially for touch-ups or when precision is needed. They are very hard and durable.
Will sharpening shorten the life of my drill bits?
Sharpening removes material from the bit. However, if done correctly, the amount of material removed is minimal, and the extended lifespan from having a sharp, efficient bit far outweighs the small amount of material lost. A poorly sharpened or overheated bit will fail much faster.
What’s the best way to sharpen a large drill bit?
Larger drill bits can be more challenging to sharpen with hand tools. A bench grinder with a suitable jig or a dedicated drill bit grinder is usually the most effective method for larger bits.
How do I know if I’ve removed too much material?
If you grind the “web” of the drill bit too thin, or if the cutting edges become uneven or much shorter than they should be, you’ve likely removed too much material. A properly sharpened bit will retain most of its original length.
Can I sharpen cobalt drill bits?
Yes, cobalt drill bits can be sharpened, but they are harder than standard HSS bits. You’ll need a good quality grinding wheel, preferably one designed for harder metals, and you must be diligent about cooling to prevent damage. Diamond wheels are often recommended for cobalt.
By following these guidelines and practicing with the right tools, you can confidently sharpen your drill bits at home, saving money and improving your woodworking and metalworking results. Effective drill bit sharpening is a skill that pays dividends in efficiency and quality.