
Creating holes in rock is a fundamental process in many fields, from construction and mining to art and geology. Whether you need to install anchors, prepare for blasting, or simply craft a unique stone sculpture, the method you choose depends on the rock type, the desired hole size, and the depth required. Can you drill holes in rocks with common household tools? Generally, no. Specialized rock drilling tools and techniques are necessary. This guide will walk you through the essential rock drilling techniques and equipment for successfully creating holes in rock.
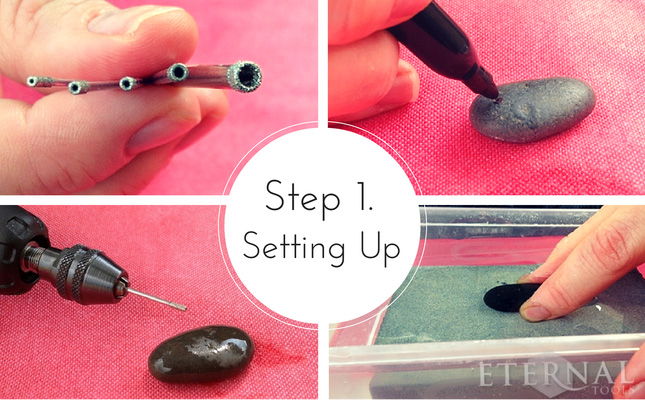
Image Source: theme-assets.ecommercedns.uk
Fathoming Rock Properties for Drilling
Before you even pick up a drill, it’s crucial to grasp the nature of the rock you’re working with. Different stones have vastly different characteristics that influence the drilling process.
Rock Hardness and Strength
The hardness of a rock is a primary factor. Softer rocks like sandstone or shale are easier to penetrate than harder ones like granite or basalt. Hardness is often measured on the Mohs scale, where talc is 1 (very soft) and diamond is 10 (very hard).
- Mohs Hardness Scale:
- Talc (1)
- Gypsum (2)
- Calcite (3)
- Fluorite (4)
- Apatite (5)
- Orthoclase Feldspar (6)
- Quartz (7)
- Topaz (8)
- Corundum (9)
- Diamond (10)
The compressive strength of the rock also plays a significant role. A rock that is hard but brittle might fracture easily, while a tough, strong rock will resist penetration.
Rock Abrasiveness
Some rocks contain abrasive minerals, such as quartz or feldspar. These minerals can rapidly wear down drill bits, reducing their effectiveness and lifespan. This is especially important when selecting drilling equipment for stone.
Rock Porosity and Fracturing
Porous rocks might absorb water or debris, which can affect drilling. Naturally fractured rocks can break apart unpredictably during the rock hole drilling process, making it harder to maintain a clean hole.
Essential Drilling Equipment for Stone
Choosing the right tools is paramount for efficient and safe rock drilling. The market offers a variety of types of rock drills and bits, each suited for different applications.
Types of Rock Drills
The selection of a drill depends on the scale of the project and the power source available.
- Hammer Drills (Rotary Hammer Drills): These are excellent for medium-duty tasks. They combine a hammering action with rotation, making them effective for drilling into concrete and masonry, and some softer rocks. They are often used for drilling stone for anchors.
- Demolition Hammers (Jackhammers): While primarily for breaking rock, smaller versions can be used for creating larger holes or channels in softer rock formations. They deliver a powerful impact but lack precision for fine work.
- Rotary Drills with Masonry Bits: Standard rotary drills can be used for very soft rocks or when making small pilot holes. However, they rely solely on rotation and can overheat or bind quickly in harder materials.
- Core Drills: These drills use a hollow, cylindrical bit to extract a core of material. They are ideal for creating precise, clean-cut holes, often used in geological sampling or when precise openings are needed.
- Percussion Drills: These are more heavy-duty than hammer drills and are designed specifically for rock drilling. They employ a powerful piston mechanism to drive the drill bit forward with rapid impacts.
- Diamond Core Drills: These use diamond-tipped bits and a water-cooling system. They are the go-to for drilling hard, abrasive materials like granite, marble, and engineered stone, offering precision and a clean finish. They are excellent for creating holes in rock where dust control is critical.
- Down-the-Hole (DTH) Hammers: These are powerful tools used in large-scale mining and construction for deep rock bore drilling. The hammer mechanism is located directly behind the drill bit, delivering maximum impact energy.
- Top Hammer Drills: These drills are typically mounted on rigs and use a pneumatic hammer located at the top of the drill string. They are versatile and used for a wide range of applications, including drilling rock for excavation.
Drill Bits for Rock
The drill bit is the cutting edge, and its material and design are critical.
- Carbide-Tipped Bits: These are common for hammer drills and percussion drills. The carbide tip is brazed onto a steel shank, providing hardness to cut into rock. Different carbide shapes (chisel, cross-point, star) offer varying performance.
- Diamond Bits: For the hardest rocks, diamond bits are essential. The cutting surface is impregnated with diamond particles or has diamond segments brazed onto a metal core. They are often used with water to cool the bit and flush away debris.
- Core Bits: As mentioned, these are specialized bits that cut a circular hole, leaving a solid core. They can be either carbide-tipped or diamond-impregnated.
- Augers: While not typically used for solid rock, augers are used for drilling in softer, unconsolidated ground that might be encountered above rock layers.
Ancillary Equipment
- Water Supply: For many rock drilling applications, a water supply is crucial for cooling the drill bit and suppressing dust. This can be a simple hose or a more complex water tank and pump system.
- Dust Collection System: In sensitive environments, a dust collection system is vital to manage rock dust, which can be harmful.
- Compressors: Pneumatic drills require a powerful air compressor to operate.
- Safety Gear: Absolutely essential includes safety glasses or a face shield, hearing protection, gloves, and sturdy footwear. A dust mask or respirator is also critical when dealing with rock dust.
Step-by-Step Guide to Drilling Holes in Rocks
The process for rock hole drilling can be broken down into several key stages.
Step 1: Planning and Preparation
This initial phase is critical for safety and success.
- Identify the Rock Type: As discussed, this dictates your tool and technique.
- Determine Hole Requirements: What is the desired diameter, depth, and precision?
- Mark the Drilling Location: Use chalk, marker, or a center punch to precisely mark where the hole should start. A center punch is particularly useful on hard surfaces to prevent the drill bit from wandering.
- Clear the Area: Remove any loose debris, vegetation, or obstacles around the drilling site.
- Set Up Safety Measures: Ensure the area is well-ventilated if indoors. If working outdoors, be aware of your surroundings. Wear all appropriate safety gear.
- Secure the Rock (if possible): If you are drilling a smaller rock or a section of rock that can be moved, ensure it is stable and won’t shift during drilling. For larger formations, the natural stability of the rock is usually sufficient, but be mindful of any existing cracks or weaknesses.
Step 2: Setting Up the Drill
Proper setup ensures efficient drilling and prolongs the life of your equipment.
- Mounting the Drill: If using a larger drill rig, ensure it is positioned stably on level ground. For handheld drills, ensure a firm grip and a stable stance.
- Attaching the Bit: Select the correct drill bit for the rock type and hole size. Ensure it is securely attached to the drill chuck.
- Connecting Power and Water: Connect the drill to its power source (electricity, battery, or air compressor). If using a water-cooled system, connect the water supply.
Step 3: Initiating the Hole
The start of the hole requires a gentle approach to prevent the bit from slipping.
- Start Slowly: Begin drilling at a slow speed.
- Apply Gentle Pressure: Don’t force the drill initially. Let the bit bite into the surface.
- Use a Center Punch: For hard surfaces, a sharp center punch mark provides a divot for the drill bit to sit in, preventing it from skittering.
- Maintain a 90-Degree Angle: Keep the drill perpendicular to the surface for a straight hole. A drill guide or stand can help with larger drills.
Step 4: The Drilling Process
This is where the bulk of the work happens.
- Apply Consistent Pressure: Once the hole is started, apply steady, firm pressure. Let the drill do the work.
- Control Speed: Adjust the drill speed based on the rock’s resistance and the bit’s performance. Faster speeds generate more heat, which can dull carbide bits quickly. Diamond bits often perform better at moderate speeds.
- Use a Percussion/Hammer Action (if applicable): Engage the hammer function on suitable drills. This action pulverizes the rock, making it easier to remove.
- Clear Debris (Pecking): Periodically, withdraw the drill bit from the hole while it’s still spinning (pecking). This removes the pulverized rock (cuttings) and prevents the hole from becoming clogged, which can cause the bit to overheat and bind. For deeper holes, this is crucial.
- Use Water for Cooling and Dust Control: If you have a water supply, ensure it’s running. Water cools the drill bit, prolonging its life, and suppresses the fine rock dust that can be a health hazard and obscure your view. The water also helps flush out cuttings.
- Monitor for Overheating: Feel the drill motor and the drill bit. If they feel excessively hot, stop drilling and allow them to cool.
Step 5: Reaching the Desired Depth
As you approach the target depth, adjust your technique.
- Reduce Pressure: As you near the desired depth, ease up on the pressure to avoid splintering or breaking the rock around the exit point.
- Maintain Stability: Ensure the drill remains steady to achieve a clean finish.
- Final Withdrawal: Once the desired depth is reached, slowly withdraw the drill bit from the hole while it is still spinning gently to clear any remaining debris.
Step 6: Cleaning and Inspection
A clean hole is often essential for its intended purpose.
- Flush the Hole: If you used water, flush the hole with more water to remove any remaining dust or debris. You might need to use a brush or compressed air to thoroughly clean it out, especially if water wasn’t used.
- Inspect the Hole: Check for any cracking, splintering, or other damage around the hole.
Specific Stone Drilling Methods
Different applications require tailored stone drilling methods.
Drilling Stone for Anchors
When drilling stone for anchors, precision and a clean hole are key.
- Marking: Accurately mark the anchor point.
- Bit Selection: Use a carbide-tipped masonry bit or a diamond bit of the correct diameter for the anchor.
- Drilling: Start slowly and apply firm, consistent pressure. Use hammer action if appropriate for the rock and drill. Periodically clear the hole.
- Cleaning: Thoroughly clean the hole using a brush and compressed air or water to ensure the anchor adheres properly.
- Anchor Installation: Insert the anchor according to the manufacturer’s instructions.
Drilling Rock for Excavation
For larger projects like drilling rock for excavation, specialized equipment and techniques are used.
- Blast Hole Drilling: This involves creating deep, precise holes (blast holes) into which explosives are placed.
- Equipment: Heavy-duty rotary drills, DTH hammers, or top hammer drills are used.
- Technique: Holes are drilled in patterns based on geological surveys. Water flush or air flush is used.
- Process: Deep holes are drilled, often with multiple rounds of drilling and blasting.
- Tunneling and Shaft Sinking: Similar to blast hole drilling but on a much larger scale, requiring specialized tunnel boring machines (TBMs) or large drilling rigs.
Creating Holes in Rock for Artistic Purposes
When creating holes in rock for art or decoration, precision and aesthetics are paramount.
- Material Choice: Artists often work with softer stones like soapstone, alabaster, or marble, but also with harder materials like granite.
- Tools: Diamond core drills and smaller rotary tools with diamond bits are common. Hand tools like chisels and rasps are also used for shaping after drilling.
- Technique: Patience is key. Slow, controlled drilling with ample cooling and dust management is essential for intricate designs. Multiple passes with progressively larger bits might be necessary to achieve the desired hole size and finish.
Maintaining Your Rock Drilling Tools
Proper maintenance ensures longevity and performance.
- Drill Bit Care:
- Keep bits sharp. Carbide bits can be resharpened, but diamond bits wear down and eventually need replacement.
- Avoid overheating. Take breaks to let bits cool.
- Store bits properly to prevent damage.
- Drill Maintenance:
- Clean your drill regularly, especially after dusty work.
- Check brushes (on corded drills) for wear.
- Lubricate moving parts as per the manufacturer’s instructions.
- Inspect cords and connections for damage.
Common Challenges and Solutions in Rock Drilling
Even with the right tools, rock bore drilling can present difficulties.
- Bit Wandering:
- Problem: The drill bit starts to slide or wander across the rock surface.
- Solution: Use a center punch mark, a drill guide, or start with a smaller pilot hole.
- Overheating:
- Problem: The drill bit or motor gets too hot.
- Solution: Reduce drilling pressure, take breaks for cooling, use water for cooling, or use a more appropriate drill bit.
- Binding:
- Problem: The drill bit gets stuck in the hole.
- Solution: Stop drilling immediately. Try to carefully reverse the drill. Ensure you are clearing debris effectively. Using water can help loosen the bit.
- Splitting or Cracking:
- Problem: The rock breaks or cracks around the hole, especially near the exit point.
- Solution: Reduce drilling pressure, especially as you approach the desired depth. Ensure the rock is stable.
Frequently Asked Questions (FAQ)
What is the best drill bit for drilling granite?
For granite and other very hard stones, diamond-tipped core bits or diamond-impregnated bits are essential. Carbide-tipped bits will wear out very quickly.
How do I keep my drill bit cool when drilling rock?
Using a water supply to constantly cool the drill bit is the most effective method. If water isn’t an option, take frequent breaks to allow the bit to cool down.
Can I drill through any rock?
While it’s possible to drill through most rocks with the right equipment, some extremely hard or dense formations might require specialized industrial-grade drilling machinery. For DIY projects, focusing on softer to moderately hard stones is more practical.
How deep can I drill into rock?
The depth you can drill depends entirely on the type and power of the drill and the length of the drill bit or extension rods used. Small handheld drills are typically limited to shallow holes, while industrial rigs can drill hundreds or thousands of feet deep.
Do I need a special drill for stone?
Yes, for consistent and efficient results, a specialized drill designed for masonry or stone is highly recommended. Standard wood or metal drill bits are not suitable for rock drilling. Hammer drills, rotary hammer drills, and diamond core drills are the most common choices for various stone drilling methods.
By carefully considering the rock type, selecting appropriate rock drilling tools, and following these step-by-step methods, you can successfully create holes in rock for a wide range of applications. Remember that safety should always be your top priority.