
Can you use a circular saw to cut wood? Yes, you absolutely can! Using a circular saw for the first time might seem a little daunting, but with the right approach and a focus on safety, anyone can learn how to cut wood with a circular saw. This guide will walk you through everything you need to know, from choosing the right saw to making precise cuts.
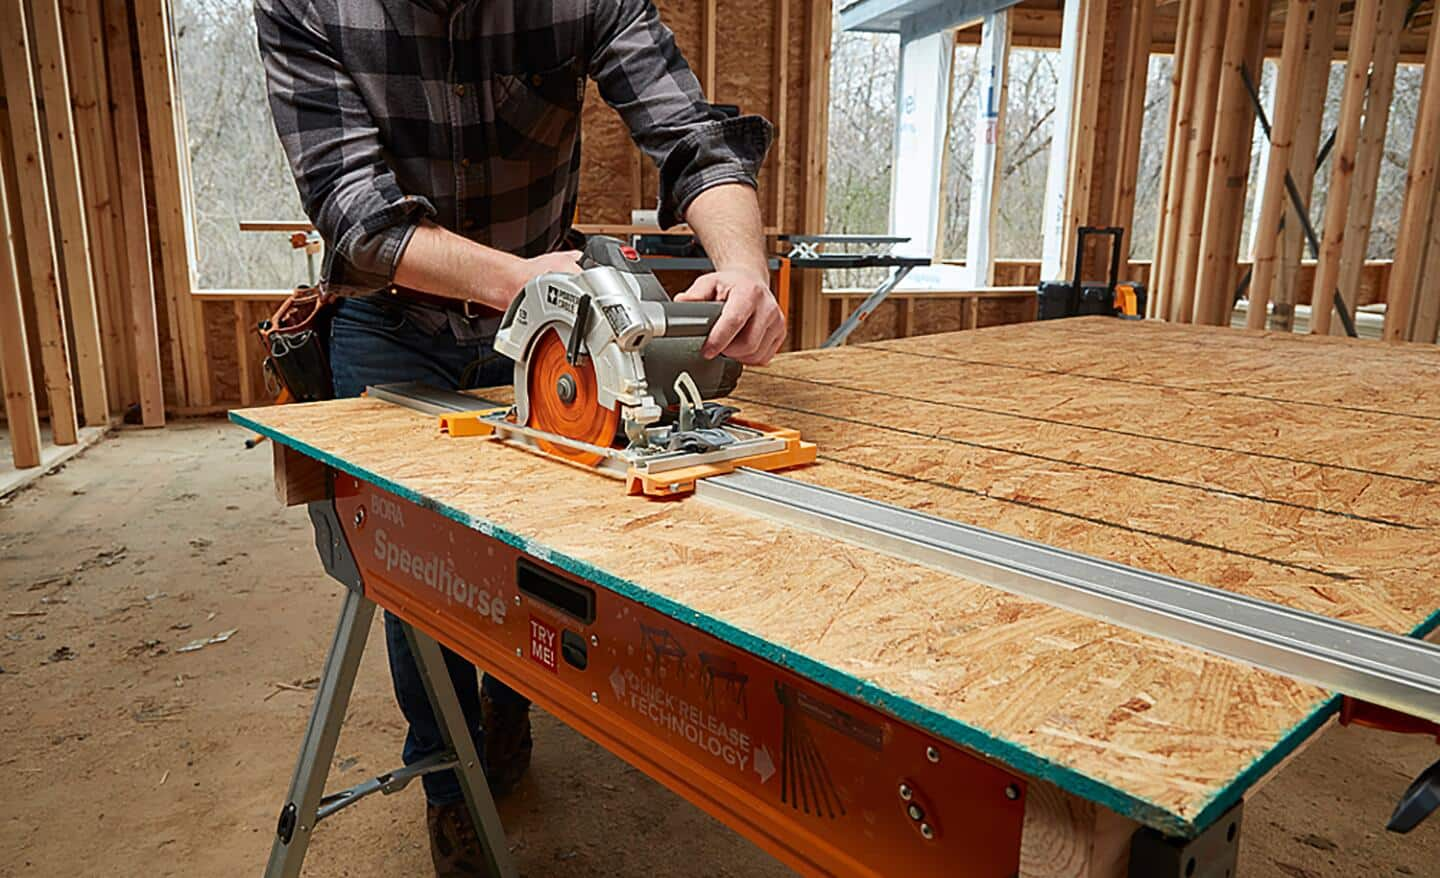
Image Source: dam.thdstatic.com
Picking Your First Circular Saw
When you’re just starting, choosing a circular saw is a big step. There are many types, but for beginners, a corded, 7 ¼-inch circular saw is a great place to start. They offer plenty of power for most home projects and are generally more affordable than cordless models.
Corded vs. Cordless
- Corded Saws: These plug into an outlet. They offer consistent power and don’t run out of battery. However, you’re limited by the cord’s length and need an extension cord.
- Cordless Saws: These run on batteries. They give you freedom of movement, which is great for larger projects or working away from power sources. Battery life and power can vary, and they are often more expensive.
Key Features to Look For
- Motor Power (Amps): For corded saws, a higher amp rating means more power for tougher cuts. Aim for at least 7 amps for general use.
- Blade Size: The most common size is 7 ¼ inches. This is versatile for most DIY tasks. Larger blades can cut deeper but are heavier.
- Weight: A lighter saw is easier to control, especially for beginners.
- Ergonomics: How the saw feels in your hands is important. Look for comfortable grips and well-placed buttons.
- Dust Port: Essential for circular saw dust collection, this lets you hook up a shop vacuum to keep your work area clean and improve visibility.
Essential Circular Saw Safety
Circular saw safety is paramount. These tools are powerful and can cause serious injury if not used correctly. Always prioritize safety!
Personal Protective Equipment (PPE)
- Safety Glasses: Always wear them to protect your eyes from sawdust and debris.
- Hearing Protection: Circular saws are loud. Earplugs or earmuffs are a must.
- Dust Mask: Sawdust can be harmful to your lungs. A dust mask will help.
- Gloves: While some prefer not to wear gloves for better grip, others find they help prevent splinters. If you wear them, ensure they are snug and won’t get caught.
- Sturdy Footwear: Protect your feet from falling objects.
Pre-Operation Checks
- Inspect the Cord: For corded saws, check for any nicks, cuts, or fraying. A damaged cord is a fire hazard and an electrocution risk.
- Check the Blade: Ensure the circular saw blade is sharp, the correct type for your material, and securely attached. A dull blade makes cutting harder and more dangerous.
- Blade Guard Function: Make sure the lower blade guard retracts smoothly and springs back into place to cover the blade when you lift the saw. Never tie it back.
- Work Area: Clear your workspace of clutter, stray tools, and anything that could trip you or get caught in the saw. Ensure good lighting.
Setting Up Your Circular Saw
Before you make your first cut, proper setup is crucial.
Adjusting the Cutting Depth
This is a key function for cutting wood with a circular saw. The circular saw depth adjustment allows you to set how deep the blade cuts.
- How to Adjust: Most saws have a lever or knob at the front. Loosen it, position the base plate so the blade extends just slightly below the material you’re cutting (about one tooth’s depth), and then re-tighten the lever.
- Why it Matters: Setting the depth correctly prevents the blade from cutting too deep into your workbench or the floor. It also helps prevent kickback.
Installing and Changing a Circular Saw Blade
The circular saw blade is what does the cutting. Knowing how to change it safely is vital.
Table: Common Blade Types and Uses
| Blade Type | Teeth Count | Teeth Configuration | Best For |
|---|---|---|---|
| All-Purpose | 24-40 | Carbide-tipped | General ripping and crosscutting |
| Wood Crosscut | 60-80 | Fine teeth | Clean cuts across the grain |
| Wood Rip | 20-30 | Coarse teeth | Cutting with the grain (long cuts) |
| Plywood/MDF | 60-100+ | Fine teeth | Smooth cuts in sheet goods, minimal tear-out |
| Metal Cutting | High | Specialized | Cutting metal (requires specific saw) |
Steps for Changing a Blade:
- Unplug the Saw: This is the most important safety step.
- Locate the Spindle Lock: Most saws have a button or lever to lock the spindle. Press and hold it.
- Loosen the Blade Nut: Use the wrench that came with your saw. It’s usually reverse-threaded (righty-loosey, lefty-tighty).
- Remove the Old Blade: Carefully take off the outer blade washer and the blade. Note which side the blade faces.
- Install the New Blade: Place the new blade on the spindle, ensuring the teeth are facing the correct direction (usually indicated by an arrow on the blade and the saw housing).
- Replace the Outer Washer and Nut: Tighten the nut by hand first, then use the wrench and spindle lock to tighten it securely. Remember, it’s reverse-threaded.
- Release Spindle Lock: Ensure the lock disengages.
- Plug In and Test: Briefly run the saw (without cutting) to ensure the blade spins freely and is secure.
Using a Circular Saw Guide
For straight, accurate cuts, a circular saw guide is invaluable. This can be a factory-made edge guide, a clamp-on straight edge, or a track saw system.
- Factory Edge Guide: Many saws come with a small guide that attaches to the base plate to help you cut parallel to the edge of your material.
- Clamp-On Straight Edge: You can use a piece of straight lumber or a metal ruler. Clamp it firmly to your workpiece, ensuring it’s parallel to your cut line. You’ll need to set your saw’s base plate against this guide.
- Track Saw System: For the most precise, rip-cut style cuts, a track saw system offers unparalleled accuracy.
How to Cut with a Circular Saw: Step-by-Step
Now for the actual cutting! How to cut with a circular saw efficiently and safely involves a few key steps.
Marking Your Cut Line
- Use a pencil and a measuring tape or ruler to mark a clear, visible cut line on your material.
- For critical cuts, consider using a chalk line for a very straight, long line.
Positioning the Material
- Support is Key: The material you’re cutting must be well-supported. Ensure the “waste” side of the cut can fall away freely without pinching the blade.
- Scrap Wood: Place scrap wood under your workpiece to protect your workbench and prevent the blade from digging into anything below.
- Clamping: For smaller pieces, clamp them securely to your workbench. For larger sheets, ensure the unsupported section doesn’t sag.
Making a Straight Cut (Rip Cut or Crosscut)
- Set Depth and Guide: Adjust your circular saw depth adjustment and attach your chosen circular saw guide if needed.
- Align the Blade: Position the saw on your workpiece so the blade is directly over your cut line. Most saws have a visible indicator on the base plate that shows where the blade will cut. Align this with your line.
- Start the Saw: With the saw base firmly on the material and the blade guard retracted, squeeze the trigger. Let the saw reach full speed before it touches the wood.
- Begin the Cut: Gently push the saw forward along your cut line. Let the saw do the work; don’t force it. Keep a steady, even pressure.
- Maintain Contact: Keep the base plate flat against the material throughout the cut. This is crucial for accuracy and safety.
- Complete the Cut: Continue until you’ve cut all the way through. Release the trigger once the blade has cleared the material.
- Blade Guard: Ensure the lower blade guard springs back to cover the blade as you lift the saw away.
Cutting Wood with a Circular Saw on Larger Sheets
When cutting large sheets of plywood or MDF, support is critical to prevent the sheet from breaking or bending, which can lead to kickback or an inaccurate cut.
- Sawhorses: Use sawhorses to support the sheet. Position them strategically so the cut line is supported, and the waste piece can fall without snagging.
- Two-Person Job: For very large sheets, it’s often easier and safer to have someone help guide the sheet and manage the waste piece.
Advanced Techniques: The Circular Saw Bevel Cut
A circular saw bevel cut allows you to make angled cuts. This is useful for tasks like framing or creating decorative edges.
-
How to Make a Bevel Cut:
- Locate the Bevel Adjustment: Most circular saws have a locking mechanism on the front of the base plate that controls the bevel angle.
- Loosen the Lock: Release the lever or knob.
- Set the Angle: Adjust the base plate to your desired angle. Many saws have detents (preset stops) at common angles like 45 degrees.
- Re-tighten the Lock: Secure the base plate firmly at the new angle.
- Adjust Depth: Remember to readjust your circular saw depth adjustment. The angle of the blade means you might need to adjust the depth slightly to ensure the blade still cuts just past the material.
- Mark and Cut: Mark your angled cut line and proceed with the cut as usual, keeping the base plate flat against the material.
-
Tips for Bevel Cuts:
- Practice: Bevel cuts can be trickier than straight cuts. Practice on scrap wood first.
- Support: Ensure the material is well-supported, especially the section being cut at an angle.
- Visibility: Make sure your line is visible, and the base plate is aligned correctly for the bevel.
Circular Saw Dust Collection
Good circular saw dust collection keeps your workspace cleaner, improves visibility of your cut line, and is better for your health.
- Using a Vacuum: Connect a shop vacuum to the dust port on your saw. This is by far the most effective method.
- Dust Bag: Some saws have a bag attached to the dust port. While better than nothing, it’s less effective than a vacuum.
- Keep the Area Clean: Regularly sweep or vacuum up sawdust.
Best Circular Saw Techniques for Smooth Operation
Mastering best circular saw techniques comes with practice and attention to detail.
Avoiding Kickback
Kickback is when the saw suddenly and violently jumps backward or upward. It’s one of the most dangerous aspects of using a circular saw.
-
Causes of Kickback:
- Pinched Blade: The material closes in on the blade, pinching it. This often happens when cutting a board that isn’t properly supported.
- Twisted Material: Cutting into wood that has a natural twist or warp.
- Dull Blade: A dull blade requires more force and is more prone to binding.
- Incorrect Depth: Setting the blade too deep.
- Forcing the Saw: Pushing the saw too hard.
- Not Following the Line: Guiding the saw off its intended path.
-
How to Prevent Kickback:
- Proper Support: Ensure the material is supported so the kerf (the cut) opens slightly rather than closing.
- Use a Depth Adjustment: Set the blade depth to just slightly more than the material thickness.
- Sharp Blades: Always use a sharp, appropriate circular saw blade.
- Don’t Cut Knots: Try to avoid cutting through knots, as they can be harder and cause the wood to bind.
- Steady Pressure: Push the saw smoothly and steadily.
- Don’t Twist: Keep the saw aligned with your cut line.
- Blade Guard: Never disable or tie back the blade guard.
- Observe the Line: Always watch your cut line and the saw’s path.
Cutting Various Materials
While this guide focuses on wood, circular saws can cut other materials with the right blade.
- Plywood and MDF: Use a fine-tooth plywood blade (60 teeth or more) to minimize tear-out on the edges. Support both sides of the sheet.
- Laminate Flooring: Use a blade designed for laminate or a fine-tooth wood blade.
- Metal: Requires a specialized metal-cutting blade and often a saw with lower RPMs. Be sure the saw is rated for metal cutting, and use appropriate safety gear for metal dust and sparks.
Maintaining Your Circular Saw
Proper maintenance ensures your saw lasts longer and works safely.
- Cleaning: After each use, clean sawdust from the motor housing, vents, and blade guard.
- Blade Care: Keep your blades clean and sharp. If a blade is dull or damaged, replace it.
- Storage: Store your saw in a dry place, preferably in its original case or a dedicated tool bag.
Frequently Asked Questions (FAQ)
Q1: What is the most important safety rule when using a circular saw?
A: The most important safety rule is to always wear safety glasses to protect your eyes from flying debris and sawdust.
Q2: Can I use a circular saw to cut metal?
A: Yes, but only if you use a specialized metal-cutting blade and your circular saw is designed or rated for metal cutting. Standard wood blades will not work and can be dangerous.
Q3: How do I make sure my cut is straight?
A: Use a measuring tape to mark your line clearly. For very straight cuts, use a circular saw guide, such as a clamped straight edge or a factory-made guide. Practicing steady pressure and keeping the base plate flat are also crucial.
Q4: What does the “depth adjustment” on a circular saw do?
A: The circular saw depth adjustment allows you to set how far the circular saw blade extends below the base plate. It’s important to set it so the blade extends just slightly (about one tooth’s depth) past the material you are cutting to ensure safe operation and prevent excessive blade exposure.
Q5: How often should I change my circular saw blade?
A: Change your circular saw blade when you notice it’s dull, makes rough cuts, or requires more force to cut. A sharp blade is essential for both cut quality and safety, as it reduces the risk of kickback.
Q6: What is the best circular saw for beginners?
A: For beginners, a corded 7 ¼-inch circular saw is typically recommended. It provides good power, is generally more affordable, and is easier to handle than larger or more specialized saws. Look for one with comfortable ergonomics and a good dust collection port.
Q7: How do I improve my cutting wood with a circular saw results?
A: To improve your results, focus on clear marking, proper material support, using a sharp and appropriate circular saw blade, setting the correct depth adjustment, and practicing steady, controlled pressure. Using a circular saw guide will significantly improve accuracy.
Q8: What is a bevel cut with a circular saw?
A: A circular saw bevel cut is an angled cut made by tilting the base plate of the saw. This is achieved by adjusting the circular saw bevel cut mechanism to a desired angle, typically marked on the saw itself.
By following these guidelines and practicing these best circular saw techniques, you’ll be well on your way to making accurate and safe cuts for all your projects. Remember, patience and safety are your best tools.