
Can you drill a well for water yourself? Yes, with the right knowledge, equipment, and safety precautions, it is possible for homeowners to undertake DIY well drilling. This comprehensive guide will walk you through the essential steps and considerations for drilling your own water well, covering everything from initial planning to the final water pump installation.
Drilling a water well on your property can provide a reliable, independent source of water. While it’s a significant undertaking, for those with a pioneering spirit and a desire for self-sufficiency, it can be a rewarding project. This guide aims to equip you with the information needed to tackle the challenge of drilling a water well successfully.
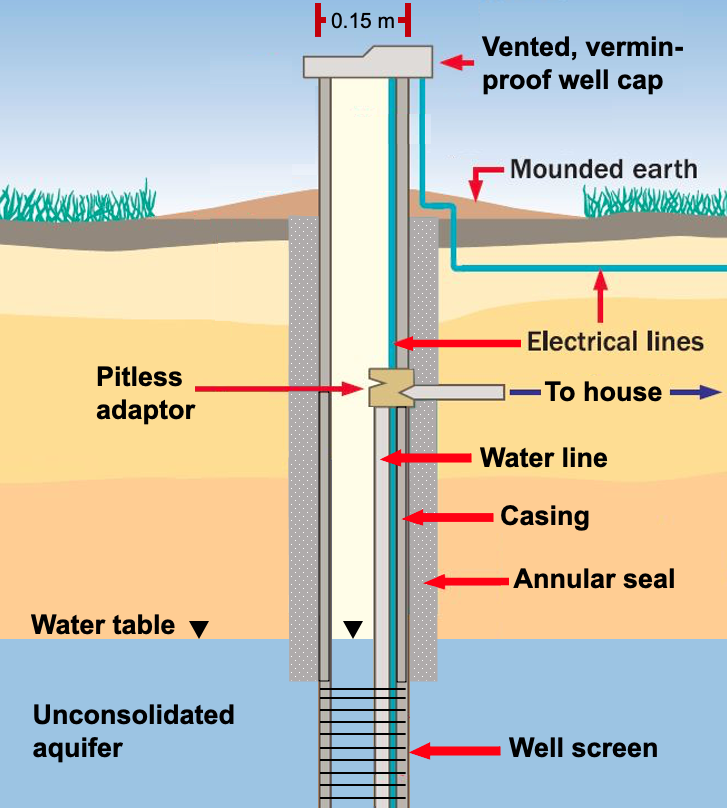
Image Source: books.gw-project.org
Getting Started: Planning and Preparation
Before you even think about picking up a drill, thorough planning and preparation are crucial. This phase will save you time, money, and potential headaches down the line.
Determining the Need for a Well
- Water Source Reliability: Is your current water supply consistent and safe? Are there concerns about drought, municipal water quality, or price increases?
- Cost Analysis: Compare the estimated well drilling cost with your current water bills and future projections. Factor in the initial investment for drilling and pump installation.
- Legal Requirements: This is paramount. You absolutely must research and obtain necessary well drilling permits from your local or state authorities. Ignorance of these regulations can lead to significant fines or the forced abandonment of your project.
Locating the Best Spot for Your Well
Choosing the right location is vital for both water quality and the longevity of your well.
Site Selection Criteria
- Proximity to Water Usage: Ideally, position your well relatively close to your home or point of use to minimize the length of piping required.
- Elevation and Drainage: Select a spot that is at a higher elevation than potential contamination sources like septic systems, drain fields, or livestock areas. Ensure the site has good drainage away from the wellhead.
- Accessibility: The location needs to be accessible for well drilling equipment, which can be quite large and heavy. Consider overhead obstructions like power lines or tree branches.
- Geological Considerations: Research the local geology. Some areas have shallower water tables or more favorable rock formations for drilling. Local drillers or geological surveys can provide valuable insights.
Avoiding Contamination Sources
Local regulations will dictate minimum setback distances from various potential contaminants. Always adhere to these rules.
- Septic Tanks and Drain Fields: Keep a significant distance to prevent bacterial and chemical contamination.
- Livestock Areas and Manure Piles: These are significant sources of bacterial and nutrient pollution.
- Underground Storage Tanks: Fuel or chemical storage tanks can leach harmful substances into groundwater.
- Roadways and Industrial Sites: Runoff can carry pollutants.
Researching Local Regulations and Permits
As mentioned, obtaining well drilling permits is non-negotiable.
- Contact Local Authorities: Your county or municipal health department and environmental protection agency are the primary sources of information.
- Permit Application Process: Understand the application requirements, fees, and inspection schedules.
- Well Construction Standards: Familiarize yourself with the specific requirements for casing, screens, grouting, and wellhead protection in your area.
Assessing Well Drilling Cost
The well drilling cost can vary significantly based on depth, geology, location, and the chosen well drilling methods.
- Depth of Well: Deeper wells generally cost more due to increased drilling time and materials.
- Geological Formations: Drilling through hard rock is more difficult and expensive than drilling through unconsolidated materials like sand and gravel.
- Water Availability: If the water table is low, or if multiple attempts are needed to find water, costs will increase.
- Well Casing and Screen: The type and length of casing and screen material contribute to the overall cost.
- Professional vs. DIY: While DIY can save on labor, the cost of renting or purchasing well drilling equipment can be substantial.
A rough estimate for professionally drilled wells can range from $15 to $30 per foot, plus costs for casing, pump, and other components. DIY costs will depend heavily on equipment acquisition.
Understanding Well Drilling Methods
There are several well drilling methods, each suited to different geological conditions and project scopes. Choosing the right method is crucial for efficiency and success.
Cable Tool Drilling (Churn Drilling)
This is one of the oldest well drilling methods.
- How it Works: A heavy, sharp-edged bit is repeatedly dropped from a height to break up the rock and soil. A bailer is then used to remove the debris.
- Pros: Effective in hard rock formations. Can produce a straighter hole than some other methods.
- Cons: Slow process. Can be vibration-intensive. Requires significant manual labor for bailing.
- Suitability: Best for deep well drilling in hard rock.
Rotary Drilling
This is the most common method used today for both shallow well drilling and deep well drilling.
- How it Works: A rotating drill bit, attached to a drill string, grinds through the earth. Water or drilling fluid is pumped down the drill string to lubricate the bit, cool the formation, and carry cuttings to the surface.
- Types of Rotary Drilling:
- Direct Circulation: Drilling fluid and cuttings are brought to the surface through the annular space between the drill string and the borehole wall.
- Reverse Circulation: Drilling fluid and cuttings are brought to the surface through the inside of the drill string.
- Pros: Faster than cable tool drilling. Can be used in a wide variety of formations.
- Cons: Can create an altered zone around the borehole that might affect water inflow. Requires a continuous supply of drilling fluid.
Percussion Drilling (Hammer Drilling)
Often used in conjunction with rotary drilling, especially in hard rock.
- How it Works: A pneumatic or hydraulic hammer at the bottom of the drill string strikes a striking bar, which transmits pulses to the drill bit.
- Pros: Very effective for penetrating hard rock quickly. Creates less filtrate invasion than pure rotary drilling.
- Cons: Requires specialized down-the-hole hammers and bits.
Air Drilling
A variation of rotary drilling that uses compressed air instead of water or mud.
- How it Works: High-pressure air is forced down the drill string, lifting cuttings to the surface.
- Pros: Fast penetration in unconsolidated formations. No drilling fluid to manage.
- Cons: Not suitable for formations that might collapse. Can cause dust issues if not managed properly.
Essential Well Drilling Equipment
The tools you’ll need will depend on the well drilling methods you choose and whether you rent or buy. For a serious DIY project, acquiring or renting specialized equipment is necessary.
Drilling Rig
- Portable Rigs: Smaller, trailer-mounted or skid rigs are available for DIY use. These are often rotary drills.
- Larger Rigs: Professional rigs are much larger and more powerful, capable of drilling much deeper and through tougher materials.
Drill Bits and Accessories
- Drill Bits: Various types exist for different formations (e.g., roller cone bits for rock, drag bits for softer material).
- Drill Pipe: Sections of pipe that connect the drill bit to the rig.
- Stabilizers: Help keep the drill string centered in the borehole.
- Reamers: Widen the borehole if necessary.
Water/Mud Pumping System (for Rotary Drilling)
- Pumps: To circulate drilling fluid.
- Tanks: To hold drilling fluid and cuttings.
- Hoses and Fittings: To connect the system.
Casing and Screen
- Casing: Steel or PVC pipe installed in the borehole to prevent collapse and seal off unwanted water zones.
- Screens: Placed at the aquifer level to allow water in while keeping out sand and gravel.
Bailers and Swivels (for Cable Tool)
- Bailers: Cylindrical containers used to lift debris from the hole.
- Swivels: Connect the drive rod to the tools.
Safety Equipment
- Hard Hats: To protect from falling objects.
- Safety Glasses: To protect eyes from debris.
- Gloves: For grip and protection.
- Steel-Toed Boots: Essential foot protection.
- Hearing Protection: For noisy drilling operations.
- First-Aid Kit: Always have one on hand.
The Step-by-Step Process of Drilling a Water Well
This is a general overview; specific steps will vary based on your chosen method and local conditions.
Step 1: Site Preparation
- Clear the Area: Remove vegetation, rocks, and any obstacles from the drilling site.
- Level the Ground: Ensure a stable platform for the drilling rig.
- Set Up Support Equipment: Position water tanks, pumps, and other necessary gear.
Step 2: Drilling the Borehole
This is the core of the water well installation.
Starting the Hole
- Pilot Hole: Begin with a smaller diameter bit to create a starting point.
- Running the Rig: Carefully operate the drilling rig according to manufacturer instructions. Maintain consistent pressure and rotation.
- Monitoring Progress: Pay attention to the type of material being brought up (cuttings) and the ease of penetration. This can indicate changes in geology and potential water-bearing zones.
Encountering Water-Bearing Zones (Aquifers)
- Signs of Water: You’ll notice increased moisture in the cuttings, a change in drilling resistance, or even water flowing into the borehole.
- Identifying Productive Zones: A geologist’s log or experience can help identify the most promising aquifers. You might use techniques like “jaw shaking” (listening to the sound of the drill bit hitting water) or well logging.
Managing Drilling Fluid (Rotary Drilling)
- Circulation: Ensure continuous circulation of drilling fluid to remove cuttings and stabilize the borehole walls.
- Fluid Properties: Monitor and adjust the viscosity and density of the drilling fluid as needed.
Advancing the Casing
- Setting Casing: As you drill, especially in unstable formations or through surface layers, you’ll install casing to prevent the borehole from collapsing.
- Driving or Pressing: Casing is typically driven into the ground with a hammer or pressed in using the rig’s weight.
- Cementing or Grouting: Once the casing is in place and at the desired depth, it needs to be sealed to the formation with cement or bentonite grout. This prevents surface water and shallow contaminants from entering the well. This is a critical step for water quality.
Step 3: Well Development and Cleaning
Once the desired depth is reached and casing is installed, the well needs to be developed to maximize water flow and remove drilling debris.
- Bailing/Surging: Repeatedly bailing out water and sediment, or surging water in and out of the well, can help remove fine particles and improve the connection between the aquifer and the well screen.
- Jetting: Using high-pressure water to clean the screen and surrounding gravel pack.
Step 4: Installing the Well Screen and Gravel Pack
- Well Screen: This is a slotted or perforated pipe that is placed at the aquifer level. It allows water to enter the well while preventing sand and larger particles from coming in.
- Gravel Pack: In many cases, a layer of carefully sized gravel is placed around the well screen. This acts as a filter, preventing finer sediment from entering the well and improving hydraulic efficiency.
Step 5: Wellhead Completion and Protection
This final step ensures the well is safe and protected from contamination.
- Sanitary Seal: A watertight cap is installed on top of the casing.
- Surface Protection: The area around the wellhead should be graded to direct surface water away. A concrete pad or sanitary well seal can be installed.
- Vermin Protection: Ensure the wellhead seal prevents entry of insects and animals.
Water Well Installation: The Pump System
Once the drilling and casing are complete, you need to get the water to the surface. This involves the well pump installation.
Choosing the Right Pump
The type of pump depends on the well’s depth, the required water pressure, and flow rate.
- Submersible Pumps: These are placed directly in the well, below the water level. They are efficient and quiet.
- Factors: Horsepower, flow rate (gallons per minute – GPM), head (vertical lift), and casing diameter are key considerations.
- Jet Pumps: Typically used for shallower wells (up to 25 feet). They are located above ground and use suction and a venturi system.
- Hand Pumps: A reliable backup for emergencies, but not typically for primary water supply.
Submersible Pump Installation
This is the most common method for modern wells.
- Attach Drop Pipe and Power Cable: Connect the drop pipe (which carries water) and the submersible pump’s electrical cable to the pump. Ensure connections are watertight and secure.
- Lower the Pump: Carefully lower the pump into the well using the drop pipe and a safety rope. Ensure the pump is set at the correct depth, typically below the lowest expected water level but above the well bottom.
- Connect to Surface Plumbing: Connect the drop pipe to the pressure tank and the house’s water system.
- Electrical Connections: Connect the submersible pump’s power cable to the control box and the electrical supply. Ensure all connections are made by a qualified electrician and meet local codes.
- Install Pressure Tank and Pressure Switch: The pressure tank stores water and maintains pressure, while the pressure switch turns the pump on and off.
Testing and Initial Operation
- Run the Pump: Turn on the pump and check for water flow and pressure.
- Flush the Well: Run water until it runs clear, flushing out any remaining sediment from the drilling and installation process.
- Water Quality Testing: Once the water is clear, collect samples for bacterial and chemical analysis from a certified laboratory. This is critical for ensuring your water is safe to drink.
Shallow Well Drilling vs. Deep Well Drilling
The terms shallow well drilling and deep well drilling refer to the depth of the water source.
Shallow Wells
- Definition: Typically draw water from an unconfined aquifer that is relatively close to the surface, often less than 100 feet deep.
- Characteristics:
- Easier and less expensive to drill.
- More susceptible to surface contamination and drought conditions.
- Often use jet pumps.
- DIY Feasibility: More approachable for DIYers due to simpler equipment and shorter drilling times.
Deep Wells
- Definition: Tap into confined aquifers that are located much deeper underground, often hundreds of feet.
- Characteristics:
- More expensive and time-consuming to drill.
- Generally provide a more consistent and protected water supply.
- Require submersible pumps.
- DIY Feasibility: Significantly more challenging for DIYers due to the specialized equipment and expertise required for extensive drilling and heavy casing.
Is DIY Well Drilling for You?
DIY well drilling is a demanding project that requires a significant investment of time, effort, and resources.
Pros of DIY Well Drilling
- Cost Savings: Potential to save on labor costs compared to professional drilling.
- Self-Sufficiency: The satisfaction of creating your own independent water source.
- Learning Experience: A hands-on opportunity to learn about geology and water systems.
Cons of DIY Well Drilling
- High Initial Cost: Purchasing or renting specialized well drilling equipment can be very expensive.
- Time Commitment: Drilling a well can take many days or even weeks.
- Technical Expertise: Requires a good grasp of mechanical principles, geology, and safety protocols.
- Safety Risks: Drilling involves heavy machinery and the potential for accidents.
- Potential for Failure: Without proper knowledge, you might drill a dry hole or create a contaminated well.
- Permitting and Regulations: Navigating complex legal requirements can be daunting.
When to Consider Hiring a Professional
- If you lack the necessary mechanical skills or physical strength.
- If you cannot afford or safely operate the required drilling equipment.
- If you are drilling in difficult geological conditions (hard rock, unstable soil).
- If your local regulations strongly discourage or prohibit DIY drilling for safety or environmental reasons.
- If you are drilling for a primary household water supply and cannot afford to take risks.
Maintenance and Longevity of Your Well
Once your well is drilled and the pump is installed, regular maintenance is key to ensuring its longevity and the quality of your water.
Regular Inspections
- Wellhead: Check for any damage, corrosion, or signs of animal entry.
- Pump and Pressure Tank: Listen for unusual noises from the pump. Check the pressure tank’s air charge.
- Water Quality: Periodically test your water, especially if you notice any changes in taste, odor, or appearance.
Protecting Your Well
- Keep the Area Clean: Prevent debris and chemicals from accumulating near the wellhead.
- Seal Abandoned Wells: If you have an old, unused well on your property, ensure it is properly sealed according to local regulations to prevent it from becoming a conduit for contamination.
Troubleshooting Common Issues
- Low Water Pressure: Could be a pump issue, a clog in the system, or a drop in the water table.
- Cloudy Water: Often caused by sediment. May require additional filtration or well development.
- Pump Cycling: May indicate a problem with the pressure switch or a leak in the system.
Frequently Asked Questions (FAQ)
Q1: How deep do I need to drill for water?
The depth varies greatly depending on your location and the local geology. You’ll need to find out where the nearest aquifers are located. Local authorities or experienced well drillers can often provide this information.
Q2: Can I drill a well with a standard power auger?
While power augers are great for shallow holes, they are generally not suitable for drilling a water well to aquifer depths. Water well drilling requires specialized drilling rigs and bits designed to penetrate various geological formations, including rock.
Q3: What are the biggest risks of DIY well drilling?
The biggest risks include hitting dry formations, contaminating your water supply, equipment failure, personal injury, and violating local regulations due to improper permitting or construction.
Q4: How long does it take to drill a well?
For a professional, a typical residential well might take 1-3 days to drill. For a DIYer, it could take significantly longer, possibly weeks, depending on experience, equipment, and the difficulty of the geological formations.
Q5: What if I drill and don’t find water?
If you drill a “dry hole,” you will still incur the costs of drilling and casing. You may need to move your location and try again, which means incurring those costs twice. This highlights the importance of thorough research and site selection.
Q6: Do I need a water well permit?
Yes, almost universally. Failure to obtain well drilling permits can result in fines, mandated abandonment of the well, and potential legal issues. Always check with your local health department or environmental agency.
Q7: What is the average well drilling cost?
The well drilling cost can range from $15-$30 per foot for professional services, not including the pump or other components. DIY costs are variable, depending on equipment rental/purchase and the total footage drilled.
Embarking on the project of drilling a water well is a substantial undertaking, but with meticulous planning, the right knowledge, and a commitment to safety and regulations, it can be a highly achievable goal for the determined DIYer. Remember, when in doubt, consulting with or hiring professionals for specific, critical stages like final pump installation or electrical work is always a wise decision.