
Can you use a nail drill on natural nails? Yes, you can use a nail drill on natural nails, but it requires extreme caution and the right technique. Using an electric nail file, often called a manicure drill, can be a game-changer for your nail care routine, especially if you work with enhancements like acrylics or gels. This guide will walk you through everything a beginner needs to know about using an e-file nail drill safely and effectively.
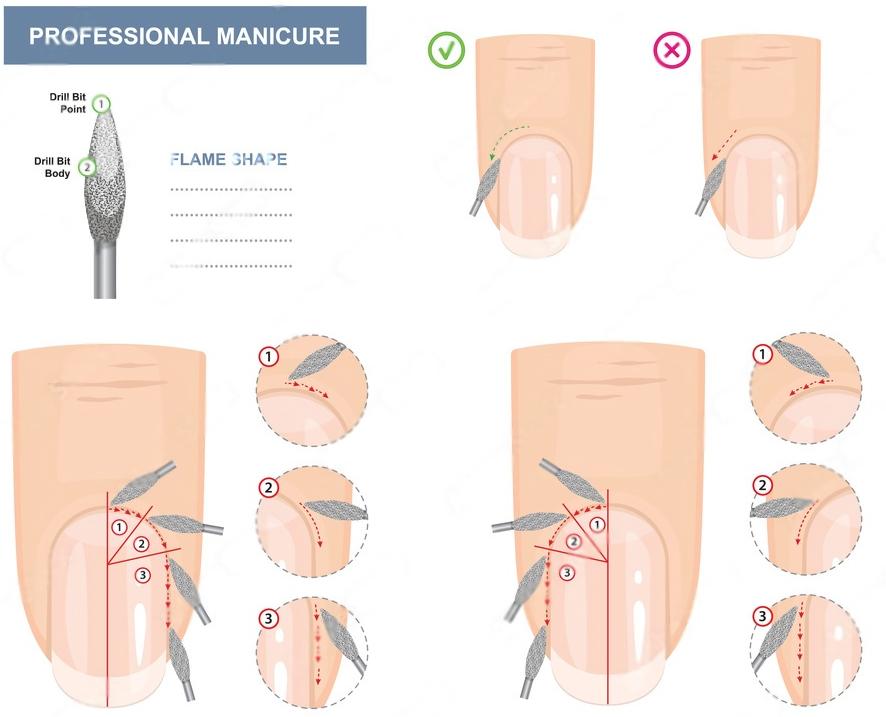
Image Source: www.burdental.com
What is a Nail Drill?
A nail drill, also known as an electric nail file or e-file nail drill, is a handheld electronic device used to shape, buff, and remove artificial nail enhancements like acrylics and gels. It can also be used to gently prepare the natural nail surface, remove cuticle buildup, and even create designs. Unlike manual files, a nail drill uses rotating nail drill bits to perform these tasks much faster and with more precision.
Choosing Your First Nail Drill
Deciding on your first beginner nail drill can feel overwhelming with so many options available. Here’s what to consider:
Types of Nail Drills
- Rechargeable vs. Corded: Rechargeable drills offer portability, while corded models provide consistent power. For beginners, a rechargeable unit might be more forgiving.
- Speed (RPM): Revolutions Per Minute (RPM) indicates how fast the drill bit spins. Look for a drill with a variable speed setting, typically ranging from 0 to 30,000 RPM. Higher RPMs are usually for more advanced techniques and professional use.
- Torque: Torque refers to the drill’s power or twisting force. Higher torque means less slowdown when encountering resistance, which is helpful for removing thicker enhancements.
- Handpiece Weight and Balance: You’ll be holding the handpiece for a while, so comfort is key. A lighter, well-balanced handpiece reduces hand fatigue.
- Noise and Vibration: Some drills are quieter and vibrate less than others. This contributes to a more pleasant experience.
Essential Nail Drill Bits for Beginners
The right nail drill bits are crucial for safety and effectiveness. Here are some essential ones for beginners:
| Bit Type | Material | Primary Use | Caution for Beginners |
|---|---|---|---|
| Diamond Barrel | Diamond | Smoothing the cuticle area, removing lifted acrylic/gel, shaping the sidewalls. | Start with a fine grit. Keep the drill moving, do not linger on one spot. |
| Chamois/Buffing | Soft Material | Buffing the natural nail surface for a smooth finish, removing dust. | Use at a low speed. Gentle pressure is key. |
| Mandrel Bit | Sanding Bands | Removing bulk of acrylic/gel, filing the surface of the nail. | Always use a sanding band. Never use the mandrel itself on the nail. Start with lower grits. |
| Cuticle Bit | Diamond/Carbide | Gently pushing back and cleaning the cuticle area. | Use at a very low speed and with minimal pressure. Avoid drilling into the nail plate. |
| Safety Bit | Diamond/Carbide | Safely filing around the cuticle and sidewalls without cutting the skin. | Ideal for beginners to prevent accidental cuts. Use at a moderate speed. |
Mastering Nail Drill Speed
Nail drill speed is one of the most critical factors for safe operation.
Understanding RPM and Speed Settings
- Low Speed (0-8,000 RPM): Good for buffing natural nails, removing shine, and very gentle cuticle work.
- Medium Speed (8,000-15,000 RPM): Suitable for removing e-file polish, shaping softer enhancements like gel, and gentle cuticle cleaning.
- High Speed (15,000-30,000 RPM): Primarily for bulk removal of hard acrylics, refining shapes, and advanced techniques.
As a beginner, always start at the lowest speed and gradually increase it only as needed and as you gain confidence.
When to Adjust Speed
- Removing Product: You’ll generally use higher speeds for removing bulk product like acrylic.
- Shaping: Medium to high speeds can be used for shaping, but focus on technique.
- Cuticle Work: Always use the lowest speeds for cuticle work to avoid damage.
- Buffing: Low speeds are best for buffing to prevent overheating or damaging the nail.
Safe Nail Drill Techniques for Beginners
Safety should always be your top priority when using an e-file nail drill.
Preparing Your Workspace and Yourself
- Clean and Organized Area: Ensure your workspace is clean and free of clutter. This prevents accidental bumps or spills.
- Dust Control: Nail drills create dust. Consider a dust collector or wear a mask to avoid inhaling it.
- Secure Handpiece: Make sure the handpiece is properly connected to the base and the drill bit is securely inserted.
- Comfortable Position: Sit in a stable chair with good posture. You should be able to comfortably hold the handpiece without straining your wrist.
- Client Communication: If you’re working on someone else, maintain clear communication. Ask them to inform you if they feel any heat or discomfort.
Holding the Handpiece Correctly
The way you hold the handpiece significantly impacts control and safety.
- Pencil Grip: This is the most common and recommended grip for beginners. Hold the handpiece like you would a pencil, with your index finger and thumb controlling the movement.
- Finger Rest: Rest your ring or pinky finger on the client’s hand (or your own) as a stable pivot point. This prevents jerky movements and keeps the drill bit from slipping.
Effective Filing Techniques
- Angle is Key: For most filing tasks, hold the drill bit at a slight angle (around 45 degrees) to the nail surface. Never file straight down with the end of the bit.
- Keep it Moving: Never let the drill bit linger in one spot for too long. Constant, smooth, sweeping motions are essential to prevent heat buildup and damage to the natural nail.
- Light Pressure: Let the drill bit do the work. Applying too much pressure can cause heat, discomfort, and damage.
- Work in Sections: Don’t try to remove all the product from one section at a time. Work across the nail in small, overlapping sections.
- Direction of Rotation: Most drills have forward and reverse settings. Be mindful of which way the bit is spinning and adjust your technique accordingly to avoid catching the cuticle or skin. For most forward filing, you’ll file away from yourself. For reverse filing, you’ll file towards yourself. Learn to use both to avoid filing in one direction and creating heat.
Protecting the Natural Nail
- Avoid the Cuticle: Never let the drill bit touch your cuticle or the skin surrounding the nail. This can cause serious injury. Use dedicated cuticle bits or safety bits for this area with extreme caution and low speed.
- Don’t Over-File: Remove only the necessary amount of product or natural nail. Over-filing can thin the nail plate, making it weak and prone to breakage.
- Check for Heat: If you feel any heat, stop immediately and let the drill cool down. You can also lift the drill bit off the nail for a moment. Heat is a sign you’re filing too aggressively or in one spot for too long.
Common Nail Drill Uses for Beginners
Preparing the Natural Nail
Before applying enhancements or polish, proper nail prep is crucial.
- Push Back Cuticles: Gently use a cuticle bit or a specialized cuticle tool to push back the eponychium (the living skin at the base of the nail).
- Remove Shine: Use a fine-grit barrel bit or a gentle buffing bit at a low speed to remove the natural shine from the nail plate. This creates a surface for products to adhere to. Avoid over-buffing.
- Clean the Sidewalls: A fine-grit diamond bit or safety bit can be used to gently clean up the sidewalls and remove any dead skin or product residue.
Removing Gel Polish and Nail Polish
- Soak Off First (Optional but Recommended for Beginners): For beginners, soaking off gel polish with acetone is often safer than filing it all off with a drill.
- Filing Off: If filing off, use a fine-grit carbide or diamond bit. Start with a low speed and work at an angle, filing only the gel polish and avoiding contact with the natural nail. Keep the drill moving.
Working with Acrylics and Gels
- Acrylic Nail Drill: When removing or shaping acrylics, you’ll typically use higher speeds and coarser grit bits, like carbide bits or sanding bands on a mandrel. Always remove in layers and check for heat.
- Gel Nail Drill: Gels are generally softer than acrylics. You can often use medium speeds and diamond or carbide bits for shaping and removal. Be cautious of heat buildup.
- Bulk Removal: Use a coarse grit bit (like a carbide barrel or a coarse sanding band) at a moderate to high speed to quickly remove the bulk of the enhancement. Keep the drill moving and avoid the natural nail.
- Shaping and Refining: Switch to finer grit bits to perfect the shape, refine the cuticle area, and smooth the surface.
Maintenance and Care of Your Nail Drill
Proper nail drill maintenance will ensure its longevity and optimal performance.
Cleaning Your Nail Drill
- Handpiece Cleaning: After each use, wipe down the handpiece with a disinfectant wipe or spray specifically designed for e-file bits and handpieces. Ensure no product or dust remains on the exterior.
- Bit Cleaning: This is critical.
- Brushing: Use a small wire brush (often included with drills or sold separately) to gently brush away any dust or debris from the bits.
- Soaking: Some bits, especially diamond and carbide, can be soaked in a disinfecting solution or alcohol for a specified time (follow manufacturer instructions).
- Ultrasonic Cleaner: For professional-level cleaning, an ultrasonic cleaner can be very effective for removing stubborn debris.
- Sanitizing/Sterilizing: After cleaning, bits must be sanitized or sterilized according to your local regulations and the bit manufacturer’s recommendations. This might involve using barbicide, autoclaving, or other approved methods. Never use the same bits on different clients without proper sterilization.
Storing Your Nail Drill
- Protect the Handpiece: Store the handpiece in its original case or a dedicated protective pouch to prevent damage from drops or dust.
- Organize Bits: Use a bit organizer or case to keep your various nail drill bits clean, organized, and easily accessible.
- Store in a Dry Place: Avoid storing your drill in humid environments, as this can affect the electronics.
Avoiding Common Mistakes
- Don’t Force It: If a bit isn’t cutting effectively, it might be dull, the wrong type, or you might need a slightly higher speed. Don’t force it into the nail.
- Don’t Let it Get Wet: Most e-file drills are not waterproof. Keep the base unit away from liquids.
- Don’t Overheat: If the handpiece feels hot, stop using it and let it cool down. Overheating can damage the motor.
Transitioning from Beginner to Advanced Use
As you gain experience with your beginner nail drill, you can explore more advanced techniques.
Refining Your Skills
- Practice on Yourself: Consistent practice on your own nails is the best way to build muscle memory and control.
- Watch Tutorials: Many professional nail technicians share detailed tutorials online. Observe their techniques for holding the drill, angles, and pressure.
- Take Classes: Consider enrolling in a certified e-file training course. This provides structured learning and expert feedback.
Advanced Techniques
- Russian Manicure: This advanced technique uses specialized cuticle bits at very low speeds to meticulously clean the cuticle area. It requires extensive training and practice.
- Reverse Filing: Learning to file in the opposite direction of rotation can help with efficient product removal and avoiding heat.
- Different Bit Applications: Explore various diamond and carbide bit shapes for specific tasks like cuticle lifting, undersurface cleaning, and detailed shaping.
When to Consider a Professional Nail Drill
While a good beginner nail drill is essential, as your skills and demands grow, you might consider investing in a professional nail drill. These often have higher torque, more durable motors, and a wider RPM range, designed for continuous, heavy use.
Safety First: A Recap for Beginners
- Start Slow: Always begin with the lowest speed setting.
- Use Light Pressure: Let the bit do the work.
- Keep Moving: Constant motion prevents heat and damage.
- Protect Your Cuticles: Never let the bit touch your skin.
- Listen to Your Nails (and Clients): Stop if you feel heat or discomfort.
- Clean and Sanitize: Proper hygiene is paramount, especially when working on others.
Using an electric nail file can elevate your nail game, but safety is non-negotiable. By following these guidelines, practicing diligently, and respecting the power of the tool, you can confidently and safely use your manicure drill for beautiful results.
Frequently Asked Questions (FAQ)
Q1: How long does it take to get used to using a nail drill?
A: It typically takes several weeks of consistent practice to feel truly comfortable and confident with a nail drill. Don’t rush the process; focus on mastering safe techniques first.
Q2: Can I use a nail drill to remove calluses?
A: While some specialized bits can be used for callus removal on feet, it’s generally not recommended for beginners on hands, as the skin on the hands is more delicate. Always use foot-specific bits and techniques if attempting this.
Q3: What’s the difference between a diamond bit and a carbide bit?
A: Diamond bits are coated with diamond particles and are excellent for gentle cuticle work and smoothing. Carbide bits are made of a hard metal alloy and are more aggressive, ideal for removing bulk acrylic and gel.
Q4: My nail drill gets hot. What am I doing wrong?
A: Heat is usually caused by filing too aggressively, applying too much pressure, or keeping the drill bit in one spot for too long. Ensure you’re using light pressure, keeping the drill moving in smooth, sweeping motions, and using the appropriate speed for the task.
Q5: Can I use my nail drill on my natural nails if I don’t have enhancements?
A: Yes, but with extreme caution. Focus on gentle preparation, buffing away shine, and very careful cuticle work with specialized bits at low speeds. Avoid aggressive filing on the natural nail plate itself.
Q6: How often should I clean my nail drill bits?
A: You should clean your nail drill bits after every single use. Proper cleaning and sanitization are essential for preventing the spread of bacteria and ensuring the longevity of your bits.
Q7: Is it okay to share my electric nail file with friends?
A: It is strongly advised against sharing your e-file nail drill or its bits with others, especially without thorough professional sterilization. Bacteria and fungal infections can easily spread.
Q8: What is the ideal RPM for filing natural nails?
A: For natural nails, especially for buffing or light shaping, you should use a very low RPM, typically between 3,000 and 8,000 RPM, and always with minimal pressure.
Q9: What happens if I accidentally cut my cuticle with the nail drill?
A: If you accidentally cut your cuticle, stop immediately. Clean the area with an antiseptic, apply a styptic powder if needed to stop bleeding, and cover it with a bandage. Monitor for any signs of infection. It’s crucial to practice gentle techniques to avoid this.