
Can you drill a well at home? Yes, it is possible to drill a well at home, but it requires specialized equipment, knowledge, and adherence to local regulations. Is DIY well drilling for everyone? No, DIY well drilling is a complex undertaking and is not recommended for individuals without significant experience, proper safety training, and the correct tools.
Drilling a well is a significant project that provides a private, sustainable water source. This guide will walk you through the essential steps involved in water well drilling, from initial planning to the final well pump installation. We will cover everything you need to know, whether you are considering shallow well drilling or deep well drilling.
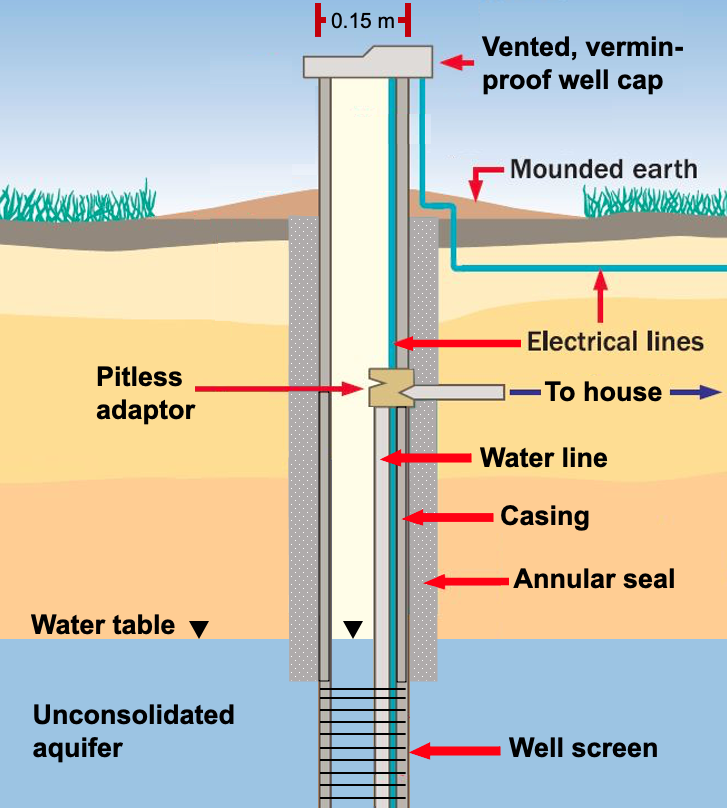
Image Source: books.gw-project.org
The Basics of Well Drilling
A water well is essentially a hole drilled into the ground to access groundwater. The depth and method of drilling depend on several factors, including local geology, water table depth, and water quality requirements. Understanding these basics is crucial before you even think about acquiring well drilling equipment.
What is Groundwater?
Groundwater is water held underground in the soil and rocks. It accumulates from rain and snowmelt seeping into the earth. This water is stored in porous rock formations called aquifers. Wells tap into these aquifers to bring water to the surface.
Types of Wells
There are several types of wells, but the most common for domestic use are:
- Drilled Wells: These are the most common type, typically drilled to depths of 100 feet or more. They access deeper, more reliable aquifers.
- Dug Wells: These are shallow, wide wells dug by hand or with an excavator. They are less common now due to their susceptibility to contamination and limited water yield.
- Driven Wells (Sand Point Wells): These are shallow wells where a perforated pipe with a screened point is driven into the ground. They are suitable for areas with shallow water tables.
This guide will focus primarily on drilled wells, as they are the most common and reliable for consistent water supply.
Planning Your Well Project
Before you can start drilling, thorough planning is essential. This phase involves research, legal considerations, and site selection.
Legal and Regulatory Requirements
- Permits: Most jurisdictions require permits to drill a well. Contact your local health department or environmental agency to find out the specific requirements and application processes in your area.
- Setbacks: Regulations often mandate minimum distances (setbacks) between your well and potential sources of contamination, such as septic systems, sewer lines, and property lines.
- Water Rights: In some regions, you may need to consider water rights and how your well might affect neighboring water sources.
Site Selection
Choosing the right location for your well is critical for water quality and yield.
Factors to Consider:
- Proximity to Water Source: While you want to be close to your home for convenience, you must also respect setback requirements.
- Topography: Avoid low-lying areas that could flood or collect surface runoff. Higher ground is generally preferred.
- Geology: The soil and rock type will influence the drilling method and the potential for encountering water.
- Contamination Sources: Keep the well site away from septic tanks, drain fields, animal pens, fuel storage tanks, and any other potential contaminants.
Water Needs Assessment
How much water do you need? Consider the daily usage for your household, including drinking, cooking, bathing, and any potential irrigation or livestock needs. This will help determine the required yield and the type of pump needed.
Drilling a Well: The Process
Water well drilling is a specialized process that involves using a drilling rig to bore a hole into the earth. The complexity and duration of the drilling process depend heavily on the geology of your area and the depth of the water table.
Step 1: Site Preparation
- Clear the Area: Remove any trees, brush, or debris from the chosen well site to provide ample working space for the drilling rig and associated equipment.
- Access Route: Ensure there is a clear and stable path for the drilling rig and delivery trucks to reach the site.
Step 2: Drilling the Hole
This is the core of the water well drilling process. Various methods are used, depending on the ground conditions.
Common Drilling Methods:
- Rotary Drilling: This is the most common method. A rotating drill bit grinds through the rock and soil. Water or drilling mud is pumped down the drill string to cool the bit, lubricate the hole, and carry cuttings to the surface.
- Cable Tool Drilling (Perussion Drilling): This older method uses a heavy bit that is repeatedly dropped onto the ground to break up the rock. Water is periodically added to flush out cuttings. This method is generally slower than rotary drilling.
The Drill String and Bits:
The drill string is a series of connected pipes that transmit rotational force and weight to the drill bit. Different types of drill bits are used for various formations:
- Roller Cone Bits: Used for harder rock formations.
- Drag Bits: Used for softer formations like clay and sand.
- PDC Bits: Polycrystalline Diamond Compact bits, offering high durability for various rock types.
Monitoring the Drilling Progress:
As the drilling progresses, the driller will monitor:
- Formation Changes: Identifying different soil and rock layers.
- Water Strikes: Detecting the presence of groundwater.
- Drilling Rate: Observing how quickly the bit penetrates the material.
Step 3: Installing Well Casing
Once the desired depth is reached, well casing is installed. This is a crucial step for protecting the well from contamination and preventing cave-ins.
- Casing Material: Typically made of steel or PVC (polyvinyl chloride), chosen based on local regulations and geological conditions. Steel casing is often preferred in areas with unstable ground or where iron is present in the groundwater.
- Casing Diameter: The diameter of the casing will depend on the size of the pump and the required water flow. Common diameters range from 4 to 8 inches.
- Installation: The casing is lowered into the drilled hole. For deeper wells, especially in unstable formations, the casing might be cemented in place from the bottom to the surface to create a watertight seal. This prevents surface water from migrating down the annulus between the casing and the borehole wall.
Step 4: Developing the Well
Well development is the process of cleaning and preparing the aquifer to deliver its maximum yield of clean water to the well. This removes drilling fluid, fine sediment, and other debris from the aquifer pores and the well screen.
- Surging: This involves rapidly increasing and decreasing the water level in the well to create pressure fluctuations that help dislodge fine particles.
- Bailing: Removing loose sediment from the bottom of the well.
- Jetting or Air Lifting: Using high-pressure water or air to flush out the well.
Step 5: Installing the Well Screen
A well screen is a perforated section of casing placed opposite the aquifer. It allows water to enter the well while preventing sand and gravel from entering.
- Screen Type: Screens come in various slot sizes, chosen based on the size of the sand and gravel in the aquifer.
- Installation: The well screen is typically installed at the bottom of the well, within the water-bearing zone.
Step 6: Sealing the Annulus (Grouting)
After the well casing is installed and the well is developed, the space between the borehole and the casing (the annulus) is sealed, usually with cement grout. This prevents the migration of surface water and shallower, potentially contaminated groundwater into the deeper aquifer.
- Grout Mixture: A mixture of cement, water, and sometimes bentonite clay is used.
- Placement: The grout is pumped into the annulus from the bottom up, ensuring a complete seal.
Step 7: Well Development and Testing
After grouting, the well is further developed, and its performance is tested.
- Pumping Test: The well is pumped at a sustained rate to determine its yield (gallons per minute) and how the water level changes over time. This test is crucial for sizing the well pump installation.
- Water Quality Testing: Samples are collected and sent to a lab for analysis to check for contaminants like bacteria, nitrates, and heavy metals.
Well Pump Installation
Once the well is drilled, developed, and tested, the next critical step is the well pump installation. This system brings the water from the well to your home.
Types of Well Pumps
- Submersible Pumps: These are the most common type for deep wells. They are placed directly in the water below the water level and push water up. They are efficient and quiet.
- Jet Pumps: These are typically used for shallower wells and are located above ground. They use a motor and an impeller to create suction, drawing water up.
- Hand Pumps: A manual option, useful for backup or in areas without electricity.
Key Components of a Well Pump System:
- Pump: The device that lifts the water.
- Drop Pipe: Connects the pump to the surface.
- Pitless Adapter (for cold climates): A device that allows the water line to exit the well below the frost line, preventing freezing.
- Pressure Tank: Stores water under pressure, reducing the frequency the pump cycles on and off.
- Pressure Switch: Turns the pump on and off based on water pressure in the tank.
- Wiring and Controls: Electrical components to power and operate the pump.
Considerations for Pump Installation:
- Pump Size and Capacity: Must match the well’s yield and your household’s water demand.
- Depth of Pump Setting: The pump should be set below the expected minimum water level in the well.
- Electrical Requirements: The pump needs a dedicated electrical circuit.
DIY Well Drilling vs. Professional Drilling
Deciding whether to undertake DIY well drilling or hire professionals is a significant choice. The well drilling cost can be a major factor, but so are safety, efficiency, and the likelihood of success.
DIY Well Drilling: Pros and Cons
Pros:
- Potential Cost Savings: If done correctly, it can be cheaper than hiring a professional.
- Sense of Accomplishment: The satisfaction of completing a major project yourself.
Cons:
- High Risk: Involves significant physical labor and potential for injury.
- Specialized Equipment: Requires expensive and specialized well drilling equipment, including a drilling rig, which may need to be rented or purchased.
- Technical Knowledge: Requires a deep understanding of geology, drilling techniques, and safety protocols.
- Permitting and Regulations: Navigating these can be complex.
- Time Commitment: Can be a very time-consuming process.
- Risk of Failure: Incorrect techniques can lead to a dry well, contaminated water, or damage to the aquifer.
Professional Well Drilling: Pros and Cons
Pros:
- Expertise and Experience: Professionals have the knowledge and skills to drill efficiently and safely.
- Proper Equipment: They have access to the right well drilling equipment, including powerful drilling rigs.
- Efficiency: They can typically complete the job much faster than a DIYer.
- Troubleshooting: Experienced drillers can handle unexpected geological challenges.
- Guaranteed Water Source (often): Reputable companies often guarantee a certain water yield.
- Compliance: They are familiar with all necessary permits and regulations.
Cons:
- Higher Initial Cost: The well drilling cost is generally higher when hiring professionals.
Estimating Well Drilling Cost
The well drilling cost can vary significantly based on:
- Depth of the Well: Deeper wells require more time and resources.
- Geological Conditions: Drilling through hard rock is more expensive than drilling through soft soil.
- Location: Labor and material costs vary by region.
- Casing and Screen Material: Steel casing is typically more expensive than PVC.
- Contractor’s Overhead and Profit: Different companies will have different pricing structures.
A rough estimate for well drilling cost can range from $15 to $30 per foot for drilling alone, not including casing, pump, and other components. A typical residential well might cost anywhere from $5,000 to $15,000 or more.
Shallow Well Drilling vs. Deep Well Drilling
The choice between shallow well drilling and deep well drilling depends entirely on your local conditions and water availability.
Shallow Well Drilling
- Depth: Typically less than 100 feet.
- Method: Often accomplished with simpler equipment, like driven wells or smaller rotary rigs.
- Water Source: Taps into the shallowest aquifer, which may be more susceptible to surface contamination and drought.
- Cost: Generally less expensive due to less depth and simpler equipment.
- Pump: Often suitable for jet pumps or smaller submersible pumps.
Deep Well Drilling
- Depth: Can range from 100 feet to several hundred feet, or even more.
- Method: Requires more robust drilling rig and techniques, often rotary drilling.
- Water Source: Accesses deeper, more stable aquifers, which are generally less prone to contamination and drought.
- Cost: Significantly more expensive due to the depth and complexity.
- Pump: Requires submersible pumps designed for deeper settings.
Maintaining Your Well
Once your well is providing water, proper maintenance is crucial for ensuring its longevity and water quality.
Regular Inspections
- Wellhead: Check for any damage or signs of contamination around the well cap.
- Pressure Tank: Monitor its operation and listen for any unusual noises.
- Pump Performance: Note any changes in water pressure or flow rate.
Water Quality Testing
It’s recommended to test your well water annually for bacteria and nitrates, and every 3-5 years for other common contaminants.
Wellhead Protection
Ensure the area around the wellhead is kept clear and properly sealed to prevent the entry of contaminants.
Professional Servicing
Periodically, have a qualified well technician inspect your pump and system to ensure everything is functioning optimally.
Frequently Asked Questions (FAQ)
Q1: How long does it take to drill a well?
A: The time it takes to drill a well can vary greatly, but for a typical residential well, it can take anywhere from a few days to a week or more, depending on the depth, geological conditions, and the efficiency of the drilling crew.
Q2: What is a well casing?
A: A well casing is a pipe, usually made of steel or PVC, that is installed in the borehole to prevent the sides of the hole from collapsing and to keep surface contaminants from entering the groundwater.
Q3: Can I use a regular power drill to drill a well?
A: No, a regular power drill is not designed for water well drilling. You need specialized well drilling equipment, including a drilling rig capable of penetrating rock and soil to significant depths.
Q4: What is the average well drilling cost?
A: The average well drilling cost can range from $5,000 to $15,000 or more, with the price largely dependent on the depth of the well, local geology, and the materials used.
Q5: What is involved in a well pump installation?
A: Well pump installation involves placing a pump (usually submersible for deep wells) into the well, connecting it to piping, a pressure tank, and an electrical supply system to bring water to your home.
Q6: Is shallow well drilling a good option?
A: Shallow well drilling can be an option if a reliable shallow aquifer is available and regulations permit it. However, shallow wells are more susceptible to contamination and drought compared to deeper wells.
Q7: What are the risks of DIY well drilling?
A: The risks of DIY well drilling are substantial and include personal injury, damage to the aquifer, drilling a dry hole, or creating a pathway for contamination, all of which can lead to significant financial losses and safety hazards.
Q8: How do I find a reputable well driller?
A: Look for licensed and insured contractors, check reviews and testimonials, ask for references, and get multiple quotes before making a decision.
Conclusion
Drilling your own well can be a rewarding experience, but it’s a serious undertaking that requires careful planning, specialized equipment, and a commitment to safety and environmental responsibility. While DIY well drilling might seem appealing for cost savings, the complexities involved often make hiring experienced professionals the most reliable and safe approach to securing a consistent water supply for your home. From site selection and legal permits to the intricacies of water well drilling, well casing installation, and the crucial well pump installation, every step demands precision and expertise. Whether you opt for shallow well drilling or deep well drilling, investing in a properly installed and maintained well is an investment in your property and your family’s well-being.