
Can you drill a hole in stone? Yes, you absolutely can drill a hole in stone with the right tools and techniques. This guide will walk you through the process, making it easier than you might think.
Drilling a hole in stone can seem like a daunting task, but with the proper knowledge and equipment, it’s achievable for most DIY enthusiasts. Whether you’re looking to hang a shelf, install a fixture, or get creative with stone crafts, this guide covers everything you need to know. We’ll delve into the essential tools, various stone drilling techniques, and crucial masonry drilling tips to ensure your success.
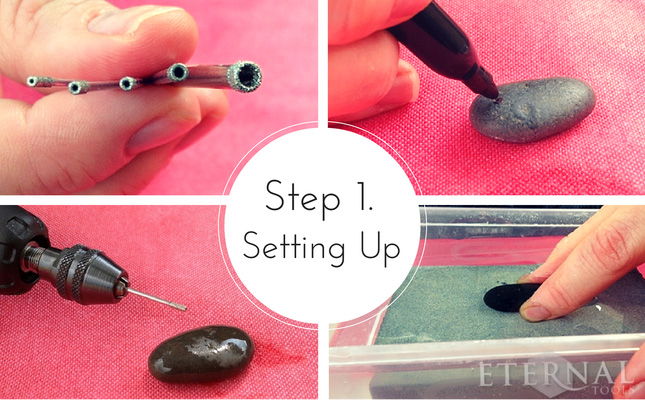
Image Source: theme-assets.ecommercedns.uk
Essential Tools for Drilling Stone
Before you begin, gather the necessary tools. Having the right equipment is half the battle when it comes to drilling natural stone.
The Best Drill for Stone
Choosing the best drill for stone is crucial. For most stone drilling tasks, a powerful corded drill is recommended due to the demanding nature of the material. However, for lighter jobs or when portability is key, a high-quality cordless drill with sufficient torque can also work.
- Hammer Drill vs. Standard Drill: A hammer drill stone setting is incredibly useful. This feature adds a percussive action to the rotation, which helps to break up the stone more effectively. For harder stones or larger holes, a hammer drill is highly recommended. A standard drill might struggle and overheat.
- Variable Speed Control: Look for a drill with variable speed settings. This allows you to start slow and gradually increase speed as needed, which helps prevent the drill bit from overheating and provides better control.
Drill Bits: The Key to Success
The type of drill bit you use is paramount. Standard wood or metal drill bits will not work on stone.
- Diamond Drill Bits for Stone: For drilling through dense and hard materials like granite, marble, or tile, diamond drill bits for stone are essential. These bits have a cutting edge coated with industrial diamonds, which are the hardest known material. This allows them to grind through stone efficiently.
- Types of Diamond Bits:
- Cored Diamond Bits: These are often used for larger diameter holes and create a core that is removed. They are very effective but can be slower.
- Solid Diamond Bits: These are more common for smaller to medium holes and essentially grind away the material.
- Types of Diamond Bits:
- Carbide-Tipped Masonry Bits: For softer stones like sandstone or some types of slate, carbide-tipped masonry bits can be sufficient. They are more affordable than diamond bits but will wear out much faster, especially on harder materials.
- Hole Saw for Stone: For creating larger, circular openings, a hole saw for stone is the tool of choice. These typically have a pilot drill bit in the center to guide the cut, with diamond-coated or carbide-tipped teeth around the circumference.
Other Important Supplies
- Safety Gear: Always wear safety glasses or goggles to protect your eyes from flying debris. Hearing protection is also advisable, especially when using a hammer drill. A dust mask is a good idea to prevent inhaling fine stone dust.
- Water Source: Keeping the drill bit cool is vital for both the bit’s longevity and the quality of the cut. A spray bottle with water, a hose with a low-pressure flow, or a dedicated water-cooled drilling stone system is highly recommended.
- Marking Tools: A pencil, marker, or chalk to mark your drilling location.
- Painter’s Tape or Masking Tape: Applying tape to the drilling area can help prevent chipping on the surface.
- Center Punch: For harder stones, a center punch can create a small indentation to guide the drill bit and prevent it from wandering at the start.
- Clamps: To secure the workpiece if it’s not a permanent installation.
Preparing Your Workspace and Stone
Proper preparation ensures a smoother and safer drilling experience.
Safety First
- Eye Protection: Always wear safety glasses.
- Hearing Protection: Use earplugs or earmuffs.
- Dust Mask: Protect your lungs from dust.
- Gloves: Protect your hands.
- Secure the Workpiece: Ensure the stone is stable and won’t move during drilling. Use clamps if necessary.
Marking Your Spot
- Accuracy: Clearly mark the exact spot where you want to drill the hole.
- Center Punching: For harder stones, use a center punch to create a small dimple at your mark. This will help the drill bit start in the correct position and prevent it from skipping across the surface.
- Masking Tape: Apply painter’s tape over the marked area. This can help to reduce surface chipping, especially on finished or polished stone.
Step-by-Step Stone Drilling Techniques
Now, let’s get to the actual drilling process. Different stone drilling techniques exist, but the general principles remain the same.
Step 1: Set Up Your Drill
- Insert the Drill Bit: Securely insert the appropriate drill bit (diamond or carbide-tipped) into your drill’s chuck. Ensure it’s tight.
- Select Speed: Start with a low speed setting on your drill. You can gradually increase it as you get into the material.
- Hammer Function: If using a hammer drill stone setting, engage it only after you’ve made an initial small indentation. For very hard stones, you might use it more frequently, but for softer ones, it can cause excessive chipping.
Step 2: Starting the Hole
- Initial Contact: Hold the drill perpendicular to the stone surface.
- Slow and Steady: Begin drilling at a slow speed.
- Gentle Pressure: Apply light, steady pressure. Let the drill bit do the work. Forcing the drill can cause it to overheat or break the bit.
- Center Punch Guide: If you used a center punch, align the tip of your drill bit with the indentation.
Step 3: Drilling Through the Stone
- Cooling is Key: This is where water-cooled drilling stone becomes important. Periodically spray water onto the drilling area. This cools the bit, washes away debris, and reduces dust. If you’re drilling something that needs to be clean, you might need to pause and rinse the area.
- Water Application:
- Spray Bottle: For small jobs, a spray bottle is sufficient.
- Hose: A slow trickle from a hose can be used for larger projects.
- Dedicated Coolant: For extensive work, specialized drilling coolant can be used.
- Water Application:
- Clear Debris: As you drill, dust and small chips will accumulate. If the hole seems blocked or you’re not making progress, pull the drill bit out slightly (while it’s still spinning slowly) to clear the debris. This also helps with cooling.
- Maintain Perpendicularity: Keep the drill as straight as possible throughout the process. Angled drilling can stress the bit and lead to breakage.
- Increasing Pressure: Once you’ve established a small pilot hole, you can gradually increase the speed and apply slightly more pressure, but always listen to your drill and the stone. If you hear straining, ease off.
- Cutting Stone with Drill: When cutting stone with drill, especially when using a hole saw, maintain a consistent speed and pressure.
- Patience: Drilling stone takes time. Don’t rush the process.
Step 4: Exiting the Stone
- Reduce Speed: As you feel the drill bit nearing the other side, reduce the drill speed.
- Ease Pressure: Lighten the pressure considerably. This helps prevent chipping on the exit side.
- Backing Up: Some people find it helpful to drill halfway through, then flip the stone over and finish drilling from the other side to create a cleaner hole. This works best for thinner materials.
Step 5: Cleaning Up
- Remove Debris: Once the hole is complete, remove any loose stone fragments.
- Rinse: Rinse the area with water to remove fine dust.
- Inspect: Check the hole for any rough edges. You can sometimes smooth these with a bit of sandpaper or a finer grit diamond file, but be careful not to enlarge the hole unintentionally.
Specific Stone Drilling Scenarios
Let’s explore some specific situations and how to handle them.
Drilling Ceramic Tile
Ceramic tile is relatively easy to drill, but it can still crack if done incorrectly.
- Best Drill Bit: Carbide-tipped masonry bits or specialized tile drill bits are usually sufficient. For very hard porcelain tiles, a diamond-tipped bit is better.
- Technique: Start with a low speed. Use masking tape on the surface. Apply water to keep the bit cool. Drill slowly and steadily. Avoid using the hammer function.
Drilling Natural Stone (Granite, Marble, Slate)
Drilling natural stone requires more care and the right tools.
- Best Drill Bit: Diamond drill bits for stone are almost always necessary for granite and marble. For softer slate, a good carbide-tipped bit might work for small holes.
- Technique: Use a hammer drill stone setting if available, but start slowly. Keep the bit well-lubricated with water. Use a center punch to start. Be prepared for it to take longer than drilling tile.
Drilling Concrete
Concrete is harder than most natural stone and requires specific techniques.
- Best Drill Bit: A carbide-tipped masonry bit is the minimum requirement. For dense concrete or rebar, a diamond-tipped bit is superior. A SDS-Plus or SDS-Max rotary hammer is the ideal tool for concrete.
- Technique: Use the hammer function consistently. Keep the bit cool. Clear debris frequently.
Using a Hole Saw for Stone
A hole saw for stone is used to create larger, clean-edged holes.
- Preparation: Mark your center point. Apply masking tape.
- Setup: Fit the appropriate hole saw onto your drill. Ensure the pilot bit is sharp and centered.
- Drilling: Start at a slow speed with gentle pressure. Once the pilot bit has dug in, increase speed slightly. Apply water for cooling.
- Kerf: The gap between the teeth of the hole saw is called the kerf. As you drill, it’s important to clear this kerf of debris so the saw doesn’t bind. Periodically lift the saw slightly while it’s still spinning to clear material.
- Pressure: Apply steady, even pressure. If the saw starts to struggle, ease off and let it cool.
Troubleshooting Common Issues
Even with the best preparation, you might encounter problems.
| Problem | Cause | Solution |
|---|---|---|
| Drill Bit Not Cutting | Dull bit, incorrect bit type, overheating | Use a diamond bit, ensure it’s new or sharp, use water for cooling, check drill speed. |
| Excessive Chipping | Too much pressure, wrong drill speed, no tape | Reduce pressure, use slower speed, apply masking tape, consider drilling from both sides for exit holes, use a pilot hole first. |
| Drill Bit Wandering | No starting point on smooth surface | Use a center punch, apply masking tape, start at very slow speed. |
| Overheating Drill/Bit | Insufficient cooling, drilling too fast/hard | Increase water application, slow down drilling speed, reduce pressure, take breaks to let the bit cool. |
| Hole Saw Binding | Debris in kerf, forcing the cut | Periodically lift the hole saw while drilling to clear debris, maintain steady speed, do not force the cut. |
| Drill Motor Overheating | Overworking the drill, insufficient cooling | Use a hammer drill on appropriate settings, ensure the drill’s ventilation is clear, take breaks, use a corded drill for sustained work on hard materials. |
Portable Stone Drills vs. Benchtop Drills
While most DIY projects can be handled with a portable stone drill, larger or more precise jobs might benefit from other equipment.
- Portable Stone Drills: These are your standard drills and hammer drills. They offer versatility and are suitable for most household tasks, from hanging pictures to installing plumbing fixtures.
- Diamond Core Drills: For very clean, large-diameter holes (like for plumbing or ventilation shafts), a dedicated diamond core drill rig is often used. These are specialized tools that provide immense stability and water supply, ensuring precise and efficient cuts. While not typically considered a portable stone drill in the consumer sense, they are essential for professional stone work.
Advanced Techniques and Considerations
For those looking to push the boundaries of their stone drilling projects:
- Drilling on Angles: If you need to drill at an angle, it’s best to create a small jig or guide to ensure the drill bit doesn’t slip.
- Drilling Wet vs. Dry: While dry drilling is possible, it’s generally discouraged for most stone. The dust generated is hazardous, and the heat build-up significantly reduces the lifespan of your drill bits. Water-cooled drilling stone methods are superior for performance and longevity.
- Hole Depth: Be mindful of the depth of your hole. Ensure your drill bit is long enough for the task, but also be aware that drilling very deep holes in hard stone can be time-consuming and challenging.
Frequently Asked Questions (FAQ)
Here are some common questions people have about drilling stone:
- Q: Can I use my regular drill for stone?
A: For softer stones like slate or sandstone, a good quality standard drill with carbide-tipped bits might work for small holes. However, for harder stones like granite or marble, a hammer drill or rotary hammer with diamond bits is strongly recommended. - Q: How do I prevent my drill bit from breaking?
A: Keep the bit cool with water, use the correct speed for the material, apply steady but not excessive pressure, and ensure the bit is properly seated in the drill chuck. - Q: What is the best way to make a clean hole in tile?
A: Use a tile or diamond-tipped drill bit, start at a low speed, apply masking tape to the surface, and use water to cool the bit. Avoid the hammer function. - Q: How deep can I drill into stone?
A: The depth depends on the power of your drill, the length of your drill bit, and the hardness of the stone. For most DIY projects, holes up to a few inches deep are common. For deeper holes, specialized equipment is usually required. - Q: Do I need a special drill for stone?
A: While you can attempt some stone drilling with a standard drill and the right bits, a hammer drill or rotary hammer is significantly more effective for harder stones. For extensive or precise work, professional-grade drills are ideal.
Conclusion
Drilling a hole in stone is a skill that can be learned with patience and the right approach. By selecting the best drill for stone, the appropriate drill bits like diamond drill bits for stone, and employing careful stone drilling techniques, you can successfully tackle a variety of projects. Remember to prioritize safety, keep your bits cool with water-cooled drilling stone methods, and don’t be afraid to go slow and steady. Happy drilling!