
Can you sharpen a drill bit at home? Yes, you absolutely can sharpen a drill bit at home, and doing so can save you money and improve your drilling performance significantly. A sharp drill bit cuts through materials more easily, produces cleaner holes, and requires less effort, which in turn puts less strain on your drill and the user. This guide will walk you through the essential techniques and tools for mastering drill bit sharpening.
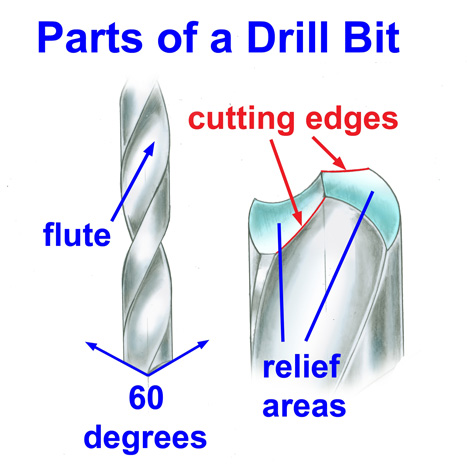
Image Source: www.gia.edu
Why Sharpening Drill Bits Matters
Dull drill bits are a common problem for DIYers and professionals alike. Over time, the cutting edges of a drill bit wear down from friction and contact with materials. This wear can lead to several issues:
- Slower Drilling: Dull bits require more force, making the drilling process take longer.
- Heat Buildup: Increased friction generates heat, which can damage the drill bit itself and the material you’re drilling into. This is especially problematic when sharpening metal drill bits, as overheating can ruin the temper of the steel.
- Poor Hole Quality: Dull bits tend to wander, producing oversized or rough holes that are not precise.
- Increased Tool Wear: Pushing a dull bit puts extra strain on your drill motor and chuck, potentially shortening their lifespan.
- Operator Fatigue: More force means more effort for you, leading to quicker exhaustion.
Regularly sharpening your drill bits ensures they perform at their best, making your projects smoother and more efficient.
Tools for Drill Bit Sharpening
Several tools can help you achieve a sharp drill bit. The best choice depends on the type of drill bit, the material it’s used for (like sharpening wood drill bits versus sharpening metal drill bits), and your budget.
1. Drill Bit Grinders
A drill bit grinder is a specialized tool designed specifically for sharpening drill bits. These machines typically have abrasive wheels that spin at high speeds, allowing you to grind the cutting edges of the drill bit to a sharp point.
- Bench Grinder Drill Bit Attachment: Many bench grinders can be fitted with specific drill bit grinding attachments. These attachments often include guides or jigs to help you hold the drill bit at the correct angle for effective sharpening. They offer a good balance of power and control.
- Dedicated Drill Bit Sharpeners: These are standalone machines that may look like a small bench grinder but are optimized for drill bits. Some advanced models can handle a wide range of bit sizes and types, even some specialty bits.
2. Manual Sharpening Tools
For those who prefer a more hands-on approach or don’t have access to powered grinders, manual options are available.
- Sharpening Stones/Hones: A sharpening stone, or honing stone, can be used for drill bit honing. This requires a steady hand and practice to maintain the correct angles. You’ll typically use a diamond file or a fine-grit stone for this.
- Portable Drill Sharpeners: These are compact, handheld devices that can be attached to your regular drill. You insert the dull drill bit into the sharpener, and it uses abrasive inserts to restore the cutting edges. They are convenient for on-the-go sharpening but may not achieve the same level of precision as a dedicated grinder.
3. Jigs and Guides
Precision is key when sharpening drill bits. Jigs and guides help you maintain the correct angles and consistent pressure.
- Drill Sharpening Jig: A drill sharpening jig is an accessory that holds the drill bit securely and guides it against the grinding wheel or stone at the correct angle. Many bench grinder attachments and portable sharpeners incorporate a jig system.
How to Sharpen a Twist Drill: A Step-by-Step Guide
How to sharpen a twist drill is a common question, and the process involves restoring the primary and secondary cutting edges. Here’s a general guide, focusing on a common method using a bench grinder with an attachment or a dedicated drill bit grinder.
Preparation is Key
Before you start sharpening drill bits, gather your tools and prepare your workspace.
- Safety First: Always wear safety glasses to protect your eyes from flying debris. Gloves can also be helpful to protect your hands.
- Clean the Drill Bit: Remove any dirt, rust, or built-up material from the drill bit. A wire brush or a degreaser can be used for this.
- Identify the Cutting Edges: A standard twist drill bit has two primary cutting edges at the tip, which form a point. There are also secondary bevels behind these edges that help with clearance.
Step-by-Step Sharpening Process (Bench Grinder Method)
This method assumes you have a bench grinder with a drill bit grinding attachment or a jig.
-
Set Up the Grinder:
- Ensure the grinder is stable and securely mounted.
- Install the appropriate grinding wheel. For general-purpose sharpening, a medium-grit (e.g., 60-80 grit) aluminum oxide wheel is common for steel bits.
- If using an attachment or jig, install it according to the manufacturer’s instructions. Adjust the angle guides for the primary clearance angle (typically 11-15 degrees for general use).
-
Position the Drill Bit:
- Insert the shank of the drill bit into the holder or guides of your jig.
- Most jigs allow you to rotate the drill bit in a specific arc. The key is to present the cutting edge to the grinding wheel at the correct angle.
-
Grind the Primary Cutting Edge:
- With the grinder running, gently bring the primary cutting edge of the drill bit into contact with the spinning grinding wheel.
- Move the drill bit in a slight rocking or sweeping motion, following the path dictated by your jig. This ensures you grind the entire length of the cutting edge evenly.
- Important: Apply light pressure. Let the wheel do the work. Excessive pressure will overheat the bit and can damage its temper.
- After grinding one side of the point, rotate the drill bit within the jig to grind the opposite cutting edge to match. The goal is to achieve a symmetrical point.
- Periodically dip the drill bit in water to cool it down, especially if you feel it getting too hot. This prevents overheating and preserves the bit’s hardness.
-
Grind the Secondary Clearance (Heel) Bevel:
- Once the primary cutting edges are sharp, you need to create a secondary clearance angle (the “heel”) behind the primary edge. This prevents the bit from rubbing against the hole wall and reducing friction.
- Most specialized drill bit grinders and attachments have a separate setting or motion for this. You’ll typically rotate the drill bit slightly so that the heel contacts the wheel.
- Again, use light pressure and grind evenly on both sides, ensuring the secondary bevels are consistent and don’t interfere with the primary cutting edge.
-
Check the Point:
- Remove the drill bit from the grinder and examine the tip. The two cutting edges should be symmetrical and sharp.
- You can test sharpness by gently touching the edge with your fingernail; it should feel like it wants to bite. Alternatively, try drilling a small piece of scrap wood or plastic.
- If the point is not symmetrical or sharp enough, repeat the grinding process with light passes.
Sharpening Metal Drill Bits vs. Sharpening Wood Drill Bits
While the general principles of sharpening apply to both, there are nuances:
- Metal Drill Bits: These are typically made of High-Speed Steel (HSS) or carbide. When sharpening metal drill bits, preventing overheating is paramount. The temper of the steel can be ruined if it gets too hot, making the bit brittle or soft. Frequent cooling in water is essential. Carbide bits are harder and more brittle, so they require even lighter pressure.
- Wood Drill Bits: These are often made of simpler steel. While overheating is still a concern, they are generally more forgiving. The primary goal for wood bits is a sharp point that cleanly penetrates the wood fibers. Some wood bits have a spur or pilot point that also needs to be maintained.
Using a Portable Drill Sharpener
Portable drill sharpeners offer a convenient alternative for quick touch-ups.
- Select the Correct Adapter: Most portable sharpeners come with different collets or adapters to fit various drill bit shank sizes.
- Insert the Drill Bit: Securely insert the drill bit into the sharpener’s chuck or holder.
- Sharpen: Many portable sharpeners work by inserting the sharpener into your drill and then inserting the drill bit into the sharpener. You then run the drill at a low speed and press the drill bit against the abrasive surface according to the device’s instructions. Some have manual crank mechanisms.
- Rotate and Repeat: You’ll typically need to rotate the drill bit to sharpen both cutting edges and the secondary clearance. Follow the product’s specific instructions for the number of turns or passes.
These are generally best for maintaining existing sharpness rather than restoring severely dulled bits.
Sharpening with a Sharpening Stone or File
This method, often referred to as drill bit honing, requires more skill but is feasible for smaller bits or when power tools aren’t available.
- Secure the Bit: Clamp the drill bit securely in a vise. If you don’t have a vise, you might need to improvise or rely on a drill sharpening jig that can be used with stones.
- Choose the Right Abrasive: Use a fine-grit sharpening stone (like a diamond stone or a fine-grit ceramic stone) or a specialized metal file.
- Replicate the Original Angles: The most challenging part is replicating the original point geometry. You need to grind the primary cutting edge and the secondary clearance angle.
- Primary Edge: Hold the stone at the correct angle to the cutting edge and move it in a sweeping motion along the edge.
- Secondary Clearance: Angle the stone slightly differently to grind the heel of the bit.
- Work Symmetrically: Grind each side of the point equally. Take very light passes.
- Cooling: Dip the bit in water frequently.
This method is best learned through practice. Many woodworking or metalworking instructors demonstrate how to sharpen a twist drill using files and stones.
Maintaining Your Sharpened Drill Bits
Sharpening is only part of the equation. Proper care ensures your bits stay sharp longer.
- Use Correct Speeds: Drilling too fast generates excess heat. Consult charts for recommended speeds based on the material and bit size.
- Apply Appropriate Pressure: Let the drill bit do the cutting. Forcing it leads to faster dulling and breakage.
- Coolant for Metal: When drilling metal, especially harder metals, use a cutting fluid or lubricant. This significantly reduces friction and heat, extending the life of your bit and improving cut quality.
- Store Properly: Keep drill bits organized in a case or rack to prevent them from bumping into each other and damaging their cutting edges.
Common Pitfalls to Avoid
- Overheating: This is the number one enemy of sharp drill bits. Always cool your bits in water during grinding.
- Grinding Too Much: Remove only the minimum amount of material necessary to restore the cutting edge.
- Asymmetrical Grinding: Uneven sharpening will lead to poor drilling performance and can damage the bit.
- Incorrect Angles: While precise angles aren’t always critical for casual use, extreme deviations from the original geometry will negatively impact cutting.
- Using Worn-Out Grinding Wheels: A worn wheel can make it harder to achieve the correct angles and can lead to uneven sharpening.
Types of Drill Bits and Sharpening Considerations
While this guide focuses on twist drills, other bits have different sharpening needs:
- Spade Bits (for Wood): These have a pointed center spur and two side cutters. The spur should be sharpened to a fine point, and the side cutters need to be sharpened from the top edge.
- Auger Bits (for Wood): These have a screw-like lead point and cutting spurs. The spurs are the primary cutting elements and require careful sharpening to maintain their shape and sharpness.
- Masonry Bits: These have a carbide tip with a chisel-like shape. They are harder to sharpen and often benefit more from replacement, though specialized carbide sharpeners exist.
- Forstner Bits: These create flat-bottomed holes and have a rim cutter and two spurs. Sharpening requires a small round file or stone on the rim and spurs.
For most common DIY tasks, mastering the sharpening drill bits of standard twist drills is the most valuable skill.
When is it Time to Replace a Drill Bit?
Even with proper sharpening, drill bits have a finite lifespan. Consider replacing a bit if:
- The Bit is Severely Damaged: If the tip is chipped, broken, or the flutes are damaged beyond repair.
- Excessive Material Loss: If you’ve had to grind away so much material that the bit is significantly shorter than its original length.
- Inability to Sharpen: If despite your best efforts, you can’t achieve a sharp, symmetrical cutting edge.
- Material Type: Extremely hard materials like hardened steel might require specialized bits that are often replaced rather than sharpened.
Conclusion
Mastering the art of how to sharpen a drill bit is a rewarding skill for any tradesperson or hobbyist. By using the right tools, like a drill bit grinder or a drill sharpening jig, and following careful techniques, you can significantly extend the life of your drill bits and improve your drilling accuracy and efficiency. Remember to prioritize safety, use cooling methods to prevent overheating, and practice for the best results. With a little practice, you’ll be able to keep your bits razor-sharp and ready for any project.
Frequently Asked Questions (FAQ)
Q1: How often should I sharpen my drill bits?
A1: The frequency depends on how often you use them and the materials you drill. For light DIY use, you might sharpen them every few months. For heavy use, you might need to sharpen them weekly or even daily. A good indicator is when you notice drilling taking more effort or producing rougher holes.
Q2: Can I use a standard bench grinder to sharpen drill bits?
A2: Yes, a standard bench grinder can be used, especially with a dedicated drill bit grinding attachment or a drill sharpening jig. Without these, it’s much harder to maintain the correct angles, but it’s possible with practice and a steady hand.
Q3: What is the correct angle for sharpening a drill bit?
A3: For general-purpose twist drills, the primary cutting edge is typically ground at an angle of around 59 degrees (forming a 118-degree point angle). The secondary clearance angle (heel) is usually around 8-12 degrees. Most drill bit grinders and jigs are pre-set to these common angles.
Q4: Will sharpening damage my drill bits?
A4: If done incorrectly, yes. The biggest risk is overheating, which can ruin the temper of the steel, making the bit brittle or soft. Grinding away too much material or creating uneven angles can also reduce the bit’s effectiveness. Using light pressure and cooling is crucial.
Q5: What’s the difference between sharpening and honing?
A5: Sharpening involves removing material to create new, sharp edges. Honing is a finer process of refining and realigning the existing edge to make it even sharper and smoother. Often, the terms are used interchangeably in casual conversation about drill bit honing, but technically, sharpening is the primary process of restoring the edge.
Q6: Can I sharpen carbide-tipped drill bits?
A6: Yes, but it’s more challenging. Carbide is very hard but also brittle. They require specialized diamond grinding wheels and very light pressure. For many, replacing carbide-tipped bits is more practical than sharpening them, especially if they are inexpensive.
Q7: What kind of abrasive should I use for sharpening metal drill bits?
A7: For sharpening metal drill bits, aluminum oxide or silicon carbide wheels are common. Diamond wheels are excellent for harder steels and carbide bits. The grit size depends on how dull the bit is and the desired finish, but a medium grit (60-80) is typical for initial sharpening, followed by a finer grit if needed.
Q8: My drill bit keeps getting hot when I sharpen it. What should I do?
A8: This means you are applying too much pressure or grinding for too long without cooling. Drill bit sharpening generates friction, which creates heat. You must periodically dip the drill bit into a container of water to cool it down. This prevents the bit from losing its hardness.
Q9: How do I know if my drill bit is sharp enough?
A9: A sharp drill bit will easily bite into your fingernail when you gently slide it across the cutting edge. When drilling, it will cut cleanly and with less force, producing shavings rather than dust or melted material. A visually inspection should show a clean, well-defined cutting edge.
Q10: Is a portable drill sharpener as good as a bench grinder?
A10: Generally, a bench grinder with a proper jig provides more control and can achieve a higher level of precision and sharpness, especially for restoring severely dulled bits. Portable drill sharpeners are convenient for quick touch-ups and maintaining slightly dull bits but may not be as effective for heavy-duty sharpening.