
Need to swap out your hole saw bit? It’s a straightforward process. You’ll typically need a specific hole saw adapter, often called an arbor, and a way to loosen the pilot drill bit screw. With the right tools and a few simple steps, you can quickly change your hole saw bit for different cutting tasks.
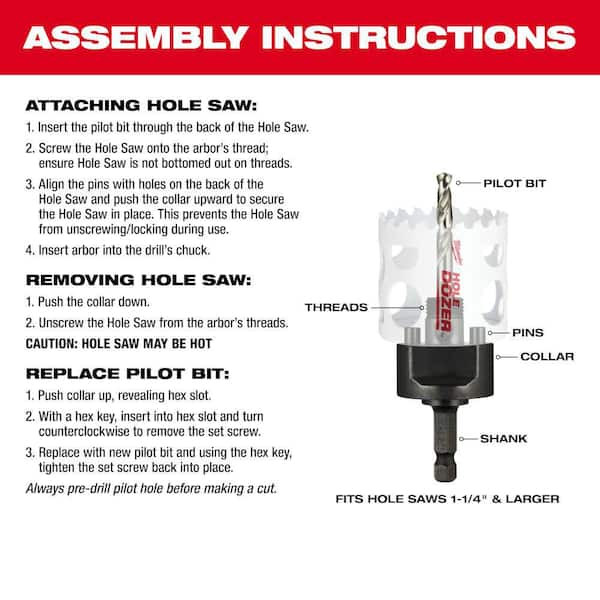
Image Source: images.thdstatic.com
Why Swapping Hole Saws Matters
Hole saws are fantastic tools for making clean, large-diameter holes in various materials like wood, metal, and plastic. However, one hole saw bit isn’t enough for every job. Different projects require different hole sizes. That’s where the ability to change your hole saw bit quickly and safely becomes essential. A quick change system for your hole saws can save you a significant amount of time and frustration, especially if you’re working on a project with many different hole sizes. It allows you to move from cutting a 1-inch hole to a 3-inch hole with minimal downtime. This adaptability is crucial for efficiency and completing your work promptly.
What You Need for a Successful Swap
Before you begin, gather the necessary tools and components. Having everything ready ensures a smooth and efficient changeover.
Essential Tools and Components
- Hole Saw Adapter (Arbor): This is the central piece that connects the hole saw blade to your drill. Most modern arbors are designed for quick changes.
- Hole Saw Blades: Have the different sizes you need for your project.
- Allen Wrench or Hex Key: This is crucial for loosening and tightening the pilot drill bit screw. The size needed will vary depending on the arbor.
- Adjustable Wrench or Pliers (Optional): Sometimes, the arbor itself might have a chuck that needs tightening.
- Safety Glasses: Always protect your eyes from debris.
- Gloves (Optional): To improve grip and protect your hands.
- Workpiece: The material you are drilling into.
The Heart of the System: The Hole Saw Adapter
The hole saw adapter, commonly referred to as an arbor, is the backbone of your hole saw setup. It’s not just a simple connector; it’s engineered to facilitate the secure attachment and rapid detachment of various hole saw blades. Understanding how your arbor works is key to mastering the quick change process.
Types of Arbors
While the core function remains the same, there are a few common types of arbors you might encounter:
- Threaded Arbors: These are the older style. The hole saw blade screws onto the arbor. Changing these can be more time-consuming.
- Quick-Release Arbors: These are designed for speed. They usually feature a spring-loaded mechanism or a bayonet-style mount that allows you to twist and lock the hole saw in place or release it with a simple push.
- Mandrel-Style Arbors: Similar to quick-release, these often use a central shaft with a threaded end and a way to secure the hole saw, often with a set screw.
For the purpose of a quick change system, you’ll primarily be dealing with quick-release or modern mandrel-style arbors.
The Pilot Drill Bit
Every hole saw needs a pilot drill bit at its center. This bit’s job is to guide the hole saw, preventing it from wandering and ensuring a clean start to your cut. The pilot bit is usually held in place by a small screw, often called a pilot bit screw. This screw needs to be loosened to remove the pilot bit itself, which is sometimes necessary for cleaning or replacement.
Step-by-Step Guide to Changing a Hole Saw Bit
Let’s walk through the process of swapping out your hole saw blade. We’ll assume you have a common quick-release arbor system.
Step 1: Safety First!
Always prioritize safety. Before you touch any tools or attempt to change the hole saw bit, ensure:
- The drill is unplugged or the battery is removed. This prevents accidental activation.
- You are wearing safety glasses. Metal shavings and small parts can fly unexpectedly.
- Your work area is clear. Remove any clutter that could interfere with the process or cause a hazard.
Step 2: Detaching the Current Hole Saw
This is where the “quick change” aspect comes into play. The method for detaching will depend slightly on your specific hole saw adapter.
-
For Quick-Release Arbors:
- Look for a collar or sleeve on the arbor, usually near the base where the hole saw attaches.
- Grasp the hole saw blade firmly with one hand.
- With your other hand, pull the collar or sleeve towards the drill chuck. This action disengages the locking mechanism.
- While holding the collar back, twist the hole saw blade counter-clockwise. It should detach from the arbor with minimal effort.
-
For Mandrel-Style Arbors with a Set Screw:
- Locate the small pilot bit screw on the side of the arbor, near the base of the hole saw.
- Use the appropriate Allen wrench to loosen this screw. You don’t need to remove it completely, just loosen it enough so it no longer grips the blade shank of the hole saw.
- With the screw loosened, grip the hole saw and twist it counter-clockwise off the threaded portion of the arbor.
Step 3: Removing the Pilot Drill Bit (If Necessary)
Sometimes, when changing hole saws, you might also need to change the pilot drill bit. This is especially true if you’re drilling into a different material or if the current pilot bit is dull.
- Locate the pilot bit screw on the side of the arbor.
- Use the correct size Allen wrench to loosen this screw.
- Once loose, the pilot bit should slide out from the center of the arbor. You might need to gently wiggle it.
Step 4: Installing the New Hole Saw Blade
Now it’s time to attach your new hole saw.
- If you removed the pilot bit: Slide the new pilot bit into the center of the arbor. Tighten the pilot bit screw just enough to hold it securely. Don’t overtighten at this stage; you may need to adjust it later.
- Align the new hole saw blade: Take your desired hole saw. Notice the internal threads or the notches on the blade shank.
- Mounting the hole saw:
- For Quick-Release Arbors: Align the slots on the back of the new hole saw with the corresponding tabs or locking mechanism on the arbor. Push the hole saw onto the arbor until you feel it seat. Now, push the quick-release collar towards the hole saw and twist the hole saw clockwise until it locks into place. You should hear or feel a click.
- For Mandrel-Style Arbors: Screw the new hole saw onto the threaded portion of the arbor by turning it clockwise. Once it’s snug, use the Allen wrench to tighten the pilot bit screw firmly against the blade shank of the hole saw. This secures it.
Step 5: Securing the Arbor to the Drill
With the new hole saw blade mounted onto the arbor, you need to attach the arbor to your drill.
- Insert the arbor shank: Place the shank of the arbor into your drill’s chuck. Ensure it’s seated as far in as it will comfortably go.
- Chuck Tightening: Close the drill’s chuck around the arbor shank. If you have a keyless chuck, tighten it firmly by hand. If you have a keyed chuck, use the chuck key to tighten it securely on at least two, preferably three, of the chuck’s jaw holes. This ensures the arbor won’t slip during operation. A loose arbor can lead to inaccurate cuts and potential damage.
Step 6: Final Check
Before you start drilling, give everything a final check:
- Is the hole saw firmly attached to the arbor?
- Is the arbor securely gripped by the drill chuck?
- Are you wearing safety glasses?
Maintaining Your Hole Saw Accessory Kit
To ensure your quick change system remains efficient and your hole saws perform optimally, regular maintenance is key. This applies to your accessory kit as a whole.
Cleaning and Lubrication
- After each use: Clean any sawdust, metal filings, or debris from the hole saw teeth, the arbor, and the pilot bit. Compressed air is excellent for this.
- Arbor Threads/Mechanisms: If your arbor has exposed threads or moving parts (like a quick-release collar), a light application of a dry lubricant or anti-seize compound can prevent rust and ensure smooth operation. Avoid heavy greases, as they can attract debris.
- Pilot Bit: Keep the pilot bit clean and sharp. A dull pilot bit can cause the drill to wander and create rougher holes.
Checking for Wear and Damage
- Hole Saw Teeth: Inspect the teeth on your hole saw blades for any signs of wear, chipping, or dullness. Damaged teeth will result in poor cut quality and put extra strain on your drill.
- Arbor Threads: Examine the threads on the arbor for any damage or cross-threading.
- Pilot Bit Screw: Ensure the head of the pilot bit screw isn’t stripped, making it difficult to tighten or loosen.
When to Consider Arbor Replacement
While arbors are generally robust, they can wear out or get damaged.
- Stripped Threads: If the threads on the arbor become stripped, it won’t securely hold the hole saw.
- Damaged Quick-Release Mechanism: If the collar on a quick-release arbor becomes sticky, doesn’t lock properly, or is damaged, the entire arbor might need replacement for safety and functionality.
- Bent Arbor: If the arbor becomes bent, your holes will be off-center and inaccurately drilled.
Mandrel replacement is a common maintenance task for arbors. If the pilot bit is integrated into the arbor and becomes damaged, you might need to replace the entire arbor. Many arbors are designed so the pilot bit can be replaced independently, which is often a more cost-effective solution.
Troubleshooting Common Issues
Even with a good system, you might encounter a few hiccups.
Hole Saw Won’t Detach
- Check the pilot bit screw: Ensure it’s fully loosened. Sometimes, vibration can cause it to re-tighten slightly.
- Release the collar: For quick-release types, make sure you are pulling the collar back fully while twisting.
- Apply gentle force: If it’s stuck, try wiggling the hole saw slightly while twisting. Avoid excessive force, which could damage the arbor.
Pilot Bit Screw is Stripped
- Use a screw extractor: These specialized tools can grip a stripped screw head and allow you to remove it.
- Carefully drill it out: As a last resort, you may need to carefully drill out the screw. Use a drill bit slightly smaller than the screw shank. Once the head is removed, you can usually slide the hole saw off and then remove the remaining screw shank with pliers.
Hole Saw Wobbles or Cuts Off-Center
- Re-secure the arbor to the drill: Ensure the drill chuck is tightened firmly.
- Check hole saw mounting: Make sure the hole saw is properly seated and tightened onto the arbor.
- Pilot drill bit issue: Ensure the pilot bit is sharp and centered correctly in the arbor. If it’s loose or damaged, it can cause wobbling.
Frequently Asked Questions (FAQ)
Q1: Can I use a hole saw blade from one brand with an arbor from another brand?
Generally, yes, but only if the mounting system is compatible. Most hole saw adapters use standard thread sizes (like 5/8″-18 or 1/2″-20 UNF) or have universal quick-release mechanisms. Always check the specifications of both the arbor and the hole saw blade to ensure compatibility. A mismatch can lead to a poor fit, safety hazards, or damage.
Q2: How often should I replace my hole saw bits?
Hole saw bit lifespan depends on the material you’re cutting, the depth of the cut, and the quality of the bit. You should replace or sharpen them when you notice:
- Slower cutting speed.
- Increased heat generation during cutting.
- Rougher cut edges.
- Visible wear or damage to the teeth.
For general woodworking, a good set might last for dozens or even hundreds of holes. For cutting hard metals, the lifespan will be significantly shorter.
Q3: Do I need a special drill for hole saws?
No, you don’t necessarily need a special drill, but a powerful drill with a variable speed setting is highly recommended. A drill with a minimum of 5 amps for wood and a higher amperage or cordless drill with good torque for metal is ideal. A hammer drill function should generally be turned off when using hole saws, as it can damage the hole saw teeth and the arbor. The ability to control the speed is crucial for efficient and safe cutting.
Q4: What is the purpose of the pilot drill bit screw?
The pilot bit screw is used to secure the pilot drill bit in the center of the hole saw adapter. This screw prevents the pilot bit from becoming dislodged during the drilling process, which is essential for guiding the hole saw accurately and safely. It’s also the point you loosen to swap out the pilot bit or detach the hole saw blade from certain types of arbors.
Q5: What is a hole saw adapter called other than an arbor?
While “arbor” is the most common term, you might also hear it referred to as a hole saw mandrel or simply a hole saw holder. Some accessory kits might categorize the arbor and associated parts as a hole saw accessory kit.
Q6: How do I make sure the hole saw is mounted securely?
After mounting the hole saw onto the arbor, ensure the locking mechanism (collar on quick-release, or set screw on mandrel types) is engaged tightly. Then, when attaching the arbor to the drill, make sure the drill’s chuck is tightened securely around the arbor shank. A final visual check and a gentle tug will help confirm it’s secure before you begin drilling.
Q7: Can I use my hole saw without a pilot drill bit?
While it’s technically possible in some soft materials, it is strongly discouraged. The pilot drill bit is crucial for:
- Centering the cut: Preventing the hole saw from wandering off course.
- Starting the cut cleanly: Reducing the chance of the material tearing or chipping.
- Stabilizing the process: Reducing vibration and making the drilling more controlled.
Without a pilot bit, you risk inaccurate holes, damage to your workpiece, and potential injury.
Q8: What are the benefits of a quick change system for hole saws?
A quick change system significantly reduces the time spent switching between different hole saw sizes. This boosts productivity, especially in professional settings or for DIY projects requiring multiple hole diameters. It also minimizes the risk of errors by ensuring the correct bit is mounted securely and efficiently. The ease of swapping makes it more practical to use the precise hole size needed for each task, leading to better results.
By following these steps and tips, you can confidently and efficiently change your hole saw bits, making your drilling projects smoother and more productive. Remember that regular maintenance of your accessory kit will ensure your tools are always ready for the job.