
Yes, you can drill in porcelain tile without cracking it. The key is to use the right tools, techniques, and a bit of patience. Drilling porcelain tile, a notoriously hard material, can seem daunting, but with the proper approach, it’s a manageable DIY task. This guide will walk you through everything you need to know for successful porcelain tile drilling, whether you’re hanging a shelf, installing a towel bar, or need to route a pipe.
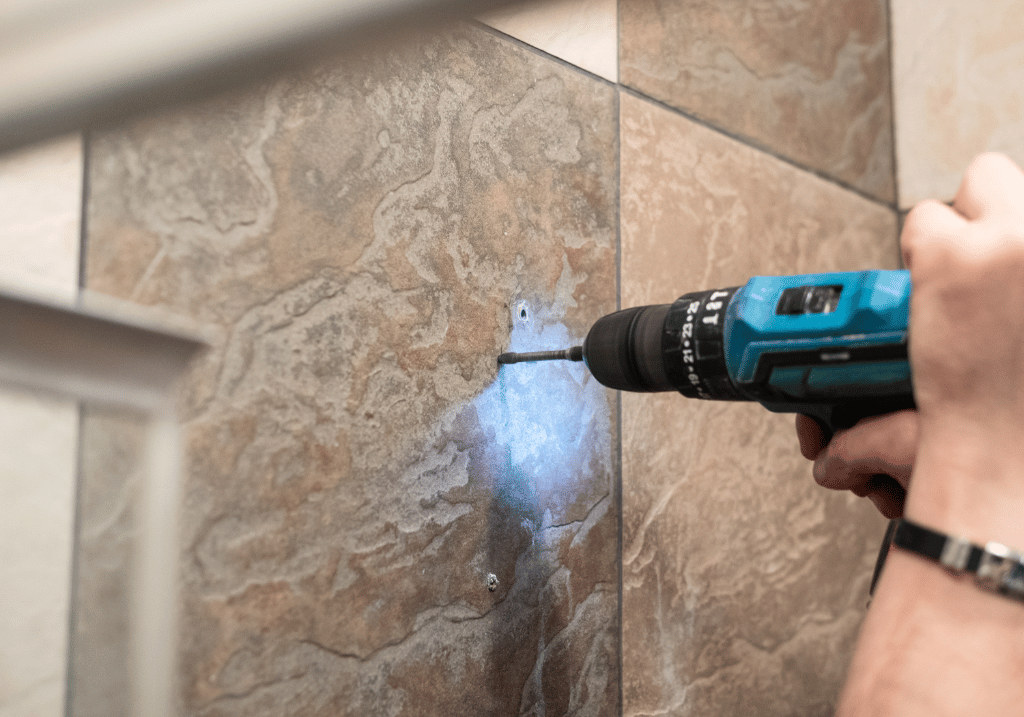
Image Source: ceramiccity.ie
Preparing for Porcelain Tile Drilling
Before you even pick up a drill, careful preparation is crucial for safe and effective porcelain tile drilling. This involves gathering the right supplies and setting up your workspace.
What You’ll Need: Essential Tools and Materials
When embarking on drilling holes in porcelain, having the correct equipment makes all the difference. Here’s a breakdown of what you’ll need:
- Drill: A corded drill is often preferred for its consistent power, but a powerful cordless drill can also work. Look for a drill with variable speed control.
- Tile Drill Bits: This is the most critical component. You absolutely need tile drill bits specifically designed for hard materials like porcelain.
- Diamond-Tipped Drill Bits: These are the undisputed champions for drilling hard tile. They have a tip coated with industrial diamond particles, allowing them to grind through tough materials rather than cutting. They are excellent for drilling ceramic tile and porcelain.
- Carbide-Tipped Masonry Bits: While not ideal for porcelain, these can sometimes work for very small holes if you’re extremely careful. However, for best results and to minimize cracking risk, stick to diamond bits.
- Water Source: Water is vital for cooling the drill bit and the tile, preventing overheating and dust. You can use a spray bottle, a sponge, or a slow trickle from a hose if working outdoors.
- Masking Tape or Painter’s Tape: This helps prevent the drill bit from slipping when you start drilling.
- Safety Gear:
- Safety Glasses: Essential to protect your eyes from flying debris.
- Dust Mask: Porcelain dust is a respiratory hazard.
- Gloves: For better grip and protection.
- Measuring Tape and Pencil/Marker: For precise placement of your holes.
- Bucket or Container: To catch water and debris.
- Clean Cloths: For wiping away water and dust.
Selecting the Best Drill Bit for Porcelain
The question of the best drill bit for porcelain is paramount. For porcelain, the clear winner is the diamond drill bit for tile. These bits are specifically engineered to tackle the extreme hardness of porcelain.
| Drill Bit Type | Suitability for Porcelain | Key Features | Pros | Cons |
|---|---|---|---|---|
| Diamond-Tipped Bits | Excellent | Diamond grit coating on the tip | Grinds through hard materials, durable, minimal heat buildup with water, low risk of cracking. | Can be more expensive than other types, wear down over time. |
| Carbide-Tipped Masonry Bits | Fair (with caution) | Carbide tip, typically for softer masonry | Widely available, relatively inexpensive. | Prone to overheating, high risk of chipping/cracking porcelain, slower drilling. |
| Standard Metal Bits | Not Suitable | High-speed steel (HSS) | Good for metal and wood. | Will dull instantly and likely shatter porcelain. |
When purchasing diamond drill bits for tile, ensure they are specifically rated for porcelain or very hard ceramic. They often come in a spear-like or cylindrical shape with a diamond-encrusted tip.
Step-by-Step Guide to Drilling Porcelain Tile
Once you have your tools and a clear plan, it’s time to start drilling porcelain backsplash or any other porcelain surface. Follow these steps meticulously.
Step 1: Mark the Drilling Location
- Measure Twice, Drill Once: Use your measuring tape to mark the exact spot where you need to drill. Double-check your measurements.
- Apply Tape: Place a piece of masking tape or painter’s tape over the marked spot. This provides a surface for your drill bit to grip, preventing it from wandering and causing scratches or cracks when you begin porcelain tile drilling.
- Mark the Center: Use your pencil or marker to make a clear crosshair mark on the tape where the center of your hole should be.
Step 2: Set Up Your Drill and Water Supply
- Drill Settings: Ensure your drill is set to a low speed and no hammer function. Hammer action is designed for masonry but will shatter porcelain tile. Variable speed is your friend here; start very slow.
- Cooling System: Have your water source ready. If using a spray bottle, keep it within easy reach. For a continuous trickle, you might need to position a sponge or a small water reservoir around the drilling area. For drilling ceramic tile, the cooling is just as crucial.
Step 3: Start the Drilling Process
- Initial Grip: Place the tip of your tile drill bit precisely on the marked center of the tape.
- Gentle Pressure: Begin drilling with very light, consistent pressure. Let the bit do the work. Do not force the drill.
- Angle: Start drilling at a slight angle (about 45 degrees) until the bit creates a small notch. This helps establish a secure starting point.
- Straighten Up: Once the notch is formed, gradually bring the drill up to a 90-degree angle (perpendicular to the tile surface).
- Maintain Water Flow: As soon as you start to see dust, begin applying water. Keep the area around the drill bit wet. The water will cool the bit and the tile, significantly reducing the risk of heat-induced cracks. You should see a slurry of water and tile dust.
- Slow and Steady: Continue drilling at a slow, steady speed. Periodically lift the drill bit slightly to allow water to flush out debris and cool the bit. This is a key tip for drilling tile.
Step 4: Drilling Through the Tile
- Patience is Key: This is where patience truly pays off. Porcelain is dense. It will take time. Listen to your drill; if it sounds strained, ease up on the pressure and ensure adequate cooling.
- Managing Debris: As the slurry forms, try to keep it contained. A wet sponge can help create a dam around the drilling area. For drilling glass tile, the same principle of keeping the area wet and using light pressure applies.
- Approaching the Back: As you near the end of the tile, you might feel the drill bit break through. Reduce pressure even further to avoid chipping the back of the tile or the surface behind it.
Step 5: Finishing and Cleaning
- Smooth Edges: Once the hole is complete, you can gently smooth the edges with the drill bit itself at a low speed or use a fine-grit sandpaper or a diamond hand pad.
- Clean Up: Thoroughly clean the area with water and a cloth to remove all dust and debris.
Advanced Tips for Drilling Porcelain Tile
Mastering porcelain tile drilling involves a few extra techniques that can make the process smoother and safer.
Using a Drill Guide or Template
For perfectly aligned holes, especially when drilling porcelain backsplash or multiple holes in a line, a drill guide or template is invaluable.
- Drill Guides: These are small jig-like devices that attach to your drill or the tile surface. They have a sleeve that guides the drill bit, ensuring it stays perfectly perpendicular to the surface and prevents any wobbling.
- Templates: You can create your own template from cardboard or plywood by drilling the required hole size in the template and then placing it on the tile to guide your drilling. This is particularly useful when drilling ceramic tile if you need consistent hole placement.
Cooling Strategies for Continuous Drilling
Keeping the drill bit and tile cool is paramount. Here are a few methods:
- Water Reservoir: For larger projects or multiple holes, you can create a small dam around the drilling area using plumber’s putty or clay. Fill this dam with water, allowing the bit to be continuously submerged.
- Sponge Method: Soak a sponge and wrap it around the drill bit area. As you drill, the water from the sponge will drip onto the bit and the tile.
- Coolant Lubricant: Specialized ceramic or tile drilling coolants can also be used. These are designed to keep the bit cool and lubricated.
Dealing with Tile Backing and Grout
Consider what lies behind your porcelain tile:
- Drywall: If you’re drilling into drywall behind the tile, be aware that the drill bit might snag on the paper or the drywall material itself once it breaks through the tile. Reduce pressure as you approach the breakthrough point.
- Wood Studs: If you hit a wood stud, the resistance will increase. Ensure your drill has enough power.
- Metal Studs: Metal studs will require a different type of drill bit once you’re through the tile and potentially a backer board.
- Grout Lines: If your hole is near a grout line, be extra careful. Grout is softer and can crumble. The tape method is especially helpful here.
Drilling Through Existing Installations (e.g., Drilling Porcelain Backsplash)
When drilling porcelain backsplash, you are often working with a finished surface.
- Minimal Mess: Keep a shop vacuum running nearby to suck up water and debris as you drill. This keeps the work area cleaner and safer.
- Wall Protection: Place a drop cloth or plastic sheeting below the backsplash to protect countertops or floors from water and debris.
- Fixture Placement: Ensure you know what is behind the tile before you drill. Use a stud finder and be mindful of electrical wires or plumbing.
Troubleshooting Common Issues in Porcelain Tile Drilling
Even with the best preparation, occasional hiccups can occur. Here’s how to address them.
The Drill Bit is Slipping
This usually happens at the very beginning of the drilling process.
- Solution: Ensure you’ve applied masking tape firmly and made a good crosshair mark. Start at a slow speed and at a slight angle to create a pilot notch before straightening up.
The Drill Bit is Overheating
Overheating is a primary cause of cracking.
- Solution: You’re likely drilling too fast, applying too much pressure, or not using enough water. Slow down, ease up on the pressure, and increase your water supply. Periodically pull the bit out of the hole to let it cool.
The Tile is Chipping or Cracking
This is the most feared outcome.
- Solution:
- Start Slow: Ensure your drill is on its lowest speed.
- Use Diamond Bits: Confirm you are using diamond-tipped bits.
- Constant Water: Keep the area thoroughly wet.
- Gentle Pressure: Let the bit do the work. Avoid pushing hard.
- Tape: Make sure the tape is applied correctly.
- Backing Support: If possible, provide support to the back of the tile at the drilling point, especially if drilling outside of a backsplash or wall where there’s an air gap.
Hole Size is Too Small/Large
- Solution: If the hole is too small, you can carefully enlarge it by slightly angling the drill bit around the circumference of the hole. If it’s too large, you’ll likely need to replace the tile.
Frequently Asked Questions About Drilling Porcelain Tile
Q: Can I use a regular drill bit for porcelain tile?
A: No, absolutely not. Regular drill bits (like those for wood or metal) are not designed for the hardness of porcelain and will dull instantly, likely causing the tile to crack. You must use specialized tile drill bits, ideally diamond drill bits for tile.
Q: How deep do I need to drill into porcelain tile?
A: You only need to drill through the thickness of the tile itself. Most tiles are between 1/4 inch and 3/8 inch thick. If you’re inserting a screw or anchor, ensure the hole is deep enough for that purpose.
Q: What if I hit a stud or pipe behind the tile?
A: If you hit a stud, continue drilling with the appropriate bit for wood. If you suspect you might hit a pipe or electrical wire, stop drilling immediately and consult a professional. Always use a stud finder and be cautious about what’s behind your drilling location.
Q: How do I drill a large hole in porcelain tile?
A: For larger holes (e.g., for plumbing), you’ll need a larger diameter diamond drill bit for tile or a diamond hole saw. The process remains the same: slow speed, ample water, and light pressure.
Q: Is drilling porcelain tile safe?
A: Yes, when done with the correct safety precautions. Always wear safety glasses and a dust mask. Ensure good ventilation, especially when drilling indoors, as porcelain dust can be harmful if inhaled.
Q: Can I drill porcelain tile with a hammer drill?
A: Never use the hammer function of a hammer drill on tile. Only use the regular drilling setting. The hammering action will shatter the tile.
Q: What is the best lubricant for drilling porcelain tile?
A: Water is the most effective and safest lubricant. Specialized tile drilling lubricants are also available and can be helpful for prolonged drilling. Avoid oil-based lubricants as they can stain the tile.
By following these detailed instructions and tips for drilling tile, you can confidently tackle drilling porcelain backsplash or any other porcelain surface, achieving clean, precise holes without the frustration of cracked tiles. Remember, patience and the right tools are your best allies in this process.