
Image Source: i.ytimg.com
How to Sharpen a Drill Bit With a Bench Grinder: Easy DIY Guide
Yes, you can sharpen a drill bit with a bench grinder, and it’s a fantastic DIY skill to learn for anyone who uses drills regularly. This guide will walk you through the process of grinding drill bits to restore their sharpness, saving you money and extending the life of your tools.
Why Sharpen Drill Bits?
Drill bits, especially those used for metal, dull over time with use. A dull drill bit doesn’t cut cleanly; instead, it scrapes and burns the material. This not only makes drilling difficult but can also damage your workpiece and the drill bit itself. Drill bit maintenance is crucial for efficient and clean drilling. Sharpening them yourself is a rewarding way to keep your toolbox in top shape.
What You’ll Need
Before you start DIY drill bit sharpening, gather the following:
- Bench Grinder: A two-wheel grinder is ideal, with one wheel typically coarser for aggressive material removal and another finer for smoothing.
- Safety Glasses or Face Shield: Absolutely essential for protecting your eyes from flying sparks and metal shards.
- Gloves: To protect your hands from sharp edges and heat.
- Drill Bits: The dull bits you intend to sharpen.
- Water Trough or Bucket: To cool the drill bit during the sharpening process to prevent overheating and losing its temper.
- Marker: To mark the clearance angle on the drill bit.
- Vise (Optional but Recommended): A small vise that can attach to your bench grinder’s tool rest can greatly improve accuracy and safety.
Getting Your Bench Grinder Ready
Proper setup is key to successful tool sharpening techniques.
Bench Grinder Wheel Selection
For sharpening drill bits, you’ll want to use an appropriate grinding wheel.
- Aluminum Oxide Wheels: These are common for general-purpose grinding and metal sharpening.
- Silicon Carbide Wheels: Good for sharpening harder metals and softer materials.
Typically, one wheel will be finer than the other. The coarser wheel is for shaping, and the finer wheel is for honing the cutting edge. Ensure your wheels are clean and free of embedded metal.
Grinder Settings and Adjustments
Most bench grinders have adjustable tool rests. Position these rests close to the grinding wheels – about 1/8 inch away – to provide adequate support for the drill bit. Ensure the tool rests are secure and won’t move during grinding.
Bench grinder tips for setup:
- Wheel Dressing: If your grinding wheels are glazed or uneven, use a wheel dresser to clean and true them. A true wheel provides a consistent grinding surface.
- Wheel Guard: Always ensure the wheel guards are in place and secure.
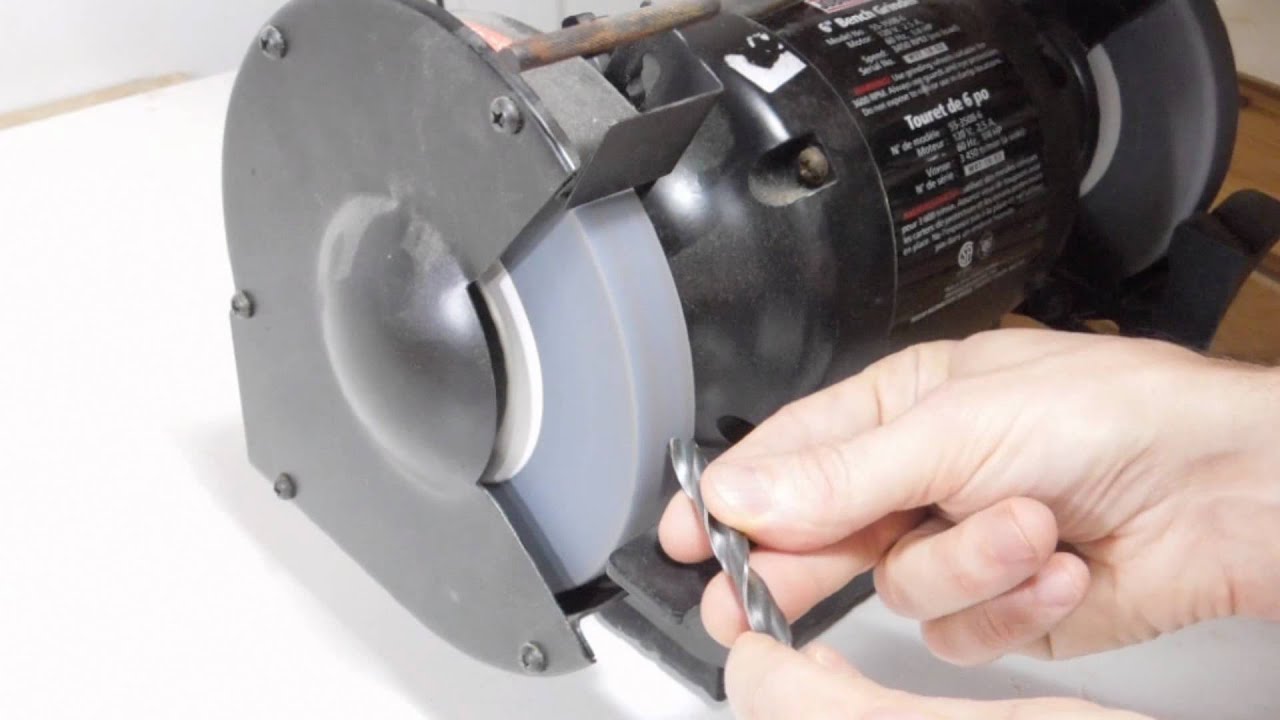
The Process of Sharpening Twist Drills
Sharpening twist drills involves recreating the cutting edges and the proper clearance angles. This is where correct drill sharpening comes into play.
Step 1: Identify the Cutting Lips
A standard twist drill bit has two cutting lips at the tip. These are the sharp edges that do the cutting. When a drill bit is dull, these edges are rounded.
Step 2: Marking the Clearance Angle
The clearance angle is the small bevel on the flank of the drill bit’s cutting lip. This angle allows the cutting lip to bite into the material without the flank dragging.
- Use a marker to color the end of the drill bit, specifically the cutting lips.
- As you grind, the marker will be removed, showing you where the grinding is occurring. This helps you maintain the correct angle.
Step 3: Grinding the Primary Clearance Angle
This is the most critical step in metal drill bit sharpening.
- Grasping the Bit: Hold the drill bit firmly. If you have a vise attachment for your grinder, use it. If not, grip the shank securely.
- Grinding Wheel Angle: Position the drill bit against the grinding wheel so that the cutting lip rests on the wheel. The angle at which you hold the drill bit relative to the grinding wheel determines the clearance angle. For most drill bits, a clearance angle of around 12 degrees is ideal.
- Motion: Move the drill bit in a slight oscillating motion while maintaining contact with the wheel. This helps create a consistent bevel.
- Cooling: Dip the drill bit in your water trough frequently – every few seconds of grinding. Overheating will ruin the temper of the steel, making the bit softer and less effective.
- Grinding the Opposite Side: After grinding one lip, rotate the drill bit so you can grind the other lip. Aim for symmetry. You should be grinding the flank of the drill bit, not the face that does the cutting.
Key considerations for this step:
- Angle Consistency: Try to maintain a consistent angle for both cutting lips.
- Light Pressure: Don’t force the drill bit into the wheel. Let the abrasive do the work.
- Visual Cues: Watch the marker disappear. You’re aiming to remove just enough material to create a sharp edge.
Step 4: Creating the Secondary Clearance Angle (Web Thinning)
The “web” is the central part of the drill bit that joins the two flutes. At the very tip of the drill bit, the web thickens. This thickening can cause the bit to “wander” or require more force to start a hole. Web thinning addresses this.
- Positioning: Hold the drill bit at a slightly steeper angle than for the primary clearance.
- Grinding the Web: Grind the heel of the cutting lip at a slightly steeper angle. This effectively thins the web and creates a slight chisel point.
- Symmetry: Again, ensure you grind both sides of the web symmetrically.
Step 5: Checking for Sharpness and Symmetry
After grinding, examine the tip of the drill bit.
- Sharpness: The cutting lips should appear sharp and have a clean edge. You can test this gently on a piece of scrap wood or plastic.
- Symmetry: Both cutting lips should be the same length and angle. Uneven lips will cause the drill bit to drill an oversized hole or wobble.
- Centering: The point of the drill bit should be centered.
Advanced Techniques and Tips
For more precise sharpening twist drills, consider these bench grinder tips:
Using a Drill Grinding Attachment
Many bench grinders can be fitted with specialized drill grinding attachments. These jigs hold the drill bit at the correct angles, making the process much easier and more accurate, especially for beginners. They are highly recommended for consistent results.
Grinding Wheel Angle Chart
| Drill Bit Type | Primary Clearance Angle | Secondary Clearance Angle (Web Thinning) |
|---|---|---|
| General Purpose | 10-12 degrees | 20-30 degrees |
| Hard Materials (e.g., Steel) | 8-10 degrees | 15-20 degrees |
| Soft Materials (e.g., Wood, Plastic) | 12-15 degrees | 25-35 degrees |
Note: These are general guidelines. Specific drill bit manufacturers may recommend slightly different angles.
Sharpening Different Types of Drill Bits
While this guide focuses on standard twist drills, the principles can be adapted.
- Cobalt Drill Bits: These are harder and more brittle. Use a fine-grit grinding wheel and be extra careful not to overheat them, as they can lose their hardness easily.
- ** Carbide Drill Bits: These are very hard and brittle. Bench grinders are generally not recommended for sharpening carbide bits. Specialized diamond grinding wheels are usually required.
Common Mistakes to Avoid
- Overheating: This is the biggest mistake. Dipping the bit in water frequently is paramount. You can even grind in short bursts and cool between each burst.
- Incorrect Angles: Grinding too much or too little clearance angle will result in poor performance or premature dulling.
- Uneven Grinding: Not making both cutting lips identical will lead to poor hole quality.
- Grinding the Flute: You should only be grinding the cutting lip and the web, not the flute itself.
When to Consider Professional Sharpening or Replacement
While DIY sharpening is great, some situations call for professional service or replacement:
- Damaged Tips: If the tip of your drill bit is chipped, broken, or severely deformed, it may be beyond effective sharpening.
- Carbide Bits: As mentioned, carbide requires specialized equipment.
- Very Small Bits: Extremely small drill bits (e.g., under 1/16 inch) can be challenging to sharpen accurately by hand.
- Lack of Confidence: If you’re not comfortable with the process, it’s better to buy new bits than to damage your tools or create unsafe conditions.
Frequently Asked Questions (FAQ)
Q1: Can I sharpen a drill bit with a hand file?
A: While possible for larger bits and for touch-ups, it’s very difficult to achieve the correct angles and a sharp, consistent edge with a hand file. A bench grinder offers much more control and efficiency.
Q2: How often should I sharpen my drill bits?
A: This depends heavily on usage and the material being drilled. For frequent metal drilling, you might sharpen bits every few days. For occasional wood drilling, they might last much longer. Look for signs of dullness: increased heat, rough cuts, and difficulty penetrating material.
Q3: What is the best grinder settings for drills?
A: The best “settings” involve having the tool rest at the correct proximity to the wheel (about 1/8 inch) and using the appropriate grit wheel. The actual angle is controlled by how you hold the drill bit.
Q4: Why is my sharpened drill bit not cutting well?
A: This could be due to several reasons: insufficient clearance angle, uneven cutting lips, overheating that softened the bit’s temper, or the bit itself is worn out and needs replacement.
Q5: Can I use a grinding wheel that’s too coarse or too fine?
A: Using a wheel that’s too coarse can remove material too quickly, making it hard to control the angles and potentially overheating the bit. A wheel that’s too fine might take excessively long to sharpen and may not create a sharp enough edge without a lot of effort.
Sharpening drill bits with a bench grinder is a valuable skill that can save you time and money. By following these steps and practicing patience, you can restore your dull bits to their former cutting glory. Remember always to prioritize safety and cool the bits to maintain their temper. This approach to drill bit maintenance will ensure your tools are always ready for the job.