
Can you drill holes in rocks? Yes, you absolutely can drill holes in rocks, and this guide will show you exactly how to do it safely and effectively. Whether you’re a DIY enthusiast, a gardener planning a rock garden, or someone working on a construction project, knowing how to drill into stone is a valuable skill. This comprehensive guide will cover everything from the basic principles of rock drilling to the specific tools and techniques you’ll need, ensuring you can tackle stone drilling with confidence. We’ll delve into various rock drilling techniques, explore the different types of rock drills, and discuss how to approach drilling hard rock, including challenging materials like drilling granite.
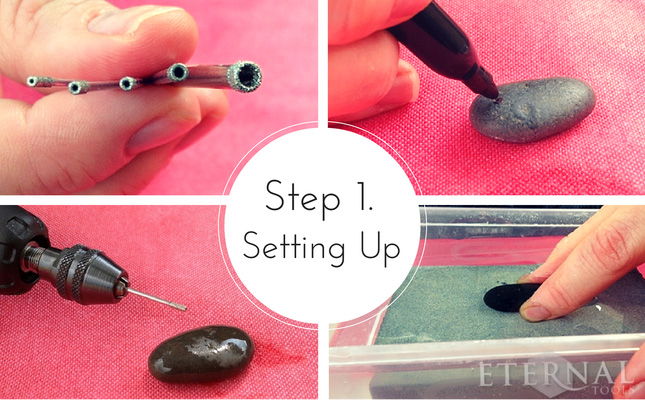
Image Source: theme-assets.ecommercedns.uk
Essential Tools for Rock Drilling
Before you start, gathering the right equipment is crucial. Having the correct rock drilling tools will make the job easier, safer, and much more successful. Think of it like cooking; you need the right utensils for the best results.
Choosing the Right Drill
The type of drill you use depends heavily on the size of the hole you need and the type of rock you’re working with.
- Hammer Drill: These are excellent for general drilling, including into tougher materials. They have a hammering action that helps break up the material as the bit rotates. For drilling concrete and less dense rocks, a good hammer drill is often sufficient.
- Rotary Hammer: More powerful than a standard hammer drill, a rotary hammer offers both rotation and a more forceful hammering action. This makes it ideal for drilling hard rock and larger diameter holes. They are often used in construction for tasks like breaking concrete.
- Diamond Core Drill: For precise, clean holes, especially in very hard materials like granite or for creating larger openings, a diamond core drill is the best choice. These drills use a hollow, cylindrical bit with diamond segments that grind away the rock. This is the go-to for serious rock drilling on tougher jobs.
- Impact Driver (with caution): While not ideal for primary rock drilling, an impact driver can sometimes be used for very small holes in softer rocks, but it’s not recommended for sustained stone drilling.
Rock Drilling Bits
The drill bit is arguably the most important component. The right bit can mean the difference between a smooth, efficient drilling process and a frustrating struggle. For rock drilling, you need bits specifically designed for the job.
- Masonry Bits: These are designed for drilling into brick, mortar, and concrete. They usually have a carbide tip. They can handle some softer rocks but will wear out quickly on harder stone.
- Carbide-Tipped Bits: These are a step up from basic masonry bits and are suitable for drilling concrete and some natural stones. They offer better durability.
- Diamond Drill Bits: These are the champions of rock drilling. They feature diamond-encrusted cutting surfaces.
- Diamond Core Bits: These are hollow and create cylindrical holes, ideal for sampling or running pipes.
- Diamond Grinding Bits: These are used for shaping or creating wider openings by grinding away material.
- Diamond Tooth Bits: These have diamond-impregnated “teeth” that cut into the rock.
When selecting bits, always consider the rock type. For drilling granite, you will absolutely need diamond bits. For general stone drilling, carbide-tipped bits might suffice for softer stones like sandstone or slate, but diamond bits will always perform better and last longer.
Bit Selection Guide
| Rock Type | Recommended Bit Type | Notes |
|---|---|---|
| Soft Stone (Slate, Sandstone) | Carbide-Tipped Masonry Bits, Diamond Bits | Carbide bits can work but will wear down faster. Diamond bits offer cleaner cuts and longevity. |
| Hard Stone (Granite, Quartzite) | Diamond Drill Bits (Core or Grinding) | Essential for these materials. Carbide bits will not effectively penetrate and will break quickly. |
| Concrete | Carbide-Tipped Masonry Bits, Specialized Concrete Bits | Hammer drills with these bits are effective. Rotary hammers offer greater power for larger holes. |
| Brick/Mortar | Carbide-Tipped Masonry Bits | Standard for these building materials. |
Safety Gear
Safety is paramount when rock drilling. Always wear:
- Safety Glasses or Goggles: Protect your eyes from flying debris.
- Gloves: Improve grip and protect your hands.
- Ear Protection: Drills can be very loud.
- Dust Mask or Respirator: Rock dust can be harmful to inhale, especially silica dust found in many stones.
Other Essential Items
- Water Source: For cooling the drill bit and suppressing dust, especially when drilling hard rock or using diamond bits. A spray bottle or a hose with a slow drip is often used.
- Chisels and Hammer: For any initial shaping or to help loosen stubborn pieces.
- Marking Tool: A pencil, chalk, or marker to mark your drilling points.
- Measuring Tape: To ensure accuracy.
- Center Punch: To create a small indentation to guide the drill bit and prevent it from wandering.
Preparing to Drill Your Rock
Proper preparation is key to a successful rock drilling project. This step ensures you’re ready for the actual drilling holes in stone.
Site Selection and Marking
- Choose Your Spot: Decide exactly where you want the hole.
- Mark the Center: Use a pencil or chalk to mark the center of your desired hole.
- Create an Indentation: Use a center punch and hammer to create a small dimple at your marked spot. This prevents the drill bit from slipping when you start drilling.
Securing the Rock
If you’re drilling a loose rock, it’s crucial to secure it. A wobbling rock can be dangerous and will make drilling very difficult.
- For Small Rocks: Place them in a vise or secure them firmly on a workbench.
- For Larger Rocks: If the rock is part of a larger structure or a landscaping feature, ensure it’s stable. You might need to brace it with additional materials. Never attempt to drill into a rock that feels loose or unstable.
Dust Suppression and Cooling
This is a vital part of rock drilling, especially for prolonged sessions or with harder materials.
- Water is Your Friend: For most stone drilling tasks, especially with diamond bits, a steady stream or spray of water is essential.
- Cooling: Water cools the drill bit, preventing it from overheating, which can damage the bit and the rock.
- Dust Control: Water binds with the rock dust, creating a slurry that significantly reduces airborne dust. This is crucial for health and safety.
- How to Apply Water:
- Spray Bottle: For small projects or initial holes, a spray bottle can suffice.
- Slow Drip: You can create a slow drip from a water bottle or hose positioned over the drilling area.
- Wet Drilling Systems: For larger or more professional jobs, dedicated wet drilling systems are available that supply water directly to the bit.
Mastering Rock Drilling Techniques
Now that you have your tools and preparation complete, it’s time to get into the rock drilling techniques. Different rocks and hole sizes will require slightly varied approaches.
Starting the Drill
- Position the Drill: Place the tip of your chosen drill bit directly into the indentation you made with the center punch.
- Start Slowly: Begin drilling at a low speed. This allows the bit to gain traction and prevents it from skipping.
- Maintain a Straight Angle: Keep the drill perpendicular to the rock surface. Inconsistent angles can lead to broken bits or crooked holes.
The Drilling Process
- Apply Steady Pressure: Once the bit has started a small pilot hole, you can gradually increase pressure. However, let the drill do the work. Forcing the drill can cause it to overheat or break.
- Withdraw and Clear: Periodically pull the drill bit out of the hole while it’s still spinning. This does two important things:
- Clears Debris: It removes accumulated rock dust and debris from the flutes of the bit, preventing it from getting clogged.
- Cooling: It allows water to reach the bottom of the hole and cool the bit.
- Repeat: Continue drilling in cycles of drilling, withdrawing, and clearing until you reach your desired depth.
Specific Techniques for Different Materials
- Drilling Granite: This is a tough job. Use a diamond core drill bit and plenty of water. Start slow, apply consistent pressure, and don’t rush. Expect it to take time.
- Drilling Concrete: A hammer drill or rotary hammer with a carbide-tipped masonry bit is usually sufficient. Use the hammer function and apply steady pressure. Clearing debris is still important to prevent overheating.
- Drilling Softer Rocks: For materials like slate or sandstone, you can often use carbide-tipped bits with a standard drill or hammer drill. Be gentle to avoid cracking the stone.
- Creating Larger Holes: For holes larger than what a standard bit can achieve, consider using a diamond core bit or drilling multiple smaller holes in a circle and then using a chisel to break out the center.
Advanced Rock Drilling Considerations
For more complex projects or drilling hard rock, there are a few extra points to keep in mind.
Speed and Power Settings
- Speed: Generally, lower speeds are better for harder materials and larger bits to prevent overheating. Higher speeds can be used for smaller bits in softer materials, but always prioritize bit longevity and safety.
- Hammer Function: Use the hammer function on your drill for materials like concrete and harder rocks. Turn it off for softer stones or when you need a very precise, clean finish.
Bit Wear and Replacement
Even the best rock drilling bits will wear down over time.
- Signs of Wear: A dull bit will require more force, generate more heat, and produce rougher holes. Diamond bits will start to lose their cutting surface.
- Replacement: Replace bits when they show signs of significant wear to maintain efficiency and prevent damage to your drill or the rock.
Troubleshooting Common Issues
- Drill Bit Stuck: If the bit gets stuck, stop the drill immediately. Try to gently back it out. If it’s really jammed, you might need to use a chisel to carefully break away some surrounding rock, or widen the hole slightly above the jam point.
- Overheating: This is usually a sign you’re not using enough water or you’re pushing too hard. Slow down, use more water, and withdraw the bit more frequently.
- Cracking the Rock: If the rock is brittle, excessive force or the hammer function can cause it to crack. Use lighter pressure, a slower speed, and consider not using the hammer function.
Types of Rock Drills and Their Applications
A deeper dive into types of rock drills can help you select the best tool for your specific needs.
Percussion Drills
These drills use a hammering action, often combined with rotation.
- Hammer Drills: Versatile for DIY, suitable for drilling concrete and softer stones.
- Rotary Hammers (SDS Drills): More powerful, designed for heavy-duty work like drilling hard rock, breaking concrete, and creating larger anchor holes. They use special SDS (Slotted Drive System) bits that lock into place.
Rotary Drills
These drills rely solely on rotation to cut through material.
- Standard Rotary Drills: Can be used with masonry or diamond bits for softer stones or less demanding tasks.
- Diamond Core Drills: Specialized rotary drills designed to cut clean, cylindrical holes using diamond-tipped core bits. Excellent for precise work and very hard materials.
Specialized Rock Drills
- Rock Augers: Used for drilling very deep holes in softer rock or soil.
- Down-the-Hole (DTH) Hammers: Heavy-duty equipment used in mining and quarrying for drilling large diameter holes in extremely hard rock.
Drilling Holes in Concrete: Specifics
Drilling concrete is a common task, and while similar to rock drilling, there are nuances.
Tools for Concrete
- Hammer Drill: Your primary tool for most home projects.
- Rotary Hammer: For larger holes or harder concrete mixes.
- Diamond Core Drills: For precise, large diameter holes, often used for plumbing or electrical pass-throughs.
Bits for Concrete
- Carbide-Tipped Bits: Standard for concrete. Ensure they are specifically designed for concrete drilling.
- Diamond Bits: Used for very hard concrete or when a clean, precise cut is needed.
Techniques for Concrete
- Use the Hammer Function: Engage the hammer action for faster penetration.
- Clear Debris Regularly: Concrete dust can build up quickly.
- Water Cooling: Beneficial for longer drilling sessions or harder concrete to prevent bit overheating.
Drilling Granite: The Ultimate Challenge
Drilling granite is at the higher end of rock drilling difficulty. It requires patience and the right equipment.
Essential Tools for Granite
- Diamond Drill Bits: Absolutely non-negotiable. Look for high-quality diamond core bits or diamond grinding bits specifically rated for granite.
- Rotary Hammer or Diamond Core Drill: A standard drill will struggle immensely and likely overheat. A rotary hammer can work for small holes, but a dedicated diamond core drill is ideal.
- Constant Water Supply: Crucial for cooling the bit and suppressing dust.
Techniques for Granite
- Mark and Punch: As with any rock, mark your spot and use a center punch.
- Start Slow: Begin at a very low speed to get the diamond bit seated properly.
- Apply Even, Moderate Pressure: Let the diamond abrasive do the work. Avoid excessive force.
- Keep it Wet: Ensure a continuous flow of water to the cutting area. This is the most critical step for drilling granite.
- Withdraw Frequently: Pull the bit out every 15-30 seconds to clear dust and cool the bit.
- Patience: Drilling granite takes time. Don’t get discouraged.
Frequently Asked Questions (FAQ)
Here are some common questions people have about rock drilling.
Q1: Can I use a regular drill for rock?
A1: For softer rocks like slate or sandstone, a powerful standard drill with carbide-tipped masonry bits might work for small holes. However, for harder rocks like granite or for extended stone drilling, you will need a hammer drill, rotary hammer, or a specialized diamond drill. A regular drill is not designed for sustained rock drilling and can easily overheat and break.
Q2: What is the best type of drill bit for drilling rocks?
A2: Diamond drill bits are the best for most types of rock, especially harder ones like granite. For softer stones or concrete, carbide-tipped masonry bits are a good option, but diamond bits will always offer superior performance and longevity in rock drilling.
Q3: How do I prevent my drill bit from breaking when drilling rock?
A3: Prevent breakage by using the correct type of bit for the rock, applying steady, moderate pressure, keeping the bit cool with water, and withdrawing it periodically to clear debris. Never force the drill. For drilling hard rock, ensure you have adequate cooling and allow the bit to do the cutting without excessive force.
Q4: How do I keep dust down when drilling rocks?
A4: The most effective way to control dust is by using water. A continuous spray or drip of water will bind with the rock dust, creating a slurry and significantly reducing airborne particles. Some drills also have dust extraction attachments. This is especially important for drilling concrete and any rock containing silica.
Q5: How deep can I drill into rock?
A5: The depth you can drill depends on the length of your drill bit and the power of your drill. For standard DIY projects, most drill bits are available in lengths up to 12 inches. For deeper holes, you would typically need specialized drilling equipment.
Q6: Is it difficult to drill granite?
A6: Yes, drilling granite is considered difficult. It’s an extremely hard igneous rock. It requires specialized diamond drill bits and a tool with significant power, such as a diamond core drill or a powerful rotary hammer, along with constant water cooling. Patience is key when drilling granite.
By following these guidelines and choosing the right tools, you can successfully drill holes in rocks for a variety of projects. Remember, safety first, and take your time to achieve the best results.