
Can you sharpen a drill bit? Yes, you absolutely can sharpen a drill bit, and it’s a valuable skill for any DIYer or professional. Sharpening drill bits at home not only saves you money but also ensures your tools perform at their best, making your drilling tasks easier and more precise. This guide will walk you through the entire process, from identifying dull bits to perfecting your sharpening technique.
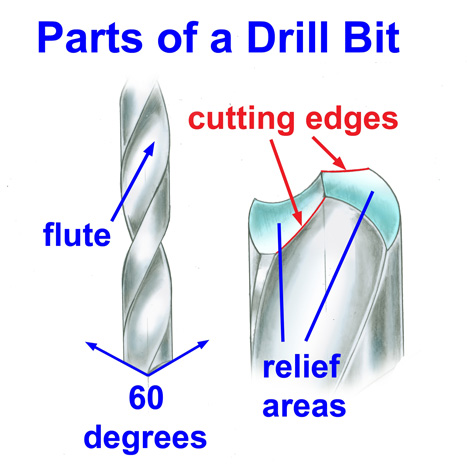
Image Source: www.gia.edu
Why Sharpen Your Drill Bits?
Drill bits, like any cutting tool, wear down with use. The sharp edges that bite into material become rounded, leading to several problems:
- Increased Effort: A dull bit requires more force to penetrate, straining your drill and your arm.
- Poor Hole Quality: Dull bits create ragged holes, burn marks, and generally messy results, especially when sharpening metal drill bits or working with delicate materials.
- Overheating: Friction from a dull bit can generate excessive heat, damaging the bit, the workpiece, and even your drill.
- Reduced Lifespan: Pushing dull bits can lead to them breaking or becoming unrecoverable, shortening their overall lifespan.
Regularly maintaining drill bits by sharpening them is crucial for efficient and safe operation.
Identifying a Dull Drill Bit
Before you can sharpen, you need to know when a bit needs attention. Here are some tell-tale signs:
- Excessive Heat: The bit feels unusually hot to the touch after drilling.
- Smoke: The material you’re drilling begins to smoke, even with moderate pressure.
- Screeching or Grinding Sounds: The drill makes unpleasant noises rather than a clean cutting sound.
- Requires Excessive Force: You have to push much harder than usual to get the bit to penetrate.
- Poor Hole Quality: The hole is rough, oversized, or the bit wanders when starting.
- Visible Wear: Inspect the cutting edges of the bit. If they appear rounded, chipped, or have lost their glint, they are likely dull.
Tools for Sharpening Drill Bits
There are several effective ways to sharpen drill bits, ranging from simple hand tools to specialized power sharpeners.
1. Drill Bit Sharpening Stone (Sharpening Stone / Whetstone)
A drill bit sharpening stone, often a combination stone with a coarse and fine grit, is a classic and effective method.
Pros:
* Inexpensive
* Portable
* Allows for precise control
Cons:
* Requires practice to achieve the correct angles
* Can be time-consuming
2. Drill Bit Sharpener Jig
A drill bit sharpener jig is a clamp that holds the drill bit at a precise angle, making it easier to maintain consistency while sharpening. These often work in conjunction with a bench grinder or a standard drill.
Pros:
* Ensures consistent angles
* Faster than freehand sharpening
* Good for beginners
Cons:
* Adds to the cost
* May be limited to specific bit sizes or types
3. Bench Grinder with Grinding Wheel
A bench grinder offers a fast way to remove material and restore a cutting edge. However, it requires a steady hand and careful angle control.
Pros:
* Fast material removal
* Can handle various bit sizes
Cons:
* High risk of overheating and damaging the bit if not careful
* Requires a jig for consistent angles
4. Electric Drill Bit Sharpeners
These are standalone, powered units designed specifically for sharpening drill bits. They often have grinding wheels or abrasive sleeves.
Pros:
* Easy to use
* Quick results
* Often self-aligning for correct angles
Cons:
* Can be expensive
* Quality varies significantly between models
* May not handle all bit types or sizes
Sharpening Common Drill Bit Types
The technique for sharpening depends slightly on the type of drill bit. The most common for DIY use are twist drill bits, which are used for metal, wood, and plastic.
Sharpening Twist Drill Bits (HSS Drill Bits)
HSS drill bits (High-Speed Steel) are the workhorses for most drilling tasks. Sharpening HSS drill bits involves restoring the primary cutting edges and the chisel edge at the tip.
The Anatomy of a Twist Drill Bit Tip
Before we dive into sharpening, let’s look at the key parts of a twist drill bit tip:
- Flutes: The spiral grooves that carry away chips and debris.
- Lands: The outer surface of the bit that runs along the wall of the hole.
- Cutting Lips (or Cutting Edges): The sharp edges at the very tip of the bit that do the cutting. These are formed by the intersection of the flute and the cone-shaped tip.
- Chisel Edge (or Web Thinning): The pointed tip at the center of the bit. It’s not a true cutting edge but a point that helps guide the bit. This needs to be thinned to reduce the force required for penetration.
- Clearance Angle: The angle behind the cutting lip that allows the lip to penetrate without rubbing against the hole wall.
Sharpening with a Sharpening Stone (Freehand Method)
This is the most accessible method for sharpening drill bits at home.
What You’ll Need:
- A good quality sharpening stone (combination stone is ideal)
- Water or honing oil (depending on the stone type)
- A vise or clamp to hold the stone steady (optional but recommended)
- Safety glasses
- Gloves
Steps:
- Prepare the Stone: If using a water stone, soak it according to the manufacturer’s instructions. If using an oil stone, apply a thin layer of honing oil. Place the stone on a stable, non-slip surface.
- Identify the Cutting Lip: Hold the drill bit so you can see one of the cutting lips clearly.
- Find the Correct Angle: The standard clearance angle for most twist drill bits is around 12-15 degrees. This is the angle of the heel of the cutting lip relative to the body of the bit. When sharpening on a stone, you’ll be working at an angle that’s roughly 59 degrees from the axis of the bit to create this clearance.
- Position the Bit: Place the cutting lip flat against the sharpening stone at the correct angle. The stone should be angled slightly upwards (about the 59-degree angle mentioned).
- Sharpen the First Lip: Gently push the drill bit forward across the stone, maintaining the angle. You’re sharpening the edge that’s angled upwards. Use a rocking motion, starting from the heel of the lip and moving towards the point. Alternate between strokes on the stone and checking your progress. You should aim to create a small burr on the opposite side of the cutting lip you are sharpening.
- Sharpen the Second Lip: Rotate the drill bit so the second cutting lip is now in the same position. Sharpen it in the same manner, matching the angle and the amount of pressure used on the first lip. You are trying to create a matching bevel on this second lip.
- Check for a Burr: Feel the tip of the drill bit gently with your fingertip (be careful, it can still be sharp!). You should feel a slight burr or rough edge on the side opposite the lip you just sharpened. This indicates you’ve ground down to the base of the cutting edge.
- Refine the Angles: Once you have a burr on both sides, you’ll want to refine the angles. Use lighter strokes, alternating between the two lips, to remove the burr and create a clean, sharp edge. You’re aiming for a symmetrical tip.
- Thin the Chisel Edge: This is a critical step for sharpening dull drill bits. The chisel edge at the very center of the tip needs to be thinned to reduce the force needed to start the hole. Place the drill bit on its side on the stone, so the chisel edge is against the stone. Gently move the bit back and forth, grinding the chisel edge so it becomes thinner and more pointed. Aim to make it almost parallel to the axis of the drill bit. Do this evenly on both sides of the chisel edge.
- Test the Sharpness: Test the bit on a piece of scrap wood or metal. It should bite easily with minimal pressure and create clean shavings.
- Clean the Bit: Rinse the drill bit thoroughly to remove any metal filings or residue from the stone.
Sharpening with a Drill Bit Sharpener Jig
Using a jig simplifies the process by pre-setting the correct angles.
What You’ll Need:
- A drill bit sharpener jig
- A drill (for jigs that use the drill as a power source) or a bench grinder
- Safety glasses
- Gloves
Steps:
- Set Up the Jig: Follow the manufacturer’s instructions to set up the jig. This usually involves selecting the correct drill bit size and setting the desired sharpening angle.
- Insert the Drill Bit: Securely clamp the drill bit into the jig’s chuck or holder.
- Sharpen:
- If using a drill: Mount the jig in your drill press or hold it firmly. Run the drill at a medium speed and press the rotating drill bit against the sharpening wheel or diamond cone integrated into the jig. Move the bit in and out slightly to ensure even grinding.
- If using a bench grinder: Mount the jig onto the grinder’s tool rest. With the grinder running, carefully advance the jig with the drill bit towards the grinding wheel. Ensure the wheel grinds the cutting lip at the pre-set angle.
- Rotate and Repeat: Rotate the drill bit to sharpen the second cutting lip, ensuring it’s ground to the same angle and depth.
- Thin the Chisel Edge: Many jigs have a separate station or angle for thinning the chisel edge. Follow the jig’s instructions to grind this point to a finer apex.
- Check and Test: Inspect the sharpened bit for symmetry and sharpness. Test it on scrap material.
Sharpening Metal Drill Bits
When sharpening metal drill bits, especially those made of HSS, it’s crucial to avoid overheating, which can “temper” or soften the steel, rendering the bit useless.
- Cooling: If using a bench grinder, dip the bit in water frequently to keep it cool. For hand sharpening, use plenty of honing oil or water.
- Light Passes: Take light, quick passes over the sharpening surface rather than heavy, prolonged grinding.
- Sharpness is Key: The goal is to restore the sharp cutting edge without removing excessive material or generating too much heat.
Sharpening Wood Drill Bits
While the principles are similar to sharpening twist drill bits, wood bits might have different geometry, like spurs for cleaner cuts.
- Spur Sharpening: Some wood bits have small spurs at the outer diameter. These need to be sharpened from the inside of the flute, angling the sharpening stone or grinding tool towards the spur. The goal is to restore their sharp point without altering their position relative to the main cutting lip.
- Careful with Depth: Be careful not to grind too deeply into the spur, as this can change the diameter of the hole the bit produces.
Sharpening Other Drill Bit Types
While twist bits are most common, you might encounter others:
- Masonry Bits: These have a carbide tip with a specific profile. They are harder to sharpen and often require specialized grinding wheels (like diamond wheels) and extreme care not to damage the carbide tip. For DIYers, replacing masonry bits is often more practical than attempting to sharpen them, especially if they are severely worn.
- Forstner Bits and Auger Bits: These wood bits have a different geometry with primary cutting edges and spurs. Sharpening involves carefully grinding the primary edges and the spurs. This is best done with a file or a specialized sharpener designed for these bit types.
Maintaining Your Drill Bits for Longevity
Proper maintenance goes beyond just sharpening.
- Clean After Use: Always clean chips and dust from your bits after each use.
- Store Properly: Keep bits organized in a bit holder or case to prevent damage and keep them from rolling around and dulling.
- Use the Right Bit for the Job: Using a wood bit on metal, or a standard bit on concrete, will dull it quickly.
- Avoid Overheating: Let the drill and bit cool down if they get too hot.
- Lubrication: For metal drilling, use cutting fluid to reduce friction and heat.
Common Mistakes When Sharpening Drill Bits
- Incorrect Angles: This is the most frequent error. Wrong angles lead to poor cutting performance or premature dulling.
- Overheating: Grinding too aggressively or for too long without cooling can ruin the temper of the bit.
- Uneven Sharpening: Grinding one lip more than the other creates an unbalanced bit that will wobble and drill inaccurate holes.
- Not Thinning the Chisel Edge: A thick chisel edge requires excessive force to start the cut.
- Using Worn-Out Sharpening Tools: A dull sharpening stone or wheel won’t effectively sharpen your drill bit.
Advanced Techniques and Considerations
Sharpening Left-Handed Drill Bits
These bits cut in the opposite direction. The sharpening process is the same, but you’ll be working with the mirror image of a standard right-handed bit’s geometry.
Grinding vs. Honing
- Grinding removes material to reshape the cutting edge. This is what you do when the bit is significantly dull.
- Honing refines an already sharp edge to make it even keener. This is done with finer grit stones or honing steels. After grinding, a light hone can significantly improve cutting performance.
When to Replace a Drill Bit
While sharpening dull drill bits is beneficial, there comes a point when a bit is too far gone.
- Excessive Material Loss: If the bit is so worn that you can’t restore the correct cutting geometry without grinding away too much of the bit’s length or diameter.
- Cracked or Chipped Edges: Small chips might be grindeable, but significant cracks or missing pieces usually mean the bit is compromised and should be replaced.
- Severely Overheated Bits: If a bit has been overheated multiple times, its temper may be permanently compromised.
Frequently Asked Questions (FAQ)
Q1: How often should I sharpen my drill bits?
A1: This depends on how often you use them and the materials you drill. For frequent use on tough materials like metal, you might need to sharpen them every few uses. For occasional use on softer materials like wood, they might last many jobs before needing sharpening. Listen to your drill and observe the quality of the holes.
Q2: Can I sharpen drill bits with just a file?
A2: For very minor touch-ups on larger bits, a small file might work. However, for effective and precise sharpening, a sharpening stone or a jig is highly recommended. Files tend to be less precise and can remove too much material unevenly.
Q3: What is the best angle to sharpen a drill bit?
A3: For most standard twist drill bits, the primary cutting lip should be at an angle of around 118 degrees (a 59-degree angle from the centerline of the bit). The secondary clearance angle behind the cutting lip is typically around 12-15 degrees. Jigs help achieve these precise angles.
Q4: How do I know if I’ve over-sharpened a drill bit?
A4: If you grind away too much material, the bit will become significantly shorter. You might also be unable to achieve the correct angles, or the bit might become too thin and weak. Overheating is a common sign of aggressive grinding, which can also be considered “over-sharpening” in terms of damage.
Q5: Is it cheaper to sharpen or buy new drill bits?
A5: For standard HSS bits, sharpening is almost always cheaper than buying new ones, especially when you factor in the cost of replacing a whole set. The savings become even more significant for larger or specialized bits.
By mastering the art of sharpening drill bits at home, you’ll not only extend the life of your tools but also improve the quality and ease of your DIY projects. Whether you choose a simple stone or a specialized jig, the key is practice, patience, and attention to detail. Happy drilling!