
Can you build a miter saw table? Absolutely! Building your own miter saw table is a fantastic way to boost your workshop’s efficiency and precision. What is a miter saw table? It’s a sturdy, stable platform that elevates your miter saw to a comfortable working height, often incorporating features like extension wings, a longer fence, and dust collection ports. This article will guide you through making a miter saw table that will serve as a cornerstone of your woodworking projects, transforming your portable miter saw into a powerful station.
A miter saw table is more than just a stand; it’s a crucial component for anyone serious about woodworking. It provides a stable base, extends your cutting capacity, and improves safety. Whether you’re looking for miter saw stand plans, aiming to build a DIY miter saw workbench, or want to create a miter saw outfeed table, this guide covers the essential steps and considerations. We’ll explore how to design and construct a robust, functional miter saw station that can handle various tasks, from simple trim work to complex joinery.
Many woodworkers find their portable miter saw’s included stand lacking in stability and functionality. This often leads to inaccurate cuts and frustration. By building a dedicated miter saw table, you gain control, accuracy, and a more pleasant working environment. Think of it as upgrading from a basic tool to a precision instrument. We’ll cover everything from selecting materials to adding helpful features.
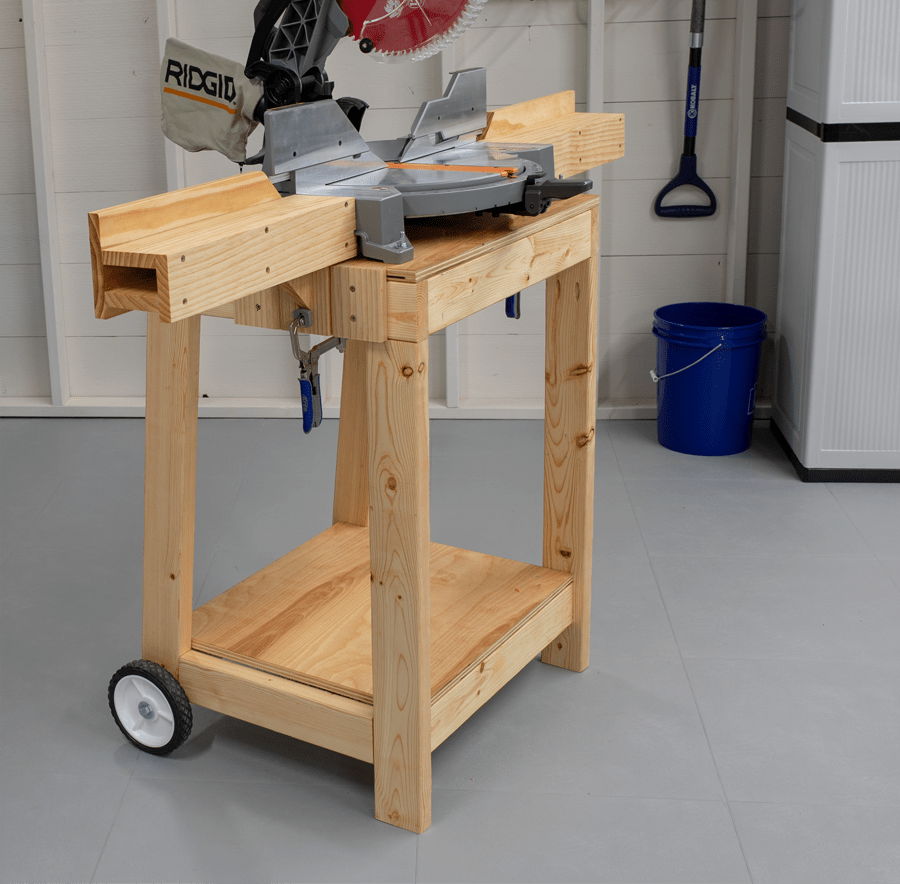
Image Source: learn.kregtool.com
Why Build a Miter Saw Table?
A well-built miter saw table offers numerous advantages over relying on a portable stand or simply placing your saw on a workbench. Here are some key reasons why this project is a worthwhile workshop upgrade:
- Enhanced Stability: A heavier, more robust table minimizes vibrations, leading to cleaner cuts and greater accuracy. This is especially important for longer cuts or when working with harder woods.
- Increased Cutting Capacity: Many designs allow for longer fences and outfeed supports, enabling you to cut wider boards and trim more efficiently.
- Improved Ergonomics: Setting the saw to a comfortable working height reduces strain on your back and arms, allowing you to work for longer periods without fatigue.
- Integrated Features: You can design your table with built-in features like dust collection ports, storage for accessories, and fence extensions, creating a truly integrated miter saw station.
- Portability (Optional): While some tables are stationary, you can design them with a mobile miter saw base or a folding miter saw table mechanism for easy movement around your shop or for storage.
- Cost-Effectiveness: Building your own can be significantly cheaper than purchasing a high-end commercial miter saw table or station.
- Customization: You can tailor the design to your specific needs, the size of your miter saw, and the layout of your workshop.
Whether you are looking for a simple shop-made miter saw stand or a more elaborate miter saw cart, the benefits of a dedicated table are undeniable.
Designing Your Miter Saw Table
Before you pick up a saw, it’s crucial to plan your miter saw workbench. A good design considers your miter saw’s footprint, your workspace, and your typical cutting needs.
Key Design Considerations
Here are the essential elements to think about when designing your table:
- Miter Saw Footprint: Measure your miter saw’s base accurately. This will dictate the size of the mounting platform.
- Working Height: Aim for a height that aligns comfortably with your elbow when you’re standing. A general rule of thumb is about 36-40 inches, but adjust this to your personal comfort.
- Overall Size: Consider the space you have available. Do you need a compact unit, or can you afford a larger miter saw station with extensive outfeed support?
- Stability: The base should be wide and heavy enough to prevent tipping. Using robust materials and sturdy joinery is paramount.
- Extension Wings: These provide support for long workpieces. They can be made from plywood or MDF and should be level with the saw’s base.
- Fence Extension: A longer fence can improve accuracy when cutting long pieces. You can create a fence that extends beyond the saw’s built-in fence.
- Dust Collection: Integrating a dust collection port or shroud can significantly improve your workshop’s air quality.
- Mobility: If you need to move your table, consider adding casters or a mobile miter saw base. For space-saving, a folding miter saw table design is excellent.
- Storage: Can you incorporate shelves or drawers for storing blades, measuring tools, or other accessories?
Planning Your Miter Saw Table Layout
A common and effective layout for a DIY miter saw workbench includes:
- Base: A sturdy, stable foundation, often made from 2×4 or 2×6 lumber.
- Legs: These support the tabletop and determine the overall height.
- Tabletop/Mounting Platform: This is where your miter saw will be attached. It should be flat and strong, typically made from plywood or MDF.
- Side Extensions (Wings): These run out from the sides of the mounting platform, providing support for longer workpieces.
- Outfeed Support: This extends from the back of the table, often as a hinged or removable section, to support material as it exits the saw.
- Fence (Optional but Recommended): A T-fence or a simple wooden fence can extend your cutting reference point.
Finding Miter Saw Stand Plans
If you’re not keen on designing from scratch, there are many excellent miter saw stand plans available online. These plans often come with detailed cut lists and assembly instructions. Searching for terms like “free miter saw stand plans,” “DIY miter saw workbench plans,” or “shop-made miter saw stand plans” will yield numerous options. Look for plans that match your skill level and desired features.
Materials and Tools
The materials and tools you choose will significantly impact the durability and functionality of your miter saw table.
Common Materials
- Plywood: ¾-inch Baltic birch plywood or cabinet-grade plywood is ideal for the tabletop and extension wings due to its stability and flatness. Standard ½-inch or ¾-inch construction-grade plywood can also be used.
- MDF (Medium-Density Fiberboard): A cost-effective option for tabletops and fences. It’s very flat and stable but can be heavier and less resistant to moisture than plywood.
- Lumber: 2x4s and 2x6s are common for the base and legs. Hardwoods like oak or maple can be used for fences for added durability.
- Fasteners: Wood screws (e.g., 1 ¼-inch and 2 ½-inch), lag bolts (for attaching the saw), and possibly dado blades or biscuit joiners for stronger joinery.
- Hardware: Hinges (for folding sections or outfeed), casters (for a mobile miter saw base), drawer slides (if adding storage), and toggle clamps for workpiece holding.
- Finishing: Sandpaper, wood glue, and a durable finish like polyurethane or lacquer.
Essential Tools
- Miter Saw: Of course! You’ll need this to cut your materials.
- Circular Saw or Table Saw: For breaking down large sheets of plywood or MDF and making straight cuts.
- Jigsaw: Useful for cutting curves or intricate shapes, like dust collection ports.
- Drill/Driver: For pre-drilling and driving screws.
- Measuring Tape and Square: For accurate measurements and ensuring square cuts.
- Clamps: Essential for holding pieces together while gluing and fastening.
- Sander: Orbital sander or belt sander for smoothing surfaces.
- Safety Gear: Safety glasses, hearing protection, and dust mask are non-negotiable.
Building Your Miter Saw Table: Step-by-Step
Let’s walk through the construction process. We’ll focus on a common design that balances functionality and ease of construction, suitable for a general-purpose miter saw workbench.
Step 1: Construct the Base Frame
This is the foundation of your shop-made miter saw stand.
- Cut Your Lumber: Cut your 2x4s or 2x6s to the desired lengths for the base perimeter. If your miter saw table will have legs that attach to the inside corners, make these pieces slightly longer.
- Assemble the Frame: Use wood glue and 2 ½-inch screws to create a sturdy rectangular or square frame. Ensure the corners are square using a carpenter’s square.
- Add Cross Supports: For added rigidity, especially if you plan to mount casters or make a mobile miter saw base, add one or two cross supports within the frame.
Step 2: Attach the Legs
The legs elevate the table to your desired working height.
- Cut the Legs: Cut your 2x4s to the height you determined in your design.
- Attach Legs to Base:
- Option A (Inside Corners): Attach legs flush to the inside corners of the base frame using glue and long wood screws or lag bolts.
- Option B (Corner Braces): Cut triangular braces from plywood or scrap lumber and attach them to the inside of each corner where the legs meet the base frame for maximum stability.
- Option C (Apron Design): You can create an apron structure by adding horizontal 2x4s around the top of the legs, connecting them and providing a solid mounting point for the tabletop. This creates a very robust workbench for miter saw.
Step 3: Create the Tabletop and Mounting Platform
This is where your miter saw will sit.
- Cut the Platform: Cut a piece of ¾-inch plywood or MDF to the size of your miter saw’s base, plus a few inches on each side for mounting. Ensure it’s perfectly flat.
- Mount the Miter Saw:
- Place your miter saw on the platform and mark the mounting holes.
- Drill pilot holes through the plywood/MDF.
- Align your miter saw with the holes and secure it using the appropriate bolts or lag screws. Sometimes, it’s easier to build the table around the saw if your saw has mounting feet that protrude. Alternatively, you can drill through the workbench top and secure it from underneath using T-nuts or backing plates for a cleaner look.
- Attach the Tabletop: Secure the plywood/MDF mounting platform to the top of your base frame and legs using wood glue and screws. Ensure it’s flush and level.
Step 4: Add Extension Wings
These are vital for supporting long boards for your miter saw outfeed table.
- Cut the Wings: Cut pieces of ¾-inch plywood or MDF to your desired length and width for the side extensions.
- Attach the Wings: Secure the wings to the sides of the mounting platform using glue and screws. Ensure they are perfectly level with the mounting platform. You can use additional support bracing underneath the wings if they are particularly long.
Step 5: Incorporate an Outfeed Support
This is crucial for safely cutting long workpieces.
- Hinged Outfeed: Cut a piece of plywood or MDF for the outfeed. Attach it to the back of the main tabletop using sturdy hinges. This allows it to fold down for storage or maneuverability.
- Adjustable Outfeed Support: You can also build an adjustable outfeed roller or leg that can be moved to support workpieces of varying lengths.
- Integrated Fence Extension: Some designs extend the fence material rearward from the saw’s fence, providing a continuous reference surface.
Step 6: Add Fences and Guides (Optional)
A longer fence or a T-fence can greatly improve accuracy.
- Simple Fence: Attach a strip of ¾-inch plywood or hardwood to the back of the mounting platform, extending higher than the saw’s base fence.
- T-Fence: For more advanced accuracy, consider building a T-fence by attaching a higher fence board to a thicker base, which is then secured to the workbench. This can provide a more substantial reference.
Step 7: Dust Collection Integration
A cleaner workshop is a safer workshop.
- Dust Port: Cut a hole in the back of the table or create a shroud around the saw’s dust port that connects to a hose for your shop vacuum or dust collector.
- Dust Chute: Design a simple chute or box that helps direct dust towards the vacuum.
Step 8: Mobility Features (Optional)
If you need to move your miter saw cart or portable miter saw stand, this is where you add them.
- Casters: Attach heavy-duty locking casters to the bottom of the base frame. Ensure they can support the weight of the table and your miter saw.
- Folding Design: If you opted for a folding miter saw table, install robust hinges and locking mechanisms to ensure stability when deployed. This can also involve hinged legs.
Step 9: Finishing Touches
- Sanding: Sand all surfaces smooth, paying attention to edges.
- Finishing: Apply a durable finish like polyurethane, lacquer, or paint to protect the wood from dust, moisture, and wear.
Advanced Features and Customizations
Once you have the basic DIY miter saw workbench built, you can enhance it further.
Integrated Measuring Tape
- Installation: Embed a measuring tape into the fence or a dedicated channel on the table. This allows for quick and repeatable measurements. Use a self-adhesive measuring tape for ease.
Flip Stops and Fences
- Function: Flip stops are small adjustable blocks that attach to your fence, allowing you to make identical cuts repeatedly without re-measuring.
- Construction: You can buy these or make them from hardwood. They attach to the fence with screws or a sliding dovetail.
Workpiece Hold-Downs
- Purpose: Secure your workpiece to the table for added safety and accuracy.
- Options: Consider incorporating T-tracks to accept toggle clamps or bench dogs for quick and versatile clamping.
Storage Solutions
- Shelves: Add shelves below the tabletop for storing blades, measurement tools, or safety gear.
- Drawers: For more organized storage, build drawers into the base.
- Tool Holders: Design specific holders for push sticks, measuring tapes, or marking tools.
Specialized Miter Saw Stations
- Benchtop Miter Saw Conversion: If you have a benchtop miter saw, your table can be designed to elevate it and add a robust base and extension wings.
- Compound Miter Saw Workbench: For larger compound miter saws, you’ll need a larger, more robust table capable of handling the weight and footprint.
Maintaining Your Miter Saw Table
A well-maintained workbench will last for years.
- Regular Cleaning: Keep the tabletop and fence clear of sawdust and debris.
- Inspect Fasteners: Periodically check that all screws and bolts are tight.
- Refinish as Needed: If the finish wears down, reapply a protective coating.
- Lubricate Hinges/Casters: If your table has moving parts, a little lubricant will keep them operating smoothly.
Frequently Asked Questions (FAQ)
Q1: What is the best material for a miter saw table?
A1: For the tabletop and extension wings, ¾-inch Baltic birch plywood or cabinet-grade plywood is generally considered the best due to its flatness, stability, and durability. MDF is a more budget-friendly option but can be heavier and less resistant to moisture. For the base and legs, 2×4 or 2×6 lumber is standard.
Q2: How high should my miter saw table be?
A2: The ideal height is one that allows you to stand comfortably with your elbows at about a 90-degree angle when using the saw. A common range is between 36 and 40 inches, but you should measure yourself and adjust for your personal ergonomics.
Q3: Can I make a miter saw table with a folding design?
A3: Yes, absolutely. Many folding miter saw table designs incorporate hinged legs and folding extension wings, making them ideal for smaller workshops or for easier transport. You’ll need sturdy hinges and locking mechanisms to ensure stability when deployed.
Q4: What are the benefits of a miter saw outfeed table?
A4: An miter saw outfeed table provides crucial support for long workpieces as they exit the saw. This prevents them from dropping, binding, or tipping, which improves cut accuracy and safety significantly. It helps ensure your material stays level throughout the cut.
Q5: How do I attach my miter saw to the table?
A5: The most common method is to drill pilot holes through the table’s mounting platform and secure the saw from underneath using lag bolts or bolts with washers and nuts. Ensure the mounting is secure and the saw is level. Some saws come with specific mounting hardware.
Q6: What makes a miter saw station different from a simple miter saw table?
A6: A miter saw station is typically a more elaborate and integrated system. It often includes features like extensive fence extensions, integrated dust collection, multiple outfeed supports, storage cabinets, and a robust mobile base, all designed to create a self-contained, highly functional cutting center.
Q7: Is it worth building my own miter saw table instead of buying one?
A7: For most DIYers, building your own miter saw table is significantly more cost-effective than buying a commercial one. It also allows for complete customization to your specific needs and workshop layout, which is often not possible with off-the-shelf options.
Q8: How can I make my miter saw table mobile?
A8: To create a mobile miter saw base, you can attach heavy-duty, lockable casters to the underside of the base frame. Ensure the casters are rated to support the combined weight of the table, miter saw, and any materials you might be cutting.
By investing the time to build a sturdy miter saw table, you’ll create an essential upgrade that enhances precision, efficiency, and safety in your workshop for years to come. Whether you’re building a simple shop-made miter saw stand or a feature-rich miter saw station, the process is rewarding and the results will transform your woodworking experience. Happy building!