
Image Source: images.thdstatic.com
How To Drill Cabinet Pull Holes for a Pro Finish
Can you drill cabinet pull holes yourself for a professional look? Yes, absolutely! With the right tools and techniques, even a beginner can achieve perfect cabinet hardware installation. This guide will walk you through every step to ensure your drawer pull placement is spot on and your drilled holes are clean and precise, giving your cabinets a polished, high-end appearance without the professional price tag.
The Importance of Precise Hole Placement
When it comes to cabinet hardware installation, accuracy is king. Even a millimeter off can be noticeable, especially on cabinet doors or drawer fronts where symmetry is key. Poorly placed pulls can make your cabinets look amateurish, detracting from the overall aesthetic of your kitchen or bathroom. Conversely, perfectly aligned and installed hardware elevates the look of your cabinetry, making it a focal point. This guide aims to equip you with the knowledge to achieve that professional finish in your DIY cabinet hardware projects.
Gathering Your Essential Tools and Materials
Before you begin drilling, ensure you have all the necessary supplies. Having everything ready will make the process smoother and prevent you from having to stop mid-project.
What You’ll Need:
- Cabinet Pulls/Knobs: The hardware you intend to install.
- Measuring Tape: For accurate measurements.
- Pencil: For marking drilling points.
- Level: To ensure your hardware is straight.
- Drill: A cordless drill is ideal for ease of use.
- Drill Bits: Crucial for clean holes. We’ll discuss the drill bit size for pulls later.
- Masking Tape or Painter’s Tape: To prevent tear-out and provide a surface for marking.
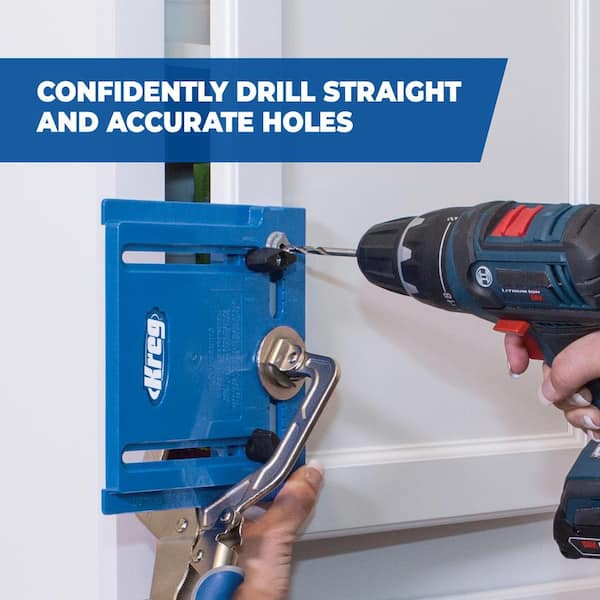
- Template or Drilling Jig: Highly recommended for consistency.
- Safety Glasses: Always protect your eyes when drilling.
- Optional:
- Center Punch: To create a divot for the drill bit to start in.
- Block of Wood: To place behind the cabinet door or drawer front to support the drill bit and prevent blowout.
Step-by-Step Guide to Drilling Cabinet Pull Holes
Let’s break down the process into manageable steps. Following these instructions carefully will help you achieve flawless results.
Step 1: Planning Your Hardware Placement
This is arguably the most crucial step. Good planning saves you from costly mistakes.
Locating Cabinet Hardware:
- Knobs: Typically centered on the door or drawer front. For doors, find the vertical and horizontal center. For drawers, measure the width and find the center point.
- Pulls: Placement can vary greatly. Common placements include:
- Centered on the drawer front: Similar to knobs, find the horizontal center.
- Off-center on drawers: Measure from the top or bottom edge and the side edge.
- On cabinet doors: Often placed towards the top or bottom edge, horizontally centered or slightly offset for aesthetic balance.
Key Considerations for Drawer Pull Placement:
- Ergonomics: Ensure the hardware is comfortable to grip and use.
- Aesthetics: Consider the overall design of your kitchen or bathroom. Do you want a symmetrical look, or a more modern, asymmetrical feel?
- Consistency: If you are installing hardware on multiple cabinets and drawers, ensure the placement is consistent across all of them. For example, if you place a pull 2 inches from the top of one drawer, do the same for all similar drawers.
Step 2: Marking the Drilling Points
Once you’ve decided on the placement, it’s time to mark.
Using a Template or Jig:
This is where a template for cabinet pulls or a drilling jig for cabinet pulls truly shines. These tools are designed to ensure perfect alignment and consistent spacing.
- Types of Templates:
- Adjustable Jigs: These often have sliding rulers and guides to accommodate various hardware sizes and spacing. They are excellent for ensuring parallel cabinet pull holes.
- Fixed Jigs: Made for specific hardware types or standard hole spacings (e.g., 3-inch on center).
- Paper Templates: Often provided by hardware manufacturers, these are glued or taped onto the cabinet for marking.
How to Use a Template/Jig:
- Align the Template: Position the template on the cabinet door or drawer front according to your planned measurements. Use a level to ensure it’s perfectly straight, especially if it’s for a long pull.
- Secure the Template: Use masking tape to firmly secure the template in place.
- Mark the Holes: Use your pencil to mark the center of each screw hole through the template’s guide holes.
Marking Without a Template:
If you don’t have a jig, meticulous measuring is essential.
- Measure Accurately: Use your measuring tape and pencil to mark the exact spot where the screw will enter.
- Use a Level: For pulls, use a level to draw a faint, straight line for the hardware to follow. Mark your hole points along this line.
- Center Punch (Optional but Recommended): Lightly tap a center punch at your marked points. This creates a small indentation that will guide the drill bit and prevent it from wandering.
Step 3: Preparing the Cabinet Surface
Proper preparation prevents wood tear-out and ensures clean holes.
Applying Masking Tape:
- Apply a strip of masking tape or painter’s tape over the marked drilling points. This tape acts as a sacrificial layer.
- Re-mark your drilling points directly onto the tape. The tape will help hold the wood fibers together as the drill bit enters and exits.
Step 4: Selecting the Correct Drill Bit Size
Choosing the right drill bit size for pulls is critical for a snug fit.
- The Screw’s Diameter: The drill bit should be the same diameter as the shaft of the screw that comes with your hardware, not the threads or the head.
- Check Your Hardware: Most cabinet hardware kits will specify the correct screw size. If not, measure the screw shaft carefully.
- Common Sizes: For most cabinet hardware, you’ll likely need a drill bit between 1/8 inch and 3/16 inch.
- Test: If you’re unsure, drill a small test hole in a scrap piece of wood of the same type and thickness as your cabinet doors. Then, try screwing in the hardware. The screw should thread in smoothly but snugly, without wobbling.
Drill Bit Size Chart (Example):
| Screw Diameter (Shaft) | Recommended Drill Bit Size |
|---|---|
| 1/8 inch | 1/8 inch |
| 5/32 inch | 5/32 inch |
| 3/16 inch | 3/16 inch |
| Metric Equivalents | Consult a conversion chart |
Step 5: Drilling the Holes
This is where the magic happens. Take your time and focus on keeping the drill straight.
Techniques for Clean Holes:
- Set Your Drill: Use a medium speed setting on your drill. High speeds can cause heat buildup and splintering.
- Drill Perpendicularly: Hold the drill as straight up and down (perpendicular) to the cabinet surface as possible. This is where a cabinet door drilling guide attachment for your drill can be invaluable. These guides help maintain a perfectly vertical drilling angle.
- Drill Slowly: Start drilling slowly. Apply steady, even pressure.
- Support the Back (Crucial!): If possible, place a scrap piece of wood on the back of the cabinet door or drawer front, directly behind where you are drilling. This supports the wood fibers as the drill bit exits, preventing blowout (splintering on the back side). You can hold this scrap piece in place with clamps or have a helper hold it firmly.
- Pilot Holes for Cabinet Pulls: After the drill bit has passed through the tape and the cabinet surface, continue drilling through the scrap wood. Do not drill all the way through the cabinet – you only need to create the entry point for the screw.
- Withdraw the Drill: Once you’ve drilled to the appropriate depth (usually just through the cabinet material), reverse the drill and slowly withdraw the bit.
Step 6: Installing the Hardware
With your holes perfectly drilled, installing the hardware is straightforward.
- Align the Hardware: Position your pull or knob over the drilled holes.
- Insert the Screws: Insert the screws from the back of the cabinet door or drawer front.
- Tighten: Gently tighten the screws. Start by hand, then use your drill on a low torque setting. Be careful not to overtighten, as this can strip the threads or crack the cabinet material.
- Check for Alignment: Ensure the hardware sits flush and is straight before fully tightening. Use your level if necessary.
Advanced Tips for a Flawless Finish
Beyond the basic steps, a few extra techniques can elevate your work from good to exceptional.
Ensuring Parallel Cabinet Pull Holes:
This is particularly important for long pulls or when installing hardware on multiple doors or drawers in a row.
- Use a Drilling Jig: As mentioned, a good drilling jig is the easiest way to guarantee parallel holes. Many jigs have adjustable fences or rulers that allow you to set precise distances and angles.
- Marking Techniques:
- Double-Sided Tape: For template-free marking, use double-sided tape to temporarily adhere your hardware to the cabinet. Then, carefully mark the screw hole positions.
- Measuring from a Straight Edge: If drilling multiple holes for a single pull, use a level or a straight edge to draw a perfectly straight line for placement, then measure from that line.
Working with Different Cabinet Materials:
The technique might vary slightly depending on your cabinet material.
- Solid Wood: Generally forgiving. Take care to avoid splintering, especially on hardwoods.
- MDF/Particle Board: More prone to tear-out and stripping. Using a good drilling jig, the masking tape trick, and supporting the back of the material are even more critical here. Use a lower torque setting when tightening screws.
- Laminate/Veneer: Be extra cautious with the drill bit. A sharp bit and slow speed are essential to prevent chipping the laminate.
When to Consider a Cabinet Door Drilling Guide:
A cabinet door drilling guide is a tool that attaches to your drill, ensuring the bit remains perfectly perpendicular to the surface. If you’re drilling many holes, or if your cabinets are particularly valuable, investing in or renting one of these can be a wise decision. It removes the guesswork from maintaining a straight drilling angle, which is vital for ensuring parallel cabinet pull holes.
Troubleshooting Common Issues
Even with careful planning, you might encounter minor hiccups.
Issue: Drill Bit Wandering
- Solution: Use a center punch to create a starting divot. Apply masking tape before marking. Ensure you’re starting the drill slowly and at a perpendicular angle.
Issue: Wood Splintering/Blowout
- Solution: Apply masking tape firmly over the drilling area. Drill slowly and with moderate pressure. Always support the back of the material with a scrap piece of wood. A sharp drill bit also helps significantly.
Issue: Hardware Not Sitting Flush
- Solution: The holes might be slightly misaligned or the wrong size. If the holes are too small, you can carefully ream them out slightly with the drill bit or a file. If they are misaligned, and the hole is already drilled, you may need to fill it and re-drill if the imperfection is too noticeable. This is where using a template for cabinet pulls or a drilling jig for cabinet pulls is paramount.
Issue: Screw Won’t Tighten Properly (Stripped Hole)
- Solution: If the hole is slightly stripped, you can try inserting a wooden toothpick or two into the hole before screwing in the hardware. For more severe stripping, you might need to fill the hole with wood filler or a dowel, let it dry completely, and then re-drill.
Frequently Asked Questions (FAQ)
Here are some common questions people have when drilling cabinet pull holes.
Q1: What is the best drill bit size for cabinet pulls?
A1: The best drill bit size for cabinet pulls is one that matches the shaft diameter of the screw that comes with your hardware. It should be slightly larger than the screw’s shank but smaller than the threads, ensuring a snug fit without the threads tearing out. A common range is 1/8 inch to 3/16 inch.
Q2: Can I use the same drill bit for knobs and pulls?
A2: Yes, as long as the screws that come with your knobs and pulls have the same shaft diameter. Always check the screw size provided with your hardware.
Q3: How do I ensure my cabinet hardware is straight?
A3: Use a level to draw a faint guide line before marking your holes. For pulls with multiple holes, a template or a drilling jig is the most reliable way to ensure the holes are perfectly aligned and parallel.
Q4: What if I drill the hole in the wrong spot?
A4: If it’s a minor error and the hole is hidden by the hardware base, you might get away with it. For significant errors, you’ll need to fill the incorrect hole with wood filler or a wooden dowel, let it cure, sand it smooth, and then re-drill in the correct location. Using a template or jig helps prevent this.
Q5: Do I need a special drill for cabinet hardware installation?
A5: No, a standard cordless drill is sufficient. However, using variable speed settings and ensuring the drill is held at a 90-degree angle to the surface are key. Attachments like a drilling guide can improve accuracy.
Conclusion
Achieving a professional finish for your DIY cabinet hardware projects is well within reach. By carefully planning your drawer pull placement, using the correct tools like a template for cabinet pulls or a drilling jig for cabinet pulls, selecting the appropriate drill bit size for pulls, and employing careful techniques for locating cabinet hardware and ensuring parallel cabinet pull holes, you can transform your cabinets. Remember to prioritize accuracy, take your time, and don’t be afraid to practice on scrap material. With these steps, your cabinets will sport beautifully installed hardware that rivals any professional job. Happy drilling!