
Can you drill and screw directly into concrete? Yes, you can drill and screw into concrete with the right tools and techniques. It’s a common DIY task, whether you’re hanging shelves, mounting brackets, or installing fixtures. This guide will walk you through the process, ensuring your fixings are secure and your project is a success.
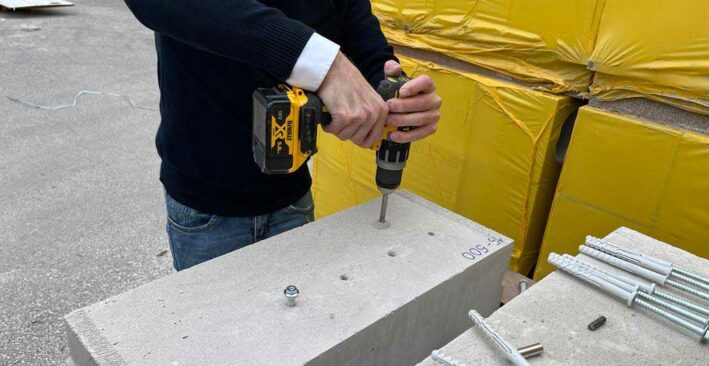
Image Source: www.celofixings.com
Gathering Your Essential Tools
To successfully drill and screw into concrete, you’ll need a specific set of tools. Having the right equipment makes the job easier and safer, and ensures a professional finish.
The Drill: Powering Through Concrete
The most crucial tool is a drill. For concrete, a standard drill often won’t suffice. You’ll need a drill with a hammer drill function.
Understanding Hammer Drills
A hammer drill combines the rotational motion of a regular drill with a rapid hammering action. This hammering action pulverizes the concrete as the drill bit turns, making it much easier to penetrate the hard surface.
- Variable Speed Control: Most good hammer drills have variable speed. This is helpful for starting holes cleanly and controlling the drilling process.
- Impact Rate: Look for a drill with a good impact rate (measured in BPM or blows per minute). A higher rate means faster drilling.
- Corded vs. Cordless: Corded hammer drills generally offer more consistent power, while cordless models provide greater portability. Choose based on your project’s location and duration.
Drill Bits: The Cutting Edge
Not just any drill bit will do. You need specialized concrete drill bits.
Selecting the Right Concrete Drill Bits
Concrete drill bits are designed with a hardened carbide tip. This tip is shaped to chip away at the concrete, enabling the drill to make progress.
- Carbide-Tipped Bits: Always opt for bits specifically labeled for masonry or concrete. They usually have a distinctively shaped tip.
- Bit Size: The diameter of your drill bit should match the size of the screw anchor or wall plug you plan to use. This is critical for a snug fit. The packaging of your anchors will tell you the required drill bit size.
- SDS Bits: For more demanding jobs or thicker concrete, SDS (Slotted Drive System) bits are recommended. They fit into special SDS chucks on higher-powered hammer drills and offer more efficient power transfer.
Anchors and Fasteners: The Holding Power
Once you have your holes drilled, you need something to hold your screws. This is where masonry anchors come in.
Types of Masonry Anchors
Masonry anchors are designed to expand or grip within the concrete, providing a secure base for your screws.
- Plastic Wall Plugs (Dowel Plugs): These are the most common and budget-friendly. They are inserted into the drilled hole, and as the screw is driven in, the plug expands, gripping the concrete. They are suitable for light to medium loads.
- Lag Shields: These are metal sleeves that expand when a lag screw is tightened. They offer better holding power than plastic plugs for heavier items.
- Wedge Anchors: These are heavy-duty metal anchors. A cone is driven into a metal sleeve, forcing the sleeve to expand against the concrete. They are used for very heavy loads.
- Screw Anchors (Concrete Screws): These are specialized metal screws with a self-tapping thread that cut into the concrete. They often require a pre-drilled pilot hole. Some types have an expansion sleeve that is driven into the hole before the screw.
Screws: The Driving Force
You’ll need screws suitable for use with your chosen anchors.
Choosing the Right Screws
- Masonry Screws: These are specifically designed for use with concrete anchors, particularly the screw-in types and lag shields. They are often hardened steel with a special thread pattern.
- Screw Length: Ensure your screws are long enough to go through your fixture, the anchor, and into the concrete sufficiently to provide adequate grip. The anchor packaging will typically recommend a screw length.
Other Useful Tools
- Measuring Tape: For accurate placement of your holes.
- Pencil or Marker: To mark drilling locations.
- Level: To ensure your fixture is mounted straight.
- Safety Glasses: Essential eye protection.
- Dust Mask: To avoid inhaling concrete dust.
- Vacuum Cleaner or Brush and Dustpan: For cleaning up dust.
- Stud Finder (Optional but Recommended): While not for concrete itself, if you’re drilling into a concrete wall that also has internal studs (like in some basement framing), a stud finder can help you avoid them.
- Torque Wrench (Optional): For precise tightening.
- Hammer: For tapping in plastic wall plugs or setting some types of anchors.
Preparing Your Workspace
Before you start drilling, a little preparation goes a long way in ensuring safety and a clean finish.
Safety First: Protecting Yourself
Concrete dust can be harmful. Always wear safety glasses and a dust mask.
Marking Your Drilling Points
Use a measuring tape and pencil to mark exactly where you want to drill. A level can help ensure these marks are in the correct position for a straight mounting.
Clearing the Area
Remove any furniture or objects that might be in the way of your drilling or potential falling debris.
Using a Stud Finder (When Applicable)
If you’re drilling into a wall that might contain hidden metal or wooden studs, a stud finder can be helpful. While it won’t detect concrete, it can prevent you from hitting unexpected metal conduits or rebar within the concrete itself, which can damage your drill bits.
The Drilling Process: Making Holes in Concrete
This is the core of the task. Follow these steps carefully.
Step 1: Setting Up Your Hammer Drill
- Insert the Drill Bit: Firmly insert the correct size concrete drill bit into the chuck of your hammer drill. Ensure it’s tightened securely.
- Set the Mode: Make sure your drill is set to the “hammer” or “impact” mode. Some drills have a symbol of a hammer. If there’s a separate setting for rotation only, ensure that is off.
- Adjust the Depth Stop (if applicable): Many hammer drills have an adjustable depth stop. Set this to the desired depth of your hole, which should correspond to the length of your anchor.
Step 2: Drilling the Pilot Hole
- Start Slowly: Begin drilling at a slow speed to create a small indentation. This prevents the bit from wandering.
- Apply Steady Pressure: Once the indentation is made, increase the speed and apply firm, consistent pressure. Let the drill’s hammering action do the work. Don’t force it.
- Keep it Straight: Try to keep the drill perfectly perpendicular to the concrete surface.
- Clear Debris: Periodically pull the drill bit out of the hole while it’s still spinning slowly. This helps clear out the concrete dust, which can bind the bit and reduce efficiency. You can use a can of compressed air or a thin tube to blow out the dust.
- Achieve Desired Depth: Continue drilling until you reach the required depth.
Step 3: Cleaning the Hole
This is a crucial, often overlooked step. A clean hole ensures your anchor grips effectively.
- Dust Removal: Use a vacuum cleaner with a crevice tool or a brush and dustpan to thoroughly clean out all the dust from the drilled hole. You can also use compressed air.
Installing the Anchor and Screw
With your holes drilled and cleaned, it’s time to insert the anchors and drive the screws.
Installing Plastic Wall Plugs (Dowel Plugs)
- Insert the Plug: Gently tap the plastic wall plug into the clean hole with a hammer until it’s flush with the concrete surface. If it’s a tight fit, a few taps should seat it.
- Drive the Screw: Insert the appropriate screw into the plug. Use your drill (set to screw mode, not hammer mode) to drive the screw.
Achieving Optimal Torque
- Torque Setting: If your drill has a torque setting, adjust it appropriately. Too little torque and the screw won’t be tight enough; too much and you risk stripping the threads in the plug or anchor, or even cracking the concrete. Start with a lower setting and increase gradually.
Installing Screw Anchors (Concrete Screws)
- No Separate Anchor Needed: For many types of concrete screws, you don’t need a separate anchor. The screw itself is designed to tap into the concrete.
- Drive the Screw: Using your drill in screw mode (with the appropriate torque setting), drive the masonry screw directly into the pilot hole. The screw’s threads will cut into the concrete, creating a secure fixing.
Pilot Hole Considerations
- Size Matters: Ensure the pilot hole is the correct diameter as recommended by the screw manufacturer. If the hole is too small, you might break the screw; if it’s too large, the screw won’t get a good grip.
Installing Other Anchors (Lag Shields, Wedge Anchors)
These types often involve slightly different installation steps:
- Lag Shields: Insert the lag shield into the hole. Then, insert the lag screw and tighten it with your drill or a wrench. As you tighten, the shield expands.
- Wedge Anchors: Insert the wedge anchor into the hole. Then, use a hammer to tap the internal stud (which the screw will attach to) further into the anchor sleeve. Tighten the nut on the stud to expand the anchor.
Securing Your Fixture
Once the anchors are in place and the screws are driven, you can attach your item.
Attaching the Object
Align your fixture with the installed anchors. Insert the screws through the fixture and into the anchors. Tighten them securely.
Checking for Stability
Give the fixture a gentle tug to ensure it’s firmly attached. If anything feels loose, you may need to re-drill and install a new anchor.
Troubleshooting Common Issues
Even with careful preparation, you might encounter problems.
Drill Bit Stuck
- Cause: The bit can get stuck if concrete dust isn’t cleared, or if you hit rebar.
- Solution: Try reversing the drill. If it’s rebar, you may need a specialized rebar cutting bit or a different location.
Hole Too Big
- Cause: Using the wrong size bit or drilling too aggressively.
- Solution: If it’s only slightly too big, you might be able to use a larger anchor or screw anchor. For significant oversizing, you’ll likely need to patch the hole (using a concrete repair compound) and choose a new location.
Anchor Not Holding
- Cause: Hole not deep enough, hole not cleaned properly, or the concrete itself is of poor quality.
- Solution: Try drilling a new hole slightly deeper or in a different spot. Ensure thorough cleaning. For very poor quality concrete, consider using a heavier-duty anchor like a wedge anchor.
Stripped Screw Head
- Cause: Using too much torque setting or a worn-out screwdriver bit in your drill.
- Solution: Try a screw extractor kit. For future jobs, be mindful of your drill’s torque.
When to Call a Professional
While many concrete drilling tasks are manageable for DIYers, there are times when professional help is advisable.
- Heavy Load Requirements: If you need to hang something extremely heavy (like structural beams or heavy machinery), it’s best to consult a professional who can assess the concrete’s integrity and recommend the most appropriate setting anchors.
- Encountering Rebar: If you repeatedly hit rebar while drilling, it can indicate structural reinforcement. Attempting to drill through rebar can damage your drill bits and is often impractical without specialized equipment. A professional can advise on safe drilling practices or alternative fixing methods.
- Uncertainty About Concrete Quality: If you are unsure about the strength or composition of your concrete, a professional can provide an assessment.
Frequently Asked Questions (FAQ)
Q1: Can I use a regular drill to drill into concrete?
A1: While you can attempt it, a regular drill is not ideal for concrete. It will be very slow and may overheat the drill. You need a hammer drill with concrete drill bits for efficient and effective drilling.
Q2: What is the best type of anchor for concrete?
A2: The best type of anchor depends on the load. For light to medium loads, plastic wall plugs or screw anchors are usually sufficient. For heavy loads, consider lag shields or wedge anchors.
Q3: How deep do I need to drill for anchors?
A3: The depth of the hole should typically match the length of the anchor you are using, plus a little extra to ensure the anchor is fully seated. Check the packaging of your masonry anchors for specific depth recommendations.
Q4: Do I need to use a pilot hole for all concrete screws?
A4: Most masonry screws designed for concrete require a pilot hole. Always check the manufacturer’s instructions. Some self-tapping screws may not explicitly call for one but starting with a shallow indentation can be beneficial.
Q5: How do I know what size drill bit to use?
A5: The size of the drill bit required is almost always specified on the packaging of the masonry anchors or screw anchors you are using. It’s crucial to use the exact recommended size for a secure fit.
Q6: What happens if I drill into rebar?
A6: Drilling into rebar will likely stop your drill bit. It’s hardened steel and difficult to cut without specialized bits. If you encounter it, you may need to choose a different drilling location or use a specialized tool.
Q7: Can I use screws without anchors in concrete?
A7: In some very specific cases, specially designed concrete screws can be driven directly into concrete without a separate anchor. However, for most DIY applications and for the strongest fixings, using masonry anchors with appropriate screws is recommended.
By following these steps and using the right tools, you can confidently drill and screw into concrete, creating secure and lasting fixings for all your DIY projects.